LVS+Keepalived高可用负载均衡集群架构实验-01
一、为什么要使用负载均衡技术?
1、系统高可用性
2、 系统可扩展性
3、 负载均衡能力
LVS+keepalived能很好的实现以上的要求,LVS提供负载均衡,keepalived提供健康检查,故障转移,提高系统的可用性!采用这样的架构以后很容易对现有系统进行扩展,只要在后端添加或者减少realserver,只要更改lvs的配置文件,并能实现无缝配置变更!
二、LVS+Keepalived介绍
1、 LVS
LVS是一个开源的软件,可以实现LINUX平台下的简单负载均衡。LVS是Linux Virtual Server的缩写,意思是Linux虚拟服务器。目前有三种IP负载均衡技术(VS/NAT、VS/TUN和VS/DR);八种调度算法(rr,wrr,lc,wlc,lblc,lblcr,dh,sh)。
2、 keepalived
Keepalived 是运行在lvs 之上,它的主要功能是实现真实机的故障隔离及负载均衡器间的失败切换,提高系统的可用性
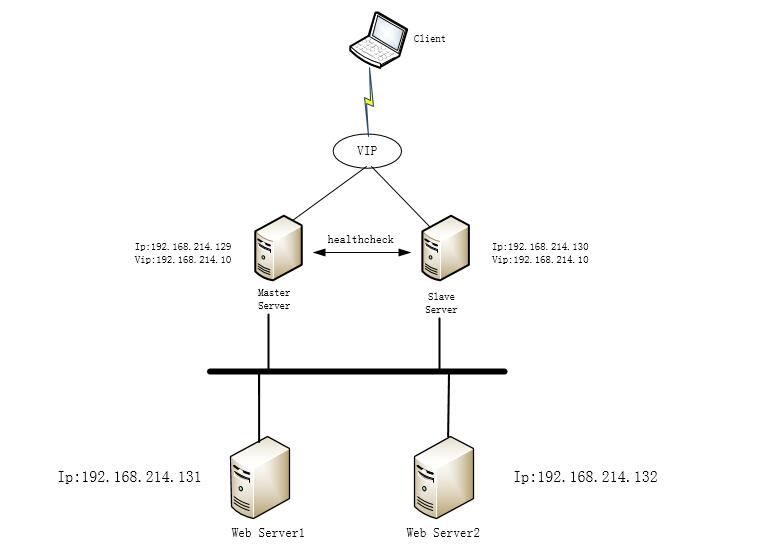
实验环境:Centos6
服务器地址分配:Master Server:192.168.214.129 VIP:192.168.214.10
Backup Server :192.168.214.130 VIP:192.168.214.10
Web Server 1 : 192.168.214.131
Web Server 2 : 192.168.214.132
三:负载层安装:
负载层使用LVS实现负载均衡功能,Keepalived实现主备高可用功能,因此在Master Server, Backup Server 上同时安装LVS,Keepalied。LVS,Keepalied的安装包可以到官网下载获取。也可以使用yum安装,实验使用yum安装。
1. Master Server, Backup Server 上安装 ipvsadm:
yum install ipvsadm -y
2. Master Server, Backup Server 上安装Keepalived(keepalived官网:http://www.keepalived.org/,可以编译安装,实验使用yum安装)
yum install keepalived -y
当LVS与keepalived结合使用时,就需要用ipvsadm指令添加负载均衡的规则 ,直接在keepalived.conf的配置文件中配置即可,非常方便。
四:Web server端的配置:
负载均衡层安装好后迟点再配置,先把后端服务安装好后再配置keepalived,这里Web Server 只安装nginx测试。过程略过。
需要注意的是,Web server端也需要进行虚拟ip的配置。并且需要抑制APR通信。提供如下执行脚本realserver.sh:
#!/bin/bash
# description: Config realserver lo and apply noarp

SNS_VIP=192.168.214.10

/etc/rc.d/init.d/functions

case "$1" in
start)
       ifconfig lo:0 $SNS_VIP netmask 255.255.255.255 broadcast $SNS_VIP
       /sbin/route add -host $SNS_VIP dev lo:0
       echo "1" >/proc/sys/net/ipv4/conf/lo/arp_ignore
       echo "2" >/proc/sys/net/ipv4/conf/lo/arp_announce
       echo "1" >/proc/sys/net/ipv4/conf/all/arp_ignore
       echo "2" >/proc/sys/net/ipv4/conf/all/arp_announce
       sysctl -p >/dev/null 2>&1
       echo "RealServer Start OK"

       ;;
stop)
       ifconfig lo:0 down
       route del $SNS_VIP >/dev/null 2>&1
       echo "0" >/proc/sys/net/ipv4/conf/lo/arp_ignore
       echo "0" >/proc/sys/net/ipv4/conf/lo/arp_announce
       echo "0" >/proc/sys/net/ipv4/conf/all/arp_ignore
       echo "0" >/proc/sys/net/ipv4/conf/all/arp_announce
       echo "RealServer Stoped"
       ;;
*)
       echo "Usage: $0 {start|stop}"
       exit 1
esac

exit 0
上面的脚本分别在Web Server上执行。执行后查看
ifconfig指令显示如下:
[root@anan ~]# ifconfig
eth0      Link encap:Ethernet  HWaddr 00:0C:29:2A:64:95
          inet addr:192.168.214.132  Bcast:192.168.214.255  Mask:255.255.255.0
          inet6 addr: fe80::20c:29ff:fe2a:6495/64 Scope:Link
          UP BROADCAST RUNNING MULTICAST  MTU:1500  Metric:1
          RX packets:22128 errors:0 dropped:0 overruns:0 frame:0
          TX packets:9775 errors:0 dropped:0 overruns:0 carrier:0
          collisions:0 txqueuelen:1000
          RX bytes:3186564 (3.0 MiB)  TX bytes:2538536 (2.4 MiB)

lo        Link encap:Local Loopback
          inet addr:127.0.0.1  Mask:255.0.0.0
          inet6 addr: ::1/128 Scope:Host
          UP LOOPBACK RUNNING  MTU:65536  Metric:1
          RX packets:0 errors:0 dropped:0 overruns:0 frame:0
          TX packets:0 errors:0 dropped:0 overruns:0 carrier:0
          collisions:0 txqueuelen:0
          RX bytes:0 (0.0 b)  TX bytes:0 (0.0 b)

lo:0      Link encap:Local Loopback
          inet addr:192.168.214.10  Mask:255.255.255.255
          UP LOOPBACK RUNNING  MTU:65536  Metric:1
关于arp_ignore和arp_announce的作用:(属于内核参数,存放路径:/proc/sys/net/ipv4/conf/all/)
arp_ignore和arp_announce作用:(存放路径:/proc/sys/net/ipv4/conf/all/)
arp_ignore:定义接收到arp请求时的响应级别
      (默认)0:只要本地有相应地址就响应,不论在哪个接口上
                 1:仅在请求目的地址匹配请求到达的接口上的时候才响应
arp_announce:定义将自己地址向外通告时的通告级别
(默认) 0:将本机上任意接口上的任意地址向外通告
        1:试图将目标网络通告与其网络匹配的地址
        2:仅向与本地接口上匹配的网络进行通告
可以将上面的脚本设置开机自动执行:在 /etc/rc.d/rc.local 中添加执行命令:
vim /etc/rc.d/rc.local


#!/bin/sh
#
# This script will be executed *after* all the other init scripts.
# You can put your own initialization stuff in here if you don't
# want to do the full Sys V style init stuff.

touch /var/lock/subsys/local
sh /etc/init.d/realserver.sh start 2>&1 > /dev/null
查看ARP设置:
[root@anan ~]# cat /proc/sys/net/ipv4/conf/lo/arp_ignore
1
[root@anan ~]# cat /proc/sys/net/ipv4/conf/lo/arp_announce
2
[root@anan ~]#
测试后端服务是否正常:

五:配置keepalied.conf 配置文件:
vim /etc/keepalived/keepalived.conf


! Configuration File for keepalived

global_defs {
   notification_email {
     acassen@firewall.loc           ##配置管理员邮箱,用于报警,一行设置一个,可以设置多个,系统需要开启sendmail 服务
     failover@firewall.loc
     sysadmin@firewall.loc
   }
   notification_email_from Alexandre.Cassen@firewall.loc   #设置邮件的发送地址
   smtp_server 192.168.200.1                    #设置smtp server地址
   smtp_connect_timeout 30                    #设置连接smtp服务超时时间
   router_id LVS_DEVEL                       #路由ID,和BACKUP 要不同,不然会报错
}

vrrp_instance VI_1 {
    state MASTER                 #指定Keepalived的角色,MASTER表示此主机是主用服务器,BACKUP表示是备用服务器。
    interface eth0                #指定检测网络的接口

    virtual_router_id 51            #虚拟路由标识,即同一个vrrp_instance下,MASTER和BACKUP必须是一致的。
    priority 100                  #定义优先级,数字越大,优先级越高,在一个vrrp_instance下,MASTER的优先级必须大于BACKUP的优先级。
    advert_int 1                #设定MASTER与BACKUP负载均衡器之间同步检查的时间间隔,单位是秒。
    authentication {              #设定验证类型和密码
    auth_type PASS                #设置验证类型,主要有PASS和AH两种
   auth_pass 1111                #设置验证密码,在一个vrrp_instance下,MASTER与BACKUP必须使用相同的密码才能正常通信。
 }
}
virtual_ipaddress {
192.168.214.10 #设置虚拟IP地址,可以设置多个虚拟IP地址,每行一个。
}
}
virtual_server 192.168.214.10 80 { #设置虚拟服务器,需要指定虚拟ip地址和服务端口,ip与端口之间用空格隔开。
delay_loop 6 #设置健康检查时间,单位是秒。
lb_algo rr #设置负载调度算法,这里设置为rr,即轮询算法
lb_kind DR #设置LVS实现负载均衡的机制,可以有NAT、TUN和DR三个模式可选。
nat_mask 255.255.255.0
persistence_timeout 2 #会话保持时间,单位是秒,默认是50,这个会话保持功能,用户的请求会被一直分发到某个服务节点,直到超过这个会话保持时间。需 要注意的是,这个会话保持时间,是最大无响应超时时间,也就是说用户在操作动态页面时,如果在2秒内没有执行任何操 作,那么接下来的操作会被分发到另外节点,但是如果一直在操作动态页面,则不受2秒的时间限制。由于在本次属于实验性 质,需要看到轮询功能的情况,所以将此值调整得2秒这么小。
protocol TCP #指定转发协议类型,有tcp和udp两种。
real_server 192.168.214.131 80 { #配置服务节点1,需要指定realserver的真实IP地址和端口,ip与端口之间用空格隔开。
weight 1 #配置服务节点的权值,权值大小用数字表示,数字越大,权值越高,设置权值的大小可以为不同性能的服务器分配不同的负载,可 以对性能高的服务器设置较高的权值,而对性能较低的服务器设置相对较低的权值,这样就合理的利用和分配了系统资源。
HTTP_GET { #realserve的状态检测设置部分,单位是秒
url {
path /index.html #检查首页文件
status_code 200 #请求状态码是200
}
connect_timeout 3 #请求超时时间 3 秒
nb_get_retry 3 #重试次数
delay_before_retry 3 #重试间隔时间
}
}
real_server 192.168.214.132 80 { #配置服务节点2
weight 1
HTTP_GET {
url {
path /index.html
status_code 200
}
connect_timeout 3
nb_get_retry 3
delay_before_retry 3
}
}
}
保存退出。将改配置文件cp到backup server中,使用修改上面标红两处即可。
将 state MASTER 改为  BACKUP  (字母必须要大写)
将 priority 100 改为  99      (值必须要比MASTER的值小)
六:启动测试:
MASTER 和 BACKUP 分别启动keepalived服务
service keepalived start
然后查看LVS状态:
[root@booktest ~]# ipvsadm -l -n
IP Virtual Server version 1.2.1 (size=4096)
Prot LocalAddress:Port Scheduler Flags
  -> RemoteAddress:Port           Forward Weight ActiveConn InActConn
TCP  192.168.214.10:80 rr persistent 2
  -> 192.168.214.131:80           Route   1      0          0
  -> 192.168.214.132:80           Route   1      0          0
[root@booktest ~]#
状态正常,查看keepalived启动的日志
[root@booktest ~]# tail /var/log/messages
Oct 21 15:36:37 booktest Keepalived_vrrp[2095]: Opening file '/etc/keepalived/keepalived.conf'.
Oct 21 15:36:37 booktest Keepalived_vrrp[2095]: Configuration is using : 63498 Bytes
Oct 21 15:36:37 booktest Keepalived_vrrp[2095]: Using LinkWatch kernel netlink reflector...
Oct 21 15:36:37 booktest Keepalived_vrrp[2095]: VRRP sockpool: [ifindex(2), proto(112), unicast(0), fd(10,11)]
Oct 21 15:36:38 booktest Keepalived_vrrp[2095]: VRRP_Instance(VI_1) Transition to MASTER STATE
Oct 21 15:36:39 booktest Keepalived_vrrp[2095]: VRRP_Instance(VI_1) Entering MASTER STATE
Oct 21 15:36:39 booktest Keepalived_vrrp[2095]: VRRP_Instance(VI_1) setting protocol VIPs.
Oct 21 15:36:39 booktest Keepalived_vrrp[2095]: VRRP_Instance(VI_1) Sending gratuitous ARPs on eth0 for 192.168.214.10
Oct 21 15:36:39 booktest Keepalived_healthcheckers[2094]: Netlink reflector reports IP 192.168.214.10 added
Oct 21 15:36:44 booktest Keepalived_vrrp[2095]: VRRP_Instance(VI_1) Sending gratuitous ARPs on eth0 for 192.168.214.10
[root@booktest ~]#
可以看到启动成功,并且状态为MASTER状态。接下来执行service keepalived start 启动BACKUP SERVER并且查看日志信息:
[root@node1 ~]# tail /var/log/messages
Oct 21 23:41:36 node1 Keepalived_vrrp[3055]: Netlink reflector reports IP 192.168.214.130 added
Oct 21 23:41:36 node1 Keepalived_vrrp[3055]: Netlink reflector reports IP fe80::20c:29ff:fe93:4905 added
Oct 21 23:41:36 node1 Keepalived_vrrp[3055]: Registering Kernel netlink reflector
Oct 21 23:41:36 node1 Keepalived_vrrp[3055]: Registering Kernel netlink command channel
Oct 21 23:41:36 node1 Keepalived_vrrp[3055]: Registering gratuitous ARP shared channel
Oct 21 23:41:36 node1 Keepalived_vrrp[3055]: Opening file '/etc/keepalived/keepalived.conf'.
Oct 21 23:41:36 node1 Keepalived_vrrp[3055]: Configuration is using : 63500 Bytes
Oct 21 23:41:36 node1 Keepalived_vrrp[3055]: Using LinkWatch kernel netlink reflector...
Oct 21 23:41:36 node1 Keepalived_vrrp[3055]: VRRP_Instance(VI_1) Entering BACKUP STATE
Oct 21 23:41:36 node1 Keepalived_vrrp[3055]: VRRP sockpool: [ifindex(2), proto(112), unicast(0), fd(10,11)]
可以看到BACKUP SERVER主机启动服务后自动成为备用状态。说明keepalived.conf的vrrp_instance配置是正确的。
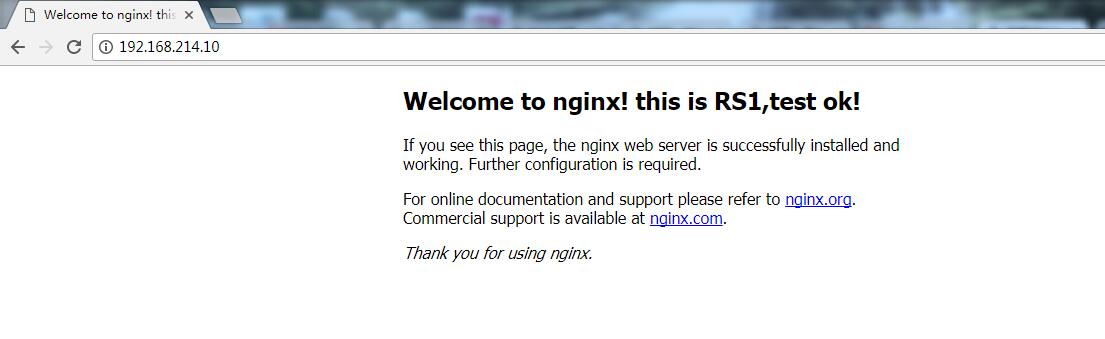
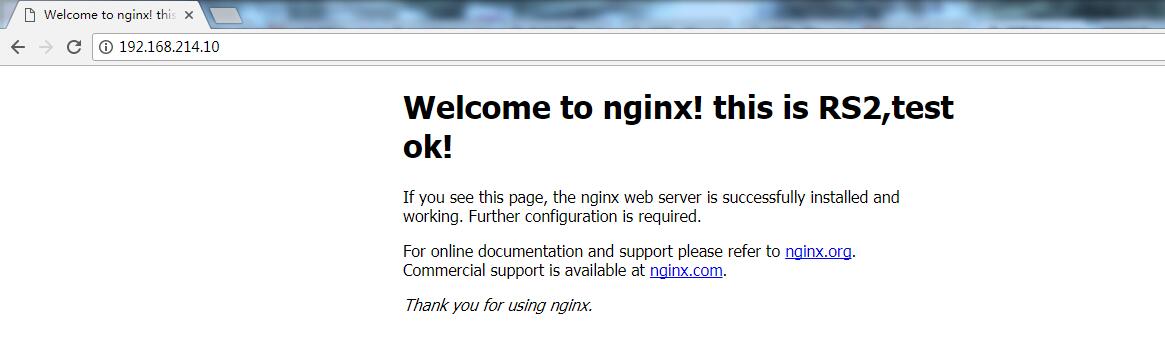
这时在浏览器输入VIP地址:192.168.214.10测试

在进行负载均衡测试的时候遇到了一个问题:就是不停的刷新页面页面都没有变化,没有调用web server 2 的页面,要过很长时间才会轮询一次。这样显然不合理。网上查了一下是LVS 有持久连接的特性。就是keepalived.conf中 persistence_timeout 2 指定的值。上面解释中提到这参数的作用。
同时还需要查看LVS的默认超时时间:
[root@booktest ~]# ipvsadm -l --timeout
Timeout (tcp tcpfin udp): 900 120  300
[root@booktest ~]#
900 120 300这三个数值分别是TCP TCPFINUDP的时间.也就是说一条tcp的连接经过lvs后,lvs会把这台记录保存15分钟,就是因为这个时间过长,
所以大部分人都会发现做好LVS DR之后轮询现象并没有发生,查看很少文档并没有提到这一点,有点晕。因为是实验性质,所以将此数值调整为非常小,
以便看到轮询效果。

执行指令调整这个值:
[root@booktest ~]# ipvsadm --set 1 2 1
再查看
[root@booktest ~]# ipvsadm -l --timeout
Timeout (tcp tcpfin udp): 1 2 1
[root@booktest ~]#
保存一下:
[root@booktest ~]# ipvsadm --save
-A -t 192.168.214.10:http -s rr -p 2
-a -t 192.168.214.10:http -r 192.168.214.131:http -g -w 1
-a -t 192.168.214.10:http -r 192.168.214.132:http -g -w 1
接下来继续测试:
隔两秒刷新页面如下:

反复几次轮询调用正常。
七:模拟故障
故障前先看一下ipvsadm状态:
[root@booktest ~]# ipvsadm -l -n
IP Virtual Server version 1.2.1 (size=4096)
Prot LocalAddress:Port Scheduler Flags
  -> RemoteAddress:Port           Forward Weight ActiveConn InActConn
TCP  192.168.214.10:80 rr persistent 2
  -> 192.168.214.131:80           Route   1      0          0
  -> 192.168.214.132:80           Route   1      0          0
[root@booktest ~]#
将192.168.214.131这台Web Server down掉模拟故障。直接粗暴点杀掉nginx:pkill nginx
页面正常访问。再看ipvsadm状态:
[root@booktest ~]# ipvsadm -l -n
IP Virtual Server version 1.2.1 (size=4096)
Prot LocalAddress:Port Scheduler Flags
  -> RemoteAddress:Port           Forward Weight ActiveConn InActConn
TCP  192.168.214.10:80 rr persistent 2
  -> 192.168.214.131:80           Route   1      0          0
[root@booktest ~]#
可以看到192.168.21.132节点的Web Server已经掉线了
接下来,测试负载均衡的主备切换。先关掉MASTER的keepalived服务模拟故障,然后查看BACKUP 的状态
[root@booktest ~]# service keepalived stop
停止 keepalived:                                          [确定]
[root@booktest ~]# tail /var/log/messages
Oct 21 16:10:43 booktest Keepalived_healthcheckers[2094]: Error connecting server [192.168.214.132]:80.
Oct 21 16:10:43 booktest Keepalived_healthcheckers[2094]: Removing service [192.168.214.132]:80 from VS [192.168.214.10]:80
Oct 21 16:10:43 booktest Keepalived_healthcheckers[2094]: Remote SMTP server [192.168.200.1]:25 connected.
Oct 21 16:11:04 booktest Keepalived_healthcheckers[2094]: Error reading data from remote SMTP server [192.168.200.1]:25.
Oct 21 16:19:27 booktest kernel: IPVS: __ip_vs_del_service: enter
Oct 21 16:19:27 booktest Keepalived_vrrp[2095]: VRRP_Instance(VI_1) sending 0 priority
Oct 21 16:19:27 booktest Keepalived_vrrp[2095]: VRRP_Instance(VI_1) removing protocol VIPs.
Oct 21 16:19:27 booktest Keepalived[2093]: Stopping Keepalived v1.2.13 (03/19,2015)
Oct 21 16:19:27 booktest Keepalived_healthcheckers[2094]: Netlink reflector reports IP 192.168.214.10 removed
Oct 21 16:19:27 booktest Keepalived_healthcheckers[2094]: Removing service [192.168.214.131]:80 from VS [192.168.214.10]:80
[root@booktest ~]#
接着查看BACKUP的状态:
[root@node1 ~]# tail /var/log/messages
Oct 22 00:11:03 node1 Keepalived_healthcheckers[3053]: Error reading data from remote SMTP server [192.168.200.1]:25.
Oct 22 00:16:29 node1 dhclient[989]: DHCPREQUEST on eth0 to 192.168.214.254 port 67 (xid=0x37dffe90)
Oct 22 00:16:29 node1 dhclient[989]: DHCPACK from 192.168.214.254 (xid=0x37dffe90)
Oct 22 00:16:31 node1 dhclient[989]: bound to 192.168.214.130 -- renewal in 806 seconds.
Oct 22 00:19:26 node1 Keepalived_vrrp[3055]: VRRP_Instance(VI_1) Transition to MASTER STATE
Oct 22 00:19:27 node1 Keepalived_vrrp[3055]: VRRP_Instance(VI_1) Entering MASTER STATE
Oct 22 00:19:27 node1 Keepalived_vrrp[3055]: VRRP_Instance(VI_1) setting protocol VIPs.
Oct 22 00:19:27 node1 Keepalived_healthcheckers[3053]: Netlink reflector reports IP 192.168.214.10 added
Oct 22 00:19:27 node1 Keepalived_vrrp[3055]: VRRP_Instance(VI_1) Sending gratuitous ARPs on eth0 for 192.168.214.10
Oct 22 00:19:32 node1 Keepalived_vrrp[3055]: VRRP_Instance(VI_1) Sending gratuitous ARPs on eth0 for 192.168.214.10
[root@node1 ~]#
可以看到原来BACKUP已经接替了MASTER,成为了MASTER。
然后再重新启动MASTER的keepalived服务,重启的MASTER会自动成为MASTER,而原来的BACKUP会从MASTER变为BACKUP
[root@booktest ~]# service keepalived start
正在启动 keepalived:                                      [确定]
[root@booktest ~]# tail /var/log/messages
Oct 21 16:29:43 booktest Keepalived_healthcheckers[2256]: Using LinkWatch kernel netlink reflector...
Oct 21 16:29:43 booktest Keepalived_healthcheckers[2256]: Activating healthchecker for service [192.168.214.131]:80
Oct 21 16:29:43 booktest Keepalived_healthcheckers[2256]: Activating healthchecker for service [192.168.214.132]:80
Oct 21 16:29:43 booktest Keepalived_vrrp[2257]: VRRP sockpool: [ifindex(2), proto(112), unicast(0), fd(10,11)]
Oct 21 16:29:44 booktest Keepalived_vrrp[2257]: VRRP_Instance(VI_1) Transition to MASTER STATE
Oct 21 16:29:44 booktest Keepalived_vrrp[2257]: VRRP_Instance(VI_1) Received lower prio advert, forcing new election
Oct 21 16:29:45 booktest Keepalived_vrrp[2257]: VRRP_Instance(VI_1) Entering MASTER STATE
Oct 21 16:29:45 booktest Keepalived_vrrp[2257]: VRRP_Instance(VI_1) setting protocol VIPs.
Oct 21 16:29:45 booktest Keepalived_healthcheckers[2256]: Netlink reflector reports IP 192.168.214.10 added
Oct 21 16:29:45 booktest Keepalived_vrrp[2257]: VRRP_Instance(VI_1) Sending gratuitous ARPs on eth0 for 192.168.214.10
[root@booktest ~]#
再看原来BACKUP主机状态:
[root@node1 ~]# tail /var/log/messages
Oct 22 00:19:27 node1 Keepalived_healthcheckers[3053]: Netlink reflector reports IP 192.168.214.10 added
Oct 22 00:19:27 node1 Keepalived_vrrp[3055]: VRRP_Instance(VI_1) Sending gratuitous ARPs on eth0 for 192.168.214.10
Oct 22 00:19:32 node1 Keepalived_vrrp[3055]: VRRP_Instance(VI_1) Sending gratuitous ARPs on eth0 for 192.168.214.10
Oct 22 00:29:42 node1 Keepalived_vrrp[3055]: VRRP_Instance(VI_1) Received higher prio advert
Oct 22 00:29:42 node1 Keepalived_vrrp[3055]: VRRP_Instance(VI_1) Entering BACKUP STATE
Oct 22 00:29:42 node1 Keepalived_vrrp[3055]: VRRP_Instance(VI_1) removing protocol VIPs.
Oct 22 00:29:42 node1 Keepalived_healthcheckers[3053]: Netlink reflector reports IP 192.168.214.10 removed
Oct 22 00:29:57 node1 dhclient[989]: DHCPREQUEST on eth0 to 192.168.214.254 port 67 (xid=0x37dffe90)
Oct 22 00:29:57 node1 dhclient[989]: DHCPACK from 192.168.214.254 (xid=0x37dffe90)
Oct 22 00:29:59 node1 dhclient[989]: bound to 192.168.214.130 -- renewal in 793 seconds.
[root@node1 ~]#
BACKUP主机重新从MASTER状态变成BACKUP状态。继续刷新页面正常。
Lvs+Keepalived高可用负载均衡实验成功。接下来将会对web server进行部署优化。
