


〖Python〗-- Nginx + Uwsgi +Django 实现生产环境部署
【Nginx + Uwsgi +Django 实现生产环境部署】
一、如何在生产上部署Django?
Django的部署可以有很多方式,采用nginx+uwsgi的方式是其中比较常见的一种方式。
二、uwsgi介绍
uWSGI是一个Web服务器,它实现了WSGI协议、uwsgi、http等协议。Nginx中HttpUwsgiModule的作用是与uWSGI服务器进行交换。
要注意 WSGI / uwsgi / uWSGI 这三个概念的区分。
- WSGI是一种Web服务器网关接口。它是一个Web服务器(如nginx,uWSGI等服务器)与web应用(如用Flask框架写的程序)通信的一种规范。
- uwsgi是一种线路协议而不是通信协议,在此常用于在uWSGI服务器与其他网络服务器的数据通信。
- 而uWSGI是实现了uwsgi和WSGI两种协议的Web服务器。
- uwsgi协议是一个uWSGI服务器自有的协议,它用于定义传输信息的类型(type of information),每一个uwsgi packet前4byte为传输信息类型描述,它与WSGI相比是两样东西。
uwsgi性能非常高
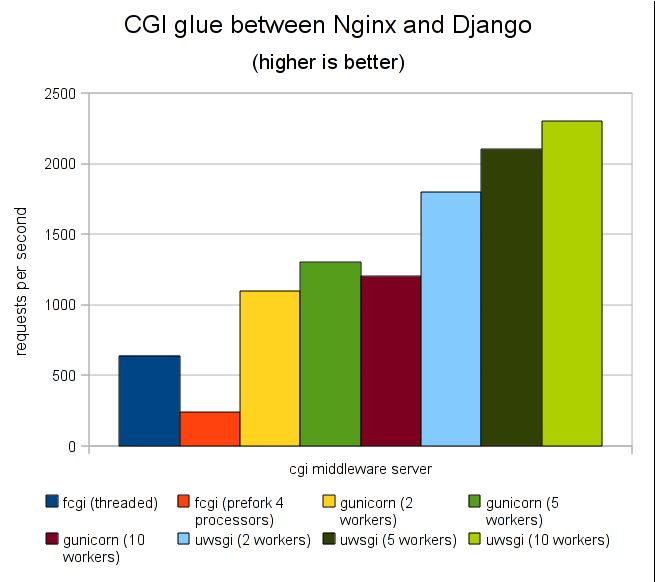
uWSGI的主要特点如下
- 超快的性能
- 低内存占用(实测为apache2的mod_wsgi的一半左右)
- 多app管理(终于不用冥思苦想下个app用哪个端口比较好了-.-)
- 详尽的日志功能(可以用来分析app性能和瓶颈)
- 高度可定制(内存大小限制,服务一定次数后重启等)
If you are searching for a simple wsgi-only server, uWSGI is not for you, but if you are building a real (production-ready) app that need to be rock-solid, fast and easy to distribute/optimize for various load-average, you will pathetically and morbidly fall in love (we hope) with uWSGI.
三、Django + Uwsgi + Nginx 生产部署
1、准备环境
a、需要linux服务器一台
[root@web01 ~]# cat /etc/redhat-release
CentOS release 6.6 (Final)
[root@web01 ~]# uname -r
2.6.32-504.el6.x86_64
b、在服务器上面安装好Python和Django
1、安装setuptools
[root@django tools]# yum install pcre pcre-devel openssl openssl-devel zlib bzip2-devel -y

[root@django tools]# ll
-rw-r--r-- 1 root root 641502 3月   2 18:50 setuptools-19.6.tar.gz

[root@django tools]# tar xf setuptools-19.6

[root@django tools]# cd setuptools-19.6

[root@django tools]#python setup.py install

[root@django tools]#cd ..

##################################################################

#nginx模块

pcre pcre-devel  #perl语言兼容正则表达式,用来做Nginx的HTTP Rewrite 模块

bzip2-devel   ·#提供压缩功能

openssl openssl-devel  #https加密模块

###################################################################

zlib #在编译python3的时候,加载setuptools的时候会报错,所以这里提前处理啦!
2、安装pip
[root@django tools]# ll
-rw-r--r-- 1 root root 1197370 3月   2 13:30 pip-9.0.1.tar.gz

[root@django tools]# tar xf pip-9.0.1.tar.gz

[root@django tools]# cd pip-9.0.1

[root@django pip-9.0.1]# python setup.py install

[root@django pip-9.0.1]# cd ..

#配置环境变量:

[root@django bin]# vi /etc/profile
export PATH="/usr/local/python3/bin:$PATH"

  [root@django bin]# tail -1 /etc/profile
  export PATH="/usr/local/python3/bin:$PATH"
  [root@django bin]# source /etc/profile
  #查看帮助
  [root@django bin]# pip3  或 pip
3、安装sqlite3
方法一:
yum install sqlite-devel

或

方法二:

软件下载官网:http://www.sqlite.org

[root@django tools]# ll
-rw-r--r-- 1 root root 2515143 3月   2 13:33 sqlite-autoconf-3170000.tar.gz

[root@django tools]# tar xf sqlite-autoconf-3170000.tar.gz

[root@django tools]# cd sqlite-autoconf-3170000

[root@django tools]# ./configure

[root@django tools]#make && make install
4、安装Python3
方法一:

升级为python3.5版本步骤
root@template ~]# cd /home/oldboy/tools/

#下载python-3.5.2
[root@template tools]# wget https://www.python.org/ftp/python/3.5.2/Python-3.5.2.tgz

[root@template tools]# ll
总用量 20104
-rw-r--r--  1 root root 20566643 6月  26 05:47 Python-3.5.2.tgz

#解压到下载目录
[root@template tools]# tar zxvf Python-3.5.2.tgz

#进入解压后的文件夹
[root@template tools]# cd Python-3.5.2

#在编译前先在/usr/local建一个文件夹python3(作为python的安装路径,以免覆盖老的版本)
[root@template Python-3.5.2]# mkdir /usr/local/python3

#开始编译安装
[root@template Python-3.5.2]#  ./configure --prefix=/usr/local/python3

[root@template Python-3.5.2]# make && make install

此时没有覆盖老版本,再将原来/usr/bin/python链接改为别的名字
[root@template Python-3.5.2]# mv /usr/bin/python /usr/bin/python_old

#再建立新版本python的软链接
[root@template Python-3.5.2]# ln -s /usr/local/python3/bin/python3 /usr/bin/python

#就会显示出python的新版本信息
[root@template Python-3.5.2]# python
Python 3.5.2 (default, Aug  2 2016, 11:35:06)
[GCC 4.4.7 20120313 (Red Hat 4.4.7-11)] on linux
Type "help", "copyright", "credits" or "license" for more information.
>>> exit()     #<----退出python

PS:如果不建立新安装路径python3,而是直接默认安装,则安装后的新python应该会覆盖linux下自带的老版本。当然如果还想保留原来的版本,那么这种方法最好不过了。

注意事项:
这种方法虽然能安装成功,但会导致yum不能正常使用。

解决方法:
[root@template tools]# cp /usr/bin/yum /usr/bin/yum.backup_2016-08-02

修改第一行参数
vi /usr/bin/yum
把  #!/usr/bin/python    修改为:/usr/bin/python_old
或
把  #!/usr/bin/python    修改为:/usr/bin/python2.6

#查看版本
[root@template Python-3.5.2]# python --version
Python 3.5.2

#查看安装路径(可以省略这步)
[root@web01 ~]# python
Python 3.5.2 (default, May 27 2017, 18:39:42)
[GCC 4.4.7 20120313 (Red Hat 4.4.7-11)] on linux
Type "help", "copyright", "credits" or "license" for more information.
>>> import sys
>>> print(sys.path)
['', '/usr/local/python3/lib/python35.zip', '/usr/local/python3/lib/python3.5', '/usr/local/python3/lib/python3.5/plat-linux', '/usr/local/python3/lib/python3.5/lib-dynload', '/usr/local/python3/lib/python3.5/site-packages']
>>> exit()
5.安装Django
方式一:用pip3安装

pip3 install django

升级方法:

pip3 install django --upgrade
启动django项目命令(备注:其它settings连接数据库方法跟window一样的)
#& 表示后台启动
python manage.py runserver 0.0.0.0:80 &
6、安装PyMysql (选装,具体看你的项目连接方式)
pip3 install PyMySQL

#检查模块是否安装成功
[root@web01 ~]# python
Python 3.5.2 (default, May 27 2017, 18:39:42)
[GCC 4.4.7 20120313 (Red Hat 4.4.7-11)] on linux
Type "help", "copyright", "credits" or "license" for more information.
>>> import pymysql
>>>
>>> exit()
c、uwsgi
# 安装 uwsgi
[root@localhost teacher]# pip3 install uwsgi
测试uwsgi
[root@web01 nulige]# cd /home/nulige
[root@web01 nulige]# mkdir -p uwsgi_test
[root@web01 nulige]# cd uwsgi_test/
#测试文件
[root@web01 uwsgi_test]# vi test.py
def application(env, start_response):
start_response('200 OK', [('Content-Type','text/html')])
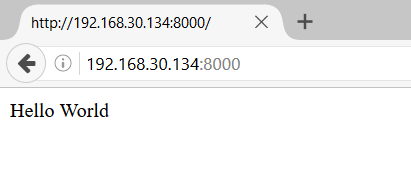
return [b"Hello World"] # python3
#return ["Hello World"] # python2
启动uwsgi
[root@web01 uwsgi_test]# uwsgi --http :8000 --wsgi-file test.py
*** Starting uWSGI 2.0.15 (64bit) on [Sat May 27 19:12:58 2017] ***
compiled with version: 4.4.7 20120313 (Red Hat 4.4.7-11) on 27 May 2017 18:48:50
os: Linux-2.6.32-504.el6.x86_64 #1 SMP Wed Oct 15 04:27:16 UTC 2014
nodename: web01
machine: x86_64
clock source: unix
pcre jit disabled
detected number of CPU cores: 1
current working directory: /home/nulige/uwsgi_test
detected binary path: /usr/local/python3/bin/uwsgi
uWSGI running as root, you can use --uid/--gid/--chroot options
*** WARNING: you are running uWSGI as root !!! (use the --uid flag) ***
*** WARNING: you are running uWSGI without its master process manager ***
your processes number limit is 14719
your memory page size is 4096 bytes
detected max file descriptor number: 1024
lock engine: pthread robust mutexes
thunder lock: disabled (you can enable it with --thunder-lock)
uWSGI http bound on :8000 fd 4
spawned uWSGI http 1 (pid: 17972)
uwsgi socket 0 bound to TCP address 127.0.0.1:38831 (port auto-assigned) fd 3
Python version: 3.5.2 (default, May 27 2017, 18:39:42)  [GCC 4.4.7 20120313 (Red Hat 4.4.7-11)]
*** Python threads support is disabled. You can enable it with --enable-threads ***
Python main interpreter initialized at 0x1ed4a90
your server socket listen backlog is limited to 100 connections
your mercy for graceful operations on workers is 60 seconds
mapped 72768 bytes (71 KB) for 1 cores
*** Operational MODE: single process ***
WSGI app 0 (mountpoint='') ready in 0 seconds on interpreter 0x1ed4a90 pid: 17970 (default app)
*** uWSGI is running in multiple interpreter mode ***
spawned uWSGI worker 1 (and the only) (pid: 17970, cores: 1)
查看启动端口
[root@web01 ~]# ps -ef|grep uwsgi
root      17970   1000  0 19:12 pts/0    00:00:00 uwsgi --http :8000 --wsgi-file test.py
root      17972  17970  0 19:12 pts/0    00:00:00 uwsgi --http :8000 --wsgi-file test.py
root      17996  17973  0 19:14 pts/1    00:00:00 grep uwsgi
在浏览器中,通过ip+端口号进行访问
根据项目进行配置
# 启动 uwsgi
    **进入项目目录**
    **使用uwsgi启动前确保无代码问题导致通过runserver可以正常启动起来**
    uwsgi --http 192.168.31.123:8080 --file teacher/wsgi.py --static-map=/static=static #测试启动

    # 解释
        --http 这个就和runserver一样指定IP 端口
        --file 这个文件就里有一个反射,如果你在调用他的时候没有指定Web Server就使用默认的
        -- static   做一个映射,指定静态文件
2、生产环境配置
Nginx + uWSGI + Djangos配置方法:
# uwsig使用配置文件启动
    [uwsgi]
    # 项目目录
    chdir=/opt/project_teacher/teacher/
    # 指定项目的application
    module=teacher.wsgi:application
    # 指定sock的文件路径
    socket=/opt/project_teacher/script/uwsgi.sock
    # 进程个数
    workers=5
    pidfile=/opt/project_teacher/script/uwsgi.pid
    # 指定IP端口
    http=192.168.31.123:8080
    # 指定静态文件
    static-map=/static=/opt/test_project/teacher/static
    # 启动uwsgi的用户名和用户组
    uid=root
    gid=root
    # 启用主进程
    master=true
    # 自动移除unix Socket和pid文件当服务停止的时候
    vacuum=true
    # 序列化接受的内容,如果可能的话
    thunder-lock=true
    # 启用线程
    enable-threads=true
    # 设置自中断时间
    harakiri=30
    # 设置缓冲
    post-buffering=4096
    # 设置日志目录
    daemonize=/opt/project_teacher/script/uwsgi.log
# uwsig常用命令
    # 通过配置文件启动
        uwsgi --ini uwsgi.ini
        # 会生成两个文件
            PID文件 他是标识这个程序所处的状态
            SOCK文件  他是用来和其他程序通信的
    # 停止uwsgi
        uwsgi --stop uwsgi.pid

    # 重载配置
        uwsgi --reload uwsgi.ini
d、nginx
#先换成国内yum源
#以CentOS6.x 系统为例

1、备份
mv /etc/yum.repos.d/CentOS-Base.repo /etc/yum.repos.d/CentOS-Base.repo.backup

2、更换成国内源
wget -O /etc/yum.repos.d/CentOS-Base.repo http://mirrors.aliyun.com/repo/Centos-6.repo

3、之后运行yum makecache生成缓存
# 安装nginx
yum -y install nginx
# Nginx添加配置文件
#先进入到配置文件:
vi /etc/nginx/conf.d/

#编辑配置文件
server {   # 这个server标识我要配置了
        listen 80;  # 我要监听那个端口
        server_name 10.129.205.183 ;  # 你访问的路径前面的url名称
        access_log  /var/log/nginx/access.log  main;  # Nginx日志配置
        charset  utf-8; # Nginx编码
        gzip on;  # 启用压缩,这个的作用就是给用户一个网页,比如3M压缩后1M这样传输速度就会提高很多
        gzip_types text/plain application/x-javascript text/css text/javascript application/x-httpd-php application/json text/json image/jpeg image/gif image/png application/octet-stream;  # 支持压缩的类型

        error_page  404           /404.html;  # 错误页面
        error_page   500 502 503 504  /50x.html;  # 错误页面

        # 指定项目路径uwsgi
        location / {        # 这个location就和咱们Django的url(r'^admin/', admin.site.urls),
            include uwsgi_params;  # 导入一个Nginx模块他是用来和uWSGI进行通讯的
            uwsgi_connect_timeout 30;  # 设置连接uWSGI超时时间
            uwsgi_pass unix:/opt/project_teacher/script/uwsgi.sock;  # 指定uwsgi的sock文件所有动态请求就会直接丢给他
        }

        # 指定静态文件路径
        location /static/ {
            alias  /opt/project_teacher/teacher/static/;
            index  index.html index.htm;
        }

        }
# 启动Nginx通过Nginx访问
/etc/init.d/nginx start
/etc/init.d/nginx stop

# 这里有个命令configtest,Nginx配置是重启生效的,如果你修改完了,不知道对不对又担心影响其他人可以使用它测试
/etc/init.d/nginx configtest

# 如果是生产环境的话Nginx正在运行,就不要直接stop start 或者 restart  直接reload就行了
# 对线上影响最低(生产环境用的方法)
/etc/init.d/nginx reload
e、Django Admin静态文件配置
有一个小bug:
# 解决Django静态配置文件丢失
问题原因:
    是因为admin所需的js,css等静态文件都在django的安装目录内,但是我们并没有配置指向Django的配置文件。

解决办法:
    我们可以通过配置 STATIC_ROOT = os.path.join(BASE_DIR, "static_all")来指定静态文件的默认家目录是那里,然后把项目里所有的静态文件都收集起来放到这个目录下面。

收集命令:
    python3 manage.py collectstatic --noinput

修改Nginx 指定静态路径
    alias  /opt/test_project/teacher/static_all/;

#参数优化
首先参考下官网的 things to know : http://uwsgi-docs.readthedocs.org/en/latest/ThingsToKnow.html
我这边最终启动的命令如下:
uwsgi --socket 127.0.0.1:9090 -p 16 -l 8192 -M -R 100000 -z30 -L --wsgi-file app.py --max-apps 65535 --stats 127.0.0.1:1717 --post-buffering 100M --cpu affinity --buffer-size 65535 --daemonize /tmp/uwsgi --pidfile /tmp/uwsgi.pid --memory-report --threads 16
四、简易部署案例
1、准备环境
a.关闭iptables和selinux
b.配置settings.py
|
1
|
ALLOWED_HOSTS = ['服务器',] |
c.Django默认遵循wsgi协议:wsgiref
|
1
2
|
# 安装uwsgipip3 install uwsgi |
2、简单测试:
app.py
    def application(env, start_response):
        start_response('200 OK', [('Content-Type','text/html')])
        return [b"Hello World"]

uwsgi --http :9001 --wsgi-file app.py

uwsgi --http :9002 --wsgi-file foobar.py --master --processes 4 --threads 2
# 不处理静态文件
uwsgi --http :9002 --chdir /data/s4/deploy --wsgi-file deploy/wsgi.py --master --processes 4 --threads 2
# 处理静态文件
STATICFILES_DIRS = (
    os.path.join(BASE_DIR,'static'),
)
STATIC_ROOT = os.path.join(BASE_DIR,'uuuuuu')

python manage.py collectstatic

完事,注释静态配置

uwsgi --http :9003 --chdir /data/s4/deploy --wsgi-file deploy/wsgi.py --static-map /static=/data/s4/deploy/uuuuuu
# 写一个配置文件
wsgi_http.ini
    [uwsgi]
    http = 0.0.0.0:9004
    chdir = /data/s4/deploy
    wsgi-file = deploy/wsgi.py
    # processes = 4
    # threads = 2
    static-map = /static=/data/s4/deploy/uuuuuu
uwsgi wsgi_http.ini
# nginx反向代理使用
wsgi_sock.ini
    [uwsgi]
    socket = 127.0.0.1:8001
    chdir = /data/s4/deploy
    wsgi-file = deploy/wsgi.py
    # processes = 4
    # threads = 2
    static-map = /static=/data/s4/deploy/uuuuuu
uwsgi wsgi_sock.ini
3、Nginx
# 安装并启动
|
1
2
3
4
|
yum install nginx/etc/init.d/nginx start/stop/restartsystemctl start/stop/restart/reload nginx |
# 配置文件:/etc/nginx/nginx.conf
# For more information on configuration, see:
#   * Official English Documentation: http://nginx.org/en/docs/
#   * Official Russian Documentation: http://nginx.org/ru/docs/

user root;
worker_processes 4;

error_log /var/log/nginx/error.log;
pid /var/run/nginx.pid;

events {
    worker_connections  1024;
}


http {
    log_format  main  '$remote_addr - $remote_user [$time_local] "$request" '
                      '$status $body_bytes_sent "$http_referer" '
                      '"$http_user_agent" "$http_x_forwarded_for"';

    access_log  /var/log/nginx/access.log  main;

    sendfile            on;
    tcp_nopush          on;
    tcp_nodelay         on;
    keepalive_timeout   65;
    #types_hash_max_size 2048;

    include             /etc/nginx/mime.types;
    default_type        application/octet-stream;

    upstream django {
        # server unix:///path/to/your/mysite/mysite.sock; # for a file socket
        server 127.0.0.1:8001; # for a web port socket (we'll use this first)
    }
    server {
        listen      80;

        #server_name ;
        charset     utf-8;


        # max upload size
        client_max_body_size 75M;   # adjust to taste

        location /static {
            alias  /data/s4/deploy/uuuuuu; # your Django project's static files - amend as required
        }

        # Finally, send all non-media requests to the Django server.
        location / {
            uwsgi_pass  django;
            include     uwsgi_params; # the uwsgi_params file you installed
        }
    }
}

 浙公网安备 33010602011771号