Hibernate Shards 数据的水平、垂直切割(二)- Hibernate Shards基本演示
准备
1. 以Hibernate Shards 数据的水平、垂直切割(一)- Hibernate测试环境的项目为基础
2. Hibernate Shards使用了commons logging,下载个项目最新的release版本。这里用的版本为1.1.1
3. 在Hibernate Shards 数据的水平、垂直切割(一)- Hibernate测试环境中,我们在mysql中建立了一个hbshards数据库,为了测试shards再建立一个hbshards2的数据库,contact表的结构一样
4. 将Hibernate Shards发布包中的hibernate-shards.jar放到lib目录
项目引用添加hibernate-shards.jar
将commons logging发布包中的commons-logging-1.1.1.jar放到lib目录
CLASSPATH中添加hibernate-shards.jar、commons-logging-1.1.1.jar
Hibernate Shards测试项目
出于结构上的简单考虑,定义一个ShardableEntity的接口,让ContactEntity实现这个接口:
因为我们需要将contact的数据以切片的形式存入2个数据库中,因此需要配置这2个数据库的信息。Hibernate Shards通过定义2个hibernate的配置文件解决这个问题:
shard0.hibernate.cfg.xml:
针对其他每个shard创建的SessionFactory,数据库连接信息从相应的配置文件(例如shard1.hibernate.cfg.xml)中读取,读取的内容包括connection.url、connection.username、connection.password、connection.datasource。为了hibernate加载其他shard的配置文件时不抛异常,在其他shard的配置文件中我们还是把必要的配置属性写上去了
hibernate.connection.shard_id属性为每个shard定义一个id,必须有一个shard_id为0的shard,其他的shard_id可以定义为任意整数
我们假定contact的id都是由数字组成的一个8位长度的字符串
对contact的切割策略简单定义为: contact id第一个字符为0-4的存入shard0中,为5-9的存入shard1中
为了实现这一策略,我们需要实现hibernate shards的2个接口
ShardResolutionStrategy接口的实现:
运行测试
用Eclipse编译class文件,将生成的所有class文件以及相关的配置、映射文件 拷贝到lib目录中,运行Main.class结果如下:
D:\Work\research\Java\Hibernate-Test\lib>java Main
===Create Contacts===
Hibernate: insert into CONTACT (EMAIL, NAME, LOGIN_ID, PASSWORD, ID) values (?,?, ?, ?, ?)
Hibernate: insert into CONTACT (EMAIL, NAME, LOGIN_ID, PASSWORD, ID) values (?,?, ?, ?, ?)
Hibernate: insert into CONTACT (EMAIL, NAME, LOGIN_ID, PASSWORD, ID) values (?,?, ?, ?, ?)
Hibernate: insert into CONTACT (EMAIL, NAME, LOGIN_ID, PASSWORD, ID) values (?,?, ?, ?, ?)
===Login Test===
Hibernate: select contactent0_.ID as ID0_, contactent0_.EMAIL as EMAIL0_, contactent0_.NAME as NAME0_, contactent0_.LOGIN_ID as LOGIN4_0_, contactent0_.PASSWORD as PASSWORD0_ from CONTACT contactent0_ where contactent0_.LOGIN_ID=?
Hibernate: select contactent0_.ID as ID0_, contactent0_.EMAIL as EMAIL0_, contactent0_.NAME as NAME0_, contactent0_.LOGIN_ID as LOGIN4_0_, contactent0_.PASSWORD as PASSWORD0_ from CONTACT contactent0_ where contactent0_.LOGIN_ID=?
Contact "RicCC@cnblogs.com" login successful
===Get Contact by Id===
Hibernate: select contactent0_.ID as ID0_0_, contactent0_.EMAIL as EMAIL0_0_, contactent0_.NAME as NAME0_0_, contactent0_.LOGIN_ID as LOGIN4_0_0_, contactent0_.PASSWORD as PASSWORD0_0_ from CONTACT contactent0_ where contactent0_.ID=?
{ Id="81111111", LoginId="b@cnblogs.com", Name="BBB", EMail="b@cnblogs.com" }
Hibernate: select contactent0_.ID as ID0_0_, contactent0_.EMAIL as EMAIL0_0_, contactent0_.NAME as NAME0_0_, contactent0_.LOGIN_ID as LOGIN4_0_0_, contactent0_.PASSWORD as PASSWORD0_0_ from CONTACT contactent0_ where contactent0_.ID=?
{ Id="31111111", LoginId="c@cnblogs.com", Name="CCC", EMail="c@cnblogs.com" }
===Delete Contacts===
Hibernate: select contactent0_.ID as ID0_, contactent0_.EMAIL as EMAIL0_, contactent0_.NAME as NAME0_, contactent0_.LOGIN_ID as LOGIN4_0_, contactent0_.PASSWORD as PASSWORD0_ from CONTACT contactent0_
Hibernate: select contactent0_.ID as ID0_, contactent0_.EMAIL as EMAIL0_, contactent0_.NAME as NAME0_, contactent0_.LOGIN_ID as LOGIN4_0_, contactent0_.PASSWORD as PASSWORD0_ from CONTACT contactent0_
Hibernate: delete from CONTACT where ID=?
Hibernate: delete from CONTACT where ID=?
Hibernate: delete from CONTACT where ID=?
Hibernate: delete from CONTACT where ID=?
1. 通过id加载实体的时候,hibernate shards使用ShardSelectionStrategy来决定应当从哪个shard加载数据
2. 新增数据的时候,hibernate shards使用ShardResolutionStrategy来决定应当将数据insert到哪个shard中
这里为什么不能使用ShardSelectionStrategy呢?因为与id的生成机制相关,比如说可以让数据库来生成id(hibernate中的native方式),例如自增id,在shard的应用场景下可以简单的给每个shard一个起止范围,只是在insert数据的时候必须通过特定的算法决定将数据insert到哪个shard中,这样的情况下ShardSelectionStrategy是无法运用的。而对于assigned等类似的id生成机制,还是可以运用ShardSelectionStrategy策略的
3. 执行hql或者Criteria查询的时候,则使用ShardAccessStrategy从shard中查询数据
上面示例中的buildShardStrategyFactory方法中,我们使用了hibernate shards项目提供的SequentialShardAccessStrategy策略,这个策略在所有shards中逐个执行查询语句,然后对各个结果进行合并
基于上面几点,我们可以对上面测试运行后的输出做出解释了:
两个使用了hql的地方,都产生了两次sql查询,这是因为使用了SequentialShardAccessStrategy缘故,他从我们定义的两个shard中分别执行sql查询,合并结果集返回给调用者
把测试代码中的删除语句注释掉,运行测试后查询数据库,可以确认数据都是正确的insert在相应的shard中的
总结
上面演示了hibernate shards的基本用法,总体来看使用上非常简单,只需要针对实施shard的实体使用hibernate shards提供的ShardedSessionFactory即可
使用hibernate shards也存在一些限制,但大部分都是使用shards后的一些设计要求,或者是目前的it技术背景下对shards设计上的约束,在后面一篇中再详细整理一下这方面内容
文中使用的测试项目源文件在这里: 下载。引用到的jar文件需要从相关项目网站去下载
1. 以Hibernate Shards 数据的水平、垂直切割(一)- Hibernate测试环境的项目为基础
2. Hibernate Shards使用了commons logging,下载个项目最新的release版本。这里用的版本为1.1.1
3. 在Hibernate Shards 数据的水平、垂直切割(一)- Hibernate测试环境中,我们在mysql中建立了一个hbshards数据库,为了测试shards再建立一个hbshards2的数据库,contact表的结构一样
4. 将Hibernate Shards发布包中的hibernate-shards.jar放到lib目录
项目引用添加hibernate-shards.jar
将commons logging发布包中的commons-logging-1.1.1.jar放到lib目录
CLASSPATH中添加hibernate-shards.jar、commons-logging-1.1.1.jar
Hibernate Shards测试项目
出于结构上的简单考虑,定义一个ShardableEntity的接口,让ContactEntity实现这个接口:
public interface ShardableEntity {
    public String getIdentifier();
}
public class ContactEntity implements ShardableEntity {
    public String getIdentifier(){
        return this._id;
    }
    //other code omitted is the same with previous post
}
映射文件ContactEntity.hbm.xml与上一篇文章中的一样因为我们需要将contact的数据以切片的形式存入2个数据库中,因此需要配置这2个数据库的信息。Hibernate Shards通过定义2个hibernate的配置文件解决这个问题:
shard0.hibernate.cfg.xml:
<?xml version='1.0' encoding='utf-8'?>
<!DOCTYPE hibernate-configuration PUBLIC
    "-//Hibernate/Hibernate Configuration DTD//EN"
    "http://hibernate.sourceforge.net/hibernate-configuration-3.0.dtd">
<hibernate-configuration>
<session-factory>
      <property name="connection.driver_class">com.mysql.jdbc.Driver</property>
      <property name="connection.url">jdbc:mysql://localhost/hbshards</property>
      <property name="connection.username">root</property>
      <property name="connection.password">dev</property>
      <property name="connection.pool_size">10</property>
      <property name="show_sql">true</property>
      <property name="dialect">org.hibernate.dialect.MySQLInnoDBDialect</property>
      <property name="hbm2ddl.auto">validate</property>
      <property name="hibernate.connection.shard_id">0</property>
      <property name="hibernate.shard.enable_cross_shard_relationship_checks">false</property>
      <mapping resource="ContactEntity.hbm.xml" />
</session-factory>
</hibernate-configuration>
shard1.hibernate.cfg.xml:
<?xml version='1.0' encoding='utf-8'?>
<!DOCTYPE hibernate-configuration PUBLIC
    "-//Hibernate/Hibernate Configuration DTD//EN"
    "http://hibernate.sourceforge.net/hibernate-configuration-3.0.dtd">
<hibernate-configuration>
<session-factory>
      <property name="connection.driver_class">com.mysql.jdbc.Driver</property>
      <property name="connection.url">jdbc:mysql://localhost/hbshards2</property>
      <property name="connection.username">root</property>
      <property name="connection.password">dev</property>
      <property name="dialect">org.hibernate.dialect.MySQLInnoDBDialect</property>
      <property name="hibernate.connection.shard_id">1</property>
      <property name="hibernate.shard.enable_cross_shard_relationship_checks">false</property>
</session-factory>
</hibernate-configuration>
其中shard0.hibernate.cfg.xml作为主要的配置文件,针对每个shard创建的SessionFactory对象,除了数据库连接信息的配置之外,都来自shard0.hibernate.cfg.xml针对其他每个shard创建的SessionFactory,数据库连接信息从相应的配置文件(例如shard1.hibernate.cfg.xml)中读取,读取的内容包括connection.url、connection.username、connection.password、connection.datasource。为了hibernate加载其他shard的配置文件时不抛异常,在其他shard的配置文件中我们还是把必要的配置属性写上去了
hibernate.connection.shard_id属性为每个shard定义一个id,必须有一个shard_id为0的shard,其他的shard_id可以定义为任意整数
我们假定contact的id都是由数字组成的一个8位长度的字符串
对contact的切割策略简单定义为: contact id第一个字符为0-4的存入shard0中,为5-9的存入shard1中
为了实现这一策略,我们需要实现hibernate shards的2个接口
ShardResolutionStrategy接口的实现:
import java.util.List;
import java.util.ArrayList;
import org.hibernate.shards.strategy.resolution.ShardResolutionStrategy;
import org.hibernate.shards.strategy.selection.ShardResolutionStrategyData;
import org.hibernate.shards.ShardId;
/*
 * a simple ShardResolutionStrategy implementation for our ContactEntity
 */
public class MyShardResolutionStrategy implements ShardResolutionStrategy {
    private List<ShardId> _shardIds;
    public MyShardResolutionStrategy(List<ShardId> shardIds){
        this._shardIds = shardIds;
    }
    public List selectShardIdsFromShardResolutionStrategyData(
            ShardResolutionStrategyData arg0){
        List ids = new ArrayList();
        String id = (String)arg0.getId();
        if(id==null || id.isEmpty()) ids.add(this._shardIds.get(0));
        else{
            //our shard selection is identified by the
            //first char(number) in contact id
            //0-4 => shards0, 5-9 => shards1
            Integer i = new Integer(id.substring(0, 1));
            ids.add(this._shardIds.get(i/5));
        }
        return ids;
    }
}
ShardSelectionStrategy接口的实现:
import java.util.List;
import org.hibernate.shards.ShardId;
import org.hibernate.shards.strategy.selection.ShardSelectionStrategy;
/*
 * a simple ShardSelectionStrategy implementation for our ContactEntity
 */
public class MyShardSelectionStrategy implements ShardSelectionStrategy {
       private List<ShardId> _shardIds;
       public MyShardSelectionStrategy(List<ShardId> shardIds){
           this._shardIds=shardIds;
       }
       public ShardId selectShardIdForNewObject(Object obj) {
           if(obj instanceof ShardableEntity) {
               String id = ((ShardableEntity)obj).getIdentifier();
               if(id==null || id.isEmpty()) return this._shardIds.get(0);
               Integer i = new Integer(id.substring(0, 1));
               //our shard selection is identified by the
               //first char(number) in contact id
               //0-4 => shards0, 5-9 => shards1
               return this._shardIds.get(i/5);
           }
           //for non-shardable entities we just use shard0
           return this._shardIds.get(0);
    }
}
接下来就是怎么使用hibernate shards的测试代码了:
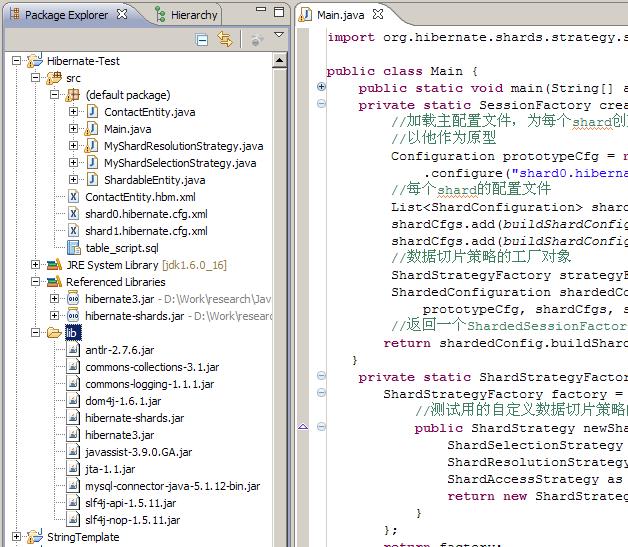
import java.util.Iterator; import java.util.List; import java.util.ArrayList; import org.hibernate.Session; import org.hibernate.SessionFactory; import org.hibernate.Transaction; import org.hibernate.cfg.Configuration; import org.hibernate.shards.*; import org.hibernate.shards.cfg.*; import org.hibernate.shards.strategy.*; import org.hibernate.shards.strategy.access.*; import org.hibernate.shards.strategy.resolution.*; import org.hibernate.shards.strategy.selection.*;项目结构图:
public class Main { public static void main(String[] args) { HibernateShardsTest(args); } private static SessionFactory createSessionFactory() { //加载主配置文件,为每个shard创建SessionFactory对象时将 //以他作为原型 Configuration prototypeCfg = new Configuration() .configure("shard0.hibernate.cfg.xml"); //每个shard的配置文件 List<ShardConfiguration> shardCfgs = new ArrayList<ShardConfiguration>(); shardCfgs.add(buildShardConfig("shard0.hibernate.cfg.xml")); shardCfgs.add(buildShardConfig("shard1.hibernate.cfg.xml")); //数据切片策略的工厂对象 ShardStrategyFactory strategyFactory = buildShardStrategyFactory(); ShardedConfiguration shardedConfig = new ShardedConfiguration( prototypeCfg, shardCfgs, strategyFactory); //返回一个ShardedSessionFactory对象 return shardedConfig.buildShardedSessionFactory(); } private static ShardStrategyFactory buildShardStrategyFactory() { ShardStrategyFactory factory = new ShardStrategyFactory() { //测试用的自定义数据切片策略的工厂类 public ShardStrategy newShardStrategy(List<ShardId> shardIds) { ShardSelectionStrategy ss = new MyShardSelectionStrategy(shardIds); ShardResolutionStrategy rs = new MyShardResolutionStrategy(shardIds); ShardAccessStrategy as = new SequentialShardAccessStrategy(); return new ShardStrategyImpl(ss, rs, as); } }; return factory; } private static ShardConfiguration buildShardConfig(String configFile) { Configuration config = new Configuration().configure(configFile); return new ConfigurationToShardConfigurationAdapter(config); } private static void HibernateShardsTest(String[] args){ String loginId = "RicCC@cnblogs.com"; String password = "123"; if(args!=null && args.length==2){ loginId = args[0]; password = args[1]; } SessionFactory factory = null; try{ factory = createSessionFactory(); ShardsTestCreate(factory); ShardsTestLogin(factory, loginId, password); ShardsTestDelete(factory); }catch(Exception e){ System.out.println(e.getMessage()); e.printStackTrace(); }finally{ if(factory!=null) factory.close(); } } private static void ShardsTestCreate(SessionFactory factory){ Session session = null; Transaction transaction = null; System.out.println("===Create Contacts==="); try{ session = factory.openSession(); transaction = session.beginTransaction(); session.save(new ContactEntity("01111111","RicCC@cnblogs.com" , "123", "Richie", "RicCC@cnblogs.com")); session.save(new ContactEntity("91111111","a@cnblogs.com" , "123", "AAA", "a@cnblogs.com")); session.save(new ContactEntity("81111111","b@cnblogs.com" , "123", "BBB", "b@cnblogs.com")); session.save(new ContactEntity("31111111","c@cnblogs.com" , "123", "CCC", "c@cnblogs.com")); transaction.commit(); }catch(Exception e){ if(transaction!=null) transaction.rollback(); System.out.println(e.getMessage()); e.printStackTrace(); }finally{ if(session!=null) session.close(); } } private static void ShardsTestLogin(SessionFactory factory , String loginId, String password){ Session session = null; ContactEntity c = null; System.out.println("\n===Login Test==="); try{ session = factory.openSession(); List contacts = session.createQuery("from ContactEntity where LoginId=:loginId") .setString("loginId", loginId) .list(); if(contacts.isEmpty()) System.out.println("Contact \"" + loginId + "\" not found!"); else{ c = (ContactEntity)contacts.get(0); if(c.getPassword().equals(password)) System.out.println("Contact \"" + loginId + "\" login successful"); else System.out.println("Password is incorrect (should be: " + c.getPassword() + ", but is: " + password + ")"); } System.out.println("\n===Get Contact by Id==="); c = (ContactEntity)session.get(ContactEntity.class, "81111111"); System.out.println(c.toString()); c = (ContactEntity)session.get(ContactEntity.class, "31111111"); System.out.println(c.toString()); }catch(Exception e){ System.out.println(e.getMessage()); e.printStackTrace(); }finally{ if(session!=null) session.close(); } } private static void ShardsTestDelete(SessionFactory factory){ Session session = null; Transaction transaction = null; System.out.println("\n===Delete Contacts==="); try{ session = factory.openSession(); transaction = session.beginTransaction(); List contacts = session.createQuery("from ContactEntity").list(); Iterator it = contacts.iterator(); while(it.hasNext()){ session.delete(it.next()); } transaction.commit(); }catch(Exception e){ if(transaction!=null) transaction.rollback(); System.out.println(e.getMessage()); e.printStackTrace(); }finally{ if(session!=null) session.close(); } } }
运行测试
用Eclipse编译class文件,将生成的所有class文件以及相关的配置、映射文件 拷贝到lib目录中,运行Main.class结果如下:
D:\Work\research\Java\Hibernate-Test\lib>java Main
===Create Contacts===
Hibernate: insert into CONTACT (EMAIL, NAME, LOGIN_ID, PASSWORD, ID) values (?,?, ?, ?, ?)
Hibernate: insert into CONTACT (EMAIL, NAME, LOGIN_ID, PASSWORD, ID) values (?,?, ?, ?, ?)
Hibernate: insert into CONTACT (EMAIL, NAME, LOGIN_ID, PASSWORD, ID) values (?,?, ?, ?, ?)
Hibernate: insert into CONTACT (EMAIL, NAME, LOGIN_ID, PASSWORD, ID) values (?,?, ?, ?, ?)
===Login Test===
Hibernate: select contactent0_.ID as ID0_, contactent0_.EMAIL as EMAIL0_, contactent0_.NAME as NAME0_, contactent0_.LOGIN_ID as LOGIN4_0_, contactent0_.PASSWORD as PASSWORD0_ from CONTACT contactent0_ where contactent0_.LOGIN_ID=?
Hibernate: select contactent0_.ID as ID0_, contactent0_.EMAIL as EMAIL0_, contactent0_.NAME as NAME0_, contactent0_.LOGIN_ID as LOGIN4_0_, contactent0_.PASSWORD as PASSWORD0_ from CONTACT contactent0_ where contactent0_.LOGIN_ID=?
Contact "RicCC@cnblogs.com" login successful
===Get Contact by Id===
Hibernate: select contactent0_.ID as ID0_0_, contactent0_.EMAIL as EMAIL0_0_, contactent0_.NAME as NAME0_0_, contactent0_.LOGIN_ID as LOGIN4_0_0_, contactent0_.PASSWORD as PASSWORD0_0_ from CONTACT contactent0_ where contactent0_.ID=?
{ Id="81111111", LoginId="b@cnblogs.com", Name="BBB", EMail="b@cnblogs.com" }
Hibernate: select contactent0_.ID as ID0_0_, contactent0_.EMAIL as EMAIL0_0_, contactent0_.NAME as NAME0_0_, contactent0_.LOGIN_ID as LOGIN4_0_0_, contactent0_.PASSWORD as PASSWORD0_0_ from CONTACT contactent0_ where contactent0_.ID=?
{ Id="31111111", LoginId="c@cnblogs.com", Name="CCC", EMail="c@cnblogs.com" }
===Delete Contacts===
Hibernate: select contactent0_.ID as ID0_, contactent0_.EMAIL as EMAIL0_, contactent0_.NAME as NAME0_, contactent0_.LOGIN_ID as LOGIN4_0_, contactent0_.PASSWORD as PASSWORD0_ from CONTACT contactent0_
Hibernate: select contactent0_.ID as ID0_, contactent0_.EMAIL as EMAIL0_, contactent0_.NAME as NAME0_, contactent0_.LOGIN_ID as LOGIN4_0_, contactent0_.PASSWORD as PASSWORD0_ from CONTACT contactent0_
Hibernate: delete from CONTACT where ID=?
Hibernate: delete from CONTACT where ID=?
Hibernate: delete from CONTACT where ID=?
Hibernate: delete from CONTACT where ID=?
1. 通过id加载实体的时候,hibernate shards使用ShardSelectionStrategy来决定应当从哪个shard加载数据
2. 新增数据的时候,hibernate shards使用ShardResolutionStrategy来决定应当将数据insert到哪个shard中
这里为什么不能使用ShardSelectionStrategy呢?因为与id的生成机制相关,比如说可以让数据库来生成id(hibernate中的native方式),例如自增id,在shard的应用场景下可以简单的给每个shard一个起止范围,只是在insert数据的时候必须通过特定的算法决定将数据insert到哪个shard中,这样的情况下ShardSelectionStrategy是无法运用的。而对于assigned等类似的id生成机制,还是可以运用ShardSelectionStrategy策略的
3. 执行hql或者Criteria查询的时候,则使用ShardAccessStrategy从shard中查询数据
上面示例中的buildShardStrategyFactory方法中,我们使用了hibernate shards项目提供的SequentialShardAccessStrategy策略,这个策略在所有shards中逐个执行查询语句,然后对各个结果进行合并
基于上面几点,我们可以对上面测试运行后的输出做出解释了:
两个使用了hql的地方,都产生了两次sql查询,这是因为使用了SequentialShardAccessStrategy缘故,他从我们定义的两个shard中分别执行sql查询,合并结果集返回给调用者
把测试代码中的删除语句注释掉,运行测试后查询数据库,可以确认数据都是正确的insert在相应的shard中的
总结
上面演示了hibernate shards的基本用法,总体来看使用上非常简单,只需要针对实施shard的实体使用hibernate shards提供的ShardedSessionFactory即可
使用hibernate shards也存在一些限制,但大部分都是使用shards后的一些设计要求,或者是目前的it技术背景下对shards设计上的约束,在后面一篇中再详细整理一下这方面内容
文中使用的测试项目源文件在这里: 下载。引用到的jar文件需要从相关项目网站去下载


 浙公网安备 33010602011771号