2.个人负责模块或任务说明
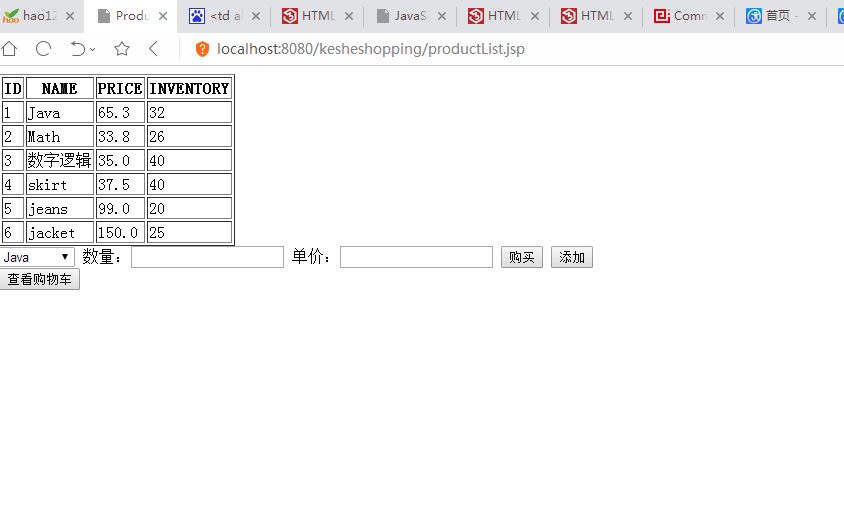
将数据库中已经存在的商品取出,用表格显示到页面中。
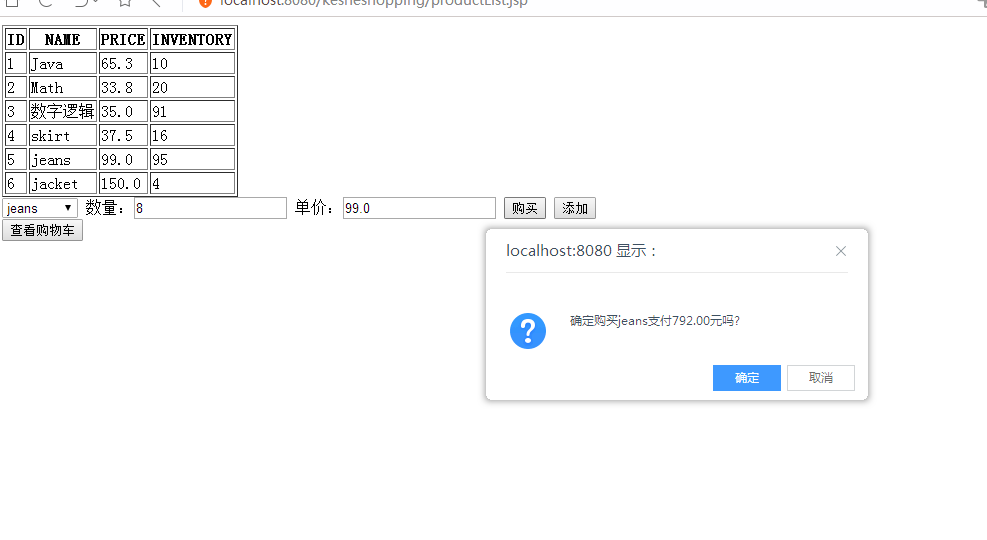
实现在商品页面的购买,直接弹出消息框,输出价格,实现购买。
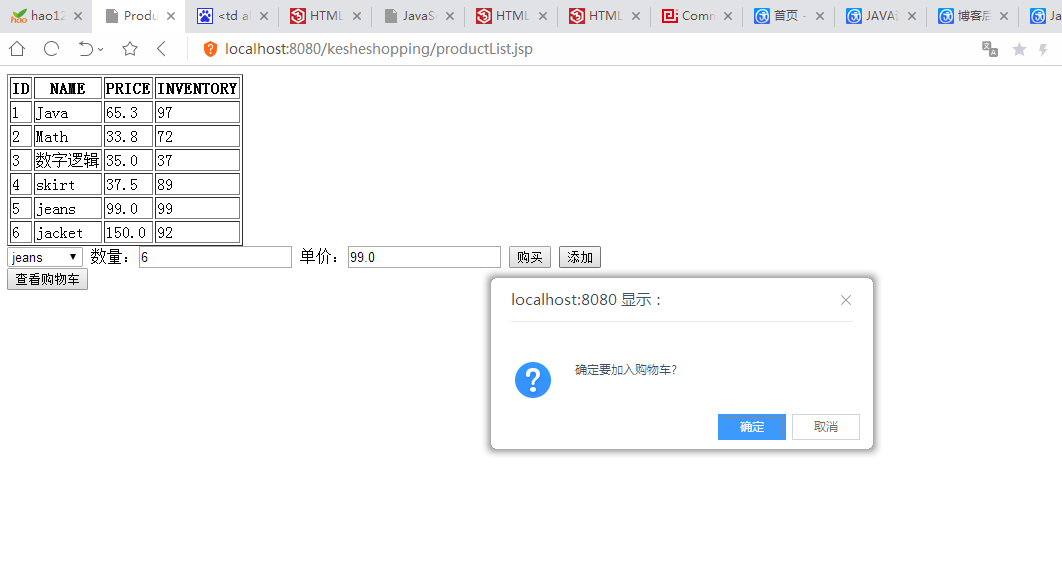
实现在商品页面进行添加购物车,并转到购物车
实现在购物车页面显示数据
实现在购物车页面进行删除表格的某一行数据
实现在购物车页面进行购买,并重新返回商品页面
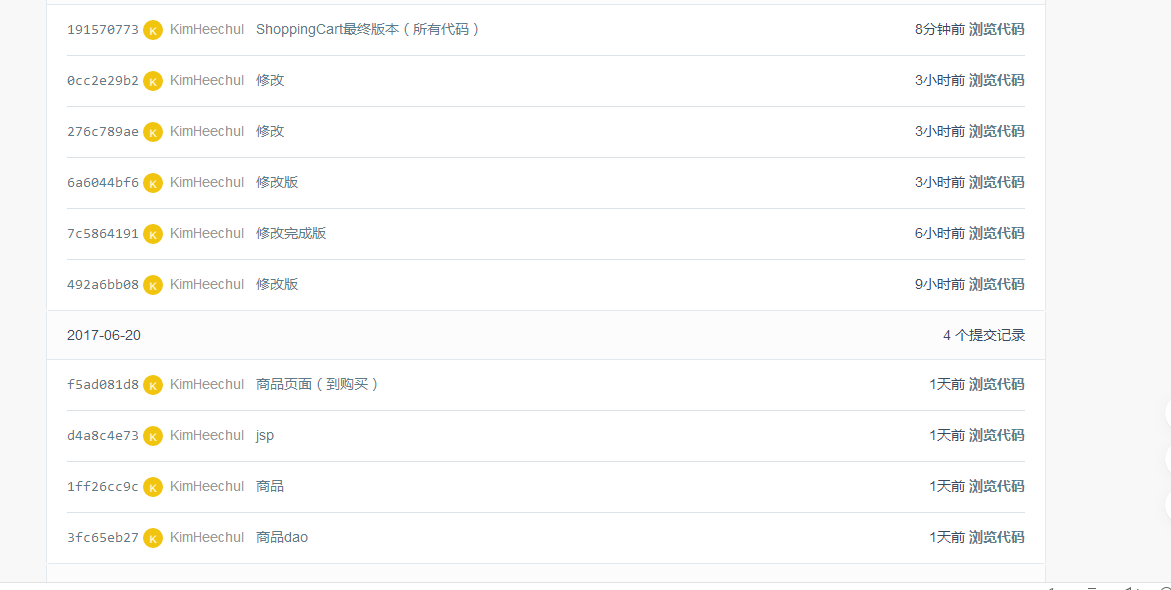
3.自己的代码提交记录截图
4.自己负责模块或任务详细说明
(1)将数据库中已经存在的商品取出,用表格显示到页面中。
主要代码:
<table border="1">
	<tr>
		<th>ID</th>
		<th>NAME</th>
		<th>PRICE</th>
		<th>INVENTORY</th>
	</tr>
	<%
	DButil util=new DButil();
	List<ProductDB>list=util.readFirstProduct();
	for(ProductDB e:list){ %>
	<tr>
	<td><%=e.getId() %></td>
	<td><%=e.getName() %></td>
	<td><%=e.getPrice() %></td>
	<td><%=new Random().nextInt(100) %></td>

	</tr>
	<%} %>
</table>

public List<ProductDB> readFirstProduct() {
		List<ProductDB> list = new ArrayList<ProductDB>();
		Connection con = null;
		PreparedStatement psmt = null;
		ResultSet rs = null;
		try {
			Class.forName("com.mysql.jdbc.Driver");
		} catch (ClassNotFoundException e) {
			e.printStackTrace();
		}
		try {
			con = DriverManager.getConnection("jdbc:mysql://localhost:3306/shopping", "root", "kimheechul");
			String sql = "select * from product";
			psmt = con.prepareStatement(sql);
			rs = psmt.executeQuery();
			while (rs.next()) {
				int id = rs.getInt("id");
				String name = rs.getString("name");
				double price = rs.getDouble("price");
				ProductDB tl = new ProductDB(id, name, price);
				list.add(tl);
			}
		} catch (SQLException e) {
			e.printStackTrace();
		} finally {
			try {
				if (rs != null) {
					rs.close();
				}
				if (psmt != null) {
					psmt.close();
				}
				if (con != null) {
					con.close();
				}
			} catch (SQLException e) {
				e.printStackTrace();
			}
		}
		return list;
	}
在DButil中定义好方法,使得其能够连接数据库,获取数据库中的数据,并将数据输入到List列表中,并返回列表。
在JSP中使用<table>、<tr>、<td>和<th>标签制作表格,并且同时使用for循环进行遍历list列表,将列表中的数据显示到表格中,使用<%= %>就可以实现。
(2)实现在商品页面的购买,直接弹出消息框,输出价格,实现购买。
主要代码:
	<form id="product" method="post" action="productList.jsp">
    <select id="ID" name="NAME">
    <%for(ProductDB e:list){ %>
   	<option value=<%=e.getName() %>><%=e.getName() %></option>
   	<%} %>
   	</select>
   	数量:<input id='count' type="text"/>
   	单价:<input id='price' type='text'>
   	<input type="submit" value="购买" onclick="fun()"/>
   	</form>

<script type="text/javascript">
		function fun()
		{
			var  obj=document.getElementById("ID");
			for (i=0;i<obj.length;i++) {//下拉框的长度就是它的选项数.
				if (obj[i].selected== true ) {
       				var text=obj[i].value;//获取当前选择项的 值 .
				}
			}
			var price = document.getElementById('price').value;
			var count = document.getElementById('count').value;
			var total = (count*price).toFixed(2);

			if(confirm("确定购买"+text+"支付"+total+"元吗?")){

				window.location.href = "productList.jsp";
			}
		}
</script>
通过使用<form id="product" method="post" action="productList.jsp">
form表单来提交选中和输入数据,同时使用action属性来规定当我们使用表单来提交数据时,数据提交到哪里。使用<select> 标签创建一个菜单,将 <option> 标签中的内容作为一个元素显示,其值可以用value=<%=e.getName() %>来实现输入。
再通过<input>标签和其type属性定义一个“submit”提交按钮,并使用onclick事件属性使得我们可以在点击购买按钮时能够执行已经编写好的JavaScript代码。
在fun()中,我们使用document.getElementById(id)来获取<select>菜单中的值,及使用document.getElementById(id).value来获取“text”字段中的值。且使用confirm()来显示对话框,并且当有对话框出现后点击的是确定按钮时,跳转页面。
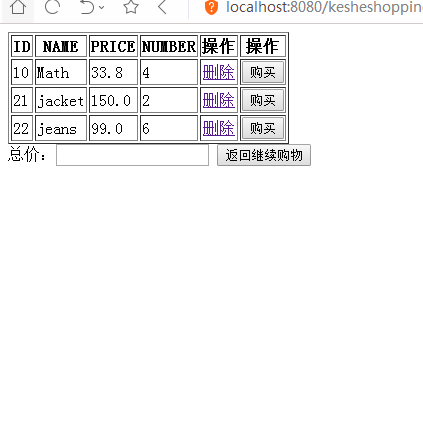
(3)实现在商品页面进行添加购物车,并转到购物车
主要代码:
</table>
	<form id="product" method="post" action="productList.jsp">
    <select id="ID" name="NAME">
    <%for(ProductDB e:list){ %>
   	<option value=<%=e.getName() %>><%=e.getName() %></option>
   	<%} %>
   	</select>
   	数量:<input id='count' type="text"/>
   	单价:<input id='price' type='text'>
   	   	<input type="button" value="添加" onclick="add()"/>
   	</form>

<script type="text/javascript" language="javaScript">
function add(){
	var  obj=document.getElementById("ID");
	for (i=0;i<obj.length;i++) {//下拉框的长度就是它的选项数.
		if (obj[i].selected== true ) {
   			var text=obj[i].value;//获取当前选择项的 值 .
		}
	}
	var price = document.getElementById('price').value;
	var count = document.getElementById('count').value;
	if(confirm("确定要加入购物车?")){
		window.location.href = "cart.jsp?count="+count+"&price="+price+"&name="+text;
	}
}
</script>
此功能和上述功能相似,且使用的代码类似。
通过使用<form id="product" method="post" action="productList.jsp">
form表单来提交选中和输入数据,同时使用action属性来规定当我们使用表单来提交数据时,数据提交到哪里。使用<select> 标签创建一个菜单,将 <option> 标签中的内容作为一个元素显示,其值可以用value=<%=e.getName() %>来实现输入。
再通过<input>标签和其type属性定义两个“text”字段和一个“button”提交按钮,并在其中使用onclick事件属性使得我们可以在点击购买按钮时能够执行已经编写好的JavaScript代码。
在add()中,我们使用document.getElementById(id)来获取<select>菜单中的值,及使用document.getElementById(id).value来获取“text”字段中的值。且使用confirm()来显示对话框,并且当有对话框出现后点击的是确定按钮时,跳转页面,并在其后添上参数,将我们获得的值传送到购物车页面中。
(4)实现在购物车页面显示数据
主要代码:
<table border="1">
	<tr>
   		<th>ID</th>
		<th>NAME</th>
		<th>PRICE</th>
		<th>NUMBER</th>
		<th>操作</th>
		<th>操作</th>
	</tr>
	<%int count = Integer.parseInt(request.getParameter("count"));%>
	<%BigDecimal price = new BigDecimal(request.getParameter("price"));
	price=price.setScale(2, BigDecimal.ROUND_HALF_UP);%>
	<%String name = request.getParameter("name");%>
    <%Connection con = null;
	PreparedStatement psmt = null;
	ResultSet rs = null;
	con = DriverManager.getConnection("jdbc:mysql://localhost:3306/test", "root", "kimheechul");
	String strSql = "insert into cart(name,price,num) values(?,?,?)";
	psmt = con.prepareStatement(strSql);
	psmt.setString(1, name);
	psmt.setBigDecimal(2,price);
	psmt.setInt(3, count);
	psmt.executeUpdate();
	psmt.close();//立即释放资源
	DButil util=new DButil();
	double total=0.0;
	List<Product>list=util.readProduct();
	for(Product e:list){ %>
	<tr>
	<td><%=e.getId() %></td>
	<td><%=e.getName() %></td>
	<td><%=e.getPrice() %></td>
	<td><%=e.getNum() %></td>
	</tr>
	<%} %>
</table>
此方法和上述的在商品页面中显示数据的代码相似,差别在于我们需要使用request.getParameter()来获得商品页面中表单使用post方式传送过来的值,且因为其类型为String型,需要将其转换成对应的类型。再将数据插入数据库中。其余与商品页面的代码大致一样。
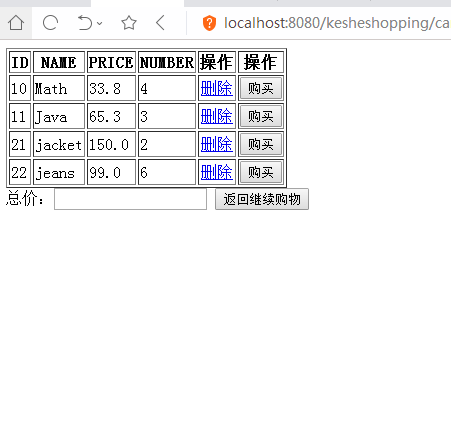
(5)实现在购物车页面进行删除表格的某一行数据
主要代码:
<td align="center"> <a href="#" onclick="this.parentNode.parentNode.parentNode.removeChild(this.parentNode.parentNode)">删除</a> </td>
删除功能是通过使用<a></a>标签,使用连接,使其匹配到this所指向的元素的父容器的父容器的父容器,(parentNode指的是父节点)也就是在这个元素外面第三层包裹他的那个元素。然后删除这个节点,并且是删除的是这个this元素指向的元素的父容器的父容器,也就是这个元素第二层包裹它的那个元素。
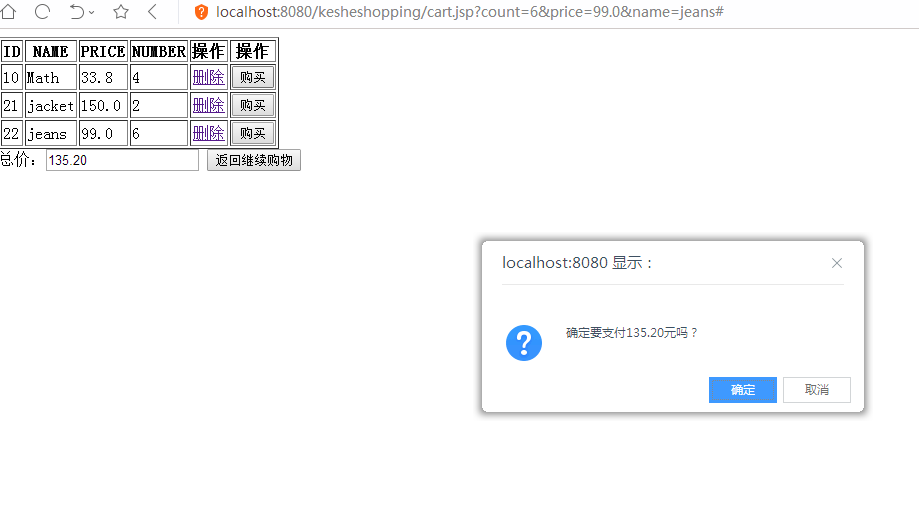
(6)实现在购物车页面进行购买,并重新返回商品页面
主要代码:
	<%
	DButil util=new DButil();
	double total=0.0;
	List<Product>list=util.readProduct();
	for(Product e:list){ %>
	<tr>
	<td><%=e.getId() %></td>
	<td><%=e.getName() %></td>
	<td><%=e.getPrice() %></td>
	<td><%=e.getNum() %></td>
	<% total=e.getPrice()*e.getNum();%>
	<td><input type="button" name="calculate" onclick="setvalue(<%=total%>)" value="购买"></td>
	</tr>
	<%} %>
</table>
总价:<input type="text" name="result" id="result">
<script>
	function setvalue(v)
	{
		document.getElementById("result").value=v.toFixed(2);
		if(confirm("确定要支付"+document.getElementById("result").value+"元吗?")){
			window.location.href = "productList.jsp";
		}
	}
</script>
同样是通过List储存数据库数据,使用for循环遍历列表,获取数据库的值,计算总价。
再通过<input>标签和其type属性定义一个“button”按钮,并使用onclick事件属性使得我们可以在点击购买按钮时能够执行已经编写好的JavaScript代码。
在setvalue()中,我们使用document.getElementById("result").value=v.toFixed(2);来将获得的值显示在“text”字段中。且使用confirm()来显示对话框,并且当有对话框出现后点击的是确定按钮时,跳转页面,支付成功。
5.课程设计感想
1、在课程设计的过程中对于一些知识点的掌握更加巩固了,尤其是关于JSP的用法,比原来稍微了解了些
2、在课设的过程发现自己的编程知识储备还是比较薄弱的,对于在编写代码的过程中发现的问题,还不是能很好地解决
3、在编写代码的过程中,虽然有碰到很多的困难,但是也有很多的收获,至少能够编写WEB界面了。虽然是比较基础的界面,但是也是一种进步和收获
4、因为本周有两场考试,所以做课程设计时间就变得很紧张了,而且开始做课设的时间又较迟,导致WEB界面没有时间弄得很美观了。希望下次能够做的更好吧。


