Spring Boot使用MyBatis Generator、Swagger
MyBatis是Java目前主流的ORM框架,在Spring Boot中使用MyBatis可以参考这篇文章:http://www.ityouknow.com/springboot/2016/11/06/spring-boot-mybatis.html
这篇文章来将介绍MyBatis Generator,(简称MBG,下文使用这个简称),该插件可以很方便的生成实体类、Mapper接口代码等,提高开发效率,它有点像.NET的EF框架中的DB First。另外,顺便介绍Spring Boot如何集成Swagger。
一、添加pom配置
(1)既然是像EF的DB First,那需要先建好数据库,可以先在MySQL中执行以下SQL脚本:


create database generatortest default character set utf8mb4 collate utf8mb4_unicode_ci;
use generatortest;
create user 'generatortest'@'localhost' identified by 'generatortest123';
grant all privileges on generatortest.* to 'generatortest'@'localhost';
flush privileges;

CREATE TABLE `user`
(
  id INT NOT NULL AUTO_INCREMENT COMMENT '用户ID',
  user_name VARCHAR(50) NOT NULL COMMENT '用户名',
  `password` VARCHAR(50) NOT NULL COMMENT '密码',
  email VARCHAR(50) COMMENT '邮箱',
  avatar VARCHAR(255) COMMENT '头像',
  create_time DATETIME NOT NULL COMMENT '创建时间',
    update_time DATETIME NOT NULL COMMENT '更新时间',
    deleted TINYINT(1) default 0 COMMENT '逻辑删除',
  PRIMARY KEY (id)
);
ALTER TABLE `user` COMMENT '用户表';

CREATE TABLE role
(
  id INT NOT NULL AUTO_INCREMENT COMMENT '角色ID',
  role_name VARCHAR(50) NOT NULL COMMENT '角色名',
  enabled TINYINT(1) default 1 NOT NULL COMMENT '有效标志',
  create_time DATETIME NOT NULL COMMENT '创建时间',
    update_time DATETIME NOT NULL COMMENT '更新时间',
    deleted TINYINT(1) default 0 NOT NULL COMMENT '逻辑删除',
  PRIMARY KEY (id)
);
ALTER TABLE role COMMENT '角色表';

CREATE TABLE permission
(
  id INT NOT NULL AUTO_INCREMENT COMMENT '权限ID',
  permission_name VARCHAR(50) NOT NULL COMMENT '权限名称',
  permission_value VARCHAR(200) NOT NULL COMMENT '权限值',
  PRIMARY KEY (id)
);
ALTER TABLE permission COMMENT '权限表';

CREATE TABLE user_role
(
  user_id INT NOT NULL COMMENT '用户ID',
  role_id INT NOT NULL COMMENT '角色ID'
);
ALTER TABLE user_role COMMENT '用户角色关联表';

CREATE TABLE role_permission
(
  role_id INT NOT NULL COMMENT '角色ID',
  permission_id INT NOT NULL COMMENT '权限ID'
);
ALTER TABLE role_permission COMMENT '角色权限关联表';
(2)新建Maven项目,还不知道怎么用VS Code建Maven项目的可以参考这篇文章;
(3)添加相关Maven文件:
        <dependency>
            <groupId>mysql</groupId>
            <artifactId>mysql-connector-java</artifactId>
        </dependency>
        <dependency>
            <groupId>org.mybatis</groupId>
            <artifactId>mybatis</artifactId>
            <version>3.4.5</version>
        </dependency>
        <dependency>
            <groupId>org.mybatis.generator</groupId>
            <artifactId>mybatis-generator-core</artifactId>
            <version>1.3.7</version>
        </dependency>
二、添加MyBatis Generator配置文件
(1)在application.properties文件中添加MySQL数据连接配置:
spring.datasource.url=jdbc:mysql://localhost:3306/generatortest?serverTimezone=UTC&useUnicode=true&characterEncoding=utf-8&useSSL=true
spring.datasource.username=generatortest
spring.datasource.password=generatortest123
spring.datasource.driver-class-name=com.mysql.cj.jdbc.Driver
(2)在src\main\resources目录下新建generatorConfig.xml配置文件,添加如下配置:
<?xml version="1.0" encoding="UTF-8"?>
<!DOCTYPE generatorConfiguration
        PUBLIC "-//mybatis.org//DTD MyBatis Generator Configuration 1.0//EN"
        "http://mybatis.org/dtd/mybatis-generator-config_1_0.dtd">
<generatorConfiguration>
    <properties resource="application.properties"/>
    <context id="MySqlContext" targetRuntime="MyBatis3Simple" defaultModelType="flat">
        <!-- 当表名或者字段名为SQL关键字的时候,可以设置该属性为true,MBG会自动给表名或字段名添加**分隔符**。默认值为false -->
        <property name="autoDelimitKeywords" value="true"/>
        <!--可以使用``包括字段名,避免字段名与sql保留字冲突报错,默认值为双引号"""-->
        <property name="beginningDelimiter" value="`"/>
        <property name="endingDelimiter" value="`"/>
        <!-- 自动生成toString方法 -->
        <plugin type="org.mybatis.generator.plugins.ToStringPlugin"/>
        <!-- 为模型生成序列化方法-->
        <plugin type="org.mybatis.generator.plugins.SerializablePlugin"/>
        <commentGenerator>
            <property name="suppressDate" value="true"/>
            <!--<property name="suppressAllComments" value="true"/>-->
        </commentGenerator>
               <jdbcConnection driverClass="${spring.datasource.driver-class-name}"
                        connectionURL="${spring.datasource.url}"
                        userId="${spring.datasource.username}"
                        password="${spring.datasource.password}">
            <!--解决mysql驱动升级到8.0后不生成指定数据库代码的问题-->
            <property name="nullCatalogMeansCurrent" value="true" />
        </jdbcConnection>
        <javaTypeResolver>
            <property name="useJSR310Types" value="true"/>
        </javaTypeResolver>
        <javaModelGenerator targetPackage="com.example.demo.model" targetProject="src/main/java"/>
        <javaClientGenerator type="ANNOTATEDMAPPER" targetPackage="com.example.demo.mapper" targetProject="src/main/java" />
        <!-- 生成所有表 -->
        <table tableName="%" >
            <generatedKey column="id" sqlStatement="Mysql" identity="true"/>
        </table>
    </context>
</generatorConfiguration>
接下来分析generatorConfig.xml配置:
<properties> 元素
非必选元素,用于指定一个需要在配置中解析使用的外部属性文件。这里引入application.properties配置文件,下文<jdbcConnection> 元素用到;
<context > 元素
必选元素,可以有多个,用必选属性id区分;
targetRuntime属性:默认值为MyBatis3;
MyBatis3:MBG将生成与MyBatis 3.0及以上版本兼容的对象,以及与JSE 5.0及以上版本兼容的对象。同时生成“by example”方法,用于构建动态where字句;
MyBatis3Simple:比MyBatis3少生成“by example”方法;
defaultModelType属性:值为flat时,每一张表只生成一个实体类,这个实体类包含表中的所有字段;
<property> 元素
非必选元素,以下三个属性设置是针对MySQL数据库的:
        <!-- 当表名或者字段名为SQL关键字的时候,可以设置该属性为true,MBG会自动给表名或字段名添加**分隔符**。默认值为false -->

        <property name="autoDelimitKeywords" value="true"/>

        <!--可以使用``包括字段名,避免字段名与sql保留字冲突报错,默认值为双引号"""-->

        <property name="beginningDelimiter" value="`"/>

        <property name="endingDelimiter" value="`"/>
假设在Mysql数据库中有一个表名为user detail,中间是一个空格,这种情况下如果写出select * from user detail这样的语句,是会报错的;
Mysql中,一般会写成样子:select * from `user detail `
以上三个配置属性就是当表名或者字段名为SQL关键字时,自动加 ` 前后分隔符;
<plugin> 元素
非必选元素,用来定义一个插件。插件用于扩展或修改MBG代码生成器生成的代码;
<commentGenerator> 元素
非必选元素,最多配置一个;
suppressAllComments属性:值为true时,阻止生成注释,默认为false;
suppressDate属性:值为true时,阻止生成包含时间戳的注释,默认为false;
<jdbcConnection> 元素
必选元素,且只能有一个,用于指定数据库连接信息;
driverClass:必选属性,访问数据库的JDBC驱动程序的完全限定类名;
connectionURL:必选属性,访问数据库的JDBC连接URL;
userId:非必选属性,访问数据库的用户ID;
Password:非必选属性,访问数据库的密码;
<javaTypeResolver> 元素
非必选元素,最多配置一个,用于指定JDBC类型和Java类型如何转换;
useJSR310Types:当值为true时,会进行如下转换,其中java.time.LocalDateTime和.NET中的DateTime最为相似;
|
JDBC Type |
Resolved Java Type |
|
DATE |
java.time.LocalDate |
|
TIME |
java.time.LocalTime |
|
TIMESTAMP |
java.time.LocalDateTime |
<javaModelGenerator> 元素
必选元素,而且最多一个,用于控制生成的实体类;
targetPackage:必选属性,生成实体类存放的包名;
targetProject:必选属性,指定targetPackage路径,可以是绝对路径或相对路径;
<javaClientGenerator> 元素
非必选元素,最多配置一个,用于生成Mapper接口代码,不配置就不生成;
Type=” ANNOTATEDMAPPER”:生成基于注解的Mapper接口,不会有对应的XML映射文件;
Type=” XMLMAPPER”:所有的方法都在XML中,接口调用依赖XML文件;
targetPackage:必选属性,生成Mapper接口代码存放的包名;
targetProject:必选属性,指定targetPackage路径,可以是绝对路径或相对路径;
<table> 元素
必选元素,可以有多个,tableName="%"时生成所有表;
子元素<generatedKey>,可选元素,最多一个,用于指定自动生成主键的属性;
Column:必选属性,生成列的列名;
sqlStatement:必选属性,使用一个预定义的的值返回新的SQL语句;
Identity:可选属性,是否为唯一标志列,默认为false;
三、运行MBG
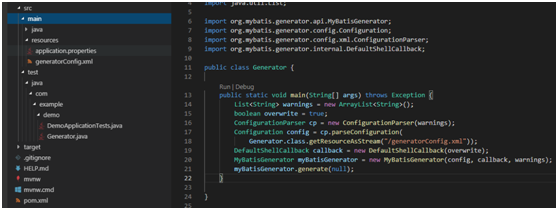
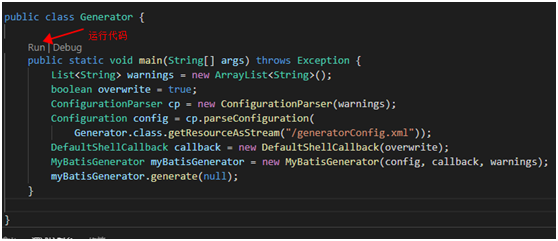
(1)在项目中创建Generator类,添加一个main方法,写上如下代码:
public static void main(String[] args) throws Exception {
        List<String> warnings = new ArrayList<String>();
        boolean overwrite = true;
        ConfigurationParser cp = new ConfigurationParser(warnings);
        Configuration config = cp.parseConfiguration(
            Generator.class.getResourceAsStream("/generatorConfig.xml"));
        DefaultShellCallback callback = new DefaultShellCallback(overwrite);
        MyBatisGenerator myBatisGenerator = new MyBatisGenerator(config, callback, warnings);
        myBatisGenerator.generate(null);
}
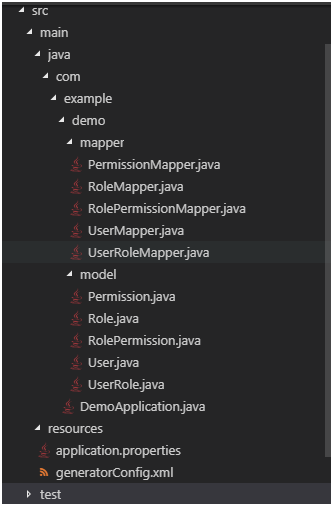
(2)点击Run,可以看到生成的实体类和Mapper接口代码
生成代码结构
四、使用MBG生成的代码
(1)pom.xml中添加如下配置,然后保存;
        <dependency>
            <groupId>org.springframework.boot</groupId>
            <artifactId>spring-boot-starter-web</artifactId>
        </dependency>
        <dependency>
            <groupId>org.mybatis.spring.boot</groupId>
            <artifactId>mybatis-spring-boot-starter</artifactId>
            <version>2.0.0</version>
        </dependency>
(2)编写控制器代码,调用MBG生成的Mapper接口代码
@RestController
public class UserController {

    @Autowired
    private UserMapper userMapper;

    @RequestMapping(value = "/getUsers", method=RequestMethod.GET)
    public List<User> getUsers() {
        List<User> users=userMapper.selectAll();
        return users;
    }

    @RequestMapping(value = "/getUser/{id}", method=RequestMethod.GET)
    public User getUser(@PathVariable("id") Integer id) {
        User user=userMapper.selectByPrimaryKey(id);
        return user;
    }

    @RequestMapping(value = "/add", method=RequestMethod.POST)
    public void save(@RequestBody User user) {
        if(user.getCreateTime()==null)
        user.setCreateTime(LocalDateTime.now(Clock.system(ZoneId.of("Asia/Shanghai"))));
        if(user.getUpdateTime() == null)
        user.setUpdateTime(LocalDateTime.now(Clock.system(ZoneId.of("Asia/Shanghai"))));
        userMapper.insert(user);
    }

    @RequestMapping(value = "/update", method=RequestMethod.PUT)
    public void update(@RequestBody User user) {
        userMapper.updateByPrimaryKey(user);
    }

    @RequestMapping(value = "/delete/{id}", method=RequestMethod.DELETE)
    public void delete(@PathVariable("id") Integer id) {
        userMapper.deleteByPrimaryKey(id);
    }
}
其中UserMapper通过注解@Autowired注入进来。
(3)在application.properties配置文件中加上:

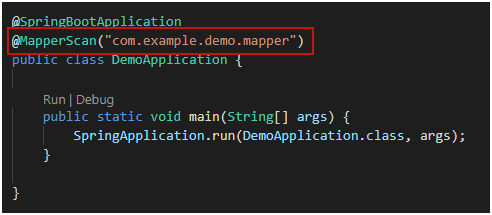
(4)在启动类中添加对 mapper 包扫描@MapperScan
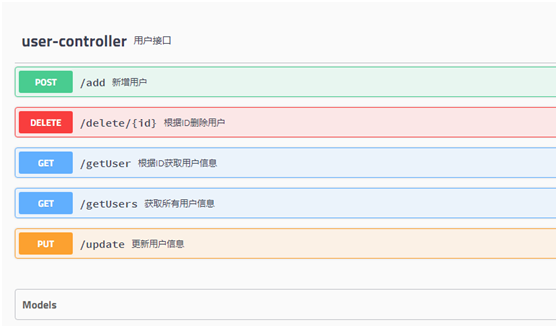
五、Spring Boot中集成Swagger,方便接口调用
(1)pom.xml中添加支持swagger的模块,然后保存。
        <dependency>
            <groupId>io.springfox</groupId>
            <artifactId>springfox-swagger2</artifactId>
            <version>2.9.2</version>
        </dependency>
        <dependency>
            <groupId>io.springfox</groupId>
            <artifactId>springfox-swagger-ui</artifactId>
            <version>2.9.2</version>
        </dependency>
(2)添加SwaggerConfig配置文件:
public class SwaggerConfig {

    @Bean
    public Docket swaggerSpringMvcPlugin() {
        return new Docket(DocumentationType.SWAGGER_2).select()
        .apis(RequestHandlerSelectors.withMethodAnnotation(ApiOperation.class)).build();
    }
}
(3)为每个接口添加@ApiOperation注解,如下:
@ApiOperation(value = "获取所有用户信息" , notes = "返回所有用户信息")

最后运行程序,浏览器打开:http://localhost:8080/swagger-ui.html
源码地址:https://github.com/Bingjian-Zhu/MybatisGeneatorDemo.git

