[小结][N种方法]实现WPF不规则窗体
WPF实现不规则窗体,方法很多很多多....
本文总结DebugLZQ认为简洁高效的几种方法
实现WPF不规则窗体的几种常用的方法如下:
1.使用Blend等工具绘制一想要的窗体。这个可以参考xiaowei0705的这篇博文:WPF制作不规则的窗体 。
2.给window的Clip属性赋Path值。这个可以参考DebugLZQ前面的博文:WPF Effect Clip以及Transform 。
3.使用透明背景的PNG图像。
4.为Window主容器添加Border
5.使用Blender制作想要的Path的说明。
6.其他
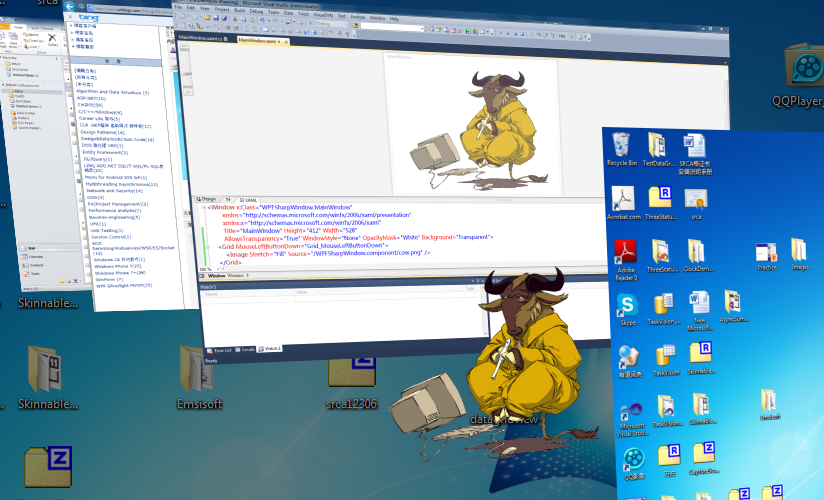
本文将要讲述的第一种方法,可以说一点技术含量都没有,基本不用动手编写代码。前提是你得有合适的透明背景的PNG图像。
我们假设你已经完成了PNG图像的制作(当然为了演示的话,down一个也行),那么这个不规则窗体实现如下:
<Window x:Class="WPFSharpWindow.MainWindow"
        xmlns="http://schemas.microsoft.com/winfx/2006/xaml/presentation"
        xmlns:x="http://schemas.microsoft.com/winfx/2006/xaml"
        Title="MainWindow" Height="412" Width="528"
        AllowsTransparency="True" WindowStyle="None" OpacityMask="White" Background="Transparent">
    <Grid MouseLeftButtonDown="Grid_MouseLeftButtonDown">
        <Image Stretch="Fill" Source="/WPFSharpWindow;component/cow.png" />
    </Grid>
</Window>
解释下这个xaml需要注意的属性设置:
allowstransparency="True" - 允许透明
background="Transparent" - 设置背景透明
windowstyle="None" - 去掉边框
opacitymask="White" - 设置白色透明
为Gird订阅的MouseLeftButtonDown路由事件,是为了实现窗体的拖动。事件处理如下:
private void Grid_MouseLeftButtonDown(object sender, MouseButtonEventArgs e)
{
   this.DragMove();
}
实现效果如下:
效果不清楚?再来两张

题外话:越来越发现发到博客园首页的博文质量是越来越差了,很多文章根本没有一点价值,纯垃圾~
真心建议发到首页的博文,希望博文的作者能够花点时间,分享有价值的东西,不要哗众取宠~试想:你发到首页的博文你自己以后都不愿意去看的,何况别人?也希望博客园团队加强监管力度!
我们写博文的目的是为了分享,分享本来就是一种积累,写博文的过程可以看做是一种沉淀,所以这是一个双赢的事。个人愚见,欢迎批评指正~
“只要人人都献出一点爱,世界将变成美好的人间...”
-------------
需要运行时更新窗体样式怎么办?即更新图片即可:
private void button1_Click(object sender, RoutedEventArgs e)
{
    var uriSource = new Uri(@"/WPFSharpWindow;component/HotPot.png", UriKind.Relative);
    imgBackground.Source=new BitmapImage(uriSource);
}

4. 为Window主容器添加Border
和前面DebugLZQ博文使用Clip属性类似,我们可以为Window的顶层容器添加Border来实现。
这种方法,对Border的编写有要求,而对其使用的Image、容器内容等没有要求。
下面给出一个例子
MainWindow.xaml如下:
<Window x:Class="WPFWindowAnimation.MainWindow"
        xmlns="http://schemas.microsoft.com/winfx/2006/xaml/presentation"
        xmlns:x="http://schemas.microsoft.com/winfx/2006/xaml"
        Title="MainWindow" Height="350" Width="525"
         AllowsTransparency="True" WindowStyle="None" Background="Transparent"
        MouseLeftButtonDown="Window_MouseLeftButtonDown">
    <Border CornerRadius="0,30,40,50" Width="Auto" Height="Auto" BorderThickness="1" BorderBrush="Green">
        <Border.Background>
            <ImageBrush ImageSource="Tulips.jpg"/>
        </Border.Background>
          <Grid>
            <Grid.RowDefinitions>
                <RowDefinition Height="Auto"/>
                <RowDefinition />
                <RowDefinition Height="Auto"/>
            </Grid.RowDefinitions>
            <TextBlock  Grid.Row="0" Margin="5" Text="Title" />
            <Grid Grid.Row="1"  />
            <TextBlock Margin="1,10,1,1" Grid.Row="2" Text="Footer" Padding="5" HorizontalAlignment="Center"/>
          </Grid>
    </Border>
</Window>
效果如下:
当然,如果我只是期待的是一个颜色背景的话,可以直接设置Border的Fill属性来获得。
tip1:关于窗口的DragMove:只要在MouseLeftButtonDown事件中调用this.DragMove();
tip2:关于窗口的Resize:通过设置Window的属性:如ResizeMode="CanResizeWithGrip"来实现。
tip3:关于窗口的关闭、最大化、最小化等:通过在容器中添加Button,为其添加合适的样式,通过Button的Click事件来实现。
this.Close();
this.WindowState = System.Windows.WindowState.Maximized;
this.WindowState = System.Windows.WindowState.Minimized;
5.方法1,2的实现关键---Path的制作
这个方法1,2中都没有讲述Path是如何制作的,因此这里有必要再说明下:
制作Path一般有2中方法:
1.使用所谓的"路径描述语言",即Path的包含有M、L、C、Z等Data属性值的书写方式。这种方法的优点是Path描述干净清爽;缺点是实现方法相对复杂一点。
2.使用Blender。缺点是Path描述复杂;但优点是使用方便,能“拖拽”出各种Path。
下面我们使用Blender来制作1个Path。
我们向Window上添加1个Rectangle和1个Triangle.

拖动调整下,如下:

注意此时,生成的xaml并不是Path。
把这两个Element组合起来,如下:
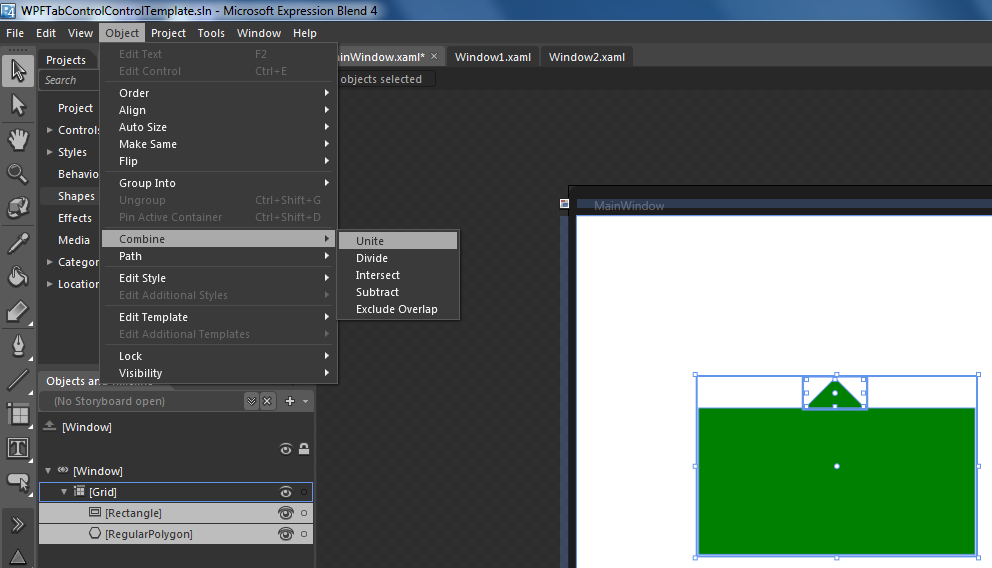
则效果如下:
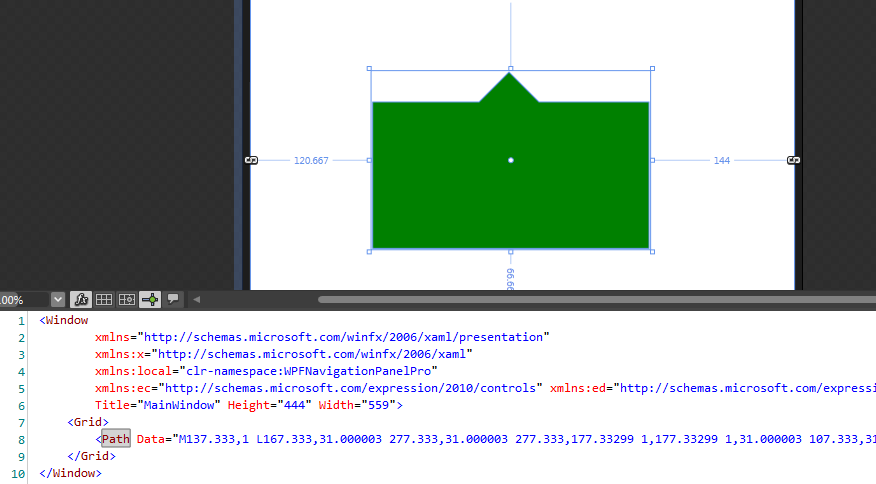
此时,生成的xaml已经是Path了。
------------------
也可先生成Path
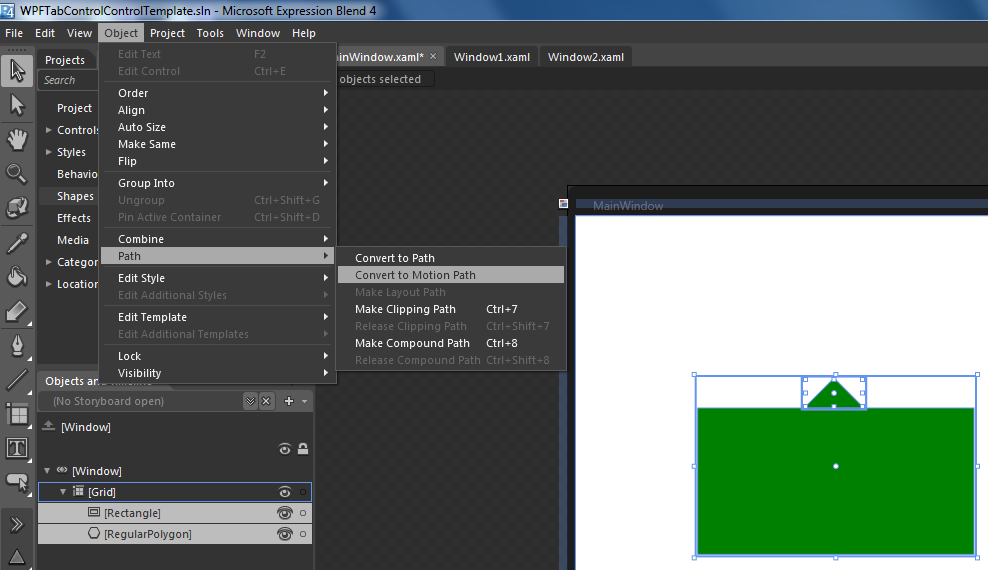
然后把生成的2个Path组合起来,效果和上面相同。
当然也可以选中页面元素右击,....,这些都是Blend的具体操作了,不是本文的主要说明对象~
----------------------
然后就可以使用这个Path,来方便的制作Path型的窗体了。如下:
<Window
        xmlns="http://schemas.microsoft.com/winfx/2006/xaml/presentation"
        xmlns:x="http://schemas.microsoft.com/winfx/2006/xaml"
        xmlns:local="clr-namespace:WPFNavigationPanelPro"
        xmlns:ec="http://schemas.microsoft.com/expression/2010/controls" xmlns:ed="http://schemas.microsoft.com/expression/2010/drawing" x:Class="WPFNavigationPanelPro.MainWindow"
        Title="MainWindow" Height="444" Width="559" WindowStyle="None" AllowsTransparency="True" Background="Transparent">
    <Grid>
        <Path Data="M137.333,1 L167.333,31.000003 277.333,31.000003 277.333,177.33299 1,177.33299 1,31.000003 107.333,31.000003 z" Fill="Green" Margin="102.667,16,106,84.117" Stretch="Fill" Stroke="Transparent" StrokeThickness="2"/>
        <WrapPanel Margin="115,94,119,116">
            <Rectangle Fill="Red" Width="60" Height="40" Margin="10"/>
            <Rectangle Fill="Red" Width="60" Height="40" Margin="10"/>
            <Rectangle Fill="Red" Width="60" Height="40" Margin="10"/>
            <Rectangle Fill="Red" Width="60" Height="40" Margin="10"/>
            <Rectangle Fill="Red" Width="60" Height="40" Margin="10"/>
        </WrapPanel>

    </Grid>
</Window>
运行效果如下:
(说明:之所以做成Path是因为:简洁一点。完全可以拖出来想要的界面直接使用~)
又如:
<Window
    xmlns="http://schemas.microsoft.com/winfx/2006/xaml/presentation"
    xmlns:x="http://schemas.microsoft.com/winfx/2006/xaml"
    x:Class="WindowTest.MainWindow"
    x:Name="Window"
    Title="MainWindow"
    Width="640" Height="552" WindowStyle="None" AllowsTransparency="True" Background="Transparent">
    <Grid x:Name="LayoutRoot">
        <Path Data="M144,0.5 C220.77621,0.5 283.46991,22.348854 287.31326,49.824082 L287.38416,50.5 287.5,50.5 287.5,52.499997 287.5,232.5 C287.5,251.27768 223.25287,266.5 144,266.5 64.747139,266.5 0.5,251.27768 0.5,232.5 L0.5,52.499997 0.5,50.5 0.61584973,50.5 0.6867221,49.824082 C4.5301003,22.348854 67.223793,0.5 144,0.5 z"  Stretch="Fill" Stroke="Black" Opacity="0.5" Margin="0,0,0,1">
            <Path.Fill>
                <LinearGradientBrush StartPoint="0,0" EndPoint="0,1">
                    <GradientStop Offset="0" Color="Violet"/>
                    <GradientStop Offset="1" Color="LightGreen"/>
                </LinearGradientBrush>
            </Path.Fill>
        </Path>
        <Border BorderBrush="Pink" BorderThickness="1" Margin="0,102,0,69" Opacity="0.3">
            <Grid Margin="8,106.5,8,72.5" />
        </Border>
    </Grid>
</Window>
效果如下:
通过Blend可以制作出你能想到的各种所谓不规则窗体~
6.其他
小结:在各种方法实现WPF不规则窗体的方法种,Blender来制作Path这种方法最灵活强大~
Wish it helps.

 浙公网安备 33010602011771号