
Moss/Sharepoint 使用代码设置Item级的权限
Title in english:set Item Level Permission for SharePoint (MOSS/WSS) List/Document Library Programmatically
有些时候,我们需要为文档库里面某个文件设置特殊的权限,这个权限不继承自列表权限,当然最简单的最好是再创建一个列表,然后存储相关文件,这样做目的是达到了,但是却会带来很多冗余。虽说sharepoint的用户权限系统强大,但是他最小的粒度也只到了列表级别,所以我们这里研究小于列表级别的权限就显得非常有必要了。
在sharepoint中,系统自带的权限可以用下图描述出来,蓝线表示我们的listitem实际是继承了list的权限系统,那么他的所有读写权限都是一样的
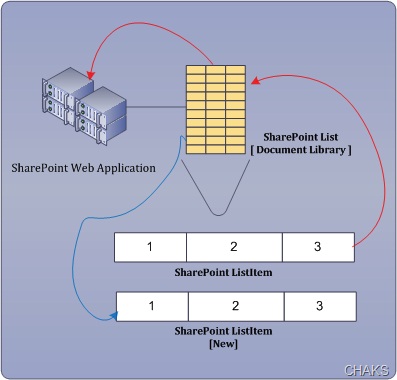
蓝线表示我们的listitem实际是继承了list的权限系统,那么他的所有读写权限都是一样的。这样会带来一个问题,那就是如果我们现在因为业务逻辑的需要,必须对list内的某一个具体项目设置特定的权限,这种自带的权限系统就无法满足了。其实这样的需求还是蛮广泛的,并不是因为我或者某人凭空想象出来的,这里我们讨论的权限可以用我们的红线来表示,为每个listitem设置独立的权限系统。
要实现listitem独立的权限系统,首先必须先打破继承,好在微软提供的相关的接口让我们完成这个工作
使用代码SPListItem.BreakRoleInheritance(true);之后我们的权限逻辑图可以用下图来描述。

好了,束缚也已经被打破了,下面我们来找一个切入点来实现我们的功能,在适当的时候加载我们的权限代码才能达到正确的效果,为了找到这个正确的时候,我们必须先了解一下listitem的创建过程,下图很直观的描述了listitem在添加时所触发的事件。
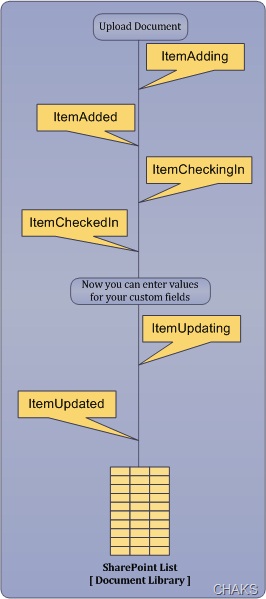
这里我们用ItemUpdated 事件来完成我们的功能,为这个事件绑定一个处理逻辑,为了简单起便,我这里只给出了逻辑部分。在ItemUpdated事件发生时,调用一下代码便可以实现listitem级别的权限系统.
{
string ReturnVal = "";
try
{
SPSite WebApp = new SPSite(SitePath);
SPWeb Site = WebApp.OpenWeb();
SPList list = Site.Lists["TestDocLib"];
SPListItem item = list.Items[0];
SPRoleDefinition RoleDefinition = Site.RoleDefinitions.GetByType(SPRoleType.Contributor);
SPRoleAssignment RoleAssignment = new SPRoleAssignment("<domain>\\<user>", "email", "name", "notes");
RoleAssignment.RoleDefinitionBindings.Add(RoleDefinition);
if(!item.HasUniqueRoleAssignments)
{
item.BreakRoleInheritance(true);
}
item.RoleAssignments.Add(RoleAssignment);
item.Update();
}
catch (Exception ex)
{
ReturnVal += "Permission not set, reason: " + ex.Message;
}
return ReturnVal;
}
item.BreakRoleInheritance(true);这句代码是精髓。
好了,我们的需求很快的并且很好的得到了满足,不过先不要那么高兴,还有一个很重要的问题我们没有解决,那就是怎么转移权限。
我们设置了item级别的权限,大家可以设想一下,要是在这个权限系统中,唯一的一个拥有修改权限的人离职了,其他人全部都是只读权限,天啦,我们公司因为一个人的离开损失多大啊。作为开发人员,我们必须在系统设立之初就解决掉这样的灾难性的问题。下面我提供了一个解决方案,来批量的转移我们的权限
using System.Web;
using System.Web.Services;
using System.Web.Services.Protocols;
using Microsoft.SharePoint;
[WebService(Namespace = "http://tempuri.org/")]
[WebServiceBinding(ConformsTo = WsiProfiles.BasicProfile1_1)]
public class Service : System.Web.Services.WebService
{
public Service () {
//Uncomment the following line if using designed components
//InitializeComponent();
}
[WebMethod]
public string ItemPermission(string SitePath, string LibName, string OldUser, string NewUser, string email, string name)
{
string ReturnVal = "";
try
{
SPSite WebApp = new SPSite(SitePath);
SPWeb Site = WebApp.OpenWeb();
SPList list = Site.Lists[LibName];
SPQuery newSPQuery = new SPQuery();
newSPQuery.Query = "<Where><Eq><FieldRef Name=\"Author\"/><Value Type=\"User\">" + OldUser + "</Value></Eq></Where>";
SPListItemCollection listItemCol = list.GetItems(newSPQuery);
if (listItemCol.Count > 0)
{
foreach (SPListItem item in listItemCol)
{
SPRoleDefinition RoleDefinition = Site.RoleDefinitions.GetByType(SPRoleType.Contributor);
SPRoleAssignment RoleAssignment = new SPRoleAssignment(NewUser, email, name, "notes");
RoleAssignment.RoleDefinitionBindings.Add(RoleDefinition);
if (!item.HasUniqueRoleAssignments)
{
item.BreakRoleInheritance(true);
}
item.RoleAssignments.Add(RoleAssignment);
item.Update();
}
}
}
catch (Exception ex)
{
ReturnVal += "Permission not set, reason: " + ex.Message;
}
return ReturnVal;
}
}
如何使用?
下面展示一个控制台程序,讲述如何使用这个webservice
替换下面的字符串
<sitepath> with the Full URL of the site
<libname> with the list/library name
<domain> with the domain name
<olduser> with the userid who left the company
<newuser> with the userid to whom you want to give permission
<email of new user> self explaning
<name of new user> self explaning
If "<domain>\\<olduser>" does not work try to use the old user’s full name such as “John Smith”.
=====================================================
using System;
using System.Collections.Generic;
using System.Text;
namespace ConsoleApplication1
{
class Program
{
//localhost.Service newService;
static void Main(string[] args)
{
localhost.Service newService = new localhost.Service();
newService.UseDefaultCredentials = true; //I am assuming an administrator/power user is running this app or use a specific credential here
string output = newService.ItemPermission("<sitepath>", "<libname>", "<domain>\\<olduser>", "<domain>\\<newuser>", "<email of new user>", "<name of new user>");
Console.WriteLine(output);
Console.ReadLine();
}
}
}
注意:本文介绍的所有代码都与用户是紧耦合的,也就是说用户是死定在代码里面的,如果真的要满足现实需求,必须解除这个耦合,MOSS/Sharepoint 控制视图页面访问权限开发的问题(代码法) 这篇文章是一个例子,你可以使用相同的方法,建立一个列表,这样用户的耦合性就被降低了,可以由客户自己定制。
参考资料:http://www.chakkaradeep.com/post/2008/11/26/SharePoint-ndash3b-Setting-Item-level-permission.aspx 借鉴了此博客的图片
http://www.cnblogs.com/anotherdir/articles/1379373.html 权限系统的OverView

