
UnityEditor研究学习之自定义Editor
UnityEditor研究学习之自定义Editor
今天我们来研究下Unity3d中自定义Editor,这个会让物体的脚本在Inspector视窗中,产生不同的视觉效果。
什么意思,举个例子,比如游戏中我有个角色Player,他有攻击力,护甲,装备等属性。
所以我定义一个脚本:MyPlayer.cs:
using UnityEngine;
using System.Collections;

public class MyPlayer : MonoBehaviour
{
    public int armor = 100;
    public int attack = 100;
    public GameObject equipment;
    void Start()
    {

    }
    void Update()
    {

    }
}
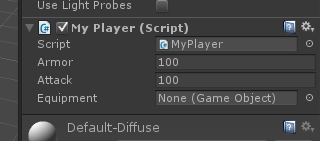
这边我定义了三个变量,分别是护甲、攻击力还有GameObject类型的装备。
将这个脚本赋值给GameObject,可以看到Inspector视窗:
那么,如果我想要修改下护甲,攻击力的显示效果,那么就可以自定义Editor:
using UnityEngine;
using UnityEditor;
using System.Collections;
[CustomEditor(typeof(MyPlayer))]
public class MyPlayerEditor : Editor
{
    public override void OnInspectorGUI()
    {
        var target = (MyPlayer)(serializedObject.targetObject);
        target.attack = EditorGUILayout.IntSlider("攻击力",target.attack,0,100);
        ProgressBar(target.attack, "攻击力");

        target.equipment =
        EditorGUILayout.ObjectField("装备",target.equipment,typeof(GameObject));
    }
    private void ProgressBar(float value, string label)
    {
        Rect rect = GUILayoutUtility.GetRect(18, 18, "TextField");
        EditorGUI.ProgressBar(rect, value, label);
        EditorGUILayout.Space();
    }
}
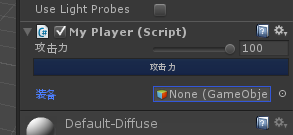
是不是一下子就好看了不少,操作性也变强了。这个就是编辑器的魅力所在。
还有一种写法就是,通过SerializedObject的SerializedProperty
我个人不是很推荐,因为更加复杂,但是效果跟上面第一种完全一样:
using UnityEngine;
using UnityEditor;
using System.Collections;
[CustomEditor(typeof(MyPlayer))]
public class MyPlayerEditor2 : Editor
{
    SerializedProperty attack;
    void OnEnable()
    {
        attack = serializedObject.FindProperty("attack");
    }
    public override void OnInspectorGUI()
    {
        serializedObject.Update();
        EditorGUILayout.IntSlider(attack, 0, 100, new GUIContent("攻击力"));
        ProgressBar(attack.intValue/100, "攻击力");
        serializedObject.ApplyModifiedProperties();
    }
    private void ProgressBar(float value, string label)
    {
        Rect rect = GUILayoutUtility.GetRect(18, 18, "TextField");
        EditorGUI.ProgressBar(rect, value, label);
        EditorGUILayout.Space();
    }
}
接下来开始具体学Editor的变量和方法等:
Editor.serializedObject
自定义编辑器所需要序列化的物体。看下官方的描述:
Description
A SerializedObject representing the object or objects being inspected.
The serializedObject can be used inside the OnInspectorGUI function of a custom Editor as described on the page about the Editor class.
The serializedObject should not be used inside OnSceneGUI or OnPreviewGUI. Use the target property directly in those callback functions instead.
就是说serializedObject只能在OnInspectorGUI方法里面使用,其他地方是不行的,还有在OnSceneGUI和OnPreviewGUI使用target来代替serializedObject。
接着来看看Editor有哪些方法:
1.Editor.DrawDefaultInspector
Description
Draw the built-in inspector.
Call this function from inside OnInspectorGUI method to draw the automatic inspector. It is useful you don't want to redo the entire inspector, but you want to add a few buttons to it.
这个方法,我们要在OnInspectorGUI()方法里面调用,用来绘制一些平常的UI,比如滑块,按钮等等。反正只要记住在OnInspectorGUI()方法最后调用这个方法就行。
2.Editor.OnPreviewGUI
Parameters
| r | Rectangle in which to draw the preview. |
| background | Background image. |
Description
Implement to create your own custom preview for the preview area of the inspector, primary editor headers and the object selector.
If you implement OnInteractivePreviewGUI then this will only be called for non-interactive custom previews. The overidden method should use the rectangle passed in and render a preview of the asset into it. The default implementation is a no-op.
Note: Inspector previews are limited to the primary editor of persistent objects (assets), e.g., GameObjectInspector, MaterialEditor, TextureInspector. This means that it is currently not possible for a component to have its own inspector preview.
这个方法是创建我们自己的物体的Preview窗口的表现。我们接下来做个试验看下这个Preview窗口长啥样子。
首先,我们先创建一个窗口,然后在窗口中传入我们需要想看的物体。
using UnityEngine;
using System.Collections;
using UnityEditor;
public class MyPreviewWindow : EditorWindow
{
    static EditorWindow myWindow;
    GameObject gameObject;
    Editor gameObjectEditor;
    [MenuItem("Window/MyPreviewWindow")]
    public static void Init()
    {
        myWindow = (MyPreviewWindow)EditorWindow.GetWindow(typeof(MyPreviewWindow), false, "MyPreviewWindow", false);
        myWindow.Show();
    }
    void OnGUI()
    {
        gameObject = (GameObject)EditorGUILayout.ObjectField(gameObject, typeof(GameObject), true);
        if (gameObject != null)
        {
            if (gameObjectEditor == null)
            {
                gameObjectEditor = Editor.CreateEditor(gameObject);
            }
            gameObjectEditor.OnPreviewGUI(GUILayoutUtility.GetRect(500, 500), EditorStyles.whiteLabel);
        }
    }
}
这里我直接拖入一个Cube,然后观察下,下面的Preview窗口:
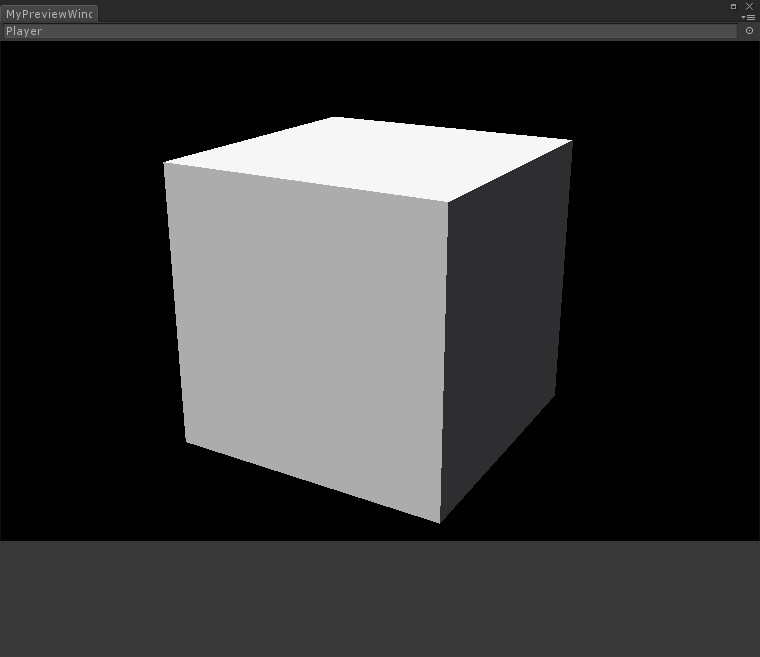
可以从下面的Preview窗口中看到Cube的模样。
所以我们想要观察一个物体,可以先为他创建他本身的Editor,然后直接修改他的OnPreviewGUI()方法就可以
了。
3.Editor.DrawPreview
Parameters
| previewPosition | The available area to draw the preview. |
Description
The first entry point for Preview Drawing.
Draws a grid of previews if there are multiple targets available. Override this method if you want to customize this behaviour.
这个方法是绘制Preview视图,我们可以重写这个方法来完成当我们调用这个方法的时候会有不同的显示效果。
using UnityEngine;
using System.Collections;
using UnityEditor;
public class MyPreviewWindow : EditorWindow
{
    static EditorWindow myWindow;
    GameObject gameObject;
    Editor gameObjectEditor;
    [MenuItem("Window/MyPreviewWindow")]
    public static void Init()
    {
        myWindow = (MyPreviewWindow)EditorWindow.GetWindow(typeof(MyPreviewWindow), false, "MyPreviewWindow", false);
        myWindow.Show();
    }
    void OnGUI()
    {
        gameObject = (GameObject)EditorGUILayout.ObjectField(gameObject, typeof(GameObject), true);
        if (gameObject != null)
        {
            if (gameObjectEditor == null)
            {
                gameObjectEditor = Editor.CreateEditor(gameObject);
            }
            gameObjectEditor.OnPreviewGUI(GUILayoutUtility.GetRect(500, 500), EditorStyles.whiteLabel);
            gameObjectEditor.DrawPreview(GUILayoutUtility.GetRect(500, 500));
        }
    }
}
我们在原先的代码中添加
gameObjectEditor.DrawPreview(GUILayoutUtility.GetRect(500, 500));
来看下会有啥不同的变化:

可以看到有两个Cube,但是他们的背景不同,主要是我们没有重写DrawPreview()。

