
Python学习【第十二篇】模块(2)
序列化
1.什么是python序列化?
把变量从内存中变成可存储或传输的过程称之为序列化,在Python中叫pickling
序列化就是将python的数据类型转换成字符串
反序列化就是将字符串转换成python的数据类型
2.Python中用于序列化的两个模块
- json 用于【字符串】和 【python基本数据类型】 间进行转换
- pickle 用于【python特有的类型】 和 【python基本数据类型】间进行转换
Json模块提供了四个功能:dumps、dump、loads、load
pickle模块提供了四个功能:dumps、dump、loads、load
一、Json
1.dumps:
将python的基本数据类型转换成字符串:
import json

dic = {'k1':'v1'}
print(dic,type(dic))

result = json.dumps(dic)
print(result,type(result))

# 输出
{'k1': 'v1'} <class 'dict'>
{"k1": "v1"} <class 'str'>
2.loads:
将字符串形式转换成python的基础数据类型:
import json

s1 = '{"k1":123}'
dic = json.loads(s1)
print(dic,type(dic))

# 输出
{'k1': 123} <class 'dict'>
#注意: 字符串形状(格式)必须与python的基本数据类型保持一致
# 在其他语言中’ ’ 引起来的是字符, '" "引起来的是字符串
li = '["sheldon","jerry"]'
ret = json.loads(li)

# 通过loads去反序列化时,一定要记住,字符串一定要用" "
li = "['sheldon','jerry']"  # 这样是错误的


import requests
import json

response = requests.get('http://wthrcdn.etouch.cn/weather_mini?city=上海')
response.encoding = 'utf-8'
print(response.text,type(response.text))

dic = json.loads(response.text)
print(dic,type(dic))
3.dump:
通过dump就可以将python基本数据类型序列化,并且写道文件里
li = [11,22,33]
json.dump(li,open('db','w',encoding='utf-8'))
4.load:
load会打开文件,将文件内容加载到内存,然后再进行反序列化,转换成python基本数据类型
li = json.load(open('db','r'))
print(type(li),li)

# 输出
<class 'list'> [11, 22, 33]
二、Pickle
Json 与 Pickle相比Json更通用,而Pickle只适用于Python
json只能序列化最基本的数据类型,而pickle可以序列化所有的数据类型,包括类,函数都可以序列化。
1.dumps:
import pickle

li = [11,22,33]
# 将列表序列化成pickle的特殊格式
r = pickle.dumps(li)
print(r)

# 输出
b'\x80\x03]q\x00(K\x0bK\x16K!e.'
2.loads:
result = pickle.loads(r)
print(result)

# 输出
[11, 22, 33]
3.dump:
li = [11, 22, 33]
# 通过dump将python基本数据类型序列化成pickle的特殊格式,并且写道文件里
pickle.dump(li, open('db', 'wb'))
4.load:
# load会打开文件,将文件内容加载到内存,然后再进行反序列化,转换成python基本数据类型
result = pickle.load(open('db','rb'))
print(result,type(result))

# 输出
[11, 22, 33] <class 'list'>
shelve模块
shelve类似于一个key-value数据库,可以很方便的用来保存Python的内存对象,其内部使用pickle来序列化数据,简单来说,使用者可以将一个列表、字典、或者用户自定义的类实例保存到shelve中,下次需要用的时候直接取出来,就是一个Python内存对象,不需要像传统数据库一样,先取出数据,然后用这些数据重新构造一遍所需要的对象。他只有一个函数就是open(),这个函数接收一个参数就是文件名,然后返回一个shelf对象。
例:我们先通过shelve打开一个文件shelve_test,然后创建三个数据类型(函数,列表,字典):
import shelve

f = shelve.open('shelve_test')

def stu_data(name,age):
    print("register stu",name,age)

name = ["rex","jerry","sheldon"]
info = {"name":"rex","age":33}

f["test"] = name
f["info"] = info
f["func"] = stu_data
然后再另外一个程序里,再打开这shelve_test文件,通过上面定义的三个key将值读取出来:
import shelve


def stu_data(name,age):
    print("stu",name,age)

f = shelve.open("shelve_test")

print(f["test"])
print(f["info"])
print(f["func"]("test",33))

# 输出
['rex', 'jerry', 'sheldon']
{'name': 'rex', 'age': 33}
stu test 33
None
configparser模块
configparser用于处理特定格式的文件,其本质上是利用open来操作文件。
[section1] # 节点
k1 = 100   # 值
k2:v2      # 值

[section2] # 节点
k1 = v1    # 值
1.获取所有节点:
import configparser

# 固定模式创建机器
config = configparser.ConfigParser()
config.read("xxoo",encoding='utf-8')

ret = config.sections()
print(ret)

# 输出
['section1', 'section2']
2.获取指定节点下所有的键值对:
key_val = config.items('section1')
print(key_val)

# 输出
[('k1', '100'), ('k2', 'v2')]
3.获取指定节点下所有的建:
key = config.options('section1')
print(key)

# 输出
['k1', 'k2']
4.获取指定节点下指定key的值:
# 获取指定节点下指定key的值
v1 = config.get('section1', 'k1')
print(v1)

# 获取节点的类型都是字符串类型,通过getint参数将k1转成int类型,前提是k1可以转成int类型
v2 = config.getint('section1','k1')
print(type(v2),v2)

# v = config.getint('section1', 'k1')
# v = config.getfloat('section1', 'k1')
# v = config.getboolean('section1', 'k1')

# 输出
100
100
5.检查、删除、添加节点(增删改查节点都是在内存中)
# 检查
has_sec = config.has_section("section1")
print(has_sec)

# 添加节点
config.add_section("section3")
# 将内存中修改的内容更新到文件
config.write(open('xxoo','w'))

# 删除节点
# 删除节点的同时会删除节点下的内容
config.remove_section('section1')
# 将内存中修改的内容更新到文件
config.write(open('xxoo','w'))
6.检查、删除、设置指定组内的键值对
# 检查
has_opt = config.has_option('section1','k1')
print(has_opt)

# 删除
config.remove_option('section1','k1')
config.write(open('xxoo','w'))

# 设置
config.set('section3','k10',"123")
config.write(open('xxoo','w'))
XML模块
什么是xml?
XML 指可扩展标记语言(eXtensible Markup Language),标准通用标记语言的子集,是一种用于标记电子文件使其具有结构性的标记语言。
XML 被设计用来传输和存储数据。
XML是一套定义语义标记的规则,这些标记将文档分成许多部件并对这些部件加以标识。
它也是元标记语言,即定义了用于定义其他与特定领域有关的、语义的、结构化的标记语言的句法语言。
XML文件格式如下:
<data>
    <country name="Liechtenstein">
        <rank updated="yes">2</rank>
        <year>2023</year>
        <gdppc>141100</gdppc>
        <neighbor direction="E" name="Austria" />
        <neighbor direction="W" name="Switzerland" />
    </country>
    <country name="Singapore">
        <rank updated="yes">5</rank>
        <year>2026</year>
        <gdppc>59900</gdppc>
        <neighbor direction="N" name="Malaysia" />
    </country>
    <country name="Panama">
        <rank updated="yes">69</rank>
        <year>2026</year>
        <gdppc>13600</gdppc>
        <neighbor direction="W" name="Costa Rica" />
        <neighbor direction="E" name="Colombia" />
    </country>
</data>
1.解析xml
利用ElementTree.XML将字符串解析成xml对象:
from xml.etree import ElementTree as ET


# 打开文件,读取XML内容
str_xml = open('xo.xml', 'r').read()

# 将字符串解析成xml特殊对象,root代指xml文件的根节点
root = ET.XML(str_xml)
利用ElementTree.parse将文件直接解析成xml对象:
from xml.etree import ElementTree as ET

# 直接解析xml文件
tree = ET.parse("xo.xml")

# 获取xml文件的根节点
root = tree.getroot()
2.操作XML
XML格式类型是节点嵌套节点,对于每一个节点均有以下功能,以便对当前节点进行操作:
class Element:
    """An XML element.

    This class is the reference implementation of the Element interface.

    An element's length is its number of subelements.  That means if you
    want to check if an element is truly empty, you should check BOTH
    its length AND its text attribute.

    The element tag, attribute names, and attribute values can be either
    bytes or strings.

    *tag* is the element name.  *attrib* is an optional dictionary containing
    element attributes. *extra* are additional element attributes given as
    keyword arguments.

    Example form:
        <tag attrib>text<child/>...</tag>tail

    """

    当前节点的标签名
    tag = None
    """The element's name."""

    当前节点的属性

    attrib = None
    """Dictionary of the element's attributes."""

    当前节点的内容
    text = None
    """
    Text before first subelement. This is either a string or the value None.
    Note that if there is no text, this attribute may be either
    None or the empty string, depending on the parser.

    """

    tail = None
    """
    Text after this element's end tag, but before the next sibling element's
    start tag.  This is either a string or the value None.  Note that if there
    was no text, this attribute may be either None or an empty string,
    depending on the parser.

    """

    def __init__(self, tag, attrib={}, **extra):
        if not isinstance(attrib, dict):
            raise TypeError("attrib must be dict, not %s" % (
                attrib.__class__.__name__,))
        attrib = attrib.copy()
        attrib.update(extra)
        self.tag = tag
        self.attrib = attrib
        self._children = []

    def __repr__(self):
        return "<%s %r at %#x>" % (self.__class__.__name__, self.tag, id(self))

    def makeelement(self, tag, attrib):
        创建一个新节点
        """Create a new element with the same type.

        *tag* is a string containing the element name.
        *attrib* is a dictionary containing the element attributes.

        Do not call this method, use the SubElement factory function instead.

        """
        return self.__class__(tag, attrib)

    def copy(self):
        """Return copy of current element.

        This creates a shallow copy. Subelements will be shared with the
        original tree.

        """
        elem = self.makeelement(self.tag, self.attrib)
        elem.text = self.text
        elem.tail = self.tail
        elem[:] = self
        return elem

    def __len__(self):
        return len(self._children)

    def __bool__(self):
        warnings.warn(
            "The behavior of this method will change in future versions.  "
            "Use specific 'len(elem)' or 'elem is not None' test instead.",
            FutureWarning, stacklevel=2
            )
        return len(self._children) != 0 # emulate old behaviour, for now

    def __getitem__(self, index):
        return self._children[index]

    def __setitem__(self, index, element):
        # if isinstance(index, slice):
        #     for elt in element:
        #         assert iselement(elt)
        # else:
        #     assert iselement(element)
        self._children[index] = element

    def __delitem__(self, index):
        del self._children[index]

    def append(self, subelement):
        为当前节点追加一个子节点
        """Add *subelement* to the end of this element.

        The new element will appear in document order after the last existing
        subelement (or directly after the text, if it's the first subelement),
        but before the end tag for this element.

        """
        self._assert_is_element(subelement)
        self._children.append(subelement)

    def extend(self, elements):
        为当前节点扩展 n 个子节点
        """Append subelements from a sequence.

        *elements* is a sequence with zero or more elements.

        """
        for element in elements:
            self._assert_is_element(element)
        self._children.extend(elements)

    def insert(self, index, subelement):
        在当前节点的子节点中插入某个节点,即:为当前节点创建子节点,然后插入指定位置
        """Insert *subelement* at position *index*."""
        self._assert_is_element(subelement)
        self._children.insert(index, subelement)

    def _assert_is_element(self, e):
        # Need to refer to the actual Python implementation, not the
        # shadowing C implementation.
        if not isinstance(e, _Element_Py):
            raise TypeError('expected an Element, not %s' % type(e).__name__)

    def remove(self, subelement):
        在当前节点在子节点中删除某个节点
        """Remove matching subelement.

        Unlike the find methods, this method compares elements based on
        identity, NOT ON tag value or contents.  To remove subelements by
        other means, the easiest way is to use a list comprehension to
        select what elements to keep, and then use slice assignment to update
        the parent element.

        ValueError is raised if a matching element could not be found.

        """
        # assert iselement(element)
        self._children.remove(subelement)

    def getchildren(self):
        获取所有的子节点(废弃)
        """(Deprecated) Return all subelements.

        Elements are returned in document order.

        """
        warnings.warn(
            "This method will be removed in future versions.  "
            "Use 'list(elem)' or iteration over elem instead.",
            DeprecationWarning, stacklevel=2
            )
        return self._children

    def find(self, path, namespaces=None):
        获取第一个寻找到的子节点
        """Find first matching element by tag name or path.

        *path* is a string having either an element tag or an XPath,
        *namespaces* is an optional mapping from namespace prefix to full name.

        Return the first matching element, or None if no element was found.

        """
        return ElementPath.find(self, path, namespaces)

    def findtext(self, path, default=None, namespaces=None):
        获取第一个寻找到的子节点的内容
        """Find text for first matching element by tag name or path.

        *path* is a string having either an element tag or an XPath,
        *default* is the value to return if the element was not found,
        *namespaces* is an optional mapping from namespace prefix to full name.

        Return text content of first matching element, or default value if
        none was found.  Note that if an element is found having no text
        content, the empty string is returned.

        """
        return ElementPath.findtext(self, path, default, namespaces)

    def findall(self, path, namespaces=None):
        获取所有的子节点
        """Find all matching subelements by tag name or path.

        *path* is a string having either an element tag or an XPath,
        *namespaces* is an optional mapping from namespace prefix to full name.

        Returns list containing all matching elements in document order.

        """
        return ElementPath.findall(self, path, namespaces)

    def iterfind(self, path, namespaces=None):
        获取所有指定的节点,并创建一个迭代器(可以被for循环)
        """Find all matching subelements by tag name or path.

        *path* is a string having either an element tag or an XPath,
        *namespaces* is an optional mapping from namespace prefix to full name.

        Return an iterable yielding all matching elements in document order.

        """
        return ElementPath.iterfind(self, path, namespaces)

    def clear(self):
        清空节点
        """Reset element.

        This function removes all subelements, clears all attributes, and sets
        the text and tail attributes to None.

        """
        self.attrib.clear()
        self._children = []
        self.text = self.tail = None

    def get(self, key, default=None):
        获取当前节点的属性值
        """Get element attribute.

        Equivalent to attrib.get, but some implementations may handle this a
        bit more efficiently.  *key* is what attribute to look for, and
        *default* is what to return if the attribute was not found.

        Returns a string containing the attribute value, or the default if
        attribute was not found.

        """
        return self.attrib.get(key, default)

    def set(self, key, value):
        为当前节点设置属性值
        """Set element attribute.

        Equivalent to attrib[key] = value, but some implementations may handle
        this a bit more efficiently.  *key* is what attribute to set, and
        *value* is the attribute value to set it to.

        """
        self.attrib[key] = value

    def keys(self):
        获取当前节点的所有属性的 key

        """Get list of attribute names.

        Names are returned in an arbitrary order, just like an ordinary
        Python dict.  Equivalent to attrib.keys()

        """
        return self.attrib.keys()

    def items(self):
        获取当前节点的所有属性值,每个属性都是一个键值对
        """Get element attributes as a sequence.

        The attributes are returned in arbitrary order.  Equivalent to
        attrib.items().

        Return a list of (name, value) tuples.

        """
        return self.attrib.items()

    def iter(self, tag=None):
        在当前节点的子孙中根据节点名称寻找所有指定的节点,并返回一个迭代器(可以被for循环)。
        """Create tree iterator.

        The iterator loops over the element and all subelements in document
        order, returning all elements with a matching tag.

        If the tree structure is modified during iteration, new or removed
        elements may or may not be included.  To get a stable set, use the
        list() function on the iterator, and loop over the resulting list.

        *tag* is what tags to look for (default is to return all elements)

        Return an iterator containing all the matching elements.

        """
        if tag == "*":
            tag = None
        if tag is None or self.tag == tag:
            yield self
        for e in self._children:
            yield from e.iter(tag)

    # compatibility
    def getiterator(self, tag=None):
        # Change for a DeprecationWarning in 1.4
        warnings.warn(
            "This method will be removed in future versions.  "
            "Use 'elem.iter()' or 'list(elem.iter())' instead.",
            PendingDeprecationWarning, stacklevel=2
        )
        return list(self.iter(tag))

    def itertext(self):
        在当前节点的子孙中根据节点名称寻找所有指定的节点的内容,并返回一个迭代器(可以被for循环)。
        """Create text iterator.

        The iterator loops over the element and all subelements in document
        order, returning all inner text.

        """
        tag = self.tag
        if not isinstance(tag, str) and tag is not None:
            return
        if self.text:
            yield self.text
        for e in self:
            yield from e.itertext()
            if e.tail:
                yield e.tail
由于每个节点 都具有以上的方法,并且在上一步骤中解析时均得到了root(xml文件的根节点),所以可以利用以上方法进行操作xml文件。
a.遍历XML文档的所有内容
from xml.etree import ElementTree as ET

############ 解析方式一 ############
"""
# 打开文件,读取XML内容
str_xml = open('xo.xml', 'r').read()

# 将字符串解析成xml特殊对象,root代指xml文件的根节点
root = ET.XML(str_xml)
"""
############ 解析方式二 ############

# 直接解析xml文件
tree = ET.parse("xo.xml")

# 获取xml文件的根节点
root = tree.getroot()


### 操作

# 顶层标签
print(root.tag)


# 遍历XML文档的第二层
for child in root:
    # 第二层节点的标签名称和标签属性
    print(child.tag, child.attrib)
    # 遍历XML文档的第三层
    for i in child:
        # 第二层节点的标签名称和内容
        print(i.tag,i.text)
b.遍历XML中指定的节点
from xml.etree import ElementTree as ET

############ 解析方式一 ############
"""
# 打开文件,读取XML内容
str_xml = open('xo.xml', 'r').read()

# 将字符串解析成xml特殊对象,root代指xml文件的根节点
root = ET.XML(str_xml)
"""
############ 解析方式二 ############

# 直接解析xml文件
tree = ET.parse("xo.xml")

# 获取xml文件的根节点
root = tree.getroot()


### 操作

# 顶层标签
print(root.tag)


# 遍历XML中所有的year节点
for node in root.iter('year'):
    # 节点的标签名称和内容
    print(node.tag, node.text)
c.修改节点内容
由于修改的节点时,均是在内存中进行,其不会影响文件中的内容。所以,如果需要修改,则需要重新将内存中的内容写到文件。
解析字符串方式,修改,保存:
from xml.etree import ElementTree as ET

############ 解析方式一 ############

# 打开文件,读取XML内容
str_xml = open('xo.xml', 'r').read()

# 将字符串解析成xml特殊对象,root代指xml文件的根节点
root = ET.XML(str_xml)

############ 操作 ############

# 顶层标签
print(root.tag)

# 循环所有的year节点
for node in root.iter('year'):
    # 将year节点中的内容自增一
    new_year = int(node.text) + 1
    node.text = str(new_year)

    # 设置属性
    node.set('name', 'alex')
    node.set('age', '18')
    # 删除属性
    del node.attrib['name']


############ 保存文件 ############
tree = ET.ElementTree(root)
tree.write("newnew.xml", encoding='utf-8')
解析文件方式,修改,保存:
from xml.etree import ElementTree as ET

############ 解析方式二 ############

# 直接解析xml文件
tree = ET.parse("xo.xml")

# 获取xml文件的根节点
root = tree.getroot()

############ 操作 ############

# 顶层标签
print(root.tag)

# 循环所有的year节点
for node in root.iter('year'):
    # 将year节点中的内容自增一
    new_year = int(node.text) + 1
    node.text = str(new_year)

    # 设置属性
    node.set('name', 'alex')
    node.set('age', '18')
    # 删除属性
    del node.attrib['name']


############ 保存文件 ############
tree.write("newnew.xml", encoding='utf-8')
d.删除节点
解析字符串方式打开,删除,保存:
from xml.etree import ElementTree as ET

############ 解析字符串方式打开 ############

# 打开文件,读取XML内容
str_xml = open('xo.xml', 'r').read()

# 将字符串解析成xml特殊对象,root代指xml文件的根节点
root = ET.XML(str_xml)

############ 操作 ############

# 顶层标签
print(root.tag)

# 遍历data下的所有country节点
for country in root.findall('country'):
    # 获取每一个country节点下rank节点的内容
    rank = int(country.find('rank').text)

    if rank > 50:
        # 删除指定country节点
        root.remove(country)

############ 保存文件 ############
tree = ET.ElementTree(root)
tree.write("newnew.xml", encoding='utf-8')
解析文件方式打开,删除,保存:
from xml.etree import ElementTree as ET

############ 解析文件方式 ############

# 直接解析xml文件
tree = ET.parse("xo.xml")

# 获取xml文件的根节点
root = tree.getroot()

############ 操作 ############

# 顶层标签
print(root.tag)

# 遍历data下的所有country节点
for country in root.findall('country'):
    # 获取每一个country节点下rank节点的内容
    rank = int(country.find('rank').text)

    if rank > 50:
        # 删除指定country节点
        root.remove(country)

############ 保存文件 ############
tree.write("newnew.xml", encoding='utf-8')
3.创建XML文档
from xml.etree import ElementTree as ET


# 创建根节点
root = ET.Element("famliy")


# 创建节点大儿子
son1 = ET.Element('son', {'name': '儿1'})
# 创建小儿子
son2 = ET.Element('son', {"name": '儿2'})

# 在大儿子中创建两个孙子
grandson1 = ET.Element('grandson', {'name': '儿11'})
grandson2 = ET.Element('grandson', {'name': '儿12'})
son1.append(grandson1)
son1.append(grandson2)


# 把儿子添加到根节点中
root.append(son1)
root.append(son1)

tree = ET.ElementTree(root)
tree.write('oooo.xml',encoding='utf-8', short_empty_elements=False)
from xml.etree import ElementTree as ET

# 创建根节点
root = ET.Element("famliy")


# 创建大儿子
# son1 = ET.Element('son', {'name': '儿1'})
son1 = root.makeelement('son', {'name': '儿1'})
# 创建小儿子
# son2 = ET.Element('son', {"name": '儿2'})
son2 = root.makeelement('son', {"name": '儿2'})

# 在大儿子中创建两个孙子
# grandson1 = ET.Element('grandson', {'name': '儿11'})
grandson1 = son1.makeelement('grandson', {'name': '儿11'})
# grandson2 = ET.Element('grandson', {'name': '儿12'})
grandson2 = son1.makeelement('grandson', {'name': '儿12'})

son1.append(grandson1)
son1.append(grandson2)


# 把儿子添加到根节点中
root.append(son1)
root.append(son1)

tree = ET.ElementTree(root)
tree.write('oooo.xml',encoding='utf-8', short_empty_elements=False)
from xml.etree import ElementTree as ET


# 创建根节点
root = ET.Element("famliy")


# 创建节点大儿子
son1 = ET.SubElement(root, "son", attrib={'name': '儿1'})
# 创建小儿子
son2 = ET.SubElement(root, "son", attrib={"name": "儿2"})

# 在大儿子中创建一个孙子
grandson1 = ET.SubElement(son1, "age", attrib={'name': '儿11'})
grandson1.text = '孙子'


et = ET.ElementTree(root)  #生成文档对象
et.write("test.xml", encoding="utf-8", xml_declaration=True, short_empty_elements=False)
由于原生保存的XML时默认无缩进,如果想要设置缩进的话,则需要修改保存方式:
from xml.etree import ElementTree as ET
from xml.dom import minidom


def prettify(elem):
    """将节点转换成字符串,并添加缩进。
    """
    rough_string = ET.tostring(elem, 'utf-8')
    reparsed = minidom.parseString(rough_string)
    return reparsed.toprettyxml(indent="\t")

# 创建根节点
root = ET.Element("famliy")


# 创建大儿子
# son1 = ET.Element('son', {'name': '儿1'})
son1 = root.makeelement('son', {'name': '儿1'})
# 创建小儿子
# son2 = ET.Element('son', {"name": '儿2'})
son2 = root.makeelement('son', {"name": '儿2'})

# 在大儿子中创建两个孙子
# grandson1 = ET.Element('grandson', {'name': '儿11'})
grandson1 = son1.makeelement('grandson', {'name': '儿11'})
# grandson2 = ET.Element('grandson', {'name': '儿12'})
grandson2 = son1.makeelement('grandson', {'name': '儿12'})

son1.append(grandson1)
son1.append(grandson2)


# 把儿子添加到根节点中
root.append(son1)
root.append(son1)


raw_str = prettify(root)

f = open("xxxoo.xml",'w',encoding='utf-8')
f.write(raw_str)
f.close()
4.命名空间
详细介绍,猛击这里
from xml.etree import ElementTree as ET

ET.register_namespace('com',"http://www.company.com") #some name

# build a tree structure
root = ET.Element("{http://www.company.com}STUFF")
body = ET.SubElement(root, "{http://www.company.com}MORE_STUFF", attrib={"{http://www.company.com}hhh": "123"})
body.text = "STUFF EVERYWHERE!"

# wrap it in an ElementTree instance, and save as XML
tree = ET.ElementTree(root)

tree.write("page.xml",
           xml_declaration=True,
           encoding='utf-8',
           method="xml")
Python时间日历模块
Python 程序能用很多方式处理日期和时间,转换日期格式是一个常见的功能。
Python 提供了一个 time 和 calendar 模块可以用于格式化日期和时间。
时间间隔是以秒为单位的浮点小数。
每个时间戳都以自从1970年1月1日午夜(历元)经过了多长时间来表示。
一、Time:
Python 的 time 模块下有很多函数可以转换常见日期格式。
时间相关的操作,时间有三种表示方式:
- 时间戳 1970年1月1日之后的秒,即:time.time()
- 格式化的字符串 2014-11-11 11:11, 即:time.strftime('%Y-%m-%d')
- 结构化时间 元组包含了:年、日、星期等... time.struct_time 即:time.localtime()
如函数time.time()用于获取当前时间戳, 如下实例:
import time

ret = time.time()
print("时间戳",ret)
time.gmtime:
# 将时间戳转换成struct_time格式
print(time.gmtime())

# struct_time元组结构如下:
# tm_year=2016
# tm_mon=12   1 到 12
# tm_mday=28  1 到 31
# tm_hour=8   0 到 23(这里显示的是格林威治标准时间)
# tm_min=8    0 到 59
# tm_sec=54   0 到 61 (60或61 是闰秒)
# tm_wday=2   0到6 (0是周一)
# tm_yday=363 1 到 366(儒略历)
# tm_isdst=0  -1, 0, 1, -1是决定是否为夏令时的旗帜
gmtime显示的是struct_time格式的格林威治标准时间,我们可以使用time.localtime显示struct_time格式的本地时间:
print(time.localtime())

# 输出
time.struct_time(tm_year=2016, tm_mon=12, tm_mday=28, tm_hour=16, tm_min=13, tm_sec=22, tm_wday=2, tm_yday=363, tm_isdst=0)
字符串拼接:
time_obj = time.gmtime()

# 字符串拼接
print("{year}-{month}".format(year=time_obj.tm_year,month=time_obj.tm_mon))

# 输出
2016-12
time.ctime&&time.asctime:
# 返回当前系统时间的字符串格式
print(type(time.ctime()),time.ctime())

# 返回当前系统时间的字符串格式
print(type(time.asctime()),time.asctime())

# 输出
<class 'str'> Wed Dec 28 16:13:22 2016
<class 'str'> Wed Dec 28 16:13:22 2016
两者都是显示当前系统时间的字符串格式,那两者有何不同呢?
def ctime(seconds=None): # known case of time.ctime
    """
    ctime(seconds) -> string

    Convert a time in seconds since the Epoch to a string in local time.
    This is equivalent to asctime(localtime(seconds)). When the time tuple is
    not present, current time as returned by localtime() is used.
    """
    return ""


def asctime(p_tuple=None): # real signature unknown; restored from __doc__
    """
    asctime([tuple]) -> string

    Convert a time tuple to a string, e.g. 'Sat Jun 06 16:26:11 1998'.
    When the time tuple is not present, current time as returned by localtime()
    is used.
    """
    return ""
简单来说ctime()是将时间戳转换成字符串,而asctime()是将时间元组转换成字符串
# 返回当前时间戳的字符串格式
print(time.ctime(time.time()-3600))

# 输出
Wed Dec 28 15:49:48 2016
mktime
time_obj = time.gmtime()

# 将struct_time转成时间戳
print(time.mktime(time_obj))
strftime
# 将struct_time格式转换成指定的字符串格式
tm_1 = time.strftime("%Y-%m-%d %H:%M",time.localtime())
print(tm_1)

# 输出
2017-01-05 15:11

--------------------------------------------------

# 将字符串格式转换成struct_time格式
tm_2 = time.strptime("2016-12-25 15:30" , "%Y-%m-%d %H:%M")
print(tm_2)

# 输出
time.struct_time(tm_year=2017, tm_mon=1, tm_mday=5, tm_hour=15, tm_min=11, tm_sec=0, tm_wday=3, tm_yday=5, tm_isdst=-1)
%y 两位数的年份表示(00-99)
%Y 四位数的年份表示(000-9999)
%m 月份(01-12)
%d 月内中的一天(0-31)
%H 24小时制小时数(0-23)
%I 12小时制小时数(01-12)
%M 分钟数(00=59)
%S 秒(00-59)
%a 本地简化星期名称
%A 本地完整星期名称
%b 本地简化的月份名称
%B 本地完整的月份名称
%c 本地相应的日期表示和时间表示
%j 年内的一天(001-366)
%p 本地A.M.或P.M.的等价符
%U 一年中的星期数(00-53)星期天为星期的开始
%w 星期(0-6),星期天为星期的开始
%W 一年中的星期数(00-53)星期一为星期的开始
%x 本地相应的日期表示
%X 本地相应的时间表示
%Z 当前时区的名称
%% %号本身
二、日历(Calendar)模块
此模块的函数都是日历相关的,例如打印某月的字符月历。
import calendar

month = calendar.month(2016,12)
print(month)

# 输出
December 2016
Mo Tu We Th Fr Sa Su
          1  2  3  4
 5  6  7  8  9 10 11
12 13 14 15 16 17 18
19 20 21 22 23 24 25
26 27 28 29 30 31
星期一是默认的每周第一天,星期天是默认的最后一天。更改设置需调用calendar.setfirstweekday()函数。模块包含了以下内置函数:
1    calendar.calendar(year,w=2,l=1,c=6)
返回一个多行字符串格式的year年年历,3个月一行,间隔距离为c。 每日宽度间隔为w字符。每行长度为21* W+18+2* C。l是每星期行数。
2    calendar.firstweekday( )
返回当前每周起始日期的设置。默认情况下,首次载入caendar模块时返回0,即星期一。
3    calendar.isleap(year)
是闰年返回True,否则为false。
4    calendar.leapdays(y1,y2)
返回在Y1,Y2两年之间的闰年总数。
5    calendar.month(year,month,w=2,l=1)
返回一个多行字符串格式的year年month月日历,两行标题,一周一行。每日宽度间隔为w字符。每行的长度为7* w+6。l是每星期的行数。
6    calendar.monthcalendar(year,month)
返回一个整数的单层嵌套列表。每个子列表装载代表一个星期的整数。Year年month月外的日期都设为0;范围内的日子都由该月第几日表示,从1开始。
7    calendar.monthrange(year,month)
返回两个整数。第一个是该月的星期几的日期码,第二个是该月的日期码。日从0(星期一)到6(星期日);月从1到12。
8    calendar.prcal(year,w=2,l=1,c=6)
相当于 print calendar.calendar(year,w,l,c).
9    calendar.prmonth(year,month,w=2,l=1)
相当于 print calendar.calendar(year,w,l,c)。
10    calendar.setfirstweekday(weekday)
设置每周的起始日期码。0(星期一)到6(星期日)。
11    calendar.timegm(tupletime)
和time.gmtime相反:接受一个时间元组形式,返回该时刻的时间辍(1970纪元后经过的浮点秒数)。
12    calendar.weekday(year,month,day)
返回给定日期的日期码。0(星期一)到6(星期日)。月份为 1(一月) 到 12(12月)。
三、datetime
#时间加减
import datetime

# print(datetime.datetime.now()) #返回 2016-08-19 12:47:03.941925
# print(datetime.date.fromtimestamp(time.time()) )  # 时间戳直接转成日期格式
# print(datetime.datetime.now() )
# print(datetime.datetime.now() + datetime.timedelta(3)) #当前时间+3天
# print(datetime.datetime.now() + datetime.timedelta(-3)) #当前时间-3天
# print(datetime.datetime.now() + datetime.timedelta(hours=3)) #当前时间+3小时
# print(datetime.datetime.now() + datetime.timedelta(minutes=30)) #当前时间+30分


# c_time  = datetime.datetime.now()
# print(c_time.replace(minute=3,hour=2)) #时间替换
日志处理(logging)模块
很多程序都有记录日志的需求,并且日志中包含的信息即有正常的程序访问日志,还有错误、警告等信息输出。
python的logging模块提供了标准的日志接口,你可以通过它存储各种格式的日志。
日志级别:
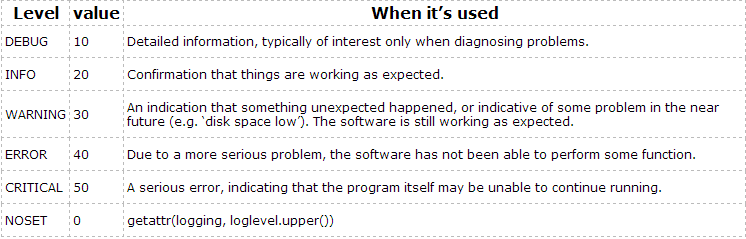
下面我们看一下怎么用(最简单的用法):
import logging

logging.debug('This is debug message')
logging.info('This is info message')
logging.warning('This is warning message')
logging.error('This is error message')
logging.critical('This is critical message')

# 输出
WARNING:root:This is warning message
ERROR:root:This is error message
CRITICAL:root:This is critical message
默认情况下,logging将日志打印到屏幕,日志级别为WARNING。
如果想把日志写进文件也很简单:
import logging

logging.basicConfig(filename="access.log",level=logging.INFO)
logging.debug('This is debug message')
logging.info('This is info message')
logging.warning('This is warning message')
logging.error('This is error message')
logging.critical('This is critical message')
其中下面这句中的level=loggin.INFO意思是,把日志纪录级别设置为INFO,也就是说,只有比日志是INFO或比INFO级别更高的日志才会被纪录到文件里,在这个例子, 第一条日志是不会被纪录的,如果希望纪录debug的日志,那把日志级别改成DEBUG就行了。
logging.basicConfig(filename="access.log",level=logging.DEBUG)
感觉上面的日志格式忘记加上时间啦,日志不知道时间怎么行呢,下面就来加上!
import logging

logging.basicConfig(filename="access.log",level=logging.DEBUG,
                    format='%(asctime)s %(message)s', datefmt='%m/%d/%Y %I:%M:%S %p')
logging.debug('This is debug message')
logging.info('This is info message')
logging.warning('This is warning message')
logging.error('This is error message')
logging.critical('This is critical message')
日志格式:

让我们来尝试一下如何打印它的时间,文件名,行数,日志等级以及信息:
import logging

logging.basicConfig(filename="access.log",level=logging.DEBUG,
                    format='%(asctime)s %(filename)s:%(lineno)d %(levelname)s: %(message)s',
                    datefmt='%m/%d/%Y %I:%M:%S %p')
logging.debug('This is debug message')
logging.info('This is info message')
logging.warning('This is warning message')
logging.error('This is error message')
logging.critical('This is critical message')
Logging模块的构成:
- Loggers:提供应用程序直接使用的接口
- Handlers:将Loggers产生的日志传到指定位置
- Filters:对输出日志进行过滤
- Formatters:控制输出格式
import logging

# create logger
logger = logging.getLogger('TEST-LOG')  # 首先获取日志用户
logger.setLevel(logging.DEBUG)  # 设置全局的日志等级

# create console handler and set level to debug
ch = logging.StreamHandler()  # 将日志输出到屏幕
ch.setLevel(logging.DEBUG)  # 设置屏幕输出日志的等级

# create file handler and set level to warning
fh = logging.FileHandler("access.log")  # 输出到文件
fh.setLevel(logging.WARNING)  # 输出到文件的日志等级

# create formatter
formatter = logging.Formatter('%(asctime)s - %(name)s - %(levelname)s - %(message)s')

# add formatter to ch and fh
ch.setFormatter(formatter)  # 设置屏幕的输出格式
fh.setFormatter(formatter)  # 设置文件的输出格式

# add ch and fh to logger
logger.addHandler(ch)  # 把日志打印到指定的位置
logger.addHandler(fh)

# 'application' code
logger.debug('debug message')
logger.info('info message')
logger.warning('warn message')
logger.error('error message')
logger.critical('critical message')

 浙公网安备 33010602011771号