
Linux上安装二进制文件MySQL详解
前言:昨天晚上搞了很久,终于搞清楚mysql的安装配置了,我真是太low了。当我在云服务器上登进Mysql时,真是高兴哈哈,咱一步一步来,彻底搞懂Mysql的安装配置。
我的安装环境: 阿里云服务器
[root@iz2zeezp920l8adg8sf0pz ~]# cat /etc/redhat-release
CentOS Linux release 7.3.1611 (Core)
[root@iz2zeezp920l8adg8sf0pz ~]#
一、下载二进制包
访问官网,无论学习啥工具,官方文档是最有学习价值的。现在用谷哥翻译英文网页成中文,也基本能看懂的。

因为商用版本需要付费的,所以我下载的是MySQL社区版(免费)。点击之后出现下图,再点击MySQL社区下载,下载MySQL服务器。
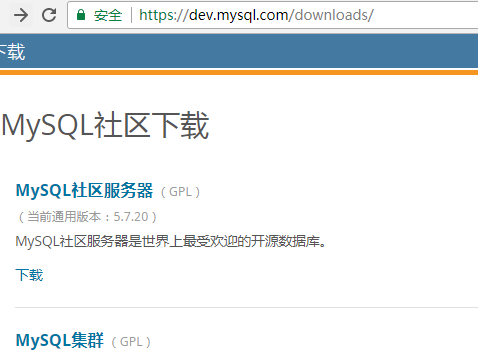
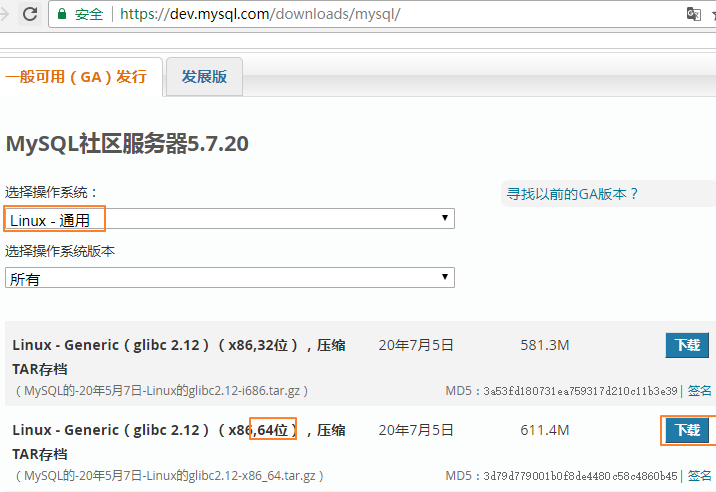
MySQL社区版是世界上最流行的开源数据库的免费下载版本,由开源开发人员和爱好者的活跃社区支持。上方的Development Releases(发展版)意思是正在开发测试中的版本,就不要下载了。下载已经发布的版本。操作系统我是云服务器,所以下载的的Linux-Generic(Linux-通用)版本。

我的服务器版本是64位的,点击下载:
二、上传安装包至服务器
下载成功后,进入/usr/local/目录,将安装包上传至云服务器:
[root@iz2zeezp920l8adg80sf0pz local]# rz
rz waiting to receive.
 zmodem trl+C ȡ

  100%  626100 KB  465 KB/s 00:22:24       0 Errorsbc2.12-x86_64.tar.gz...

[root@iz2zeezp920l8adg80sf0pz local]# ls
mysql-5.7.20-linux-glibc2.12-x86_64.tar.gz
[root@iz2zeezp920l8adg80sf0pz local]#
借助securtCRT(我是用CRT,你也可以用xshell),使用linux命令sz可以很方便的将服务器上的文件下载到本地,使用rz命令则是把本地文件上传到服务器
其中,对于sz和rz的理解与记忆我用了如下的方法(因为很多时候容易搞混):
- sz中的s意为send(发送),告诉客户端,我(服务器)要发送文件 send to cilent,就等同于客户端在下载。
- rz中的r意为received(接收),告诉客户端,我(服务器)要接收文件 received by cilent,就等同于客户端在上传。
注意:sz和rz命令需要服务器支持,如果提示没有个命令:则需要先安装rzsz。如下:
[root@iz2zeezp920l8adg80sf0pz tools]# yum install lrzsz -y
Loaded plugins: fastestmirror
Loading mirror speeds from cached hostfile
Resolving Dependencies
--> Running transaction check
---> Package lrzsz.x86_64 0:0.12.20-36.el7 will be installed
--> Finished Dependency Resolution
三、查看官方文档
官方文档: https://dev.mysql.com/doc/refman/5.7/en/binary-installation.html
-
MySQL has a dependency on the
libaiolibrary. Data directory initialization and subsequent server startup steps will fail if this library is not installed locally. If necessary, install it using the appropriate package manager. For example, on Yum-based systems:shell> yum search libaio # search for info shell> yum install libaio # install library
Or, on APT-based systems:
shell> apt-cache search libaio # search for info
shell> apt-get install libaio1 # install library
-
For MySQL 5.7.19 and later: Support for Non-Uniform Memory Access (NUMA) has been added to the generic Linux build, which has a dependency now on the
libnumalibrary; if the library has not been installed on your system, use you system's package manager to search for and install it (see the last bullet for some sample commands).
To install a compressed tar file binary distribution, unpack it at the installation location you choose (typically /usr/local/mysql). This creates the directories shown in the following table.
Table 2.3 MySQL Installation Layout for Generic Unix/Linux Binary Package
| Directory | Contents of Directory |
|---|---|
bin |
mysqld server, client and utility programs |
docs |
MySQL manual in Info format |
man |
Unix manual pages |
include |
Include (header) files |
lib |
Libraries |
share |
Error messages, dictionary, and SQL for database installation |
support-files |
Miscellaneous support files |
-
MySQL依赖于
libaio库。如果此库未在本地安装,则数据目录初始化和后续服务器启动步骤将失败。如有必要,请使用相应的软件包管理器进行安装。例如,基于Yum的系统:shell> yum search libaio # search for info shell> yum install libaio # install library
或者,在基于APT的系统上:
shell> apt-cache search libaio # search for info
shell> apt-get install libaio1 # install library
-
对于MySQL 5.7.19及更高版本:支持非均匀内存访问(NUMA)已被添加到通用Linux构建中,该构建现在依赖于
libnuma库; 如果您的系统上没有安装库,请使用系统的软件包管理器来搜索并安装它(有关示例命令,请参阅最后一个项目符号)。
要安装压缩的tar文件二进制版本,请在您选择的安装位置(通常/usr/local/mysql)将其解压缩。这将创建下表中显示的目录。
表2.3通用Unix / Linux二进制包的MySQL安装布局
| 目录 | 目录内容 |
|---|---|
bin |
mysqld服务器,客户端和实用程序 |
docs |
信息格式的MySQL手册 |
man |
Unix手册页 |
include |
包含(标题)文件 |
lib |
图书馆 |
share |
用于数据库安装的错误消息,字典和SQL |
support-files |
其他支持文件 |
由于我下载的是最新版的mysql,根据官方文档,我需要先安装libaio。那就安装呗,反正很简单,官网也写得很清楚。
四、解压前配置
先看官方文档是怎样说的:
要安装和使用MySQL二进制分发,命令序列如下所示:
shell> groupadd mysql
shell> useradd -r -g mysql -s /bin/false mysql
shell> cd /usr/local
shell> tar zxvf /path/to/mysql-VERSION-OS.tar.gz
shell> ln -s full-path-to-mysql-VERSION-OS mysql
shell> cd mysql
shell> mkdir mysql-files
shell> chown mysql:mysql mysql-files
shell> chmod 750 mysql-files
shell> bin/mysqld --initialize --user=mysql
shell> bin/mysql_ssl_rsa_setup
shell> bin/mysqld_safe --user=mysql &
# Next command is optional
shell> cp support-files/mysql.server /etc/init.d/mysql.server
This procedure assumes that you have
root(administrator) access to your system.(此过程假定您具有root访问您的系统) Alternatively, you can prefix each command using the sudo (Linux) or pfexec (Solaris) command.
The mysql-files directory provides a convenient location to use as the value for the secure_file_priv system variable, which limits import and export operations to a specific directory.(将导入和导出操作限制到特定目录) See Section 5.1.5, “Server System Variables”.
上面的知识点挺多的,如果你已经有安装经验,那对你很有用。对于我这种小白来说,并不是很友好,就算命令执行了,那命令执行的具体操作,又是否明白呢?接下来一步一步说明
五、步骤详解
shell> groupadd mysql
shell> useradd -r -g mysql -s /bin/false mysql
-r和-s /bin/false选项来创建一个不具有对服务器主机的登录权限的用户。如果您的useradd不支持这些选项,请忽略这些选项。1、接下来,创建一个到tar创建的安装目录的符号链接:
[root@iz2zeezp920l8adg80sf0pz local]# tar zxvf mysql-5.7.20-linux-glibc2.12-x86_64.tar.gz
[root@iz2zeezp920l8adg80sf0pz local]# ln -s mysql-5.7.20-linux-glibc2.12-x86_64 mysql
该ln命令创建一个到安装目录的符号链接。这使您能够更容易地将其引用为/usr/local/mysql。为避免在使用MySQL时始终键入客户端程序的路径名,您可以将该/usr/local/mysql/bin 目录添加到PATH变量中(当然,当你重新登入系统时,发现PATH变量的更改又变为原来的!! 如何永久更改PATH变量呢?后面再讲):
shell> export PATH=$PATH:/usr/local/mysql/bin
2、在mysql目录下创建mysql-files目录:
[root@iz2zeezp920l8adg80sf0pz local]# cd mysql
[root@iz2zeezp920l8adg80sf0pz mysql]# mkdir mysql-files  # 默认是没有这个文件夹的,用来放数据,当然网上很多人是用data目录,我这里为了保持与官网一致,用mysql-files
[root@iz2zeezp920l8adg80sf0pz mysql]# chown mysql:mysql mysql-files
[root@iz2zeezp920l8adg80sf0pz mysql]# chmod 750 mysql-files  # 添加权限
[root@iz2zeezp920l8adg80sf0pz mysql]# ll | grep "mysql-files"
drwxr-x---  5 mysql mysql  4096 Oct 30 00:24 mysql-files
[root@iz2zeezp920l8adg80sf0pz mysql]#
3、初始化:
[root@iz2zeezp920l8adg80sf0pz mysql]# bin/mysqld --initialize --user=mysql --basedir=/usr/local/mysql --datadir=/usr/local/mysql/mysql-files
2017-10-29T16:05:31.856327Z 0 [Warning] TIMESTAMP with implicit DEFAULT value is deprecated. Please use --explicit_defaults_for_timestamp server option (see documentation for more details).
2017-10-29T16:05:33.906980Z 0 [Warning] InnoDB: New log files created, LSN=45790
2017-10-29T16:05:34.133920Z 0 [Warning] InnoDB: Creating foreign key constraint system tables.
2017-10-29T16:05:34.249408Z 0 [Warning] No existing UUID has been found, so we assume that this is the first time that this server has been started. Generating a new UUID: fecb2929-bcc2-11e7-b26d-00163e062422.
2017-10-29T16:05:34.251580Z 0 [Warning] Gtid table is not ready to be used. Table 'mysql.gtid_executed' cannot be opened.
2017-10-29T16:05:34.252052Z 1 [Note] A temporary password is generated for root@localhost: y#cee=T_v6B9
[root@iz2zeezp920l8adg80sf0pz mysql]#
此处需要注意记录生成的临时密码,之后登陆数据库会用到,如上文:y#cee=T_v6B9
4、修改系统配置文件
将support-files文件夹下的my-default.cnf,mysql.server复制到/etc和/etc/init.d下(最新版已经没有my-default.cnf文件,可以自己按格式建立一个)
[root@iz2zeezp920l8adg80sf0pz mysql]# cd support-files/
[root@iz2zeezp920l8adg80sf0pz support-files]# ls
magic           mysqld_multi.server  mysql.server
my-default.cnf  mysql-log-rotate
这个是时候我们自己创建一个(内部代码如图): 重点下面两个socket(红色)对应的值必须一致,不然启动以后链接不上(参考自:http://www.cnblogs.com/fengyun1853/p/7441791.html)
#dvice on how to change settings please see
# http://dev.mysql.com/doc/refman/5.7/en/server-configuration-defaults.html
# *** DO NOT EDIT THIS FILE. It's a template which will be copied to the
# *** default location during install, and will be replaced if you
# *** upgrade to a newer version of MySQL.

[mysqld]

sql_mode=NO_ENGINE_SUBSTITUTION,STRICT_TRANS_TABLES

# 一般配置选项
basedir = /usr/local/mysql
datadir = /usr/local/mysql/mysql-files
port = 3306
#socket = /temp/mysqld.sock
socket = /var/run/mysqld/mysqld.sock
character-set-server=utf8


#下面是可选项,要不要都行,如果出现启动错误,则全部注释掉,保留最基本的配置选项,然后尝试添加某些配置项后启动,检测配置项是否有误
back_log = 300
max_connections = 3000
max_connect_errors = 50
table_open_cache = 4096
max_allowed_packet = 32M
#binlog_cache_size = 4M

max_heap_table_size = 128M
read_rnd_buffer_size = 16M
sort_buffer_size = 16M
join_buffer_size = 16M
thread_cache_size = 16
query_cache_size = 128M
query_cache_limit = 4M
ft_min_word_len = 8

thread_stack = 512K
transaction_isolation = REPEATABLE-READ
tmp_table_size = 128M
#log-bin=mysql-bin
long_query_time = 6


server_id=1

innodb_buffer_pool_size = 1G
innodb_thread_concurrency = 16
innodb_log_buffer_size = 16M


innodb_log_file_size = 512M
innodb_log_files_in_group = 3
innodb_max_dirty_pages_pct = 90
innodb_lock_wait_timeout = 120
innodb_file_per_table = on

[mysqldump]
quick

max_allowed_packet = 32M

[mysql]
no-auto-rehash
socket = /var/run/mysqld/mysqld.sock
default-character-set=utf8
safe-updates


[myisamchk]
key_buffer = 16M
sort_buffer_size = 16M
read_buffer = 8M
write_buffer = 8M

[mysqlhotcopy]
interactive-timeout

[mysqld_safe]
open-files-limit = 8192

[client]
loose-default-character-set = utf8
查看安装路径与数据路径:
[root@iz2zeezp920l8adg80sf0pz support-files]# cat my-default.cnf | grep "basedir"
basedir = /usr/local/mysql
[root@iz2zeezp920l8adg80sf0pz support-files]# cat my-default.cnf | grep "datadir"
datadir = /usr/local/mysql/mysql-files
[root@iz2zeezp920l8adg80sf0pz support-files]# cp my-default.cnf /etc/my.cnf
[root@iz2zeezp920l8adg80sf0pz support-files]#
[root@iz2zeezp920l8adg80sf0pz support-files]# cp mysql.server /etc/init.d/mysql
5、修改配置文件:
[root@iz2zeezp920l8adg80sf0pz support-files]# vim /etc/init.d/mysql
basedir='/usr/local/mysql'
datadir='/usr/local/mysql/mysql-files'
注意必须得加引号!!不然会出错的。
6、启动服务:
[root@iz2zeezp920l8adg80sf0pz support-files]# ../bin/mysqld_safe --user=mysql &
[1] 29215
[root@iz2zeezp920l8adg80sf0pz support-files]# Logging to '/usr/local/mysql/mysql-files/iz2zeezp920l8adg80sf0pz.err'.
2017-10-29T16:15:45.012169Z mysqld_safe Directory '/var/run/mysqld' for UNIX socket file don't exists.

[1]+  Exit 1                  ../bin/mysqld_safe --user=mysql
[root@iz2zeezp920l8adg80sf0pz support-files]#
出现错误了,'/var/run/mysqld' for UNIX socket file don't exists.
这是因为我在my-default.cnf写了以下配置:
socket = /var/run/mysqld/mysqld.sock
而/var/run/目录下根本没有mysqld目录,解决方法如下:
[root@iz2zeezp920l8adg80sf0pz run]# ls
atd.pid     crond.pid    lock       ntpd.pid   setrans      tuned
auditd.pid  cron.reboot  log        plymouth   sshd.pid     udev
blkid       dbus         mount      ppp        syslogd.pid  user
cloud-init  faillock     netreport  qga.state  systemd      utmp
console     initramfs    nscd       sepermit   tmpfiles.d
[root@iz2zeezp920l8adg80sf0pz run]#
[root@iz2zeezp920l8adg80sf0pz ~]# mkdir -p /var/run/mysqld
[root@iz2zeezp920l8adg80sf0pz ~]# chown mysql:mysql /var/run/mysqld
再次启动服务:
[root@iz2zeezp920l8adg80sf0pz mysql]# bin/mysqld_safe --user=mysql &
[1] 29710
[root@iz2zeezp920l8adg80sf0pz mysql]# Logging to '/usr/local/mysql/mysql-files/iz2zeezp920l8adg80sf0pz.err'.
2017-10-29T16:23:39.587364Z mysqld_safe Starting mysqld daemon with databases from /usr/local/mysql/mysql-files

[root@iz2zeezp920l8adg80sf0pz mysql]#
[root@iz2zeezp920l8adg80sf0pz mysql]# netstat -ntlp
Active Internet connections (only servers)
Proto Recv-Q Send-Q Local Address           Foreign Address         State       PID/Program name
tcp        0      0 0.0.0.0:22              0.0.0.0:*               LISTEN      2096/sshd
tcp6       0      0 :::3306                 :::*                    LISTEN      30188/mysqld
[root@iz2zeezp920l8adg80sf0pz mysql]#
MySQL数据库默认端口为3306,可以看到mysqld服务已启动了。
到mysql-files目录下,可以看到生成了一些数据文件
[root@iz2zeezp920l8adg80sf0pz mysql-files]# ls
auto.cnf        ib_logfile1                  iz2zeezp920l8adg80sf0pz.pid
ib_buffer_pool  ib_logfile2                  mysql
ibdata1         ibtmp1                       performance_schema
ib_logfile0     iz2zeezp920l8adg80sf0pz.err  sys
[root@iz2zeezp920l8adg80sf0pz mysql-files]#
7、登陆数据库,登陆密码是之前生成的临时密码:
[root@iz2zeezp920l8adg80sf0pz bin]# mysql -uroot -p
-bash: mysql: command not found
[root@iz2zeezp920l8adg80sf0pz bin]# ./mysql -uroot -p
Enter password:
Welcome to the MySQL monitor.  Commands end with ; or \g.
Your MySQL connection id is 3
Server version: 5.7.20

Copyright (c) 2000, 2017, Oracle and/or its affiliates. All rights reserved.

Oracle is a registered trademark of Oracle Corporation and/or its
affiliates. Other names may be trademarks of their respective
owners.

Type 'help;' or '\h' for help. Type '\c' to clear the current input statement.

mysql> show databases;
ERROR 1820 (HY000): You must reset your password using ALTER USER statement before executing this statement.
我本来想show databases查看数据库的,发现无法查看。看到必须先改密码才能执行操作。
mysql> set password=password('aa1274828542')
    -> ;
Query OK, 0 rows affected, 1 warning (0.00 sec)

mysql> show databases;
mysql> set password=password('xxxx')    # xxxx设定的新密码
    -> ;
Query OK, 0 rows affected, 1 warning (0.00 sec)
mysql> show databases;
+--------------------+
| Database |
+--------------------+
| information_schema |
| mysql |
| performance_schema |
| sys |
+--------------------+
六、直接登陆数据库
现在你已经可以登际MySQL了,想必你肯定是和我一样高兴。执行以下命令,发现无法登陆,原因是无法找到mysql指令。
[root@iz2zeezp920l8adg80sf0pz ~]# mysql -uroot -p
-bash: mysql: command not found
[root@iz2zeezp920l8adg80sf0pz ~]#
这很正常,因为mysql命令的文件是在/usr/local/mysql/bin目录下。
[root@iz2zeezp920l8adg80sf0pz ~]# ls /usr/local/mysql/bin | grep "mysql"
mysql
而系统的环境变量如下,根本无法找到mysql这个命令:
[root@iz2zeezp920l8adg80sf0pz ~]# echo $PATH
/usr/local/sbin:/usr/local/bin:/usr/sbin:/usr/bin:/root/bin
[root@iz2zeezp920l8adg80sf0pz ~]#
要想直接执行mysql -uroot -p,然后输入密码就能登陆,这就得修改.bashrc文件:
加上 export PATH=$PATH:/usr/local/mysql/bin 当然,你得确保/usr/local/mysql/bin目录有mysql。
[root@iz2zeezp920l8adg80sf0pz ~]# vim ~/.bashrc

# .bashrc

###edit by chengliang at 2017/10/30###
# export PATH for user root can logging mysql-server quickly.
# after chage this file,you should source it.

export PATH=$PATH:/usr/local/mysql/bin

[root@iz2zeezp920l8adg80sf0pz ~]# source ~/.bashrc
[root@iz2zeezp920l8adg80sf0pz ~]# mysql
ERROR 1045 (28000): Access denied for user 'root'@'localhost' (using password: NO)
[root@iz2zeezp920l8adg80sf0pz ~]# mysql -uroot -p
Enter password:
Welcome to the MySQL monitor.  Commands end with ; or \g.
生效方法:(有以下两种)
- 关闭当前终端窗口,重新打开一个新终端窗口就能生效
- 输入“source ~/.bashrc”命令,立即生效
有效期限:永久有效
用户局限:仅对当前用户
参考博客: linux查看和修改PATH环境变量的方法
七、stop/start/restart
[root@iz2zeezp920l8adg80sf0pz ~]# /etc/init.d/mysql stop   # 停止数据库服务
Shutting down MySQL..                                      [  OK  ]
[root@iz2zeezp920l8adg80sf0pz ~]#
[root@iz2zeezp920l8adg80sf0pz ~]# /etc/init.d/mysql start  # 开启数据库服务
Starting MySQL.                                            [  OK  ]
[root@iz2zeezp920l8adg80sf0pz ~]#
[root@iz2zeezp920l8adg80sf0pz ~]# /etc/init.d/mysql restart  # 重启数据库
Shutting down MySQL..                                      [  OK  ]
Starting MySQL.                                            [  OK  ]
[root@iz2zeezp920l8adg80sf0pz ~]#
虽然知道上了首页会被撤,但我还是要发首页
段子:


出处:http://www.cnblogs.com/0zcl
文章未标明转载则为原创博客。欢迎转载,但未经作者同意必须保留此段声明,且在文章页面明显位置给出原文连接,否则保留追究法律责任的权利.
1.非系统的学习也是在浪费时间
2.做一个会欣赏美,懂艺术,会艺术的技术人

 浙公网安备 33010602011771号