
《XNA高级编程:Xbox 360和Windows》2-3(2)
2.3开始编写Pong
处理用户输入
正如您在第一章所看到的,在XNA中捕捉用户的键盘和Gamepad输入是非常简单的,单单为它写一个单元测试有点夸张了。您已经知道它是如何工作的,而且也只是想测试一下控制球拍的运动,所以没有必要写一个新的单元测试,完全可以使用前面的TestGameSprites,或许可以把它重新命名为TestSingleplayerGame。单元测试的内容还是一样的,您只需在PongGame的Update方法中修改对输入的处理并更新球拍的位置:
 // Get current gamepad and keyboard statesgamePad = GamePad.GetState(PlayerIndex.One);gamePad2 = GamePad.GetState(PlayerIndex.Two);keyboard = Keyboard.GetState();gamePadUp = gamePad.DPad.Up == ButtonState.Pressed || gamePad.ThumbSticks.Left.Y > 0.5f;gamePadDown = gamePad.DPad.Down == ButtonState.Pressed || gamePad.ThumbSticks.Left.Y < -0.5f;gamePad2Up = gamePad2.DPad.Up == ButtonState.Pressed || gamePad2.ThumbSticks.Left.Y > 0.5f;gamePad2Down = gamePad2.DPad.Down == ButtonState.Pressed || gamePad2.ThumbSticks.Left.Y < -0.5f;// Move half way across the screen each secondfloat moveFactorPerSecond = 0.5f * (float)gameTime.ElapsedRealTime.TotalMilliseconds / 1000.0f;// Move up and down if we press the cursor or gamepad keys.if (gamePadUp || keyboard.IsKeyDown(Keys.Up)) rightPaddlePosition -= moveFactorPerSecond;if (gamePadDown || keyboard.IsKeyDown(Keys.Down)) rightPaddlePosition += moveFactorPerSecond;// Second player is either controlled by player 2 or by the computerif (multiplayer)
 {
{

 // Move up and down if we press the cursor or gamepad keys. if (gamePad2Up || keyboard.IsKeyDown(Keys.W)) leftPaddlePosition -= moveFactorPerSecond; if (gamePad2Down || keyboard.IsKeyDown(Keys.S) || keyboard.IsKeyDown(Keys.O)) leftPaddlePosition += moveFactorPerSecond;
 } // ifelse{ // Just let the computer follow the ball position float computerChange = ComputerPaddleSpeed * moveFactorPerSecond; if (leftPaddlePosition > ballPosition.Y + computerChange) leftPaddlePosition -= computerChange; else if (leftPaddlePosition < ballPosition.Y - computerChange) leftPaddlePosition += computerChange;} // else// Make sure paddles stay between 0 and 1if (leftPaddlePosition < 0) leftPaddlePosition = 0;if (leftPaddlePosition > 1) leftPaddlePosition = 1;if (rightPaddlePosition < 0) rightPaddlePosition = 0;if (rightPaddlePosition > 1) rightPaddlePosition = 1;
您可能注意到这里又有些新的变量(multiplayer、gamePad、 gamePad2、keyboard和 ComputerPaddleSpeed),但目前要关心的是改变球拍位置的代码。变量moveFactorPerSecond用来确保球和球拍总是以相同的速度运动,而不管帧的渲染速度是多少,如果是1fps(frame per second),那么moveFactorPerSecond就等于1,如果是10fps,那么它就等于0.1,如果是100fps,那么它就是0.01,以此类推。
接下来,当“Up”和“Down”键或按钮被按下的时候您要改变右边球拍的位置,而左边的球拍由另一个玩家控制,无论是使用Gampad还是“W”和“S”键。如果是单人游戏模式,那么左边的球拍就由计算机控制,并以ComputerPaddleSpeed=0.5f的速度跟着球运动。开始的时候,球运动比较慢,但每次碰撞都会提升一点速度,您也可以使用球拍的边缘撞击球来加速,这样计算机就接不到球您就赢了。
要让新的Update方法能正常工作,需要添加如下的变量和常量:
/// <summary>/// Ball speed multiplicator, this is how much screen space the ball will/// travel each second./// </summary>const float BallSpeedMultiplicator = 0.5f;/// <summary>/// Computer paddle speed. If the ball moves faster up or down than this,/// the computer paddle can't keep up and finally we will win./// </summary>const float ComputerPaddleSpeed = 0.5f;//25f;/// <summary>/// Game modes/// </summary>enum GameMode{ Menu, Game, GameOver,} // enum GameModeGamePadState gamePad, gamePad2;KeyboardState keyboard;bool gamePadUp = false, gamePadDown = false, gamePad2Up = false, gamePad2Down = false;/// <summary>/// Are we playing a multiplayer game? If this is false, the computer/// controls the left paddle./// </summary>bool multiplayer = false;/// <summary>/// Game mode we are currently in. Very simple game flow./// </summary>GameMode gameMode = GameMode.Menu;/// <summary>/// Currently selected menu item./// </summary>int currentMenuItem = 0;对于当前的测试您只需要使用我前面提到几个变量,但还是要看一下游戏需要的其他变量。变量BallSpeedMultiplicator决定了球的速度,同时也决定了游戏的整体速度。游戏模式枚举GameMode用来处理当前您可能在的所有三种游戏模式,您可能是刚打开游戏处于菜单界面,或者正在游戏中。当您处在游戏中时,如果一个玩家输了,那么模式将被修改成游戏结束(GameOver)状态,并显示获胜的玩家。
下面是处理菜单输入的代码,虽然您现在还不需要,但它是您要处理的最后一部分输入操作:
// Show screen depending on our current screen modeif (gameMode == GameMode.Menu){ // Show menu RenderSprite(menuTexture, 512-XnaPongLogoRect.Width/2, 150, XnaPongLogoRect); RenderSprite(menuTexture, 512-MenuSingleplayerRect.Width/2, 300, MenuSingleplayerRect, currentMenuItem == 0 ? Color.Orange : Color.White); RenderSprite(menuTexture, 512-MenuMultiplayerRect.Width/2, 350, MenuMultiplayerRect, currentMenuItem == 1 ? Color.Orange : Color.White); RenderSprite(menuTexture, 512-MenuExitRect.Width/2, 400, MenuExitRect, currentMenuItem == 2 ? Color.Orange : Color.White); // Note: Usually input should be handled in Update, but I really think // it is better to have to closely together with the UI code here! if ((keyboard.IsKeyDown(Keys.Down) || gamePadDown) && remDownPressed == false) {
{ currentMenuItem = (currentMenuItem + 1)%3; soundBank.PlayCue("PongBallHit");
 } // else if else if ((keyboard.IsKeyDown(Keys.Up) || gamePadUp) && remUpPressed == false) { currentMenuItem = (currentMenuItem + 2)%3; soundBank.PlayCue("PongBallHit"); } // else if else if ((keyboard.IsKeyDown(Keys.Space) || keyboard.IsKeyDown(Keys.LeftControl) || keyboard.IsKeyDown(Keys.RightControl) || keyboard.IsKeyDown(Keys.Enter) || gamePad.Buttons.A == ButtonState.Pressed || gamePad.Buttons.Start == ButtonState.Pressed || // Back or Escape exits our game on Xbox 360 and Windows keyboard.IsKeyDown(Keys.Escape) || gamePad.Buttons.Back == ButtonState.Pressed) && remSpaceOrStartPressed == false && remEscOrBackPressed == false) { // Quit app. if (currentMenuItem == 2 || keyboard.IsKeyDown(Keys.Escape) || gamePad.Buttons.Back == ButtonState.Pressed) { this.Exit(); } // if else { // Start game …handle game, etc….
这里有一些新的变量,像remDownPressed和gamePadUp,用来让输入处理更容易些,更详细的内容可以查看本章的源代码。下一章将详细讨论输入辅助类(Input helper class)的设计,它更加地简化了处理过程。
这些就是您在这个Pong游戏中需要要知道的处理输入的内容,如果您现在执行这个单元测试,您将看到和前一个测试相同的输出界面,只是现在您可以控制球拍了。
碰撞检测
调用下面的单元测试TestSingleplayerGame的方法可以移动球,球的运动方向是随机的(至少有四种随机方向):
/// <summary>/// Start new ball at the beginning of each game and when a ball is lost./// </summary>public void StartNewBall(){ ballPosition = new Vector2(0.5f, 0.5f); Random rnd = new Random((int)DateTime.Now.Ticks); int direction = rnd.Next(4); ballSpeedVector = direction == 0 ? new Vector2(1, 0.8f) : direction == 1 ? new Vector2(1, -0.8f) : direction == 2 ? new Vector2(-1, 0.8f) : new Vector2(-1, -0.8f);} // StartNewBall()在Update方法中使用变量ballSpeedVector来更新球的位置:
// Update ball position and bounce off the bordersballPosition += ballSpeedVector * moveFactorPerSecond * BallSpeedMultiplicator;如果现在使用这个测试运行游戏,球将运动到屏幕的外边,这就是为什么您需要碰撞检测。看一下图2-7所示的构思图,然后添加一些碰撞代码。有时候回过头去看之前设计的构思图,并基于新的想法和知识进行改进是很有必要的,比如这次就是这样。这里有三种碰撞可能会发生:
- 碰撞屏幕边界——屏幕顶部和底部
- 碰撞球拍——把球弹回给对手
- 碰撞球拍后面的屏幕边界——这时玩家会失去一条命,并用StartNewBall方法重新设置球

图2-7
您仍然可以继续使用TestSingleplayerGame来检测冲突,不过创建一些新的测试针对每一个单独的问题来测试会更容易。面对这样的问题,单元测试再一次显示出它的长处。现在您已经有了一个清晰的概念要做什么,只是还不知道要怎么去做,那就写一个单元测试来实现它吧:
public static void TestBallCollisions(){ StartTest( delegate { // Make sure we are in the game and in singleplayer mode testGame.gameMode = GameMode.Game; testGame.multiplayer = false; testGame.Window.Title = "Xna Pong - Press 1-5 to start collision tests"; // Start specific collision scene based on the user input. if (testGame.keyboard.IsKeyDown(Keys.D1)) { // First test, just collide with screen border testGame.ballPosition = new Vector2(0.6f, 0.9f); testGame.ballSpeedVector = new Vector2(1, 1); } // if else if (testGame.keyboard.IsKeyDown(Keys.D2)) { // Second test, straight on collision with right paddle testGame.ballPosition = new Vector2(0.9f, 0.6f); testGame.ballSpeedVector = new Vector2(1, 1); testGame.rightPaddlePosition = 0.7f; } // if else if (testGame.keyboard.IsKeyDown(Keys.D3)) { // Thrid test, straight on collision with left paddle testGame.ballPosition = new Vector2(0.1f, 0.4f); testGame.ballSpeedVector = new Vector2(-1, -0.5f); testGame.leftPaddlePosition = 0.35f; } // if else if (testGame.keyboard.IsKeyDown(Keys.D4)) { // Advanced test to check if we hit the edge of the right paddle testGame.ballPosition = new Vector2(0.9f, 0.4f); testGame.ballSpeedVector = new Vector2(1, -0.5f); testGame.rightPaddlePosition = 0.29f; } // if else if (testGame.keyboard.IsKeyDown(Keys.D5)) { // Advanced test to check if we hit the edge of the right paddle testGame.ballPosition = new Vector2(0.9f, 0.4f); testGame.ballSpeedVector = new Vector2(1, -0.5f); testGame.rightPaddlePosition = 0.42f; } // if // Show lives testGame.ShowLives(); // Ball in center testGame.RenderBall(); // Render both paddles testGame.RenderPaddles(); });} // TestBallCollisions()此处的想法是使用按下1-5数字键来建立自定义碰撞检测场景,比如,如果按下1,球将移动到(0.6, 0.9)这个位置,它靠近屏幕底部中心位置。球的速度向量设置成(1, 1)是为了让球向屏幕边界运动,在这个地方它将像构思图中描述的那样会反弹。如果按下4或5将检测是否撞到了右边球拍的边缘,此处要比其他简单的碰撞检测需要更多的微调。碰撞检测在PongGame的Update方法中进行。
现在您可以开始测试,但很明显如果现在开始的话它还不能正常工作因为您还没有实现任何的碰撞检测。
检测球是否碰撞了屏幕的顶部和底部是最简单的。在您为下一帧更新球的位置之前要在Update方法中添加如下的代码:
// Check top and bottom screen borderif (ballPosition.Y < 0 || ballPosition.Y > 1){ ballSpeedVector.Y = -ballSpeedVector.Y; // Move ball back into screen space if (ballPosition.Y < 0) ballPosition.Y = 0; if (ballPosition.Y > 1) ballPosition.Y = 1;} // if这个地方有一点很重要,那就是颠倒球的速度向量的y值。有时候变量moveFactorPerSecond在下一帧中的值比在当前帧中的值要小一些,这样球就会跑出屏幕范围,您就得在每一帧中颠倒速度向量的y值。要解决这个问题,您就得确保球的位置始终处于屏幕范围内而不跑出去,对于球拍也要做同样的调整。
球拍的碰撞检测会稍微复杂一些。如果您只想检测屏幕顶部和底部的碰撞,您现在就可以按下F5进行测试。要是测试球拍碰撞,就得构建边界盒(bounding box)来执行交叉检测(intersection test),可以使用XNA中的BoundingBox结构。BoundingBox使用Vector3三维向量,用于3D空间,不过在2D的Pong游戏中您可以忽略z坐标值而始终把它设置为0,代码如下:
// Check for collisions with the paddles// Construct bounding boxes to use the intersection helper method.Vector2 ballSize = new Vector2( GameBallRect.Width / 1024.0f, GameBallRect.Height / 768.0f);BoundingBox ballBox = new BoundingBox( new Vector3(ballPosition.X-ballSize.X/2, ballPosition.Y-ballSize.Y/2, 0), new Vector3(ballPosition.X+ballSize.X/2, ballPosition.Y+ballSize.Y/2, 0));Vector2 paddleSize = new Vector2( GameRedPaddleRect.Width / 1024.0f, GameRedPaddleRect.Height / 768.0f);BoundingBox leftPaddleBox = new BoundingBox( new Vector3(-paddleSize.X/2, leftPaddlePosition-paddleSize.Y/2, 0), new Vector3(+paddleSize.X/2, leftPaddlePosition+paddleSize.Y/2, 0));BoundingBox rightPaddleBox = new BoundingBox( new Vector3(1-paddleSize.X/2, rightPaddlePosition-paddleSize.Y/2, 0), new Vector3(1+paddleSize.X/2, rightPaddlePosition+paddleSize.Y/2, 0));// Ball hit left paddle?if (ballBox.Intersects(leftPaddleBox)){ // Bounce of the paddle (always make positive) ballSpeedVector.X = Math.Abs(ballSpeedVector.X); // Increase speed a little ballSpeedVector *= 1.05f; // Did we hit the edges of the paddle? if (ballBox.Intersects(new BoundingBox( new Vector3(leftPaddleBox.Min.X-0.01f, leftPaddleBox.Min.Y-0.01f, 0), new Vector3(leftPaddleBox.Min.X+0.01f, leftPaddleBox.Min.Y+0.01f, 0)))) // Bounce of at a more difficult angle for the other player ballSpeedVector.Y = -2; else if (ballBox.Intersects(new BoundingBox( new Vector3(leftPaddleBox.Min.X-0.01f, leftPaddleBox.Max.Y-0.01f, 0), new Vector3(leftPaddleBox.Min.X+0.01f, leftPaddleBox.Max.Y+0.01f, 0)))) // Bounce of at a more difficult angle for the other player ballSpeedVector.Y = +2; // Move away from the paddle ballPosition.X += moveFactorPerSecond * BallSpeedMultiplicator;} // if边界盒的构建方式有点像RenderBall和RenderPaddles方法中的渲染代码,不过这里的边界检测代码有点复杂,而且当球撞倒球拍边缘时使用了一种快速的很不雅观的方式来加快球速,不过它们让游戏更加有趣了。
处理左边球拍的代码和处理右边球拍的代码是一样的,您只需用右边球拍的变量替换掉所有左边球拍的变量,并把运动方向变成反向。
您要做的最后一件事就是检测球运动到球拍后面的情况,此时玩家会失去一条命。这个代码非常简单,而且您还可以直接处理某个玩家是否已经失去了所有生命,这个时候游戏就结束了,并显示“红方胜”或“蓝方胜”的信息(在Draw方法中处理)。此时如果玩家按下Space或Escape键,将返回主菜单重新开始游戏:
// Ball lost?if (ballPosition.X < -0.065f){ // Play sound soundBank.PlayCue("PongBallLost"); // Reduce number of lives leftPlayerLives--; // Start new ball StartNewBall();} // ifelse if (ballPosition.X > 1.065f){ // Play sound soundBank.PlayCue("PongBallLost"); // Reduce number of lives rightPlayerLives--; // Start new ball StartNewBall();} // if// If either player has no more lives, the other one has won!if (gameMode == GameMode.Game && (leftPlayerLives == 0 || rightPlayerLives == 0)){ gameMode = GameMode.GameOver; StopBall();} // if好了,这就是游戏最难的部分,除了边界盒的碰撞检测稍微有点复杂,其他的都很简单,可以很容易就实现。您还学习了一些单元测试的知识,以及如何更有效率地渲染Sprite。现在您可以按下F5来测试游戏,并对碰撞做些微调。如图2-8所示:
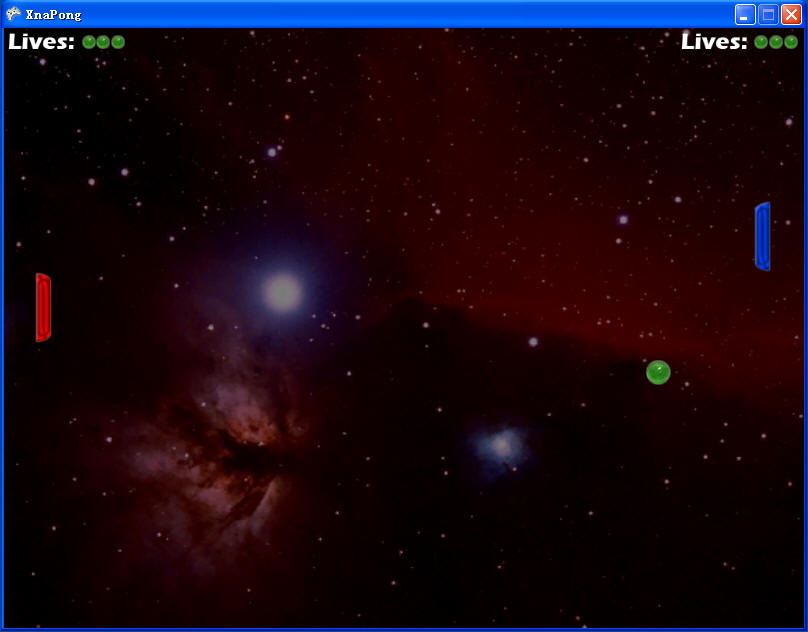
图2-8
添加声音特效
要在您的游戏中添加声音特效,您只要在项目中添加几个.wav文件然后播放它们。在XNA中,不支持加载.wav文件,原因是Xbox 360和Windows平台使用不同的格式来处理声音和音乐。为了解决这个问题,微软发明了一个叫做XACT的工具,它在DirectX SDK和Xbox 360SDK中早就有了。XACT是Microsoft Cross-Platform Audio Creation Tool的缩写,XNA也使用这个工具,并且微软决定让它成为处理声音文件的唯一方式。
虽然从添加特效、做很多调整以及在一个地方管理所有声音文件的角度来说,XACT是一个非常好的工具,但对于这样一个游戏项目来说,它还是把事情稍微复杂化了。本书有一整章用来讲解XACT,可以参考第9章的内容。对于这个Pong游戏,您只需要两个声音文件:
- PongBallHit.wav 每次碰撞边界或球拍的时候都会播放这个文件,也用作更换菜单选项的音效
- PongBallLost.wav 在玩家失去一条命时播放

图2-9
接下来把两个新的Wave Bank项拖放到Sound Bank窗口,然后再拖放到Cues窗口。如果对这个地方有疑问或者出错了,可以参考第9章的相关内容。
下面这些是XACT用来处理声音的主要组件:
- Wave Bank 存储所有的.wav文件,这里除了放.wav文件其他的都不能放。不支持.mp3、.wma或者其他任何格式,导入压缩文件也不可以。Windows的ACPCM和Xbox 360的XMA是可以的,但必须遵循第9章介绍的一些规则;
- Sound Bank 主要用来在cue的帮助下在游戏中播放声音。这里您可以修改声音设置,比如改变音量和定调(pitch),添加分类,配上音效(RPC)等。您还可以定义多声道,不过通常只是设置音量;
- Sound Cues 用来播放声音,一个Sound Cue至少要有一个Sound Bank和它对应,但可以把多个声音文件放到一个cue里,并设置一些规则——是否要随机播放某个声音,是否一次只能播放一个此类的声音,以及声音替换等。这里的cue名称非常重要,它用来在游戏中访问cue并播放声音。

图2-10
播放声音的代码非常简单,只要确保声音能正常播放,音量也合适就可以。下面是用于声音的单元测试:
public static void TestSounds(){ StartTest( delegate { if (testGame.keyboard.IsKeyDown(Keys.Space)) testGame.soundBank.PlayCue("PongBallHit"); if (testGame.keyboard.IsKeyDown(Keys.LeftControl)) testGame.soundBank.PlayCue("PongBallLost"); });} // TestSounds()现在,要实现在游戏中添加声音效果,只要在您想播放声音的地方添加几行代码即可。首先,给菜单操作和球撞击球拍和屏幕边界的时候添加PongBallHit音效(可以查看前面的碰撞检测)。然后,在玩家失去一条命的时候添加PongBallLost音效,如下代码所示:
// Ball lost?if (ballPosition.X < -0.065f){ // Play sound soundBank.PlayCue("PongBallLost"); // Reduce number of lives leftPlayerLives--; // Start new ball StartNewBall();} // ifelse if (ballPosition.X > 1.065f){ // Play sound soundBank.PlayCue("PongBallLost"); // Reduce number of lives rightPlayerLives--; // Start new ball StartNewBall();} // if添加这些代码之后,您可以重新启用单元测试TestSingleplayerGame来检查一下声音能否被正确地播放。对于复杂的游戏需要有一个好的系统在播放声音的时候进行检测,而对于大多数的简单游戏,直接使用PlayCue方法就可以了,它可以在需要的时候直接用来播放声音并保存Cue。您也可以自己创建并管理Sound Cue,这样的好处是您可以停止播放或者重新开始等等。

