
Ubuntu 18.04 git入门
git文档:https://git-scm.com/book/zh/v2
码云国内代码托管:https://gitee.com/help#article-header0 包含git文档
廖雪峰git 文档: https://www.liaoxuefeng.com/wiki/896043488029600/900375748016320
耐得千事烦git文档: https://www.jianshu.com/p/92305d949c0e
「Git」合并多个 Commit: https://www.jianshu.com/p/964de879904a
仓库服务器搭建
安装git
sudo apt-get install git
创建账户git
创建Linux账户git,用来运行git服务,之后的提示,全部按回车就行
sudo adduser git
创建证书登录
收集所有需要登录的用户的公钥,公钥位于id_rsa.pub文件中,把我们的公钥导入到/home/git/.ssh/authorized_keys文件里,一行一个。
如果没有该文件创建它:
cd /home/git/
mkdir .ssh
chmod 755 .ssh
touch .ssh/authorized_keys
chmod 644 .ssh/authorized_keys
这里的路径中的git是账户名的名称,/home/账户名/.ssh/authorized_keys,必须要所属账户下。
初始化git仓库
首先我们选定一个目录作为Git仓库,假定是/home/gitrepo/runoob.git,在/home/gitrepo目录下输入命令:
cd /home
mkdir gitrepo
chown git:git gitrepo/
cd gitrepo

git init --bare runoob.git
Initialized empty Git repository in /home/gitrepo/runoob.git/
以上命令Git创建一个空仓库,服务器上的Git仓库通常都以.git结尾。然后,把仓库所属用户改为git:
chown -R git:git runoob.git
克隆仓库
$ git clone git@192.168.0.106:/home/gitrepo/runoob.git
Cloning into 'runoob'...
warning: You appear to have cloned an empty repository.
Checking connectivity... done.
192.168.0.106 为 Git 所在服务器 ip ,你需要将其修改为你自己的 Git 服务 ip。
此时,会报错
ssh: connect to host 192.168.0.106 port 22: Connection refused
fatal: 无法读取远程仓库。
请确认您有正确的访问权限并且仓库存在。这个问题详见Ubuntu18.04 ssh server配置
此时再去clone
$ git clone git@192.168.0.106:/home/gitrepo/runoob.git
正克隆到 'runoob'...
git@192.168.0.106's password:
remote: 对象计数中: 3, 完成.
remote: Total 3 (delta 0), reused 0 (delta 0)
接收对象中: 100% (3/3), 完成.
如此,我们的git仓库就搭建完毕了。
Git命令入门
Git 仓库的三大区域
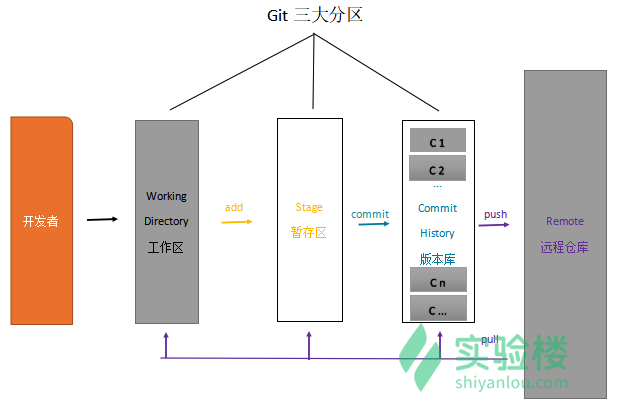
常用命令
git ls-files:命令是用来查看暂存区中文件信息。
git status:查看整个仓库的状态
git add [文件名] :跟踪此新建文件,即把新增文件添加到暂存区,以备提交
git rm --cached [文件名]:会直接从暂存区删除文件,工作区则不做出改变
git checkout ." 或者 "git checkout -- <file>":会用暂存区全部或指定的文件替换工作区的文件
git checkout HEAD . 或者 git checkout HEAD <file>:会用 HEAD 指向的 master 分支中的全部或者部分文件替换暂存区和以及工作区中的文件
git diff:查看工作区被跟踪的文件的修改详情
git commit -m [备注]:把暂存区的修改提交到版本区,生成一个新的版本。
git push:将本地新增的提交推送到 GitHub 远程仓库中
git pull 命令来拉取远程分支到本地,
--soft 表示软退回,对应的还有 --hard 硬退回,HEAD^ 表示撤销一次提交,HEAD^^ 表示撤销两次提交,撤销 n 次可以简写为 HEAD~n
git reset --soft HEAD^ :撤销最近的一次提交,将修改还原到暂存区
git reset --hard commit_id    # 退到/进到 指定commit的sha码 commit_id:xxx
git push 文档:https://www.cnblogs.com/qianqiannian/p/6008140.html
将本地的local_branch分支推送到远程主机origin上的对应remote_branch分支, origin 是远程主机名
git push origin local_branch:remote_branch
查看提交历史记录(可以看到commit_id)
git log [分支名] 查看某分支的提交历史,不写分支名查看当前所在分支
git log --oneline 一行显示提交历史
git log -n 其中 n 是数字,查看最近 n 个提交
git log --author [贡献者名字] 查看指定贡献者的提交记录
git log --graph 图示法显示提交历史
git 撤销,放弃本地修改
原文地址:https://www.cnblogs.com/qufanblog/p/7606105.html
# 未使用 git add 缓存代码
git checkout -- filepathname


# 已经使用git add 缓存代码
git reset HEAD filepathname  # 放弃单个文件修改
git reset HEAD .    # 放弃所有修改

# 已经用 git commit  提交了代码
git reset --hard HEAD^  # 回退到上一次commit的状态
git reset --hard  commitid # 可以用来回退到任意版本
查看某个文件的修改记录
原文:https://blog.csdn.net/sea_snow/article/details/91430247
git log filename # 可以看到fileName相关的commit记录
git log -p filename # 可以显示每次提交的diff
git show c5e69804bbd9725b5dece57f8cbece4a96b9f80b filename # 查看某次提交中的某个文件变化,可以直接加上fileName
Git配置
全局配置个人信息
git config --global user.email 19426@qq.com
git config --global user.name ztf
git config -l: 可以查看配置信息
Git 配置代理服务器
git config --global http.proxy=http://username:password@proxy.com:port
git config --global http.sslverify=false
git config --global http.proxyauthmethod=basic

//http
git config --global https.proxy http://127.0.0.1:1080
//https
git config --global https.proxy https://127.0.0.1:1080
//使用socks5代理的 例如ss,ssr 1080是windows下ss的默认代理端口,mac下不同,或者有自定义的,根据自己的改
git config --global http.proxy socks5://127.0.0.1:1080
git config --global https.proxy socks5://127.0.0.1:1080
//只对github.com使用代理,其他仓库不走代理
git config --global http.https://github.com.proxy socks5://127.0.0.1:1080
git config --global https.https://github.com.proxy socks5://127.0.0.1:1080
//取消github代理
git config --global --unset http.https://github.com.proxy
git config --global --unset https.https://github.com.proxy
//取消全局代理
git config --global --unset http.proxy
git config --global --unset https.proxy
单个项目配置个人信息
作者:Affandi
链接:https://www.jianshu.com/p/bac094fb0222
1.找到项目所在目录下的 .git,进入.git文件夹,然后执行如下命令分别设置用户名和邮箱
git config user.name "Affandi"
git config user.email "123333333@qq.com"
查看config文件,发现里面多了刚才配置的用户名和邮箱信息user,即成功为该项目单独设置了用户名和邮箱
...
[branch "master"]
    remote = origin
    merge = refs/heads/master
[user]
    name = Affandi
    email = 123333333@qq.com
2.如果git pull 每次都要求输入用户名和密码,则可以执行如下配置
git config credential.helper store
执行后, cat config查看,则多了credential的内容:
[user]
    name = Affandi
    email = 123333333@qq.com
[credential]
        helper = store
然后再回到项目目录下执行git pull/push,根据提示输入用户名和密码,输入正确后,以后再执行git pull/push 就不用输入用户名和密码了
修改git commit的author信息: https://blog.csdn.net/mocoe/article/details/84344411
每次都要输入用户名和密码
原文地址:https://blog.csdn.net/yywan1314520/article/details/51566924
方法一:
git config –global push.default simple
git push –set-upstream origin master
方法二:
设置记住密码(默认15分钟):
git config –global credential.helper cache
如果想自己设置时间,可以这样做:
git config credential.helper ‘cache –timeout=3600’
这样就设置一个小时之后失效
长期存储密码:
git config –global credential.helper store
撤销
git config --unset credential.helper  --unset
git reset --soft HEAD^
Git to work with a proxy server
git config --global http.proxy http://proxyuser:proxypwd@proxy.server.com:8080
git config --global --unset http.proxy
git config --global --get http.proxy
使用脚本自动化部署
git rev-parse HEAD # 短的用 --short
Getting the last commit hash from a remote repo without cloning
$ git ls-remote https://github.com/gturri/dokuJClient.git
2fb540fc8c7e9116791638393370a2fa0f079737    HEAD
2fb540fc8c7e9116791638393370a2fa0f079737    refs/heads/master
This command can be run from any directory.
If you only want the last sha1, eg to use it in a script, you could then do:
git ls-remote https://github.com/gturri/dokuJClient.git HEAD | awk '{ print $1}'
定时拉取更新的代码仓库
#!/bin/bash

cd /home/projects/demo

remote_hash=`git ls-remote https://username:password@github.com/demo.git dev/branch
 | awk '{ print $1}'`
local_hash=`git rev-parse HEAD`
if [ "$remote_hash" != "$local_hash" ];then
        echo "remote results are: $remote_hash"
        echo "local results are: $local_hash"
        git pull https://username:password@github.com/demo.git dev/branch
fi
本地合并代码
Step 1. Fetch and check out the branch for this merge request
git fetch origin
git checkout -b "feat/pre_release_voice" "origin/feat/pre_release_voice"
Step 2. Review the changes locally
Step 3. Merge the branch and fix any conflicts that come up
git fetch origin
git checkout "origin/dev-ivr-voice"
git merge --no-ff "feat/pre_release_voice"
Step 4. Push the result of the merge to GitLab
git push origin "dev-ivr-voice"
Tip: You can also checkout merge requests locally by following these guidelines.
Git 分支管理
查看分支
 git branch  # 查看当前分支,当前分支会有 *,并高亮显示
 git branch -r   # 查看远程分支
拉取远程分支到本地
git checkout -b 本地分支名 origin/远程分支名
git fetch origin 远程分支名 : 本地分支名
注:git fetch 只在本地新建分支,不自动切换到该本地分支
切换分支 和 查看当前所在分支
git checkout 分支名称
清单
git fetch :刷新本地分支信息,将远程仓库的分支信息拉取到本地仓库
git branch -av: 查看所有分支信息
git branch:查看当前使用分支(结果列表中前面标*号的表示当前使用分支)
git branch [分支名] :可以创建新的分支:
git checkout [分支名] :切换分支
git push [主机名] --delete [远程分支名]:删除远程分支
git branch -D [分支名] :删除本地分支
git branch -m [原分支名] [新分支名] :给本地分支改名
git push [主机名] [本地分支名]:[远程分支名] 即可将本地分支推送到远程仓库的分支中
git branch --unset-upstream [分支名] 即可撤销该分支对远程分支的跟踪,
git 只想部分更新远程仓库里的文件
原文:https://segmentfault.com/q/1010000016550758
本地修改不提交到远程仓库
git update-index --assume-unchanged 文件名
取消本地忽略
git update-index --no-assume-unchanged 文件名
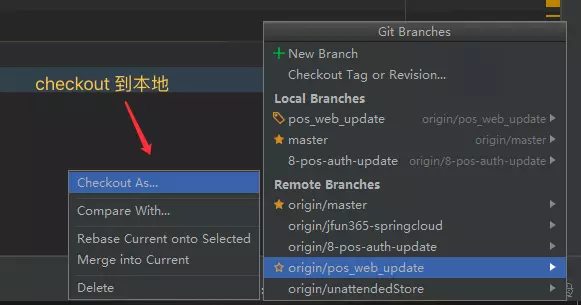
IDEA切换分支
详情请看:https://www.jianshu.com/p/8a5d6a93c0a8
本地没有该分支则Check as, 本地有该分支则check
Git本地分支和远程分支
1.创建分支
git branch develop
2.查看本地分支:
git branch
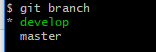
注:名称前面加* 号的是当前的分支
3.查看远程分支:
加上-a参数可以查看远程分支,远程分支会用红色表示出来(如果你开了颜色支持的话)
git branch -a

4.切换分支
git checkout branch_name  # 只切换分支,如果切换到本地不存在的分支可能会失败
git checkout -b branch_name # 创建并切换分支
5.删除本地分支
git branch -d branch_name
6.删除远程分支
git branch -r -d origin/branch-name
git push origin :branch-name
关联本地分支与远程分支
关联的目的是:如果在本地分支下进行pull 和push操作时 ,便不需要指定远程的分支。例如未关联必须像git pull origin feature拉代码,关联以后可以直接git pull会将远程不同分支代码拉取到本地关联的对应分支上。
如果远程新建了一个分支,本地没有该分支。以下命令本地会新建一个分支名叫 branch_name ,会自动跟踪远程的同名分支 branch_name。
git checkout --track origin/branch_name
如果本地新建了一个分支 branch_name,但是在远程没有。以下命令自动在远程创建一个 branch_name 分支,然后本地分支会 track 该分支。
git push --set-upstream origin branch_name
# git branch --set-upstream-to=origin/master(远程分支) master(本地分支)--allow-unrelated-histories
合并分支到master上
首先切换到master分支上
git checkout master
如果是多人开发的话 需要把远程master上的代码pull下来
git pull origin master
然后我们把dev分支的代码合并到master上
git merge dev
然后查看状态
git status
怎么更换git远程仓库地址
原文地址:https://blog.csdn.net/m0_37034294/article/details/79986198
方法一 : 通过命令直接修改远程仓库地址
git remote 查看所有远程仓库
git remote xxx 查看指定远程仓库地址
git remote show origin 查看远程仓库详细信息
git remote set-url origin 你新的远程仓库地址
方法二: 先删除在添加你的远程仓库
git remote rm origin
git remote add origin 你的新远程仓库地址
方法三: 直接修改你本地的.git文件
进入.git文件编辑.git文件中的config文件修改config文件中的url路径为你的新远程仓库地址路径。

Git解决冲突
git mergetool
情景,aa/a.txt中的,bb=1
git status

修改本地的aa/a.txt中的,bb=3
在服务器也修改了aa/a.txt,bb=2
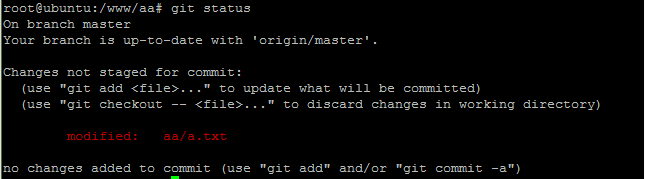
提交本地的代码到远程仓库
在服务器执行git pull

此时,发生代码冲突
1 如果希望保存本地改动并拉下最新服务器代码,手动merge
(1)要保留服务器上的修改
git stash

git stash list将当前的Git栈信息打印出来
git stash list

stash@{0}就是刚才保存的标记
(2)暂存了本地修改之后,pull内容
git pull

(3)还原暂存的内容
git stash pop stash@{0}

系统自动合并修改的内容,但是其中有冲突,需要解决其中的冲突
(4)解决文件中冲突的的部分
打开冲突的文件

Updated upstream 和=====之间的内容就是pull下来的内容
====和stashed changes之间的内容就是本地修改的内容
这种情况,git也不知道哪行内容是需要的,所以要自行确定需要的内容
直接编辑冲突了的文件(test.txt),把冲突标记删掉,把冲突解决正确
eg:
保留bb=2
保存退出
(5) 删除stash
git stash drop stash@{0}
清除0编号的stash
清除所有stash
git stash clear


(6)提交aa/a.txt的修改
git add aa/a.txt


修改本地的其他文件,并提交到远程仓库
服务器上拉取代码

将本地的a.txt,bb=5,提交代码,更新到远程仓库

按照(1)-(6)步骤处理冲突
2. 如果希望服务器上版本完全覆盖本地修改,使用如下命令回退并更新
git reset --hard
git pull
git difftool和mergetool图形化
https://www.cnblogs.com/jxldjsn/p/9691902.html
1.当然是先安装Beyond Compare3 (此处省略安装步骤,自行百度)
2.设置difftool
git config --global diff.tool bc3
git config --global difftool.bc3.path "/usr/bin/bcompare
git config --global difftool.prompt false
3.设置mergetool
git config --global merge.tool bc3
git config --global mergetool.bc3.path "/usr/bin/bcompare"
git config --global mergetool.bc3.trustExitCode true
使用时:
diff时,用git difftool <file_name>来查看就会直接弹出bcompare.
merge时,要先用git merge <branch_name> 来merge一下,然后如果提示merge有冲突,才用git mergetool来调用bcompare来merge
git清空提交历史
作者:网络中迷茫
链接:https://www.jianshu.com/p/0b986acd0064
git checkout --orphan latest_branch  # 切换到新的分支
git add -A # 存所有文件(除了.gitignore中声名排除的)
git commit -am "commit message" # 提交跟踪过的文件(Commit the changes)
git branch -D master  # 删除master分支(Delete the branch)
git branch -m master # 重命名当前分支为master(Rename the current branch to master)
git push -f origin master  # 提交到远程master分支 (Finally, force update your repository)
Git中.gitignore的配置语法
在日常的开发中,当我们需要将一个项目提交到Git时,并不是所有的文件都需要提交,比如一些自动生成的文件,这时候就可以使用.gitignore来忽略一些不需要提交的文件,本文着重介绍一下.gitignore的配置语法。
语法规范
- 空行或是以
#开头的行即注释行将被忽略。 - 可以在前面添加正斜杠
/来避免递归,下面的例子中可以很明白的看出来与下一条的区别。 - 可以在后面添加正斜杠
/来忽略文件夹,例如build/即忽略build文件夹。 - 可以使用
!来否定忽略,即比如在前面用了*.apk,然后使用!a.apk,则这个a.apk不会被忽略。 -
*用来匹配零个或多个字符,如*.[oa]忽略所有以".o"或".a"结尾,*~忽略所有以~结尾的文件(这种文件通常被许多编辑器标记为临时文件);[]用来匹配括号内的任一字符,如[abc],也可以在括号内加连接符,如[0-9]匹配0至9的数;?用来匹配单个字符。
看了这么多,还是应该来个栗子:
# 忽略 .a 文件
*.a
# 但否定忽略 lib.a, 尽管已经在前面忽略了 .a 文件
!lib.a
# 仅在当前目录下忽略 TODO 文件, 但不包括子目录下的 subdir/TODO
/TODO
# 忽略 build/ 文件夹下的所有文件
build/
# 忽略 doc/notes.txt, 不包括 doc/server/arch.txt
doc/*.txt
# 忽略所有的 .pdf 文件 在 doc/ directory 下的
doc/**/*.pdf
链接:https://www.jianshu.com/p/ea6341224e89
git stash 用法总结和注意点
推荐:https://git-scm.com/book/zh/v1/Git-%E5%B7%A5%E5%85%B7-%E5%82%A8%E8%97%8F%EF%BC%88Stashing%EF%BC%89
常用git stash命令:
(1)git stash save "save message" : 执行存储时,添加备注,方便查找,只有git stash 也要可以的,但查找时不方便识别。
(2)git stash list :查看stash了哪些存储
(3)git stash show :显示做了哪些改动,默认show第一个存储,如果要显示其他存贮,后面加stash@{$num},比如第二个 git stash show stash@{1}
(4)git stash show -p : 显示第一个存储的改动,如果想显示其他存存储,命令:git stash show stash@{$num} -p ,比如第二个:git stash show stash@{1} -p
(5)git stash apply :应用某个存储,但不会把存储从存储列表中删除,默认使用第一个存储,即stash@{0},如果要使用其他个,git stash apply stash@{$num} , 比如第二个:git stash apply stash@{1}
(6)git stash pop :命令恢复之前缓存的工作目录,将缓存堆栈中的对应stash删除,并将对应修改应用到当前的工作目录下,默认为第一个stash,即stash@{0},如果要应用并删除其他stash,命令:git stash pop stash@{$num} ,比如应用并删除第二个:git stash pop stash@{1}
(7)git stash drop stash@{$num} :丢弃stash@{$num}存储,从列表中删除这个存储
(8)git stash clear :删除所有缓存的stash
Git rebase使用
作者:陈卧虫
链接:https://www.jianshu.com/p/f7ed3dd0d2d8
git rebase能够将分叉的分支重新合并,之前写过一篇文章介绍它的原理,下面主要介绍它的两个使用场景:
场景一:本地与远端同一分支提交历史不一致
方式一
多个人在同一个分支上协作时,出现冲突是很正常的,比如现在有一个项目由我和A一同开发。
我在修复了一个bug以后准备提交
HowiedeiMac:ganlin howie$ git add models/paper.go
HowiedeiMac:ganlin howie$ git commit -m 'fix a bug'
[master 8b76654] fix a bug
 1 file changed, 3 insertions(+), 3 deletions(-)
现在准备推送到远端
HowiedeiMac:ganlin howie$ git push origin master
To https://gitee.com/greenhn/ganlin.git
 ! [rejected]        master -> master (fetch first)
error: failed to push some refs to 'https://gitee.com/greenhn/ganlin.git'
hint: Updates were rejected because the remote contains work that you do
hint: not have locally. This is usually caused by another repository pushing
hint: to the same ref. You may want to first integrate the remote changes
hint: (e.g., 'git pull ...') before pushing again.
hint: See the 'Note about fast-forwards' in 'git push --help' for details.
push失败了,说明A在我之前已经提交了,我本地master分支的提交历史已经落后远端了,需要先pull一下,与远端同步后才能push
HowiedeiMac:ganlin howie$ git pull
remote: Enumerating objects: 14, done.
remote: Counting objects: 100% (14/14), done.
remote: Compressing objects: 100% (8/8), done.
remote: Total 8 (delta 6), reused 0 (delta 0)
Unpacking objects: 100% (8/8), done.
From https://gitee.com/greenhn/ganlin
   a1bc60a..b91f711  master     -> origin/master
Merge made by the 'recursive' strategy.
 controllers/deal_local_data.go | 14 +++++++++++---
 controllers/rtu_interface.go   |  8 ++++----
 models/instrument_type.go      |  3 +++
 models/rtu_interface.go        |  3 +++
 4 files changed, 21 insertions(+), 7 deletions(-)
pull成功,现在使用git log看下一提交历史:
HowiedeiMac:ganlin howie$ git log --oneline --graph
*   f63ecbf (HEAD -> master) Merge branch 'master' of https://gitee.com/greenhn/ganlin
|\
| * b91f711 (origin/master, origin/HEAD) 修正bug,优化内置通道配置
* | 8b76654 fix a bug
|/
* a1bc60a 完善日报接口
* 9f73b5e 增加内置通道设置功能
* a0d464e ...
竟然分叉了!由于我本地master的提交历史和远端的master分支的提交历史不一致,所以git为我进行了自动合并,然后生成了一个新的提交历史(f63ecbf Merge branch 'master' of)
对于部分强迫症来说这个不能接受的,不想看到分叉。
这个时候用git rebase就可以解决
HowiedeiMac:ganlin howie$ git rebase
First, rewinding head to replay your work on top of it...
Applying: fix a bug
现在再查看一下提交历史:
HowiedeiMac:ganlin howie$ git log --oneline --graph
* 2e2b995 (HEAD -> master) fix a bug
* b91f711 (origin/master, origin/HEAD) 修正bug,优化内置通道配置
* a1bc60a 完善日报接口
* 9f73b5e 增加内置通道设置功能
* a0d464e ...
完美解决,现在再push推送到远端:
HowiedeiMac:ganlin howie$ git push origin master
Enumerating objects: 7, done.
Counting objects: 100% (7/7), done.
Delta compression using up to 4 threads
Compressing objects: 100% (4/4), done.
Writing objects: 100% (4/4), 394 bytes | 394.00 KiB/s, done.
Total 4 (delta 3), reused 0 (delta 0)
remote: Powered By Gitee.com
To https://gitee.com/greenhn/ganlin.git
   b91f711..2e2b995  master -> master
再次查看提交历史
HowiedeiMac:ganlin howie$ git lg --oneline --graph
* 2e2b995 (HEAD -> master, origin/master, origin/HEAD) fix a bug
* b91f711 修正bug,优化内置通道配置
* a1bc60a 完善日报接口
* 9f73b5e 增加内置通道设置功能
* a0d464e ...
现在远端master,远端head,本地master全部统一,问题解决。
方式二
直接执行:
git pull --rebase
效果与上面是一致的,也是最近才发现,推荐使用
场景二:不同分支之间的合并
由于老板突发奇想,要求开发一个新的功能。
先创建一个分支用于开发新功能:
HowiedeiMac:hello howie$ git checkout -b feature
Switched to a new branch 'feature'
HowiedeiMac:hello howie$ git branch
* feature
  master
接下来修改newFunc.go,增加新的功能,并且保存提交
vim newFunc.go
git add newFunc.go
git commit -m 'add new func'
现在查看一下提交
HowiedeiMac:hello howie$ git log --oneline --graph
* 4f58ab8 (HEAD -> feature) add new func
* 94c134b (master) init base

HowiedeiMac:hello howie$ git branch
* feature
  master
现在新功能开发完毕,需要将它合并的主分支中。
先尝试通过merge合并:
首先切换到master分支
HowiedeiMac:hello howie$ git checkout master
Switched to branch 'master'
Your branch is up to date with 'origin/master'.
直接合并feature分支
git merge feature
HowiedeiMac:hello howie$ git merge feature
Auto-merging newFunc.go
CONFLICT (content): Merge conflict in newFunc.go
Automatic merge failed; fix conflicts and then commit the result.
竟然失败了,说明我两个分支之前的版本已经不同步了,需要手动合并冲突,再提交:
先查看冲突文件:git status
HowiedeiMac:hello howie$ git status
On branch master
Your branch is ahead of 'origin/master' by 7 commits.
  (use "git push" to publish your local commits)

You have unmerged paths.
  (fix conflicts and run "git commit")
  (use "git merge --abort" to abort the merge)

Unmerged paths:
  (use "git add <file>..." to mark resolution)

        both modified:   newFunc.go
打开文件,进行修改
原文件:
func NewFunc() {
<<<<<<< HEAD
=======
    fmt.Println("add new func")
>>>>>>> feature
}
修改后:
func NewFunc() {
    fmt.Println("add new func")
}
现在通过add添加,然后commit提交
HowiedeiMac:hello howie$ git add newFunc.go

HowiedeiMac:hello howie$ git commit -m 'merge master and feature'
[master 562ec58] merge master and feature
现在在查看一下分支提交历史:
HowiedeiMac:hello howie$ git log --oneline --graph
*   562ec58 (HEAD -> master) merge master and feature
|\
| * 4f58ab8 (feature) add new func
* | 0e80f97 do something
|/
* 94c134b init base
虽然合并成功,但是Master已经保存了合并历史,出现开叉了!对于强迫症患者来说肯定是不能接受的。
通过rebase合并分支:
现在将版本退回到合并前,也就是回退一个版本
git reset --hard head^
HowiedeiMac:hello howie$ git reset --hard head^
HEAD is now at 0e80f97 do something

HowiedeiMac:hello howie$ git log --oneline --graph
* 0e80f97 (HEAD -> master) do something
* 94c134b init base
退回去了,现在是位于master分支的init base提交这里。
先切换回feature分支:
HowiedeiMac:hello howie$ git checkout feature
Switched to branch 'feature'
在feature分支上执行: git rebase master
这句命令的意识是:以master为基础,将feature分支上的修改增加到master分支上,并生成新的版本。
HowiedeiMac:hello howie$ git rebase master
First, rewinding head to replay your work on top of it...
Applying: add new func
Using index info to reconstruct a base tree...
M       newFunc.go
Falling back to patching base and 3-way merge...
Auto-merging newFunc.go
CONFLICT (content): Merge conflict in newFunc.go
error: Failed to merge in the changes.
Patch failed at 0001 add new func
hint: Use 'git am --show-current-patch' to see the failed patch

Resolve all conflicts manually, mark them as resolved with
"git add/rm <conflicted_files>", then run "git rebase --continue".
You can instead skip this commit: run "git rebase --skip".
To abort and get back to the state before "git rebase", run "git rebase --abort".
失败了,原因很简单,两个分支修改个同一个文件,产生了冲突。所以先需要解决冲突:
打开冲突的文件,解决冲突
原文件:
func NewFunc() {
<<<<<<< HEAD
=======
    fmt.Println("add new func")
>>>>>>> add new func
}
修改后:
func NewFunc() {
    fmt.Println("add new func")
}
现在通过add添加
HowiedeiMac:hello howie$ git add newFunc.go
现在是重点,之前的rebase其实只是完成了一半,由于出现冲突而终止,现在冲突解决,可以通过git rebase —continue继续完成之前的rebase操作。
HowiedeiMac:hello howie$ git rebase --continue
Applying: add new func
rebase完成,再查看一下提交历史:
HowiedeiMac:hello howie$ git log --oneline --graph
* b2593e6 (HEAD -> feature) add new func
* 0e80f97 (master) do something
* 94c134b init base
提交记录已经是一条完美的直线。现在切换到主分支master,将feather分支上的提交合并过来。
git checkout master
git merge feature
HowiedeiMac:hello howie$ git checkout master
Switched to branch 'master'
Your branch is ahead of 'origin/master' by 7 commits.
  (use "git push" to publish your local commits)


HowiedeiMac:hello howie$ git merge feature
Updating 0e80f97..b2593e6
Fast-forward
 newFunc.go | 1 +
 1 file changed, 1 insertion(+)
再次查看一下提交历史:
HowiedeiMac:hello howie$ git log --oneline --graph
* b2593e6 (HEAD -> master, feature) add new func
* 0e80f97 do something
* 94c134b init base
问题解决,master上也是一条直线了。
最后收个尾,删除掉feature分支:
HowiedeiMac:hello howie$ git branch -d feature
Deleted branch feature (was b2593e6).
问题汇总
IDEA中Line Separators Warning You are about to commot CRLF line separators to the Git repository
原文地址:https://blog.csdn.net/m0_38072683/article/details/82927639 (原文更加详细)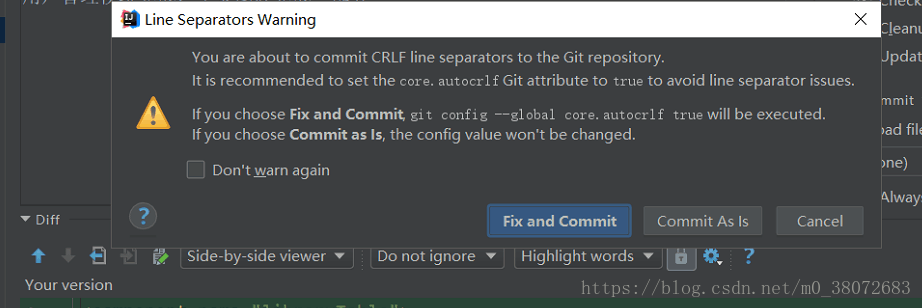
解决方案:其实只需将右下角为CRLF的文件换为LF就行了。
简介:
CRLF->Windows-style(表示句尾使用回车换行两个字符(即我们常在Windows编程时使用"\r\n"换行)
LF->Unix Style(表示表示句尾,只使用换行.)
CR->Mac Style(表示只使用回车.)
git push提交成功后如何撤销回退
解决方案:https://blog.csdn.net/guozhaohui628/article/details/78922946
git reset --hard XXXX
git push --force
git pull时产生'Merge branch 'master' of...问题
https://blog.csdn.net/xiaojie_570/article/details/96486325
https://www.cnblogs.com/coffy/p/7650564.html
git拉取分支报错:fatal:‘XXX' is not a commit and a branch ‘XXX' cannot be created from it
git pull
git checkout -b local_branch origin/remote_branch
Pull is not possible because you have unmerged files错误解决!
git reset --hard FETCH_HEAD,
git rebase -i commit_ID. ,之后会自动多出现一个merge commit
# 切换到其他分支
git checkout other_branch
# 删除出错分支
git branch -D feature/auto_ci
# 重新拉取分支
git checkout -b feature/auto_ci origin/feature/auto_ci
# 查看结果
git log --oneline
Git 将某一个仓库的某一次提交合并到另一个仓库
参考网站如下:
git 合并两个仓库代码(主仓库合并到分支仓库):https://blog.csdn.net/u011521382/article/details/83859190
git之两个仓库的合并操作: https://www.jianshu.com/p/42a10bbfbf97
git将某分支的某次提交合并到另一分支: https://blog.csdn.net/I_recluse/article/details/93619400
这里举例两个远程仓库com_bestyii_AAA和com_bestyii_BBB_bd
将com_bestyii_AAA某一次提交合并到com_bestyii_BBB_bd上边
步骤如下
1.将主仓库的代码添加到自己本地的远程仓库中
通过路径或者git地址,例如
//git remote add 仓库名称 路径
 git remote add com_bestyii_AAA_bj path/to/com_bestyii_AAA
 //git remote add 仓库名称 地址
 git remote add com_bestyii_AAA_bj git@github.weiwei.com:company/com_bestyii_AAA.git
现在git remote 一下可以看见本地有两个远程仓库
com_bestyii_AAA_bj
origin
2.抓取仓库数据到本仓库中
git fetch com_bestyii_AAA_bj //git fetch 仓库名称
通过git branch -a看到仓库下的所有分支情况
* master
remotes/com_bestyii_AAA_bj/master
remotes/origin/HEAD -> origin/master
remotes/origin/master
3.创建一个新的分支bj_master
这一步是将远程主仓库的代码在本地新建一个分支,稍后会将这个分支的代码和本地代码merge,这样也就是将主仓库代码和自己仓库的代码merge了
git checkout -b bj_master com_bestyii_AAA_bj/master
4.敲 git log 命令,查找需要合并的commit记录,比如commitID:7fcb3defff;
git log
5.切换到master分支,使用 git cherry-pick 7fcb3defff 命令,就把该条commit记录合并到了master分支,这只是在本地合并到了master分支
这里注意切换分支的命令为
git checkout master //git checkout 分支名
git cherry-pick 7fcb3defff
6.最后,git push 提交到master远程,至此,就把bj_master分支的这条commit所涉及的更改合并到了master分支
git push

 浙公网安备 33010602011771号