配置私有仓库(使用registry镜像搭建一个私有仓库)
在使用Docker一段时间后,往往会发现手头积累了大量的自定义镜像文件,这些文件通过公有仓库进行管理并不方便;另外有时候只是希望在内部用户之间进行分享,不希望暴露出去。这种情况下,就有必要搭建一个本地私有镜像仓库。
使用Docker Registry的两种主要方式:通过容器方式运行和通过本地安装运行并注册为系统服务,以及添加Nginx反向代理,添加用户认证功能。Docker Registry配置文件中各个选项的含义和使用。如何通过脚本来实现对镜像的批量管理,以及使用Registry的通知系统来支持更多应用场景。
安装Docker Registry
Docker Registry工具目前最新为2.0系列版本,这一版本与一些类库、工具一起被打包为负责容器内容分发的工具集:Docker Distribution。目前其核心的功能组件仍为负责镜像仓库的管理。新版本的Registry基于Golang进行了重构,提供更好的性能和扩展性,并且支持Docker 1.6+的API,非常适合用来构建私有的镜像注册服务器。官方仓库中也提供了Registry的镜像,因此用户可以通过容器运行和源码安装两种方式来使用Registry。
1.基于容器安装运行
基于容器的运行方式十分简单,只需要一条命令:
$ docker run -d -p 5000:5000 --restart=always --name registry registry:2.1
启动后比较关键的参数是指定配置文件和仓库存储路径。
Registry默认的配置文件为/etc/docker/registry/config.yml,因此,通过如下命令,可以指定使用本地主机上的配置文件(如/home/user/registry-conf)。
$ docker run -d -p 5000:5000 \
--restart=always \
--name registry \
-v /home/user/registry-conf/config.yml:/etc/docker/registry/config.yml \
registry:2
此外,Registry默认的存储位置为/var/lib/registry,可以通过-v参数来映射本地的路径到容器内。
例如下面的例子将镜像存储到本地/opt/data/registry目录。
$ docker run -d -p 5000:5000 --restart=always --name registry \
-v /opt/data/registry:/var/lib/registry \
registry:2
2.本地安装运行
有时候需要本地运行仓库服务,可以通过源码方式进行安装。
首先安装Golang环境支持,以Ubuntu为例,可以执行如下命令:
$ sudo add-apt-repository ppa:ubuntu-lxc/lxd-stable
$ sudo apt-get update
$ sudo apt-get install golang
确认Golang环境安装成功,并配置$GOPATH环境变量,例如/go。
创建$GOPATH/src/github.com/docker/目录,并获取源码,如下所示:
$ mkdir -p $GOPATH/src/github.com/docker/
$ cd $GOPATH/src/github.com/docker/
$ git clone https://github.com/docker/distribution.git
$ cd distribution
将自带的模板配置文件复制到/etc/docker/registry/路径下,创建存储目录/var/lib/registry:
$ cp cmd/registry/config-dev.yml /etc/docker/registry/config.yml
$ mkdir -p /var/lib/registry
然后执行安装操作:
$ make PREFIX=/go clean binaries
编译成功后,可以通过下面的命令来启动:
$ registry server /etc/docker/registry/config.yml
此时使用访问本地的5000端口,看到返回成功(200 OK),则说明运行成功:
$ curl -i 127.0.0.1:5000/v2/
HTTP/1.1 200 OK
配置TLS证书
当本地主机运行Registry服务后,所有能访问到该主机的Docker Host都可以把它作为私有仓库使用。只需要在镜像名称前面添加上具体的服务器地址。
例如将本地的ubuntu:latest镜像上传到私有仓库myrepo.com:
$ docker tag ubuntu myrepo.com:5000/ubuntu
$ docker push myrepo.com:5000/ubuntu
或者从私有仓库myrepo.com下载镜像到本地:
$ docker pull myrepo.com:5000/ubuntu
$ docker tag myrepo.com:5000/ubuntu ubuntu
私有仓库需要启用TLS认证,否则会报错。可以通过添加DOCKER_OPTS="--insecure-registry myrepo.com:5000来躲过这个问题。
在这里将介绍如何获取和生成TLS证书。
1.自行生成证书
使用openssl工具可以很容易地生成私人证书文件:
$ mkdir -p certs
$ openssl req -newkey rsa:4096 -nodes -sha256 -keyout certs/myrepo.key -x509 -days 365 -out certs/myrepo.crt
生成过程中会提示填入各种信息,注意CN一栏的信息要填入跟访问的地址相同的域名,例如这里应该为myrepo.com。
生成结果为秘钥文件myrepo.key,以及证书文件myrepo.crt。
其中证书文件需要发送给用户,并且配置到用户Docker Host上,注意路径需要跟域名一致,例如:/etc/docker/certs.d/myrepo.com:5000/ca.crt
2.从代理商申请证书
如果Registry服务需要对外公开,需要申请大家都认可的证书。
知名的代理商包括SSLs.com、GoDaddy.com、LetsEncrypt.org、GlobalSign.com等,用户可以自行选择权威的证书提供商。
3.启用证书
当拥有秘钥文件和证书文件后,可以配置Registry启用证书支持,主要通过REGISTRY_HTTP_TLS_CERTIFICATE和REGISTRY_HTTP_TLS_KEY参数来设置:
docker run -d -p 5000:5000 --restart=always --name registry \
-v `pwd`/certs:/certs \
-e REGISTRY_HTTP_TLS_CERTIFICATE=/certs/myrepo.crt \
-e REGISTRY_HTTP_TLS_KEY=/certs/myrepo.key \
registry:2
管理访问权限
通常在生产场景中,对私有仓库还需要进行访问代理,以及提供认证和用户管理。
1.Docker Registry v2的认证模式
Docker Registry v2的认证模式和v1有了较大的变化,降低了系统的复杂度、减少了服务之间的交互次数,其基本工作模式:
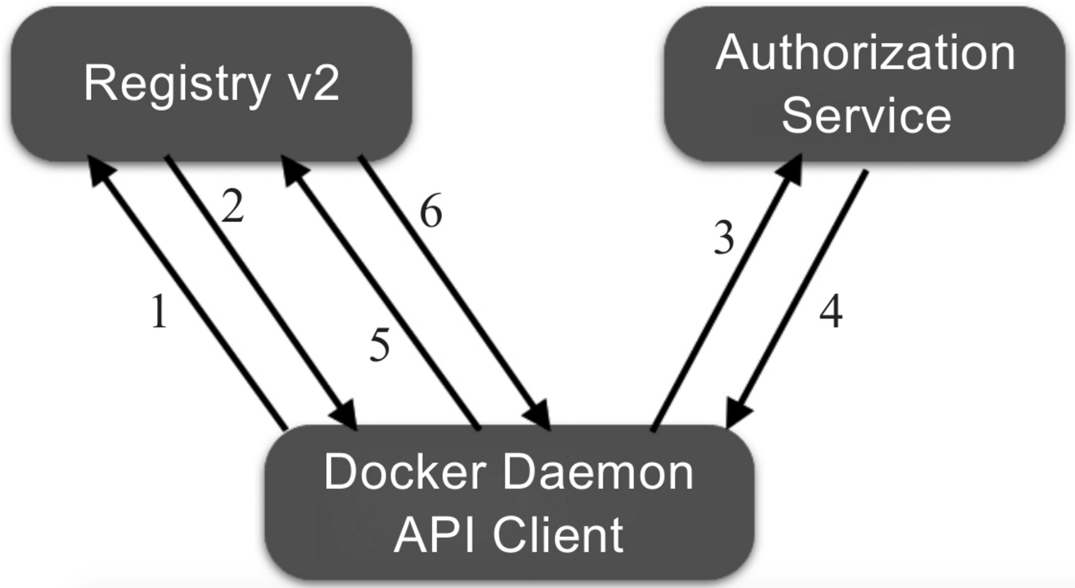
具体交互过程包括如下步骤:
1)Docker Daemon或者其他客户端尝试访问Registry服务器,比如pull、push或者访问manifiest文件;
2)在Registry服务器开启了认证服务模式时,就会直接返回401 Unauthorized错误,并通知调用方如何获得授权;
3)调用方按照要求,向Authorization Service发送请求,并携带Authorization Service需要的信息,比如用户名、密码;
4)如果授权成功,则可以拿到合法的Bearer token,来标识该请求方可以获得的权限;
5)请求方将拿到Bearer token加到请求的Authorization header中,再次尝试步骤1中的请求;
6)Registry服务通过验证Bearer token以及JWT格式的授权数据,来决定用户是否有权限进行请求的操作。
当启用认证服务时,需要注意以下两个地方:
- 对于Authentication Service,Docker官方目前并没有放出对应的实现方案,需要自行实现对应的服务接口;
- Registry服务和Authentication服务之间通过证书进行Bearer token的生成和认证,所以要保证两个服务之间证书的匹配。
除了使用第三方实现的认证服务(如docker_auth、SUSE Portus等)外,还可以通过Nginx代理方式来配置基于用户名密码的认证。
2.配置Nginx代理
使用Nginx来代理Registry服务的原理十分简单,我们让Registry服务监听在127.0.0.1:5000,这意味着只允许本机才能通过5000端口访问到,其他主机是无法访问到的。为了让其他主机访问到,可以通过Nginx监听在对外地址的15000端口,当外部访问请求到达15000端口时,内部再将请求转发到本地的5000端口。
首先,安装Nginx:
$ sudo apt-get -y install nginx
在/etc/nginx/sites-available/目录下,创建新的站点配置文件/etc/nginx/sites-available/docker-registry.conf,代理本地的15000端口转发到5000端口。
配置文件内容如下:
#本地的registry服务监听在15000端口
upstream docker-registry {
  server localhost:5000;
}
#代理服务器监听在15000端口
server {
  listen 15000;
  server_name private-registry-server.com;
  add_header 'Docker-Distribution-Api-Version' 'registry/2.0' always;
  # If you have SSL certification files, then can enable this section.
  ssl on;
  ssl_certificate /etc/ssl/certs/myrepo.crt;
  ssl_certificate_key /etc/ssl/private/myrepo.key;
  proxy_pass                          http://docker-registry;
  proxy_set_header  Host              \$http_host;   # required for docker
  client's sake
  proxy_set_header  X-Real-IP         \$remote_addr; # pass on real client's IP
  proxy_set_header  X-Forwarded-For   \$proxy_add_x_forwarded_for;
  proxy_set_header  X-Forwarded-Proto \$scheme;
  proxy_read_timeout                  600;
  client_max_body_size 0; # disable any limits to avoid HTTP 413 for large
  image uploads
  # required to avoid HTTP 411: see Issue #1486 (https://github.com/dotcloud/docker/issues/1486)
  chunked_transfer_encoding on;
  location /v2/ {#禁止旧版本Docker访问
    if (\$http_user_agent ~ "^(docker\/1\.(3|4|5(?!\.[0-9]-dev))|Go ).*\$" ) {
      return 404;
    }
    #配置转发访问请求到registry服务
    proxy_pass http://docker-registry;
  }
}
建立配置文件软连接,放到/etc/nginx/sites-enabled/下面,让Nginx启用它,最后重启Nginx服务:
$ sudo ln -s /etc/nginx/sites-available/docker-registry.conf /etc/nginx/sites-enabled/docker-registry.conf
$ service nginx restart
之后,可以通过上传镜像来测试服务是否正常。测试上传本地的ubuntu:latest镜像:
$ docker tag ubuntu:14.04 127.0.0.1:15000/ubuntu:latest
$ docker push 127.0.0.1:15000/ubuntu:latest
3.添加用户认证
公共仓库Docker Hub是通过注册索引(index)服务来实现的。由于Index服务并没有完善的开源实现,在这里介绍基于Nginx代理的用户访问管理方案。
Nginx支持基于用户名和密码的访问管理。
首先,在配置文件的location/字段中添加两行:
...
location / {
  # let Nginx know about our auth file
  auth_basic "Please Input username/password";
  auth_basic_user_file    docker-registry-htpasswd;
  proxy_pass http://docker-registry;
}
...
其中,auth_basic行说明启用认证服务,不通过的请求将无法转发。auth_basic_user_file行则指定了验证的用户名密码存储文件为本地(/etc/nginx/下)的docker-registry-htpasswd文件。
docker-registry-htpasswd文件中存储用户名密码的格式为每行放一个用户名、密码对。
例如:
...
user1:password1
user2:password2
...
需要注意的是,密码字段存储的并不是明文,而是使用crypt函数加密过的字符串。
要生成加密后的字符串,可以使用htpasswd工具,首先安装apache2-utils:
$ sudo aptitude install apache2-utils -y
创建用户user1,并添加密码。
例如,如下的操作会创建/etc/nginx/docker-registry-htpasswd文件来保存用户名和加密后的密码信息,并创建user1和对应的密码:
$ sudo htpasswd -c /etc/nginx/docker-registry-htpasswd user1
$ New password:
$ Re-type new password:
$ Adding password for user user1
添加更多用户,可以重复上面的命令(密码文件存在后,不需要再使用-c选项来新创建)。
最后,重新启动Nginx服务:
$ sudo service nginx restart
此时,通过浏览器访问本地的服务http://127.0.0.1:15000/v2/,会弹出对话框,提示需要输入用户名和密码。
通过命令行访问,需要在地址前面带上用户名和密码才能正常返回:
$ curl USERNAME:PASSWORD@127.0.0.1:15000/v2/
除了使用Nginx作为反向代理外,Registry自身也支持简单的基于用户名和密码的认证和基于token的认证,可以通过如下环境变量来指定:
REGISTRY_AUTH: htpasswd
REGISTRY_AUTH_HTPASSWD_PATH: /auth/htpasswd
REGISTRY_AUTH_HTPASSWD_REALM: basic
4.用Compose启动Registry
一般情况下,用户使用Registry需要的配置包括存储路径、TLS证书和用户认证。
这里提供一个基于Docker Compose的快速启动Registry的模板:
registry:
restart: always
image: registry:2.1
ports:
  - 5000:5000
environment:
REGISTRY_HTTP_TLS_CERTIFICATE: /certs/myrepo.crt
REGISTRY_HTTP_TLS_KEY: /certs/myrepo.key
REGISTRY_AUTH: htpasswd
REGISTRY_AUTH_HTPASSWD_PATH: /auth/docker-registry-htpasswd
REGISTRY_AUTH_HTPASSWD_REALM: basic
volumes:
  - /path/to/data:/var/lib/registry
  - /path/to/certs:/certs
  - /path/to/auth:/auth
配置Registry
Docker Registry提供了一些样例配置,用户可以直接使用它们来进行开发或生产部署。
使用配置文件来管理私有仓库。
示例配置
代码如下:
version: 0.1
log:
level: debug
fields:
service: registry
environment: development
hooks:
  - type: mail
disabled: true
levels:
  - panic
options:
smtp:
addr: mail.example.com:25
username: mailuser
password: password
insecure: true
from: sender@example.com
to:
  - errors@example.com
storage:
delete:
enabled: true
cache:
blobdescriptor: redis
filesystem:
rootdirectory: /var/lib/registry
maintenance:
uploadpurging:
enabled: false
http:
addr: :5000
debug:
addr: localhost:5001
headers:
X-Content-Type-Options: [nosniff]
redis:
addr: localhost:6379
pool:
maxidle: 16
maxactive: 64
idletimeout: 300s
dialtimeout: 10ms
readtimeout: 10ms
writetimeout: 10ms
notifications:
endpoints:
  - name: local-5003
url: http://localhost:5003/callback
headers:
Authorization: [Bearer ]
timeout: 1s
threshold: 10
backoff: 1s
disabled: true
  - name: local-8083
url: http://localhost:8083/callback
timeout: 1s
threshold: 10
backoff: 1s
disabled: true
health:
storagedriver:
enabled: true
interval: 10s
threshold: 3
选项
这些选项以yaml文件格式提供,用户可以直接进行修改,也可以添加自定义的模板段。
默认情况下,变量可以从环境变量中读取,例如log.level:debug可以配置为:
export LOG_LEVEL=debug
比较重要的选项包括版本信息、log选项、hooks选项、存储选项、认证选项、HTTP选项、通知选项、redis选项、健康监控选项、代理选项和验证选项等。
下面分别介绍这些选项。
1.版本信息
version:0.1
2.log选项
日志相关:
log:
level: debug
formatter: text
fields:
service: registry
environment: staging
参数说明:
- level:字符串类型,标注输出调试信息的级别,包括debug、info、warn、error。
- fomatter:字符串类型,日志输出的格式,包括text、json、logstash等。
- fields:增加到日志输出消息中的键值对,可以用于过滤日志。
3.hooks选项
配置当仓库发生异常时,通过邮件发送日志时的参数:
hooks:
  - type: mail
levels:
  - panic
options:
smtp:
addr: smtp.sendhost.com:25
username: sendername
password: password
insecure: true
from: name@sendhost.com
to:
  - name@receivehost.com
4.存储选项
storage选项将配置存储的引擎,默认支持包括本地文件系统、Google云存储、AWS S3云存储和OpenStack Swift分布式存储等,如下所示:
storage:
filesystem:
rootdirectory: /var/lib/registry
azure:
accountname: accountname
accountkey: base64encodedaccountkey
container: containername
gcs:
bucket: bucketname
keyfile: /path/to/keyfile
rootdirectory: /gcs/object/name/prefix
s3:
accesskey: awsaccesskey
secretkey: awssecretkey
region: us-west-1
regionendpoint: http://myobjects.local
bucket: bucketname
encrypt: true
keyid: mykeyid
secure: true
v4auth: true
chunksize: 5242880
multipartcopychunksize: 33554432
multipartcopymaxconcurrency: 100
multipartcopythresholdsize: 33554432
rootdirectory: /s3/object/name/prefix
swift:
username: username
password: password
authurl: https://storage.myprovider.com/auth/v1.0 or https://storage.
myprovider.com/v2.0 or https://storage.myprovider.com/v3/auth
tenant: tenantname
tenantid: tenantid
domain: domain name for Openstack Identity v3 API
domainid: domain id for Openstack Identity v3 API
insecureskipverify: true
region: fr
container: containername
rootdirectory: /swift/object/name/prefix
oss:
accesskeyid: accesskeyid
accesskeysecret: accesskeysecret
region: OSS region name
endpoint: optional endpoints
internal: optional internal endpoint
bucket: OSS bucket
encrypt: optional data encryption setting
secure: optional ssl setting
chunksize: optional size valye
rootdirectory: optional root directory
inmemory:
delete:
enabled: false
cache:
blobdescriptor: inmemory
maintenance:
uploadpurging:
enabled: true
age: 168h
interval: 24h
dryrun: false
redirect:
disable: false
比较重要的选项如下:
- maintenance:配置维护相关的功能,包括对孤立旧文件的清理、开启只读模式等;
- delete:是否允许删除镜像功能,默认关闭;
- cache:开启对镜像层元数据的缓存功能,默认开启;
5.认证选项
对认证类型的配置,如下所示:
auth:
silly:
realm: silly-realm
service: silly-service
token:
realm: token-realm
service: token-service
issuer: registry-token-issuer
rootcertbundle: /root/certs/bundle
htpasswd:
realm: basic-realm
path: /path/to/htpasswd
比较重要的选项如下:
- silly:仅供测试使用,只要请求头带有认证域即可,不做内容检查;
- token:基于token的用户认证,适用于生产环境,需要额外的token服务来支持;
- htpasswd:基于Apache htpasswd密码文件的权限检查。
6.HTTP选项
跟HTTP服务相关的配置,如下所示:
http:
addr: localhost:5000
net: tcp
prefix: /my/nested/registry/
host: https://myregistryaddress.org:5000
secret: asecretforlocaldevelopment
relativeurls: false
tls:
certificate: /path/to/x509/public
key: /path/to/x509/private
clientcas:
  - /path/to/ca.pem
  - /path/to/another/ca.pem
letsencrypt:
cachefile: /path/to/cache-file
email: emailused@letsencrypt.com
debug:
addr: localhost:5001
headers:
X-Content-Type-Options: [nosniff]
http2:
disabled: false
其中的参数如下:
- addr:必选,服务监听地址;
- secret:必选,跟安全相关的随机字符串,用户可以自己定义;
- tls:证书相关的文件路径信息;
- http2:是否开启http2支持,默认关闭。
7.通知选项
有事件发生时候的通知系统。
notifications:
endpoints:
  - name: alistener
disabled: false
url: https://my.listener.com/event
headers:
timeout: 500
threshold: 5
backoff: 1000
8.redis选项
Registry可以用Redis来缓存文件块,这里可以配置相关选项:
redis:
addr: localhost:6379
password: asecret
db: 0
dialtimeout: 10ms
readtimeout: 10ms
writetimeout: 10ms
pool:
maxidle: 16
maxactive: 64
idletimeout: 300s
9.健康监控选项
跟健康监控相关,主要是对配置服务进行检测判断系统状态,如下所示:
health:
storagedriver:
enabled: true
interval: 10s
threshold: 3
file:
  - file: /path/to/checked/file
interval: 10s
http:
  - uri: http://server.to.check/must/return/200
headers:
Authorization: [Basic QWxhZGRpbjpvcGVuIHNlc2FtZQ==]
statuscode: 200
timeout: 3s
interval: 10s
threshold: 3
tcp:
  - addr: redis-server.domain.com:6379
timeout: 3s
interval: 10s
threshold: 3
默认并未启用。
10.代理选项
配置Registry作为一个pull代理,从远端(目前仅支持官方仓库)下拉Docker镜像,如下所示:
proxy:
remoteurl: https://registry-1.docker.io
username: [username]
password: [password]
之后,用户可以通过如下命令来配置Docker使用代理:
$ docker --registry-mirror=https://myrepo.com:5000 daemon
11.验证选项
限定来自指定地址的客户端才可以执行push操作:
validation:
enabled: true
manifests:
urls:
allow:
  - ^https?://([^/]+\.)*example\.com/
deny:
  - ^https?://www\.example\.com/
批量管理镜像
有时候,本地镜像很多,逐个打标记进行操作将十分浪费时间。这里将以批量上传镜像为例,如何利用脚本实现对镜像的批量化处理。
1.批量上传指定镜像
可以使用下面的push_images.sh脚本,批量上传本地的镜像到注册服务器中,默认是本地注册服务器127.0.0.1:5000,用户可以通过修改registry=127.0.0.1:5000这行来指定目标注册服务器:
#!/bin/sh
# This script will upload the given local images to a registry server ($registry is the default value).
# See: https://github.com/yeasy/docker_practice/blob/master/_local/push_images.sh
# Usage:  push_images image1 [image2...]
# Author: yeasy@github
# Create: 2014-09-23
#The registry server address where you want push the images into registry=127.0.0.1:5000
### DO NOT MODIFY THE FOLLOWING PART, UNLESS YOU KNOW WHAT IT MEANS ###
echo_r () {
[ $# -ne 1 ] && return 0
echo -e "\033[31m$1\033[0m"
}
echo_g () {
[ $# -ne 1 ] && return 0
echo -e "\033[32m$1\033[0m"
}
echo_y () {
[ $# -ne 1 ] && return 0
echo -e "\033[33m$1\033[0m"
}
echo_b () {
[ $# -ne 1 ] && return 0
echo -e "\033[34m$1\033[0m"
}
usage() {
docker images
echo "Usage: $0 registry1:tag1 [registry2:tag2...]"
}
[ $# -lt 1 ] && usage && exit
echo_b "The registry server is $registry"
for image in "$@"
do
echo_b "Uploading $image..."
docker tag $image $registry/$image
docker push $registry/$image
docker rmi $registry/$image
echo_g "Done"
done
建议把脚本存放到本地的可执行路径下,例如/usr/local/bin/下面。然后添加可执行权限,就可以使用该脚本了:
$ sudo chmod a+x /usr/local/bin/push_images.sh
例如,推送本地的ubuntu:latest和centos:centos7两个镜像到本地仓库:
$ ./push_images.sh ubuntu:latest centos:centos7
上传后,查看本地镜像,会发现上传中创建的临时标签也同时被清理了。
2.上传本地所有镜像
在push_images工具的基础上,还可以进一步的创建push_all工具,来上传本地所有镜像:
#!/bin/sh
# This script will upload all local images to a registry server ($registry is the default value).
# This script requires the push_images, which can be found at https://github.com/yeasy/docker_practice/blob/master/_local/push_images.sh
# Usage:  push_all
# Author: yeasy@github
# Create: 2014-09-23
for image in `docker images|grep -v "REPOSITORY"|grep -v ""|awk '{print $1":"$2}'`
do
push_images.sh $image
done
另外,把它放在/usr/local/bin/下面,并添加可执行权限。这样就可以通过push_all命令来同步本地所有镜像到本地私有仓库了。
可以试着修改脚本,实现批量化下载镜像、删除镜像、更新镜像标签等更多的操作。
使用通知系统
Docker Registry v2还内置提供了Notification功能,提供了非常方便、快捷的集成接口,避免了v1中需要用户自己实现的麻烦。
Notification功能其实就是Registry在有事件发生的时候,向用户自己定义的地址发送webhook通知。目前的事件包括镜像manifest的push、pull,镜像层的push、pull。这些动作会被序列化成webhook事件的payload,为集成服务提供事件详情,并通过Registry v2的内置广播系统发送到用户定义的服务接口,Registry v2称这些用户服务接口为Endpoints。
Registry服务器的事件会通过HTTP协议发送到用户定义的所有Endpoints上,而且每个Registry实例的每个Endpoint都有自己独立的队列,重试选项以及HTTP的目的地址。当一个动作发生时,会被转换成对应的事件并放置到一个内存队列中。镜像服务器会依次处理队列中的事件,并向用户定义的Endpoint发送请求。事件发送处理是串行的,但是Registry服务器并不会保证其到达顺序。
相关配置
Notification在Docker Registry中的相关配置如下:
notifications:
endpoints:
  -  name: cd-handler
disabled: false
url: http://cd-service-host/api/v1/cd-service
headers:
Authorization: [token ******************]
timeout: 1s
threshold: 5
backoff: 10s
上面的配置会在pull或者push发生时向http://cd-service-host/api/v1/cd-service发送事件,并在HTTP请求的header中传入认证信息,可以是Basic、token、Bearer等模式,主要用于接收事件方进行身份认证。更新配置后,需要重启Registry服务器,如果配置正确,会在日志中看到对应的提示信息,比如:
configuring endpoint listener (http://cd-service-host/api/v1/cd-service), timeout=1s,
headers=map[Authorization: [token ******]]
此时,用户再通过docker客户端去push或pull,或者查询一些manifiest信息时,就会有相应的事件发送到定义的Endpoint上。
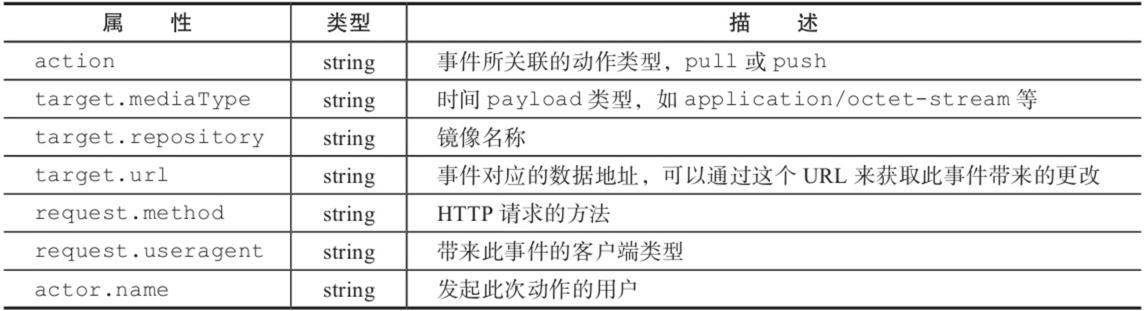
接下来看一下事件的格式和其中的主要属性:
{
    "events": [
        {
            "id": "70f44894-c4b4-4be8-9691-d37db77074cd",
            "timestamp": "2016-06-05T01:57:04.654256149Z",
            "action": "push",
            "target": {
                "mediaType": "application/vnd.docker.distribution.manifest.v1+json",
                "size": 45765,
                "digest": "sha256:fd0af29ba2ae034449bffb18dd6db2ed90d798464cc43aa81e63770713edaea8",
                "length": 45765,
                "repository": "test-user/hello-world",
                "url": "http://registry-server/v2/test-user/hello-world/manifests/sha256:fd0af29ba2ae034449bffb18dd6db2ed90d798464cc43aa81e63770713edaea8"
            },
            "request": {
                "id": "9d3d837f-d7ed-4fa9-afb4-dda58687a6ce",
                "addr": "client-host:46504",
                "host": "registry-server",
                "method": "PUT",
                "useragent": "docker/1.9.1 go/go1.4.2 git-commit/a34a1d5 kernel/4.2.0-35-generic os/linux arch/amd64"
            },
            "actor": {
                "name": "test-user"
            },
            "source": {
                "addr": "8e14c2a190f2:5000",
                "instanceID": "c564003e-dd9b-4a9b-8a30-fe8564e97ba9"
            }
        }
    ]
}
每个事件的payload,都是一个定义好的JSON格式的数据。
通知系统的主要属性主要包括action、target.mediaType、target.repository、target.url、request.method、request.useragent、actor.name等,参见表。
Notification的使用场景
理解了如何配置Docker Registry v2的Notification、Endpoint,以及接收到的Event的数据格式,我们就可以很方便地实现一些个性化的需求。
这里简单列举两个场景,一个是如何统计镜像的上传、下载次数,方便了解镜像的使用情况,另一个场景是对服务的持续部署,方便管理镜像,参见图。
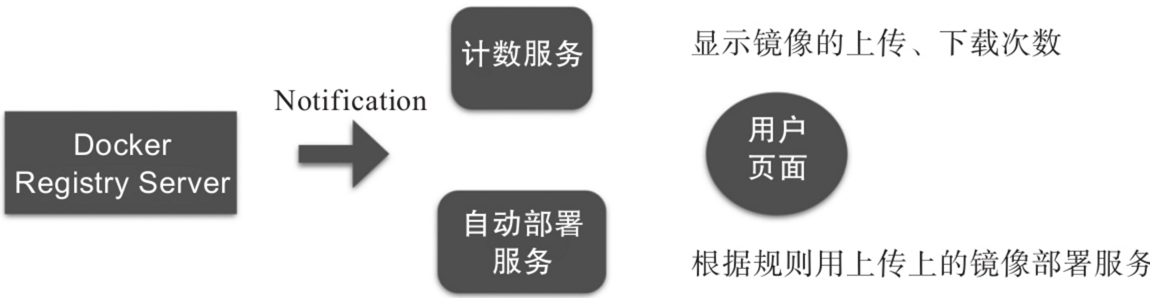
1.镜像上传、下载计数
很常见的一个场景是根据镜像下载次数,向用户推荐使用最多的镜像,或者统计镜像更新的频率,以便了解用户对镜像的维护程度。
用户可以利用Notification的功能,定义自己的计数服务,并在Docker Registry上配置对应的Endpoint。在有pull、push动作发生时,对相应镜像的下载或者上传次数进行累加,达到计数效果。然后添加一个查询接口,供用户查看用户镜像的上传、下载次数,或者提供排行榜等扩展服务。
2.实现应用的自动部署
在这个场景下,可以在新的镜像push到Docker Registry服务器时候,自动创建或者更新对应的服务,这样可以快速查看新镜像的运行效果或者进行集成测试。用户还可以根据事件中的相应属性,比如用户信息、镜像名称等,调用对应的服务部署接口进行自动化部署操作。

 浙公网安备 33010602011771号