Silverlight使用故事板事件实现视觉效果切换
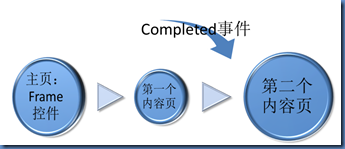
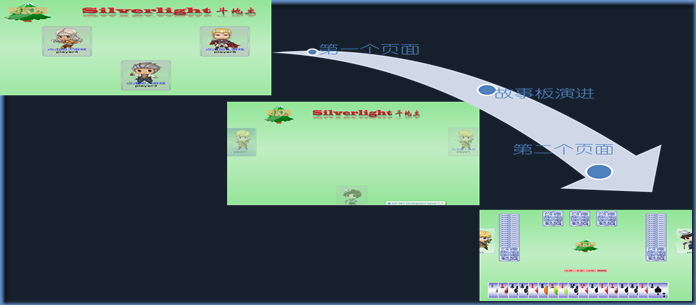
在Silverlight开发中我们会使用多个页面来减轻浏览器一次加载的数据量。不过在实际中对于多个页面的切换我们一般会采用一些动画效果来提高用户体验,这样让我们的程序看起来更酷,也让用户感觉到过渡效果很平滑、自然。不过在页面中实现这样的主意可不是小事,经过笔者的反复实验发现可以使用故事板的Completed事件来达到这个目的。现在我们来简单地浏览一下小步骤:
1、在主页的Fame中嵌入第一个内容页面;
2、使用Farme控件的导航功能将第一个内容页面换出,同时将第二个内容页面换入。
3、在导航触发时开始故事板;
4、添加Completed事件中导入第二个内容页
了解了初步的原理之后,现在我们开始来做这样一个框架:
第一步:创建一个主UserControl控件,这是Application启动的第一个窗体:
相应的Xaml代码如下:【在这儿嵌入了一个Frame控件:导航】
Generic.xaml
第二步:构建第一个内容页面,它将要放到刚才创建的Fame中:
相应的Xaml代码如下:
 代码
代码
<UserControl
    xmlns="http://schemas.microsoft.com/winfx/2006/xaml/presentation"
    xmlns:x="http://schemas.microsoft.com/winfx/2006/xaml"
    xmlns:d="http://schemas.microsoft.com/expression/blend/2008"
    xmlns:mc="http://schemas.openxmlformats.org/markup-compatibility/2006"
    mc:Ignorable="d"  xmlns:boolConverter="clr-namespace:FightsLandlordApp.Converters"
    x:Class="FightsLandlordApp.DeskSelector"
    d:DesignWidth="640" d:DesignHeight="480" >
    <UserControl.Resources>
        <boolConverter:ObjectToBoolConverter x:Key="boolConverter"/>
           <!--添加故事板代码--〉
            </UserControl.Resources>

    <Grid x:Name="LayoutRoot" Background="{StaticResource backBrush}">
        <Grid.RowDefinitions>
            <RowDefinition Height="0.5*"/>
            <RowDefinition Height="1*"/>
            <RowDefinition Height="4*"/>
            <RowDefinition Height="0.5*"/>
        </Grid.RowDefinitions>
        <StackPanel HorizontalAlignment="Center" Orientation="Horizontal" Grid.Row="1">
            <Image Source="/FightsLandlordApp;component/SampleData/CardImages/CardImages_Files/RedJoker.png"/>
            <Image Source="/FightsLandlordApp;component/Images/landlord.png" HorizontalAlignment="Center"/>
        </StackPanel>
       <Grid x:Name="content" Grid.Row="2">
           <Grid.ColumnDefinitions>
               <ColumnDefinition Width="1*"/>
            <ColumnDefinition Width="2*"/>
            <ColumnDefinition Width="1*"/>
           </Grid.ColumnDefinitions>
           <Grid.RowDefinitions>
               <RowDefinition/>
               <RowDefinition/>
           </Grid.RowDefinitions>
            <ToggleButton x:Name="leftToggle"  Width="120" Height="180"  VerticalAlignment="Center" d:LayoutOverrides="Width" Style="{StaticResource PlayerInfoStyle}" Grid.Column="1" HorizontalAlignment="Left" Checked="leftToggle_Checked" IsEnabled="{Binding [0].PlayerName,Converter={StaticResource boolConverter}}" RenderTransformOrigin="0.5,0.5">
               <ToggleButton.RenderTransform>
                   <CompositeTransform/>
               </ToggleButton.RenderTransform>
               <ToggleButton.Content>
                   <Grid Margin="10">
                       <Grid.RowDefinitions >
                           <RowDefinition Height="5*"/>
                        <RowDefinition Height="1*"/>
                    </Grid.RowDefinitions>
                        <Image Stretch="Fill" Source="{Binding [0].PlayerPhoto,Mode=OneWay}" Margin="10,0"/>
                        <TextBlock TextWrapping="Wrap" Text="{Binding [0].PlayerName,Mode=OneWay}" Grid.Row="1" HorizontalAlignment="Center" FontSize="14.667"/>
                </Grid>
            </ToggleButton.Content>
        </ToggleButton>
            <ToggleButton x:Name="rightToggle" Width="120" Height="180"  VerticalAlignment="Center" Style="{StaticResource PlayerInfoStyle}" d:LayoutOverrides="Width" Grid.Column="1" Margin="0" HorizontalAlignment="Right" Checked="rightToggle_Checked" IsEnabled="{Binding [1],Converter={StaticResource boolConverter}}" RenderTransformOrigin="0.5,0.5">
                <ToggleButton.RenderTransform>
                    <CompositeTransform/>
                </ToggleButton.RenderTransform>
               <Grid Margin="10">
                   <Grid.RowDefinitions >
                       <RowDefinition Height="5*"/>
                       <RowDefinition Height="1*"/>
                   </Grid.RowDefinitions>
                    <Image Stretch="Fill" Source="{Binding [1].PlayerPhoto}" Margin="10,0"/>
                    <TextBlock TextWrapping="Wrap" Text="{Binding [1].PlayerName}" Grid.Row="1" HorizontalAlignment="Center" FontSize="14.667"/>
               </Grid>
           </ToggleButton>
            <ToggleButton x:Name="bottomToggle" Width="{Binding Width, ElementName=rightToggle}" Height="{Binding Height, ElementName=rightToggle}" VerticalAlignment="Top" Style="{StaticResource PlayerInfoStyle}" d:LayoutOverrides="Width" Grid.Row="1" HorizontalAlignment="Center" Grid.Column="1" Checked="bottomToggle_Checked" IsEnabled="{Binding [2],Converter={StaticResource boolConverter}}" RenderTransformOrigin="0.5,0.5">
               <ToggleButton.RenderTransform>
                   <CompositeTransform/>
               </ToggleButton.RenderTransform>
               <Grid Margin="10">
                   <Grid.RowDefinitions >
                       <RowDefinition Height="5*"/>
                       <RowDefinition Height="1*"/>
                   </Grid.RowDefinitions>
                    <Image Stretch="Fill" Source="{Binding [2].PlayerPhoto}" Margin="10,0"/>
                    <TextBlock TextWrapping="Wrap" Text="{Binding [2].PlayerName}" Grid.Row="1" HorizontalAlignment="Center" FontSize="14.667"/>
               </Grid>
           </ToggleButton>
           </Grid>
    </Grid>
</UserControl>
第三步:在第一个内容页面创建一个视觉树的效果的故事板
相应的Xaml代码添加到第二步的<!--这儿添加效果故事板代码--> 下面。【这是这个特殊页面的故事板,可以自已添加故事板】
 代码
代码
<Storyboard x:Name="ClosedAnimation">
            <DoubleAnimationUsingKeyFrames Storyboard.TargetProperty="(UIElement.RenderTransform).(CompositeTransform.TranslateX)" Storyboard.TargetName="leftToggle">
                <EasingDoubleKeyFrame KeyTime="0" Value="0"/>
                <EasingDoubleKeyFrame KeyTime="0:0:0.5" Value="-300">
                    <EasingDoubleKeyFrame.EasingFunction>
                        <BackEase EasingMode="EaseInOut"/>
                    </EasingDoubleKeyFrame.EasingFunction>
                </EasingDoubleKeyFrame>
            </DoubleAnimationUsingKeyFrames>
            <DoubleAnimationUsingKeyFrames Storyboard.TargetProperty="(UIElement.Opacity)" Storyboard.TargetName="leftToggle">
                <EasingDoubleKeyFrame KeyTime="0" Value="1"/>
                <EasingDoubleKeyFrame KeyTime="0:0:0.5" Value="0"/>
            </DoubleAnimationUsingKeyFrames>
            <DoubleAnimationUsingKeyFrames Storyboard.TargetProperty="(UIElement.Opacity)" Storyboard.TargetName="rightToggle">
                <EasingDoubleKeyFrame KeyTime="0" Value="1"/>
                <EasingDoubleKeyFrame KeyTime="0:0:0.5" Value="0"/>
            </DoubleAnimationUsingKeyFrames>
            <DoubleAnimationUsingKeyFrames Storyboard.TargetProperty="(UIElement.RenderTransform).(CompositeTransform.TranslateX)" Storyboard.TargetName="rightToggle">
                <EasingDoubleKeyFrame KeyTime="0" Value="0"/>
                <EasingDoubleKeyFrame KeyTime="0:0:0.5" Value="300">
                    <EasingDoubleKeyFrame.EasingFunction>
                        <BackEase EasingMode="EaseInOut"/>
                    </EasingDoubleKeyFrame.EasingFunction>
                </EasingDoubleKeyFrame>
            </DoubleAnimationUsingKeyFrames>
            <DoubleAnimationUsingKeyFrames Storyboard.TargetProperty="(UIElement.RenderTransform).(CompositeTransform.TranslateY)" Storyboard.TargetName="bottomToggle">
                <EasingDoubleKeyFrame KeyTime="0" Value="0"/>
                <EasingDoubleKeyFrame KeyTime="0:0:.5" Value="200">
                    <EasingDoubleKeyFrame.EasingFunction>
                        <BackEase EasingMode="EaseInOut"/>
                    </EasingDoubleKeyFrame.EasingFunction>
                </EasingDoubleKeyFrame>
            </DoubleAnimationUsingKeyFrames>
            <DoubleAnimationUsingKeyFrames Storyboard.TargetProperty="(UIElement.Opacity)" Storyboard.TargetName="bottomToggle">
                <EasingDoubleKeyFrame KeyTime="0" Value="1"/>
                <EasingDoubleKeyFrame KeyTime="0:0:.5" Value="0"/>
            </DoubleAnimationUsingKeyFrames>
            <DoubleAnimationUsingKeyFrames Storyboard.TargetProperty="(UIElement.Opacity)" Storyboard.TargetName="LayoutRoot">
                <EasingDoubleKeyFrame KeyTime="0:0:0.3" Value="1"/>
                <EasingDoubleKeyFrame KeyTime="0:0:.5" Value="0"/>
            </DoubleAnimationUsingKeyFrames>
        </Storyboard>
第四步:构建第二个内容页面:这儿第二个内容页面我们并不关注他的具体实现。如果有兴趣可以察看示例代码;
第五步;处理切换故事板:在第一个内容页面添加一个鼠标事件来触发故事板【这儿是用到一个ToggleButton的Click事件】
1、找到主页面的故事板资源;
2、调用StoryBoard的Begin()方法开始播放故事板;
3、附加StoryBoard的Completed事件,在这个事件中设置Frame控件的Source依赖属性来实现导航到第二个事件。
相应的托管代码如下:
 代码
代码
  private void CheckAllToggles()
        {
            if (leftToggle.IsChecked.Value || rightToggle.IsChecked.Value || bottomToggle.IsChecked.Value)
            {
                Storyboard story = Resources["ClosedAnimation"] as Storyboard;// 1
                story.Begin();// 2
                story.Completed += new EventHandler(story_Completed);// 3

            }
        }

     //故事板事件
        void story_Completed(object sender, EventArgs e)
        {
            Home home = App.Current.RootVisual as Home;
             home.mainContent.Source = new Uri("/MainPage", UriKind.Relative);// 设置Frame的Source
        }
由于是在故事板结束以后才开始导航,所以我们能能够完全看到故事板所展现的效果了。我觉得在开发像Silverlight游戏之类运用这种方式可以大大提高玩家的用户体验,可以使整体效果更上一层。


