Vue2 -- 环境搭建
0. 官方文档
https://cn.vuejs.org/guide/quick-start.html
1. Vue概述
1.1 概述
一套用于构建用户界面的渐进式 JavaScript 框架
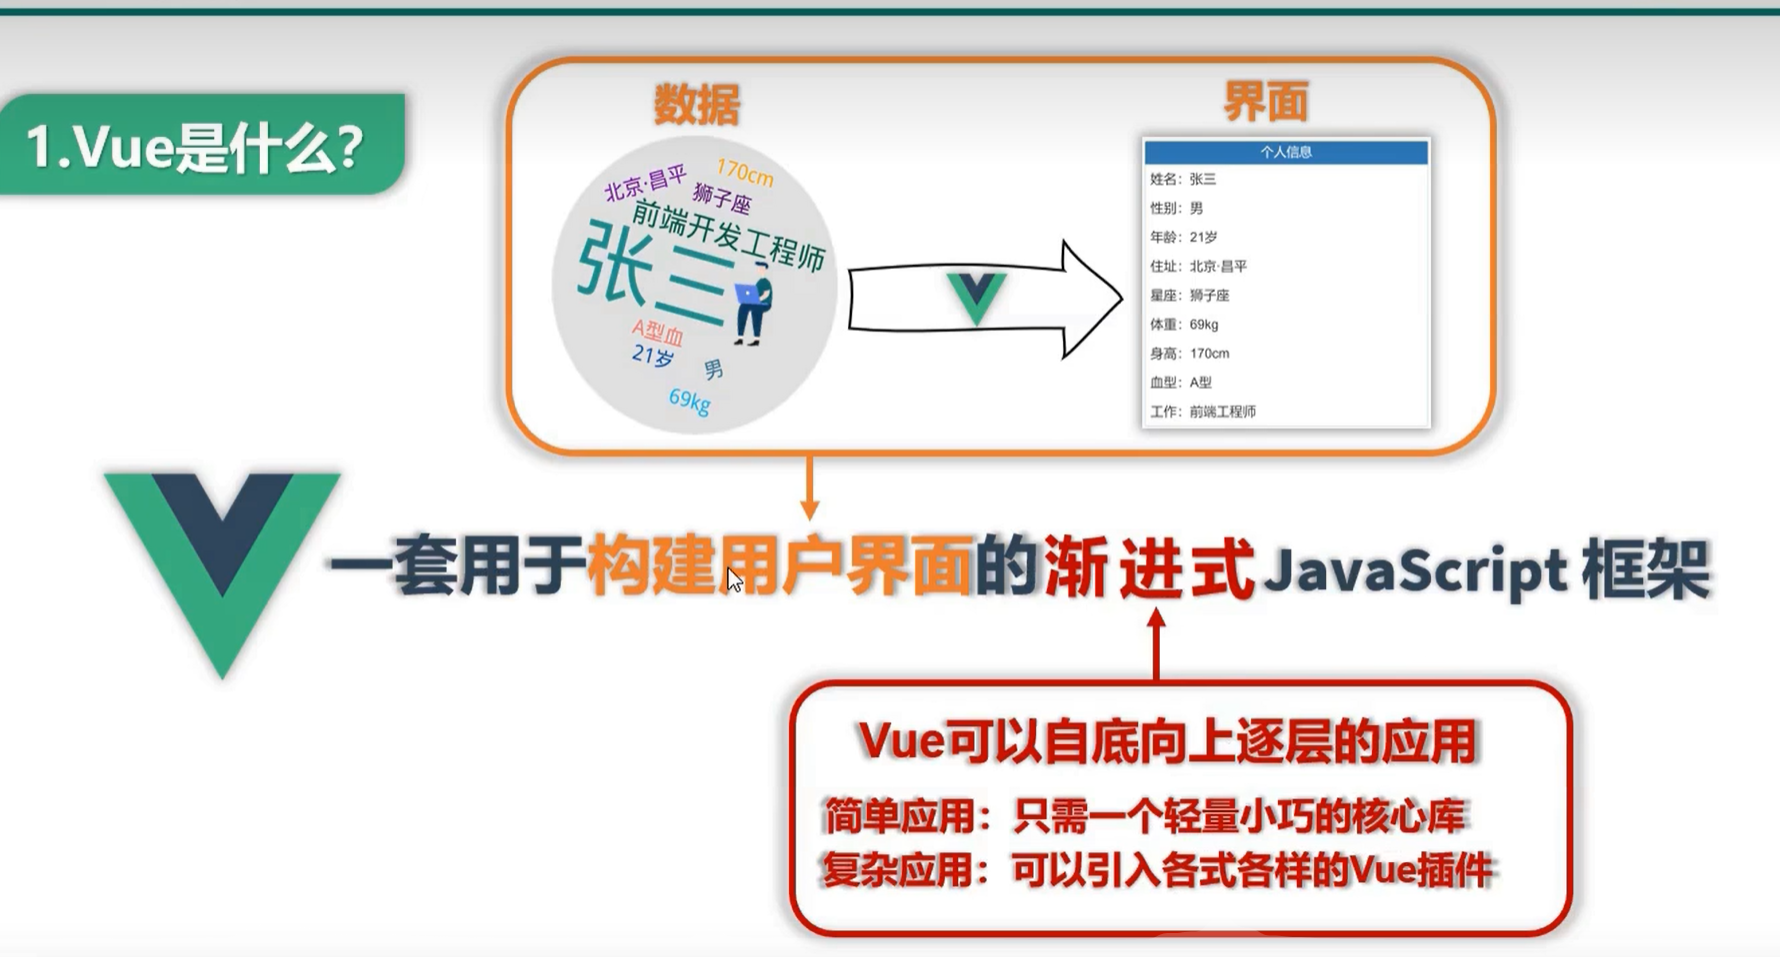
1.2 特点
1. 采用组件化模式,提高代码复用率,且让代码更好维护
2. 声明式编码,让编码人员无需直接操作DOM,提高开发效率
3. 使用虚拟DOM + 优秀的 Diff 算法,尽量复用DOM节点
2. 环境搭建
2.0 开发工具
https://devtools.vuejs.org/guide/installation.html

2.1 Script 标签引入
2.1.1 下载到本地
1. 开发环境
1. 下载地址
https://v2.cn.vuejs.org/js/vue.js
2. 代码中引入
<head>
    <!-- 引入Vue.js -->
	<script src="./xxx/vue.js"></script>
</head>
2. 生产环境
`1. 下载地址
https://v2.cn.vuejs.org/js/vue.min.js
2. 代码中引入
<head>
    <!-- 引入Vue.js -->
	<script src="./xxx/vue.min.js"></script>
</head>
2.1.2 CDN
1. 开发环境
<head>
    <!-- 引入Vue.js -->
	<script src="https://cdn.jsdelivr.net/npm/vue@2.7.16/dist/vue.js"></script>
</head>
2. 生产环境
<head>
    <!-- 引入Vue.js -->
	<script src="https://cdn.jsdelivr.net/npm/vue@2.7.16"></script>
</head>
2.2 NPM
3. 语法
3.1 快速入门
<!DOCTYPE html>
<html lang="en">
<head>
    <meta charset="UTF-8">
    <title>Title</title>
    <script type="text/javascript" src="https://cdn.jsdelivr.net/npm/vue@2.7.16/dist/vue.js"></script>
</head>
<body>
<div id="app">
    <h1>Hello {{title}}</h1>
    <h2>{{name}}</h2>
</div>
<script type="text/javascript">
    Vue.config.productionTip = false  // 阻止 Vue 在启动时生成环境检测提示

    // 创建 Vue 实例,Vue实例和容器必须是一对一的关系
    const vue = new Vue({
        el: '#app',   // 指定当前Vue实例绑定哪个标签
        data: {      // 数据存储容器,供前面指定的el区域来使用
            title: "World",
            name: "你好,世界"
        }
    })

</script>
</body>
</html>
3.2 标签绑定
1. 方式一
// 创建 Vue 实例的同时绑定标签
const vue = new Vue({
    el: '#app',
    data: {
        title: "World",
        name: "你好,世界"
    }
})
2. 方式二
// 创建 Vue 实例
const vue = new Vue({
    data: {
        name: "你好,世界"
    }
})

// 手动挂载
v.$mount("#app")
3.3 data声明
1. 方式一
// 创建 Vue 实例的同时声明data
const vue = new Vue({
    el: '#app',
    data: {
        name: "你好,世界"
    }
})
2. 方式二
// 创建 Vue 实例
const vue = new Vue({
    el: '#app',
    data(){
        return{
            name:"你好,世界"
        }
    }
})
3.4 插值语法(变量取值)
<h1> {{title}} </h1>
3.5 数据绑定
3.5.1 v-bind(单向绑定)
<a v-bind:href="url">百度</a>

<script type="text/javascript">
    const vue = new Vue({
        el: '#app',   // 指定当前Vue实例绑定哪个标签
        data: {      // 数据存储容器,供前面指定的el区域来使用
            url:"http://www.baidu.com",
        }
    })
</script>
简写形式
<a :href="url">百度</a>

<script type="text/javascript">
    const vue = new Vue({
        el: '#app',   // 指定当前Vue实例绑定哪个标签
        data: {      // 数据存储容器,供前面指定的el区域来使用
            url:"http://www.baidu.com",
        }
    })
</script>
3.5.2 v-model(双向绑定)
只能用于表单类型元素(有value值的元素),必须有输入或选择框
<div id="app">
    <div>
        <span>双向绑定:</span><input type="text" v-model:value="data">
    </div>
    <div>{{data}}</div>
</div>


<script type="text/javascript">
    const vue = new Vue({
        el: '#app',
        data: {
            data: "1234"
        }
    })
</script>
简写形式
<div id="app">
    <div>
        <span>双向绑定:</span><input type="text" v-model="data">
    </div>
    <div>{{data}}</div>
</div>


<script type="text/javascript">
    const vue = new Vue({
        el: '#app',
        data: {
            data: "1234"
        }
    })
</script>
3.5.2 数据代理技术
通过一个对象代理另一个对象中属性的读写操作就是数据代理
1. Object.defineProperty
1. 设置属性
这样设置的属性age,不可被枚举(循环)
<script>
    let person = {
        name: "张三",
        sex: "男",
    }

    // 给对象设置属性,如果想要这个属性可被枚举,必须设置 enumerable: true,
    Object.defineProperty(person, 'age', {
        value: 18,
    })
    console.log(Object.keys(person))
</script>
2. 设置属性可迭代
如果想要这个属性可被枚举,必须设置 enumerable: true
<script>
    let person = {
        name: "张三",
        sex: "男",
    }

    Object.defineProperty(person, 'age', {
        value: 18,
        enumerable: true,  // 设置属性可迭代
    })
    console.log(Object.keys(person))
</script>
3. 设置属性可修改
<script>
    let person = {
        name: "张三",
        sex: "男",
    }

    Object.defineProperty(person, 'age', {
        value: 18,
        writable: true,		// 设置属性可修改
    })
    console.log(Object.keys(person))
</script>
3. 设置属性可删除
<script>
    let person = {
        name: "张三",
        sex: "男",
    }

    Object.defineProperty(person, 'age', {
        value: 18,
        configurable: true,		// 设置属性可删除
    })
    console.log(Object.keys(person))
</script>
4. get()
<script>
    let person = {
        name: "张三",
        sex: "男",
    }

    let number = 18

    // 为保证person的age值跟随者number的改变而同时改变,需要用到以下函数
    Object.defineProperty(person, 'age', {
        get(){  // 当读取person的age属性时,get函数就会被调用,此函数的返回值为age 的值
            return number
        }
    })
    console.log(person)
    number = 19
    console.log(person)
</script>
5. set()
<script>
    let person = {
        name: "张三",
        sex: "男",
    }

    let number = 18

    Object.defineProperty(person, 'age', {
        set(value){  // 当修改person的age属性时,set函数就会被调用,此函数的返回值为age 的值
            number = value
        }
    })
    console.log(number)
    person.age = 19
    console.log(number)
</script>
6. 示例
<script>
    let obj = {x:100}
    let obj2 = {x:200}

    Object.defineProperty(obj2,'x',{
        get(){
            return obj.x
        },
        set(value){
            obj.x = value
        }
    })
</script>
2. Vue中对数据代理的应用
Vue将data对象中的每个属性进行代理,并保存到在自身的_data属性中

Vue的数据代理

总结
1. Vue中的数据代理:通过vm对象来代理data对象中属性的操作(读/写)
2. Vue中数据代理的好处: 更加方便的操作data中的数据
3. 基本原理:
	a. 通过Object.defineProperty()把data对象中所有属性添加到vm上
	b. 为每一个添加到vm上的属性,都指定一个getter/setter
	c. 在getter/setter内部取操作(读/写) data中对应的属性
3.5.3 _data的数据劫持技术
3.6 事件
3.6.1 v-on
<button v-on:click="changeInfo">修改提示词</button>
简写形式
<button @click="changeInfo">修改提示词</button>
3.6.2 点击事件
1. 绑定点击事件
<div id="app">
    <h1>欢迎来到{{name}}</h1>
    <button @click="changeInfo">修改提示词</button>
</div>
<body>
<script>
    new Vue({
        el: "#app",
        data: {
            name: "天上人间"
        },
        methods: {
            changeInfo(event) {
                console.log(event)    		// 事件对象
                console.log(event.target)   // 事件标签元素
                console.log(event.target.innerText)   // 标签元素的内容
                this.name = "水上人间"   // this为Vue的实例对象
            }

            // 箭头函数定义的函数是没有自己的this的,会往外层直接找到window
            changeInfo2:(event)=>{
                this.name  // this为Window的实例对象,window对象是没有name属性的,所以此处会报错
            }
        }
    })

</script>
2. 参数传递
<div id="app">
    <h1>欢迎来到{{name}}</h1>
    <!-- 函数名直接传参,如果想在函数内部调到event,必须传递关键字参数 $event -->
    <button @click="changeInfo($event,1)">修改提示词</button>
</div>
<body>
<script>
    new Vue({
        el: "#app",
        data: {
            name: "天上人间"
        },
        methods: {
            changeInfo(event,sid) {
                console.log(event)
                console.log(sid)
            }
        }
    })

</script>
3.6.3 事件修饰符
1. prevent -- 阻止标签默认行为
如,阻止a标签的跳转行为
1. js阻止标签默认行为
<div id="app">
    <a href="https://www.baidu.com" @click="changeInfo">弹出信息</a>
</div>

<script>
    new Vue({
        el: "#app",
        data: {
            name: "天上人间"
        },
        methods: {
            changeInfo(e) {
                e.preventDefault()  // 阻止a标签的跳转行为
                alert(name)
            }
        }
    })

</script>
3. Vue阻止标签默认行为
<div id="app">
    <!-- click.prevent 来阻止默认行为 -->
    <a href="https://www.baidu.com" @click.prevent="changeInfo">弹出信息</a>
</div>

<script>
    new Vue({
        el: "#app",
        data: {
            name: "天上人间"
        },
        methods: {
            changeInfo(e) {
                alert(name)
            }
        }
    })

</script>
2. stop -- 阻止事件冒泡
1. js阻止事件冒泡
<div id="app">
    <!-- 子元素和父元素有相同的点击事件,点击子元素的同时,默认会触发同名事件,这就是事件冒泡,这里点击事件会被执行两次 -->
   <div @click="changeInfo">
       <!-- 修饰符可以连续写多个 -->
       <button  @click.stop="changeInfo">弹框</button>
   </div>
</div>

<script>
    new Vue({
        el: "#app",
        data: {
            name: "天上人间"
        },
        methods: {
            changeInfo(e) {
                e.stopPropagation()  // 阻止时间冒泡
                alert(name)
            }
        }
    })

</script>
3. Vue阻止事件冒泡
<div id="app">
   <div @click="changeInfo">
       <button  @click.stop="changeInfo">弹框</button>
   </div>
</div>

<script>
    new Vue({
        el: "#app",
        data: {
            name: "天上人间"
        },
        methods: {
            changeInfo(e) {
                alert(name)
            },
        }
    })

</script>
3. once -- 事件只触发一次
1. js事件只触发一次
<div id="app">
    <!-- 子元素和父元素有相同的点击事件,点击子元素的同时,默认会触发同名事件,这就是事件冒泡,这里点击事件会被执行两次 -->
    <div class="demo1" @click="changeInfo">
        <button @click="changeInfo">弹出信息</button>
    </div>
</div>

<script>
    new Vue({
        el: "#app",
        data: {
            name: "天上人间"
        },
        methods: {
            changeInfo(e) {
                e.stopPropagation()  // 阻止时间冒泡
                alert(name)
            }
        }
    })

</script>
3. Vue事件只触发一次
<div id="app">
    <button @click.once="changeInfo">弹出信息</button>
</div>
<body>
<script>
    new Vue({
        el: "#app",
        data: {
            name: "天上人间"
        },
        methods: {
            changeInfo(e) {
                alert(name)
            }
        }
    })

</script>
4. captrue
由于事件是由捕获阶段到冒泡阶段的,此方法是强制事件只使用捕获模式
<div id="app">
    <!-- 外层标签加capture -->
   <div style="background-color: skyblue;padding: 20px" @click.capture="sendMsg(1)">
       div1
       <div style="background-color:orange;padding: 20px" @click="sendMsg(2)">
           div2
       </div>
   </div>
</div>
<body>
<script>
    new Vue({
        el: "#app",
        data: {
            name: "天上人间"
        },
        methods: {
            changeInfo(e) {
                alert(name)
            },
            sendMsg(msg){
                console.log(msg)
            }
        }
    })

</script>
5. self -- 也可以阻止事件冒泡
只有event.target是当前操作的元素才触发事件
<div id="app">
   <div @click.self="changeInfo">
       <button  @click.stop="changeInfo">弹框</button>
   </div>
</div>

<script>
    new Vue({
        el: "#app",
        data: {
            name: "天上人间"
        },
        methods: {
            changeInfo(e) {
                console.log(e.target)
                alert(name)
            }
        }
    })

</script>
6. passive
事件的默认行为立即执行,无需等待事件回调执行完毕
鼠标滚轮滚动事件wheel,会先将事件函数执行完毕后,再执行滚动栏的滚动行为,当事件函数需要执行流程很复杂时,会出现鼠标滚轮滚动了,但是滚动栏没动的情况,这里使用passive,则会先执行滚动条滚动,后台默默执行函数
<div id="app">
    <ul style="height: 400px;width: 400px;background-color: orange;overflow: auto" @wheel="printMsg">
        <li style="height: 200px">1</li>
        <li style="height: 200px">2</li>
        <li style="height: 200px">3</li>
        <li style="height: 200px">4</li>
    </ul>
</div>
<body>
<script>
    new Vue({
        el: "#app",
        data: {
            name: "天上人间"
        },
        methods: {
            printMsg() {
                for (let i = 0; i < 100000; i++) {
                    console.log("@")
                }
                console.log("执行完毕")
            },
        }
    })

</script>
3.6.4 滚动事件
1. scroll
滚动条绑定滚动事件,如果滚动条到底,则不再会触发
<div id="app">
    <ul style="height: 400px;width: 400px;background-color: orange;overflow: auto" @scroll="printMsg">
        <li style="height: 200px">1</li>
        <li style="height: 200px">2</li>
        <li style="height: 200px">3</li>
        <li style="height: 200px">4</li>
    </ul>
</div>
<body>
<script>
    new Vue({
        el: "#app",
        data: {
            name: "天上人间"
        },
        methods: {
            printMsg() {
                console.log("@")
            },
        }
    })

</script>
2. wheel
鼠标滚轮绑定滚动事件,滚轮一直动会一直触发,不受制于滚动条是否到底
<div id="app">
    <ul style="height: 400px;width: 400px;background-color: orange;overflow: auto" @wheel="printMsg">
        <li style="height: 200px">1</li>
        <li style="height: 200px">2</li>
        <li style="height: 200px">3</li>
        <li style="height: 200px">4</li>
    </ul>
</div>
<body>
<script>
    new Vue({
        el: "#app",
        data: {
            name: "天上人间"
        },
        methods: {
            printMsg() {
                console.log("@")
            },
        }
    })

</script>
3.6.5 键盘事件
1. keyup
键盘抬起时触发的事件
2. keydown
键盘按下时触发的事件
<div id="app">
    <input type="text" placeholder="按下回车弹出输入内容" @keyup="printMsg">
</div>
<body>
<script>
    new Vue({
        el: "#app",
        data: {
        },
        methods: {
            printMsg(e) {
                if(e.keyCode !== 13) return
                alert(e.target.value)
            },
        }
    })

</script>
3. 按键别名
回车  => enter
删除  => delete (捕获"Delete"和"Backspace"键)
退出  => esc
空格  => space
换行  => tab  (必须使用keydown绑定事件,才能正常使用,同时还有ctrl,alt.shift,meta(win键))
上  => up
下  => down
左  => left
右  => right
使用按键别名,监听回车键
<div id="app">
    <input type="text" placeholder="按下回车弹出输入内容" @keyup.enter="printMsg">
</div>
<body>
<script>
    new Vue({
        el: "#app",
        data: {
        },
        methods: {
            printMsg(e) {
                alert(e.target.value)
            },
        }
    })

</script>
4. 其他按键
<div id="app">
    <input type="text" placeholder="按下回车弹出输入内容" @keyup.caps-lock="printMsg">
</div>
<body>
<script>
    new Vue({
        el: "#app",
        data: {
        },
        methods: {
            printMsg(e) {
                console.log(e.key,e.keyCode)  // 键的名字,键的编码,得到键的名字则可以直接调用,但要注意驼峰体的按键是两个单词的拼接,如键盘上切换大小写的键: CapsLock 转换为 caps-lock,其他同理
            },
        }
    })

</script>
5. 特殊按键
1. 换行  => tab  (必须使用keydown绑定事件,才能正常使用)
2. 系统修饰键: ctrl,alt.shift,meta(win键)
	a. 配合keyup使用时,必须是按下系统修饰键的同时再按下其他键,随后释放其他键,事件才会被触发,@keyup.ctrl.y 就是 ctrl + y
	b. 配置keydown使用,正常触发事件
6. 自定义别名
<script>
    Vue.config.keyCodes.huiche = 13
</script>
3.7 计算属性
将Vue中定义的属性,重新计算后得到一个新的属性,此为计算属性,底层接住了Object.definepropeerty方法提供的getter和setter
<div id="app">
    姓: <input type="text" name="" v-model="firstName"><br>
    名: <input type="text" name="" v-model="lastName"><br>
    全名: <span>{{fullName}}</span>
</div>

<script type="text/javascript">

    const vue = new Vue({
        el: '#app',
        data: {
            firstName: "张",
            lastName: "三"
        },
        computed: {
            fullName:{
                get(){   // get() 当调用 fullName 时得到计算完成后的属性
                    // get() 什么时候调用
                        // 1. 整体模板第一次调用fullName 时,并将结果缓存起来,页面中其他地方读取都是缓存
                        // 2. fullName 所依赖的数据发生变化时,如firstName 或lastName 发生变化时就会重新执行get()
                    return this.firstName + "-" + this.lastName
                },

                // 不是必须定义的,如果很确定这个fullName不会被修改,则无需定义set(),
                // fullName 发生变化时会调用set()
                set(value){
                    const arr = value.split("-")
                    this.firstName = arr[0]
                    this.lastName = arr[1]
                }
            }
        }
    })


</script>
简写形式,确定计算属性只读不改
<div id="app">
    姓: <input type="text" name="" v-model="firstName"><br>
    名: <input type="text" name="" v-model="lastName"><br>
    全名: <span>{{fullName}}</span>
</div>

<script type="text/javascript">

    const vue = new Vue({
        el: '#app',
        data: {
            firstName: "张",
            lastName: "三"
        },
        computed: {
            fullName(){
                return this.firstName + "-" + this.lastName
            }
        }
    })


</script>
3.8 侦听属性(监视属性)
监视数据的变化
1. 定义侦听属性
<div id="app">
    <div>今天天气很{{info}}</div>
    <button @click="changeWeather">切换天气</button>
</div>
<script type="text/javascript">
    const vue = new Vue({
        el: '#app',
        data: {
            isHot: true
        },
        computed: {
            info(){
                return this.isHot ? "炎热" : "凉爽"
            }
        },
        methods:{
            changeWeather(){
                this.isHot = !this.isHot
            }
        },
        watch:{   // 监视属性
            isHot:{
                immediate:true, // 初始化时,调用handler,默认为false
                handler(newValue,oldValue){  // 当isHot发生改变时自动执行handler函数,同时保存着之前的值
                    console.log("改变后的值",newValue,"改变前的值",oldValue)
                }
            },
            info:{   // 也可以监视计算属性
                immediate:true, // 初始化时,就先调用一次handler,默认为false
                handler(newValue,oldValue){  // 当info发生改变时自动执行handler函数,同时保存着之前的值
                    console.log("改变后的值",newValue,"改变前的值",oldValue)
                }
            }
        }
    })


</script>
方式二
<div id="app">
    <div>今天天气很{{info}}</div>
    <button @click="changeWeather">切换天气</button>
</div>
<script type="text/javascript">
    const vue = new Vue({
        el: '#app',
        data: {
            isHot: true
        },
        computed: {
            info(){
                return this.isHot ? "炎热" : "凉爽"
            }
        },
        methods:{
            changeWeather(){
                this.isHot = !this.isHot
            }
        },
    })

    vm.$watch('isHot',{
        immediate:true,
        handler(newValue,oldValue){
            console.log("改变后的值",newValue,"改变前的值",oldValue)
        }
    })


</script>
2. 深度侦听
只监视numbers中的a的改变
<div id="app">
    <div>a:{{numbers.a}}   b:{{numbers.b}}</div>
    <button @click="changeNumber">a+1</button>
</div>
<script type="text/javascript">
    const vue = new Vue({
        el: '#app',
        data: {
            numbers: {
                a:1,
                b:2
            }
        },
        methods:{
            changeNumber(){
                this.numbers.a++
            }
        },
        watch:{   // 监视属性
            a:{   // a是被包裹在numbers中的,这样写是无法监视到a的
                handler(newValue,oldValue){
                    console.log("改变后的值",newValue,"改变前的值",oldValue)
                }
            },
            'numbers.a':{  // 监视 numbers.a
                handler(newValue,oldValue){
                    console.log("改变后的值",newValue,"改变前的值",oldValue)
                }
            }
        }
    })


</script>
监视numbers中的任何项发生改变
<div id="app">
    <div>a:{{numbers.a}}   b:{{numbers.b}}</div>
    <button @click="changeNumber">a+1</button>
</div>
<script type="text/javascript">
    const vue = new Vue({
        el: '#app',
        data: {
            numbers: {
                a:1,
                b:2
            }
        },
        methods:{
            changeNumber(){
                this.numbers.a++
            }
        },
        watch:{   // 监视属性
            numbers:{
                deep:true,  // 监视numbers中的任何项发生改变
                handler(newValue,oldValue){
                    console.log("改变后的值",newValue,"改变前的值",oldValue)
                }
            }
        }
    })


</script>
3. 侦听属性简写
只监视第一层属性的变化
div id="app">
    <div>a:{{a}}</div>
    <button @click="changeNumber">a+1</button>
</div>
<script type="text/javascript">
    const vue = new Vue({
        el: '#app',
        data: {
            a:1,
        },
        methods:{
            changeNumber(){
                this.a++
            }
        },
        watch:{
            a(newValue,oldValue){  // 注意参数
                console.log("改变后的值",newValue,"改变前的值",oldValue)
            }
        }
    })


</script>
<div id="app">
    <div>a:{{a}}</div>
    <button @click="changeNumber">a+1</button>
</div>
<script type="text/javascript">
    const vue = new Vue({
        el: '#app',
        data: {
            a: 1,
        },
        methods: {
            changeNumber() {
                this.a++
            }
        },
    })
    vue.$watch('a', function (newValue,oldValue) {   // 注意参数
        console.log("改变后的值", newValue, "改变前的值", oldValue)
    })

</script>
4. 侦听属性实现计算属性中的案例
<div id="app">
    姓: <input type="text" v-model="firstName"> <br>
    姓: <input type="text" v-model="lastName"> <br>
    全名: <span>{{fullName}}</span>
</div>


<script type="text/javascript">
    const vue = new Vue({
        el: '#app',
        data: {
            firstName: "张",
            lastName: "三",
            fullName: "张-三"
        },
        watch: {
            firstName(val) {
                this.fullName = val + "-" + this.lastName
            },
            lastName(val) {
                this.fullName = this.firstName + "-" + val

            }
        }
    })


</script>
5. 异步任务,只能用侦听属性实现
<div id="app">
    姓: <input type="text" v-model="firstName"> <br>
    姓: <input type="text" v-model="lastName"> <br>
    全名: <span>{{fullName}}</span>
</div>
<script type="text/javascript">
    const vue = new Vue({
        el: '#app',
        data: {
            firstName: "张",
            lastName: "三",
            fullName: "张-三"
        },
        watch: {
            firstName(val) {
                setTimeout(()=>{   // 定时器为异步任务,延迟1秒再修改全名
                    this.fullName = val + "-" + this.lastName
                },1000)
            },
            lastName(val) {
                this.fullName = this.firstName + "-" + val

            }
        }
    })


</script>
3.9 样式绑定
3.9.1 class样式
1. 字符串形式
<style>
    .basic {
        width: 100%;
        height: 400px;
    }

    .normal {
        background-color: skyblue;
    }

    .happy {
        background-color: orange;
    }

    .sad {
        background-color: green;
    }
</style>


<div id="app">
    <!-- 对于不会动态变化的class值 正常定义,对于动态变化的class 值,使用v-bind 管理,适用于样式的类名不确定,需要动态指定-->
    <div class="basic" :class="mood" @click="changeMood">test</div>
</div>


<script>
    new Vue({
        el: "#app",
        data: {
            mood: "normal"
        },
        methods: {
            changeMood() {
                this.mood = "happy"
            }
        }
    })

</script>
2. 数组形式
<style>
    .basic {
        width: 100%;
        height: 400px;
        border: 1px solid black;
    }

    .c1 {
        font-size: 100px;
    }

    .c2 {
        border-radius: 90px;
    }
    .c3 {
        color: orange;
    }
</style>

<div id="app">
    <!-- 操作数组中的class类型,来动态修改样式 -->
    <div class="basic" :class="classArr" @click="deleteClass">test</div>
</div>

<script>
    new Vue({
        el: "#app",
        data: {
            classArr: ["c1","c2","c3"]
        },
        methods: {
            deleteClass() {
                this.classArr.shift()
                // this.classArr.push("c1")
            }
        }
    })

</script>
3. 对象形式
<style>
    .basic {
        width: 100%;
        height: 400px;
        border: 1px solid black;
    }

    .c1 {
        font-size: 100px;
    }

    .c2 {
        border-radius: 90px;
    }
</style>


<div id="app">
    <!-- 对于不会动态变化的class值 正常定义,对于动态变化的class 值,使用v-bind 管理 -->
    <div class="basic" :class="classObj" @click="deleteClass">test</div>
</div>


<script>
    new Vue({
        el: "#app",
        data: {
            classObj: {
                c1: false,
                c2: false
            }
        },
        methods: {
            deleteClass() {
                this.classObj.c1 = !this.classObj.c1
                this.classObj.c2 = !this.classObj.c2
            }
        }
    })

</script>
3.9.2 style样式
写法一
<div id="app">
    <!-- 改为对象形式 font-size 改为 fontSize  并和px拼接-->
    <div :style="{fontSize: fSize + 'px'}" @click="changeClass">test</div>
</div>

<script>
    new Vue({
        el: "#app",
        data: {
            fSize:40
        },
        methods: {
            changeClass(){
                this.fSize += 10
            }
        }
    })

</script>
写法二
<div id="app">
    <!-- font-size 改为 fontSize  px拼接-->
    <div :style="fontObj" @click="changeClass">test</div>
</div>


<script>
    new Vue({
        el: "#app",
        data: {
            fontObj: {
                fontSize: '40px'
            }
        },
        methods: {
            changeClass() {
                this.fontObj.fontSize = "100px"
            }
        }
    })

</script>
3.10 条件语句
3.10.1 v-show
如果v-show 后面的表达式为false,会将当前标签用display:none隐藏,并不会删除标签,如果节点变化的比较频繁就使用v-show
<div id="app">
    <button @click="changeShow">显示test2</button>
    <div>test1</div>
    <div v-show="isShow">test2</div>
</div>

<script>
    new Vue({
        el: "#app",
        data: {
            isShow: false,
        },
        methods: {
            changeShow() {
                this.isShow = !this.isShow
            }
        }
    })

</script>

3.10.1 v-if
v-if
v-if 不满足条件是没有标签节点的
<div id="app">
    <button @click="changeShow">显示test2</button>
    <div>test1</div>
    <div v-if="isShow">test2</div>
    <div v-else-if="!isShow">test3</div>
     <div v-else>test4</div>
</div>


<script>
    new Vue({
        el: "#app",
        data: {
            isShow: false,
        },
        methods: {
            changeShow() {
                this.isShow = !this.isShow
            }
        }
    })

</script>

3.11 循环语句
3.11.1 v-for
1. 遍历数组
<div id="app">
    <ul>
        <!-- 注意必须要写key值,v为索引值,括号最好写上 -->
        <li v-for="(p,v) in persons" :key="p.id">索引{{v}}-{{p.name}}-{{p.age}}</li>
    </ul>
</div>


<script>
    new Vue({
        el: "#app",
        data: {
            persons:[
                {id:1,name:'小明',age:18},
                {id:2,name:'小红',age:19},
                {id:3,name:'小白',age:20},
            ]
        },
    })

</script>
2. 遍历对象
<div id="app">
    <ul>
        <li v-for="v,k in persons" :key="k">{{k}}-{{v}}</li>
    </ul>
</div>

<script>
    new Vue({
        el: "#app",
        data: {
            persons:{id:1,name:'小明',age:18},
        },
    })

</script>
3. 遍历字符串
<div id="app">
    <ul>
        <li v-for="i,v in persons" :key="i">{{i}}-{{v}}</li>
    </ul>
</div>


<script>
    new Vue({
        el: "#app",
        data: {
            persons:"jlkajdsf",
        },
    })
</script>
4. 遍历次数
<div id="app">
    <ul>
        <li v-for="n,v in 5">序号{{n}}-索引{{v}}</li>
    </ul>
</div>

<script>
    new Vue({
        el: "#app",
    })
</script>
5. key 的原理
key是vue在内部使用的并不会在标签上显示
1. 使用index时,且会在数组索引为0的位置安插数据时,破坏了之前数组的顺序,就会出现的标签错乱的bug,同时这样做的效果是很低的,不会复用之前的DOM,在末尾添加数据,并未破坏原本的数据不会出现这个bug,必须要换成后端获取的id字段这种唯一的ID才不会出现这个bug
<div id="app">
    <ul>
        <li v-for="(p,index) in persons" :key="index">
            {{p.name}}-{{p.age}}
            <input type="text">
        </li>
    </ul>
    <button @click.once="add">添加一个人员</button>
</div>

<script>
    new Vue({
        el: "#app",
        data: {
            persons: [
                {id: 1, name: "张三", age: 18},
                {id: 2, name: "李四", age: 19},
                {id: 3, name: "王五", age: 20},
            ]
        },
        methods:{
            add(){
                const onePerson = {id:4,name:"赵六",age:21}
                this.persons.unshift(onePerson)
            }
        }
    })

</script>
当所有的input框写入内容后,再点击添加人员时会出现标签结构问题:如下
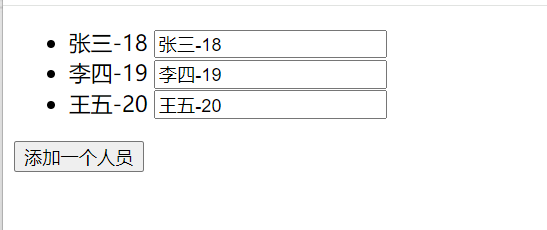
点击添加人员后

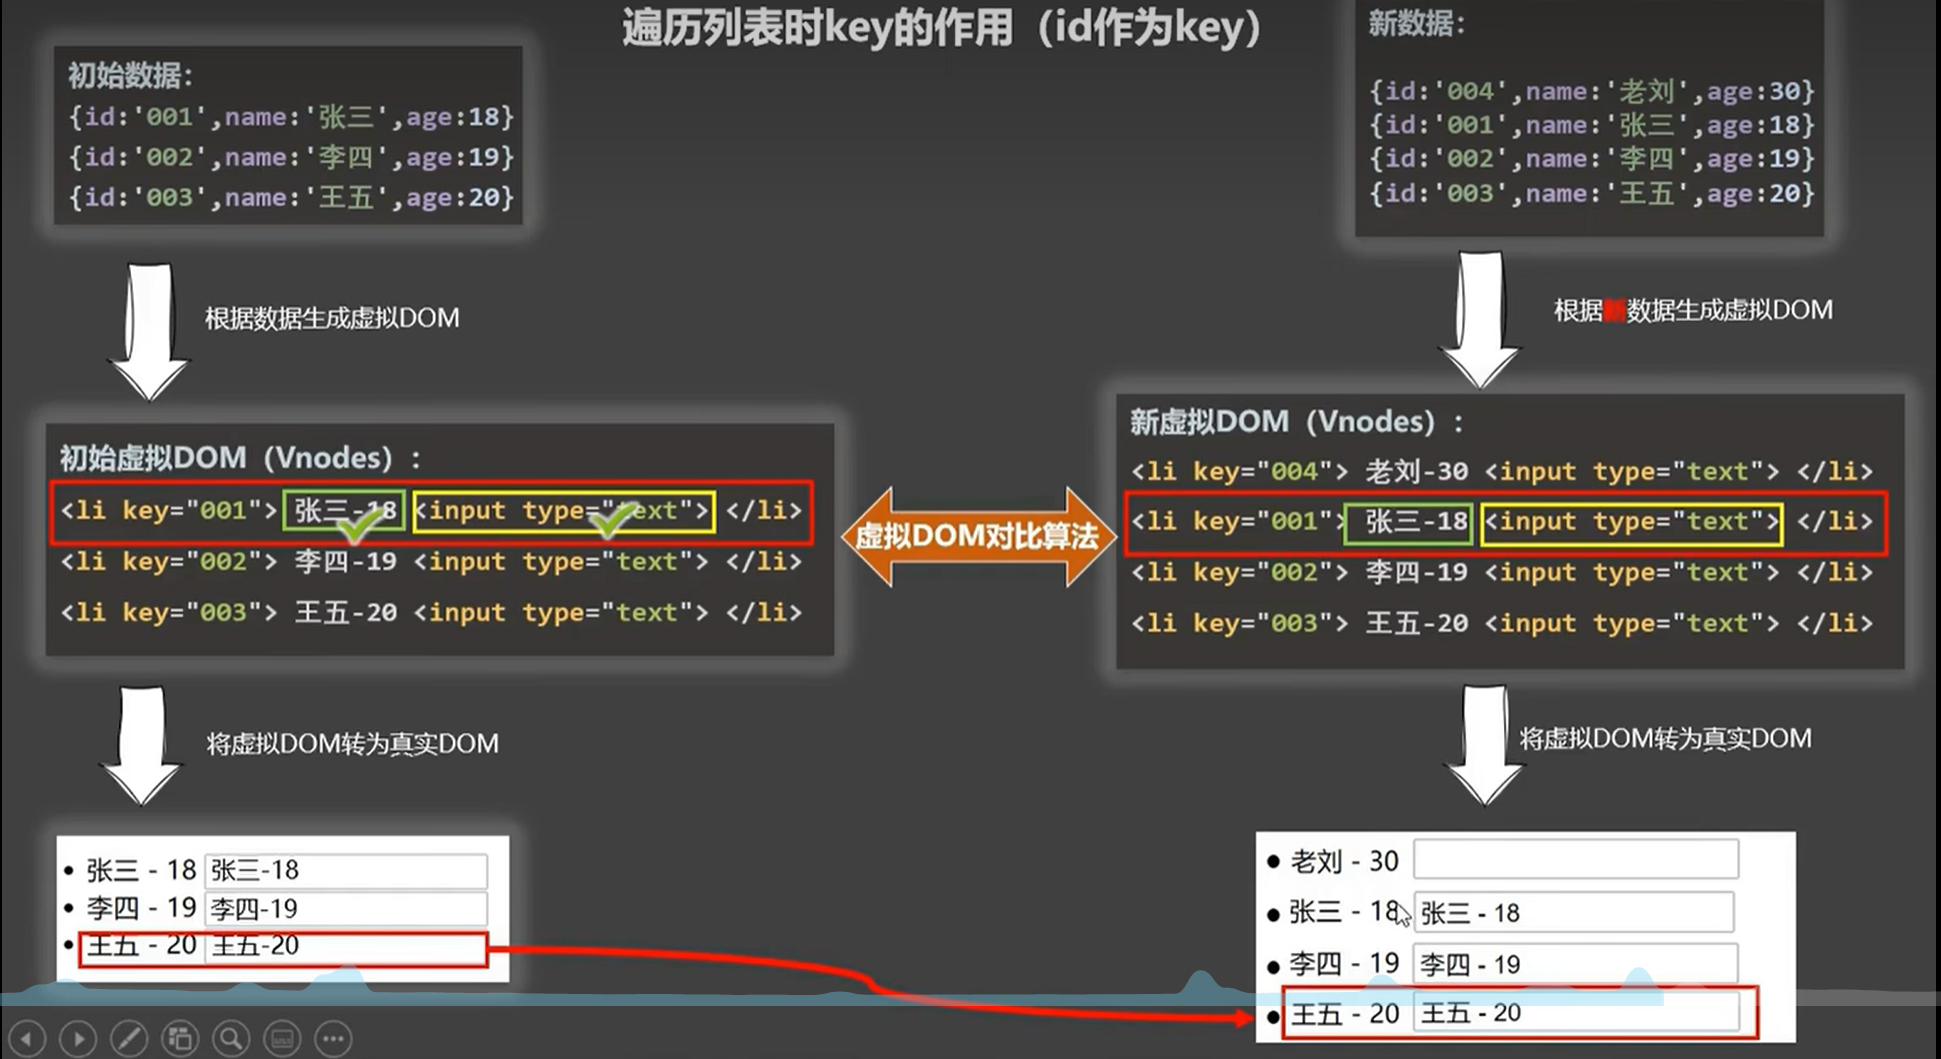
2. key的作用
Index为key时

当循环列表时,会根据初始数据生成虚拟DOM,如上图中,然后再根据虚拟DOM转成真实DOM,用户在Input框中的输入是在操作真实DOM,当有新数据插入在列表的首位时,数据发生了变化,同样根据新数据生成虚拟DOM,然后根据虚拟DOM对比算法来进行比对,比对的根据就是key这个值,如上图,会循环对比两边的虚拟DOM,如:左右两边的key=0的这一行的标签中的文字节点是不一样的,并不能复用,所以当由虚拟DOM转成真实DOM时,会生成老刘-30替换之前的文本节点,而input框在虚拟DOM中对比结果为一致的,则会复用之前携带用户输入数据的节点,以此类推
ID为key时
3. 开发中如何选择key
1. 最好使用每条数据的唯一标识作为key,如id,手机号,身份证号,学号等唯一值
2. 如果不存在对数据的逆序添加,逆序删除等破坏顺讯操作,仅用于渲染列表用于展示,使用index作为key是没有问题的
3.12 数组渲染
1. 数组遍历
<div id="app">
    <ul>
        <!-- 注意必须要写key值,v为索引值,括号最好写上 -->
        <li v-for="(p,v) in persons" :key="p.id">索引{{v}}-{{p.name}}-{{p.age}}</li>
    </ul>
</div>


<script>
    new Vue({
        el: "#app",
        data: {
            persons:[
                {id:1,name:'小明',age:18},
                {id:2,name:'小红',age:19},
                {id:3,name:'小白',age:20},
            ]
        },
    })

</script>
2. 数组过滤
1. 使用侦听属性实现
<div id="app">
    <h1>数组过滤</h1>
    <input type="text" placeholder="请输入文字" v-model="keyWord">
    <ul v-if="filPersons">
        <li v-for="(p,index) in filPersons" :key="index">
            {{p.name}}-{{p.age}}
        </li>
    </ul>

</div>
<script>
    new Vue({
        el: "#app",
        data: {
            keyWord: "",
            persons: [
                {id: 1, name: "张三", age: 18},
                {id: 2, name: "李四", age: 19},
                {id: 3, name: "王五", age: 20},
            ],
            filPersons: []
        },
        watch: {
            keyWord: {
                // immediate:true 初始化时,先调用一次handler
                immediate:true,   // 由于字符串中都会包含空字符串,当indexOf(空字符串)时,this.filPersons筛选出来的结果为persons数组的每一个元素
                handler(val) {
                    this.filPersons = this.persons.filter((p) => {
                        return p.name.indexOf(val) !== -1
                    })
                }
            }
        }
    })

</script>
2. 使用计算属性实现
<div id="app">
    <h1>数组过滤</h1>
    <input type="text" placeholder="请输入文字" v-model="keyWord">
    <ul>
        <li v-for="(p,index) in filPersons" :key="index">
            {{p.name}}-{{p.age}}
        </li>
    </ul>

</div>
<script>

    new Vue({
        el: "#app",
        data: {
            keyWord: "",
            persons: [
                {id: 1, name: "张三", age: 18},
                {id: 2, name: "李四", age: 19},
                {id: 3, name: "王五", age: 20},
            ],
        },
        computed: {
            filPersons(){
                return this.filPersons = this.persons.filter((p) => {
                    return p.name.indexOf(this.keyWord) !== -1
                })
            }
        }
    })
</script>
3. 数组过滤后排序
<div id="app">
    <h1>数组过滤+排序</h1>
    <input type="text" placeholder="请输入文字" v-model="keyWord">
    <ul>
        <li v-for="(p,index) in filPersons" :key="index">
            {{p.name}}-{{p.age}}
        </li>
    </ul>
    <button @click="sortType = 2">年龄升序</button>
    <button @click="sortType = 1">年龄降序</button>

</div>
<script>

    new Vue({
        el: "#app",
        data: {
            keyWord: "",
            sortType: 0,
            persons: [
                {id: 1, name: "马冬梅", age: 18},
                {id: 2, name: "周冬雨", age: 19},
                {id: 3, name: "周杰伦", age: 40},
                {id: 4, name: "王兆伦", age: 25},
            ],
        },
        computed: {
            filPersons() {
                const filteredArr = this.filPersons = this.persons.filter((p) => {
                    return p.name.indexOf(this.keyWord) !== -1
                })
                if (this.sortType) {
                    filteredArr.sort((p1, p2) => {
                        return this.sortType === 1 ? p2.age - p1.age : p1.age - p2.age
                    })

                }
                return filteredArr
            }
        }
    })
</script>
9. 原理
9.1 MVVM模型

1. M: 模型(Model)
对应 Vue data中的数据
2. V: 视图(View)
模版
3. VM: 视图模型(ViewModel)
Vue 实例对象
9.2 数据绑定之数据代理技术
通过一个对象代理另一个对象中属性的读写操作就是数据代理
1. Object.defineProperty
1. 设置属性
这样设置的属性age,不可被枚举(循环)
<script>
    let person = {
        name: "张三",
        sex: "男",
    }

    // 给对象设置属性,如果想要这个属性可被枚举,必须设置 enumerable: true,
    Object.defineProperty(person, 'age', {
        value: 18,
    })
    console.log(Object.keys(person))
</script>
2. 设置属性可迭代
如果想要这个属性可被枚举,必须设置 enumerable: true
<script>
    let person = {
        name: "张三",
        sex: "男",
    }

    Object.defineProperty(person, 'age', {
        value: 18,
        enumerable: true,  // 设置属性可迭代
    })
    console.log(Object.keys(person))
</script>
3. 设置属性可修改
<script>
    let person = {
        name: "张三",
        sex: "男",
    }

    Object.defineProperty(person, 'age', {
        value: 18,
        writable: true,		// 设置属性可修改
    })
    console.log(Object.keys(person))
</script>
3. 设置属性可删除
<script>
    let person = {
        name: "张三",
        sex: "男",
    }

    Object.defineProperty(person, 'age', {
        value: 18,
        configurable: true,		// 设置属性可删除
    })
    console.log(Object.keys(person))
</script>
4. get()
<script>
    let person = {
        name: "张三",
        sex: "男",
    }

    let number = 18

    // 为保证person的age值跟随者number的改变而同时改变,需要用到以下函数
    Object.defineProperty(person, 'age', {
        get(){  // 当读取person的age属性时,get函数就会被调用,此函数的返回值为age 的值
            return number
        }
    })
    console.log(person)
    number = 19
    console.log(person)
</script>
5. set()
<script>
    let person = {
        name: "张三",
        sex: "男",
    }

    let number = 18

    Object.defineProperty(person, 'age', {
        set(value){  // 当修改person的age属性时,set函数就会被调用,此函数的返回值为age 的值
            number = value
        }
    })
    console.log(number)
    person.age = 19
    console.log(number)
</script>
6. 示例
<script>
    let obj = {x:100}
    let obj2 = {x:200}

    Object.defineProperty(obj2,'x',{
        get(){
            return obj.x
        },
        set(value){
            obj.x = value
        }
    })
</script>
2. Vue中对数据代理的应用
Vue将data对象中的每个属性进行代理,并保存到在自身的_data属性中

Vue的数据代理

总结
1. Vue中的数据代理:通过vm对象来代理data对象中属性的操作(读/写)
2. Vue中数据代理的好处: 更加方便的操作data中的数据
3. 基本原理:
	a. 通过Object.defineProperty()把data对象中所有属性添加到vm上
	b. 为每一个添加到vm上的属性,都指定一个getter/setter
	c. 在getter/setter内部取操作(读/写) data中对应的属性
9.3 数据绑定之_data的数据劫持技术
9.4 数据绑定之数据监视原理
1. 更新时会出现的问题
<div id="app">
    <h1>更新时的问题</h1>
    <ul>
        <li v-for="(p,index) in persons" :key="p.id">
            {{p.name}}-{{p.age}}
        </li>
    </ul>
    <button @click="updateMdm2">更新马冬梅的信息</button>

</div>
<script>

    new Vue({
        el: "#app",
        data: {
            keyWord: "",
            sortType: 0,
            persons: [
                {id: 1, name: "马冬梅", age: 18},
                {id: 2, name: "周冬雨", age: 19},
                {id: 3, name: "周杰伦", age: 40},
                {id: 4, name: "王兆伦", age: 25},
            ],
        },
        methods: {
            updateMdm() {   // 通过属性修改时Vue是能同时修改页面显示的
                this.persons[0].name = "马老师"
                this.persons[0].age = 50
            },
            updateMdm2() {   // 直接修改数组中的元素是无法被Vue监测到的,所以代码层面和数据已经改了,但是页面显示并未发生变化
                this.persons[0] =  {id: 1, name: "马老师", age: 50}

            }
        }
    })
</script>
2. Vue是如何监测对象中的数据变化的
1. 模仿Vue做数据代理
<script>
	let data = {
        name: "小明"
    }

    Object.defineProperty(data, "name", {   // 如果有人访问data中的name,就会执行get()
        get() {
            return data.name  // 这里同样是在访问data中的name,同样需要执行get(),会造成递归,set()同理
        }
        set(val) {
            data.name = val
        }
    })
</script>
2. Vue如何解决上述问题的
Vue中写的是对data的递归查找,会找到data中对象中的对象,所有层,这里的示例代码并没有考虑到对象中有对象
<script>
    let data = {
        name: "小明"
    }

    // 创建一个监视的实例对象,用于监视data中属性的变化
    const obs = new Observer(data)

    function Observer(obj) {
        // 汇总对象中的所有属性形成一个数组
        const keys = Object.keys(obj)

        // 遍历
        keys.forEach((k) => {
            // this 是Observer的实例对象
            Object.defineProperty(this,k,{
                get(){
                    return obj[k]
                },
                set(val){
                    console.log(`${k} 被改了,接下来,解析模板,生成虚拟DOM......`)
                    obj[k] = val
                }
            })
        })
    }
    let vm = {}
    // 这里相当于将obs同时复制给Vue中定义的data,和_data
    vm._data = data = obs
    console.log(vm)
</script>

 浙公网安备 33010602011771号