Keepalived+nginx实现高可用负载均衡
图1基本逻辑图
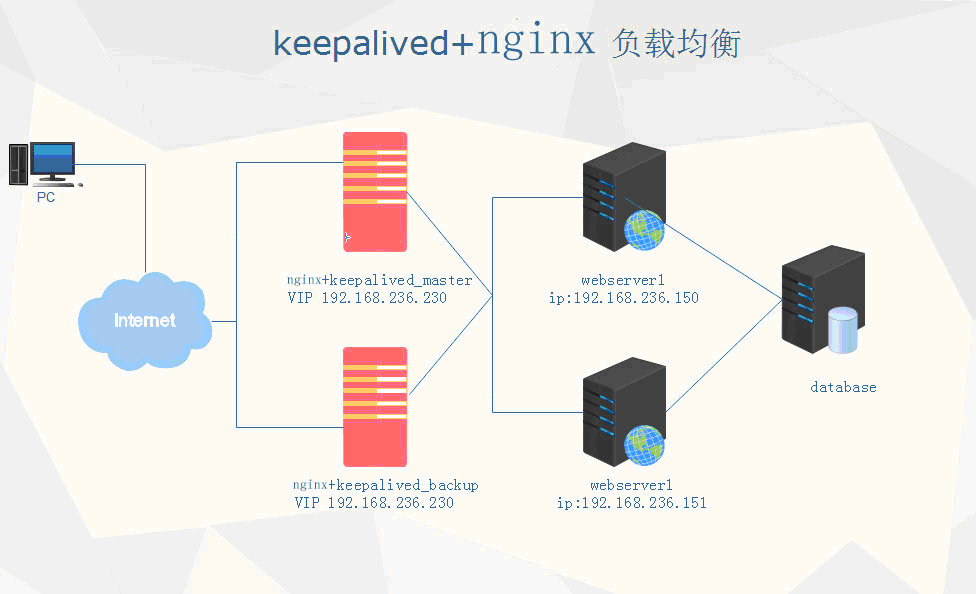
图2 为IP地址分配。
主要用途 |
IP |
Haproxy+ningx_master |
192.168.236.143 |
Haproxy+nginx_backup |
192.168.236.192 |
Webser1 |
192.168.236.150 |
Webser2 |
192.168.236.151 |
一、配置Nginx
一、安装如下环境
yum -y install make gcc gcc-c++ gcc-g77 flex bison file libtool libtool-libs autoconf kernel-devel libjpeg libjpeg-devel libpng libpng-devel libpng10 libpng10-devel gd gd-devel freetype freetype-devel libxml2 libxml2-devel zlib zlib-devel glib2 glib2-devel bzip2 bzip2-devel libevent libevent-devel ncurses ncurses-devel curl curl-devel e2fsprogs e2fsprogs-devel krb5 krb5-devel libidn libidn-devel openssl openssl-devel gettext gettext-devel ncurses-devel gmp-devel pspell-devel unzip libcap lsof
编译pcre的包
tar zxf pcre-8.31.tar.gz
cd pcre-8.31
./configure
make && make install
useradd -s /sbin/nologno -g nginx -M nginx
tar zxf nginx-1.10.2.tar.gz
cd nginx-1.10.2
./configure --prefix=/usr/local/nginx --sbin-path=/usr/local/nginx/bin/nginx --conf-path=/usr/local/nginx/conf/nginx.conf --error-log-path=/var/log/nginx/error.log --http-log-path=/var/log/nginx/access.log --pid-path=/var/run/nginx/nginx.pid  --lock-path=/var/lock/nginx.lock --user=nginx --group=nginx --with-http_ssl_module --with-http_flv_module --with-http_stub_status_module --with-http_gzip_static_module --http-client-body-temp-path=/var/tmp/nginx/client/ --http-proxy-temp-path=/var/tmp/nginx/proxy/ --http-fastcgi-temp-path=/var/tmp/nginx/fcgi/ --http-uwsgi-temp-path=/var/tmp/nginx/uwsgi --http-scgi-temp-path=/var/tmp/nginx/scgi --with-pcre
make
make install
/usr/local/nginx/bin/nginx –t
./nginx: error while loading shared libraries: libpcre.so.1: cannot open shared object file: No such file or directory
解决prce的问题
#find / -name libpcre.so*
/usr/local/lib/libpcre.so.1.0.1
/usr/local/lib/libpcre.so
/usr/local/lib/libpcre.so.1
/lib64/libpcre.so.0.0.1
/lib64/libpcre.so.0
出现了这么多结果。我们安装的PCRE库的位置在/usr/local/pcre中,我们就用这个位置
 vim /etc/ld.so.conf
在尾行加入/usr/local/bin
root@mail2 bin]# ldconfig
#/usr/local/nginx/bin/nginx -t
nginx: the configuration file /usr/local/nginx/conf/nginx.conf syntax is ok
nginx: configuration file /usr/local/nginx/conf/nginx.conf test is successful
这就正常了
启动nginx
/usr/local/nginx/bin/nginx
vim /usr/local/nginx/conf/nginx.conf
在最后面的大括号前面添加一行
include  /usr/local/nginx/conf.d/*.conf;
建立这个目录
mkdir /usr/local/nginx/conf.d
vim /usr/local/nginx/conf.d/lkq.conf
upstream backend
{
  server 192.168.236.150:80  weight=1;
  server 192.168.236.151:80  weight=2;
  #ip_hash;
}
server
{
    listen      80;
    server_name  www.lkq.com;
    location ~ ^/*
    {
    proxy_set_header Host $host;
    proxy_set_header X-Real-IP $remote_addr;
    proxy_set_header X-Forwarded-For $proxy_add_x_forwarded_for;
    proxy_buffering off;
    proxy_pass http://backend;
    }
}
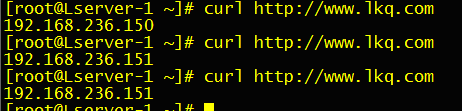
客户端测试一下
记得在客户端添加本地hosts
二、配置keepalived
一:安装过程,在两台HA机器上分别keepalived:
#ln -s /usr/src/kernels/2.6.18-128.el5-i686/ /usr/src/linux
http://www.keepalived.org/software/ keepalived 的下载地址。版本的话自己可以选择一下版本。楼主选择的版本是1.2.23的版本
[root@mail2 keepalived-1.2.23]# ./configure –sysconf=/etc
[root@mail2 keepalived-1.2.23]# make && make install
[root@mail2 keepalived-1.2.23]# ln –s /usr/local/sbin/keepalived /sbin
[root@mail2keepalived-1.2.23]#cp /etc/keepalived/keepalived.conf /etc/keepalived/keepalived.conf.bak
[root@mail4keepalived-1.2.23]# ln -s /etc/init.d/keepalived /etc/rc.d/rc3.d/S99keepalived
[root@mail4keepalived-1.2.23]# ln -s /etc/init.d/keepalived /etc/rc.d/rc5.d/S99keepalived
二、修改配置文件
[root@Lserver-1 keepalived]# cat keepalived.conf
Master :
global_defs {
    notification_email {
        zhouxiao@example.com
        itsection@example.com
    }
    notification_email_from itsection@example.com
    smtp_server mail.example.com
    smtp_connect_timeout 30
    router_id LVS_DEVEL
}
vrrp_script chk_nginx {
#    script "killall -0 nginx"
    script "/etc/keepalived/check_nginx.sh"
    interval 2
    weight -5
    fall 3
    rise 2
}
global_defs {
router_id LVS_DEVEL
}
vrrp_instance VI_1 {
state MASTER
interface eth0
virtual_router_id 51
priority 150
advert_int 1
authentication {
auth_type PASS
auth_pass 1111
}
track_script {
chk_nginx
}
virtual_ipaddress {
192.168.236.230
}
}
}
Backup
global_defs {
    notification_email {
        zhouxiao@example.com
        itsection@example.com
    }
    notification_email_from itsection@example.com
    smtp_server mail.example.com
    smtp_connect_timeout 30
    router_id LVS_DEVEL
}

vrrp_script chk_nginx {
#    script "killall -0 nginx"
    script "/etc/keepalived/check_nginx.sh"
    interval 2
    weight -5
    fall 3
    rise 2
}

global_defs {
router_id LVS_DEVEL
}
vrrp_instance VI_1 {
state BACKUP
interface eth0
virtual_router_id 51
priority 120
advert_int 1
authentication {
auth_type PASS
auth_pass 1111
}

track_script {
chk_nginx
}

virtual_ipaddress {
192.168.236.230
}
}
}
2.2 nginx监控脚本
该脚本检测ngnix的运行状态,并在nginx进程不存在时尝试重新启动ngnix,如果启动失败则停止keepalived,准备让其它机器接管。
/etc/keepalived/check_nginx.sh :
#!/bin/bash
counter=$(ps -C nginx --no-heading|wc -l)
if [ "${counter}" = "0" ]; then
    /usr/local/nginx/bin/nginx
    sleep 2
    counter=$(ps -C nginx --no-heading|wc -l)
    if [ "${counter}" = "0" ]; then
        /etc/init.d/keepalived stop
    fi
fi
你也可以根据自己的业务需求,总结出在什么情形下关闭keepalived,如 curl 主页连续2个5s没有响应则切换:
#!/bin/bash
# curl -IL http://localhost/member/login.htm
# curl --data "memberName=fengkan&password=22" http://localhost/member/login.htm

count = 0
for (( k=0; k<2; k++ ))
do
    check_code=$( curl --connect-timeout 3 -sL -w "%{http_code}\\n" http://localhost/login.html -o /dev/null )
    if [ "$check_code" != "200" ]; then
        count = count +1
        continue
    else
        count = 0
        break
    fi
done
if [ "$count" != "0" ]; then
#   /etc/init.d/keepalived stop
    exit 1
else
    exit 0
fi
启动keepalived
[root@Rserver-1 keepalived]# /etc/init.d/keepalived start
Starting keepalived: [  OK  ]
[root@Rserver-1 keepalived]# ip addr list|grep eth0
2: eth0: <BROADCAST,MULTICAST,UP,LOWER_UP> mtu 1500 qdisc pfifo_fast state UP qlen 1000
    inet 192.168.236.143/24 brd 192.168.236.255 scope global eth0
    inet 192.168.236.230/32 scope global eth0
[root@Rserver-1 keepalived]#
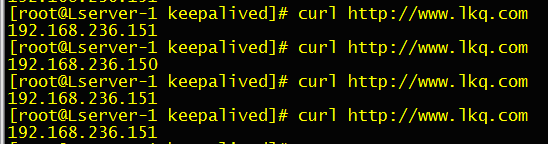
后面测试一下关闭主上面的keepalived 查看一下备节点的IP
[root@Lserver-1 keepalived]# ip addr list|grep eth0
2: eth0: <BROADCAST,MULTICAST,UP,LOWER_UP> mtu 1500 qdisc pfifo_fast state UP qlen 1000
    inet 192.168.236.192/24 brd 192.168.236.255 scope global eth0
inet 192.168.236.230/32 scope global eth0
[root@Lserver-1 keepalived]# ps -ef |grep nginx
root      19499      1  0 23:00 ?        00:00:00 nginx: master process /usr/local/nginx/bin/nginx
nginx     19501  19499  0 23:00 ?        00:00:00 nginx: worker process
root      21102   3820  0 23:12 pts/0    00:00:00 grep nginx
[root@Rserver-1 keepalived]#

已经成功了。
EOF

