
KLOOK客路旅行基于Apache Hudi的数据湖实践
1. 业务背景介绍
客路旅行(KLOOK)是一家专注于境外目的地旅游资源整合的在线旅行平台,提供景点门票、一日游、特色体验、当地交通与美食预订服务。覆盖全球100个国家及地区,支持12种语言和41种货币的支付系统,与超过10000家商户合作伙伴紧密合作,为全球旅行者提供10万多种旅行体验预订服务。
KLOOK数仓RDS数据同步是一个很典型的互联网电商公司数仓接入层的需求。对于公司数仓,约60%以上的数据直接来源与业务数据库,数据库有很大一部分为托管的AWS RDS-MYSQL 数据库,有超100+数据库/实例。RDS直接通过来的数据通过标准化清洗即作为数仓的ODS层,公司之前使用第三方商业工具进行同步,限制为每隔8小时的数据同步,无法满足公司业务对数据时效性的要求,数据团队在进行调研及一系列poc验证后,最后我们选择Debezium+Kafka+Flink+Hudi的ods层pipeline方案,数据秒级入湖,后续数仓可基于近实时的ODS层做更多的业务场景需求。
2. 架构改进
2.1 改造前架构
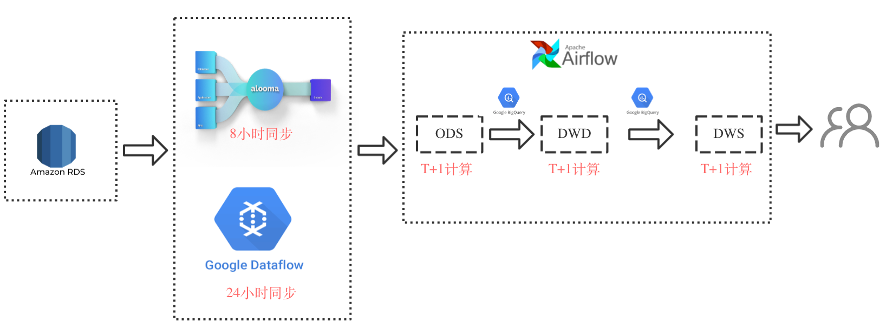
整体依赖于第三服务,通过Google alooma进行RDS全量增量数据同步,每隔8小时进行raw table的consolidation,后续使用data flow 每24小时进行刷入数仓ODS层
2.2 新架构
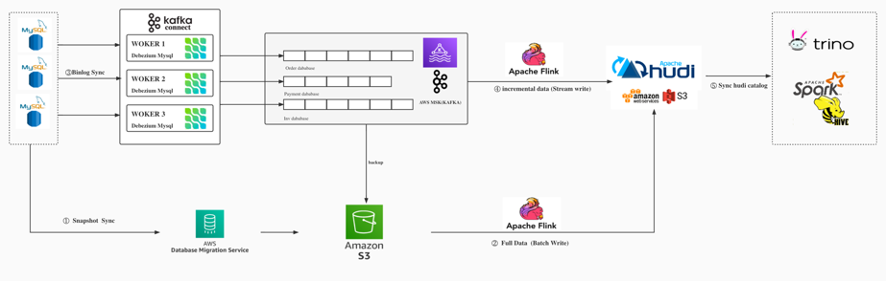
- 使用AWS DMS 数据迁移工具,将全量RDS Mysql 数据同步至S3存储中;
- 通过Flink SQL Batch 作业将S3数据批量写入Hudi 表;
- 建立Debeizum MySQL binlog 订阅任务,将binlog 数据实时同步至Kafka;
- 通过Flink SQL 启动两个流作业,一个将数据实时写入Hudi,另一个作业将数据追加写入到S3,S3 binlog文件保存30天,以备数据回溯使用;
- 通过hive-hudi meta data sync tools,同步hudi catalog数据至Hive,通过Hive/Trino提供OLAP数据查询。
2.3 新架构收益
- 数据使用及开发灵活度提升,地方放同步服务限制明显,改进后的架构易于扩展,并可以提供实时同步数据供其它业务使用;
- 数据延迟问题得到解决,基于Flink on Hudi 的实时数据写入,对于RDS数据摄入数仓可以缩短至分钟甚至秒级,对于一些库存、风控、订单类的数据可以更快的进行数据取数分析,整体从原来近8小时的consolidation缩减至5分钟;
- 成本更加可控,基于Flink on Hudi存算分离的架构,可以有效通过控制对数据同步计算处理资源配额、同步刷新数据表落盘时间、数据存储冷热归档等进行成本控制,与第三方服务成本整体对比预计可以缩减40%。
3. 实践要点
3.1 Debezium 增量Binlog同步配置
Kafka connect 关键配置信息
bootstrap.servers=localhost:9092
# unique name for the cluster, used in forming the Connect cluster group. Note that this must not conflict with consumer group IDs
group.id=connect-cluster
# The converters specify the format of data in Kafka and how to translate it into Connect data. Every Connect user will
# need to configure these based on the format they want their data in when loaded from or stored into Kafka
key.converter=org.apache.kafka.connect.json.JsonConverter
value.converter=org.apache.kafka.connect.json.JsonConverter
# Converter-specific settings can be passed in by prefixing the Converter's setting with the converter we want to apply
key.converter.schemas.enable=true
value.converter.schemas.enable=true
# Topic to use for storing offsets. This topic should have many partitions and be replicated and compacted.
# Kafka Connect will attempt to create the topic automatically when needed, but you can always manually create
# the topic before starting Kafka Connect if a specific topic configuration is needed.
# Most users will want to use the built-in default replication factor of 3 or in some cases even specify a larger value.
# Since this means there must be at least as many brokers as the maximum replication factor used, we'd like to be able
# to run this example on a single-broker cluster and so here we instead set the replication factor to 1.
offset.storage.topic=connect-offsets
# Topic to use for storing connector and task configurations; note that this should be a single partition, highly replicated,
# and compacted topic. Kafka Connect will attempt to create the topic automatically when needed, but you can always manually create
# the topic before starting Kafka Connect if a specific topic configuration is needed.
# Most users will want to use the built-in default replication factor of 3 or in some cases even specify a larger value.
# Since this means there must be at least as many brokers as the maximum replication factor used, we'd like to be able
# to run this example on a single-broker cluster and so here we instead set the replication factor to 1.
config.storage.topic=connect-configs
# Topic to use for storing statuses. This topic can have multiple partitions and should be replicated and compacted.
# Kafka Connect will attempt to create the topic automatically when needed, but you can always manually create
# the topic before starting Kafka Connect if a specific topic configuration is needed.
# Most users will want to use the built-in default replication factor of 3 or in some cases even specify a larger value.
# Since this means there must be at least as many brokers as the maximum replication factor used, we'd like to be able
# to run this example on a single-broker cluster and so here we instead set the replication factor to 1.
status.storage.topic=connect-status
查询 MySQL 最近binlog file 信息
SQL
MySQL [(none)]> show binary logs;
| mysql-bin-changelog.094531 |    176317 |
| mysql-bin-changelog.094532 |    191443 |
| mysql-bin-changelog.094533 |   1102466 |
| mysql-bin-changelog.094534 |    273347 |
| mysql-bin-changelog.094535 |    141555 |
| mysql-bin-changelog.094536 |      4808 |
| mysql-bin-changelog.094537 |    146217 |
| mysql-bin-changelog.094538 |     29607 |
| mysql-bin-changelog.094539 |    141260 |
+----------------------------+-----------+
MySQL [(none)]> show binlog events in 'mysql-bin-changelog.094539';
MySQL [(none)]> show binlog events in 'mysql-bin-changelog.094539' limit 10;
+----------------------------+-----+----------------+------------+-------------+---------------------------------------------------------------------------+
| Log_name                   | Pos | Event_type     | Server_id  | End_log_pos | Info                                                                      |
+----------------------------+-----+----------------+------------+-------------+---------------------------------------------------------------------------+
| mysql-bin-changelog.094539 |   4 | Format_desc    | 1399745413 |         123 | Server ver: 5.7.31-log, Binlog ver: 4                                     |
| mysql-bin-changelog.094539 | 123 | Previous_gtids | 1399745413 |         194 | 90710e1c-f699-11ea-85c0-0ec6a6bed381:1-108842347                          |
指定server name key 发送offset 记录到offset.storage.topic
$ ./bin/kafka-console-producer.sh -bootstrap-server localhost:9092 --topic  connect-offsets --property "parse.key=true" --property "key.separator=>"
$>["test_servername",{"server":"test_servername"}]>{"ts_sec":1647845014,"file":"mysql-bin-changelog.007051","pos":74121553,"row":1,"server_id":1404217221,"event":2}
编辑task api 请求,启动debezium task
{
    "name":"test_servername",
    "config":{
        "connector.class":"io.debezium.connector.mysql.MySqlConnector",
        "snapshot.locking.mode":"none",
        "database.user":"db_user",
        "transforms.Reroute.type":"io.debezium.transforms.ByLogicalTableRouter",
        "database.server.id":"1820615119",
        "database.history.kafka.bootstrap.servers":"localhost:9092",
        "database.history.kafka.topic":"history-topic",
        "inconsistent.schema.handling.mode":"skip",
        "transforms":"Reroute", // 配置binlog数据转发到一个topic,默认一个表一个topic
        "database.server.name":"test_servername",
        "transforms.Reroute.topic.regex":"test_servername(.*)",
        "database.port":"3306",
        "include.schema.changes":"true",
        "transforms.Reroute.topic.replacement":"binlog_data_topic",
        "table.exclude.list":"table_test",
        "database.hostname":"host",
        "database.password":"******",
        "name":"test_servername",
        "database.whitelist":"test_db",
        "database.include.list":"test_db",
        "snapshot.mode":"schema_only_recovery"  // 使用recovery模式从指定binlog文件的offset同步
    }
}
3.2 Hudi 全量接增量数据写入
在已经有全量数据在Hudi表的场景中,后续从kafka消费的binlog数据需要增量upsert到Hudi表。debezium的binlog格式携带每条数据更新的信息,需要将其解析为可直接插入的数据。
示例解析生成Flink SQL的Python代码
# 写入数据到ODS Raw表
insert_hudi_raw_query = '''
INSERT INTO
{0}_ods_raw.{1}
SELECT
{2}
FROM
{0}_debezium_kafka.kafka_rds_{1}_log
WHERE
REGEXP(GET_JSON_OBJECT(payload, '$.source.table'), '^{3}$')
AND GET_JSON_OBJECT(payload, '$.source.db') = '{4}'
AND IF(GET_JSON_OBJECT(payload, \'$.op\') = \'d\', GET_JSON_OBJECT(payload, \'$.before.{5}\'), GET_JSON_OBJECT(payload, \'$.after.{5}\')) IS NOT NULL
AND GET_JSON_OBJECT(payload, '$.op') IN ('d', 'c', 'u')
'''.format(
    database_name,
    table_name,
    hudi_schema,
    mysql_table_name,
    mysql_database_name,
    primary_key
)
如上对Debezium的三种binlog数据进行解析,我们将insert及update的数据只取after后的数据,对于delete,我们追加一个硬删除字段标记进行插入,Hudi则会自动去重。
在这里为了保证增量更新的hudi数据不重复,需要开启index bootstrap功能。
Hudi配置参数
| 名称 | Required | 默认值 | 说明 |
|---|---|---|---|
| index.bootstrap.enabled | true | false | 开启索引加载,会将已存表的最新数据一次性加载到 state 中 |
| index.partition.regex | false | * | 设置正则表达式进行分区筛选,默认为加载全部分区 |
- CREATE TABLE 创建和 Hoodie 表对应的语句,注意 table type 要正确
- 设置 index.bootstrap.enabled = true开启索引加载功能
- 索引加载为并发加载,根据数据量大小加载时间不同,可以在log中搜索finish loading the index under partition 和 Load records from file 日志来观察索引加载进度
- 重启任务将 index.bootstrap.enabled 关闭,参数配置到合适的大小,如果RowDataToHoodieFunction 和 BootstrapFunction 并发不同,可以重启避免 shuffle
3.3 Hudi同步Metastore自定义分区格式改写
Hudi 提供了HIVE Sync Tool https://hudi.apache.org/docs/syncing_metastore 用来将Hudi的meta data 同步至Hive 进行查询,同时 PrestoDB / Trino 可以直接通过配置Hive的catalog信息实现Hudi表的秒级查询。但目前HiveSyncTool 仅自带支持几种格式的Hudi partion ,源码位置如下位置:
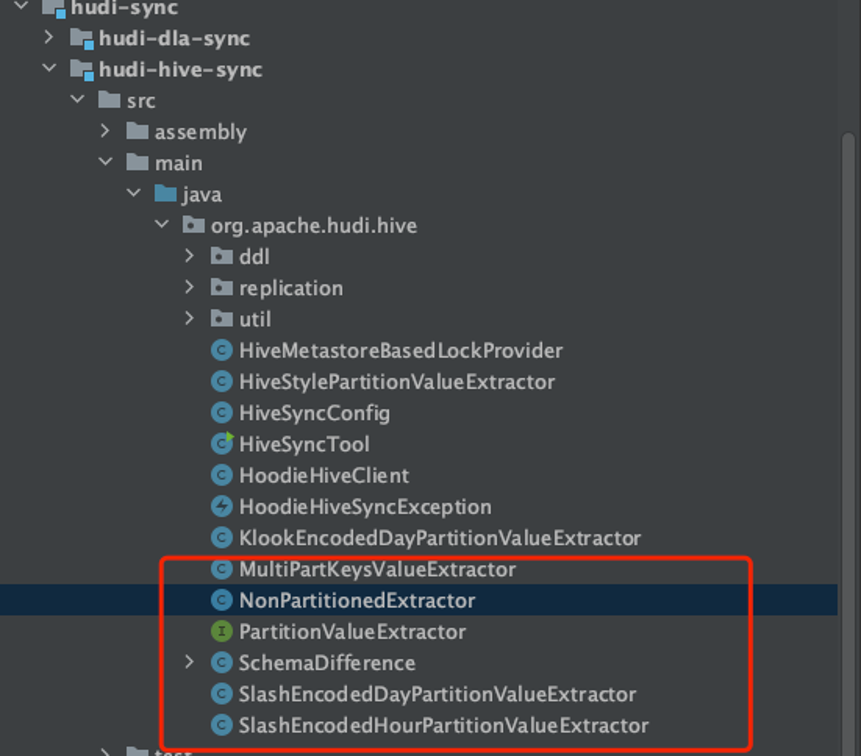
如果要同步的hudi表没有分区,或者符合hive 的’yyyy-MM-dd’ / ‘yyyy-MM-dd-HH’ 分区格式,可以直接使用参数--partition-value-extractor 指定到Non/SlashEncodedDayPartitionValueExtractor/SlashEncodedHourPartitionValueExtractor 进行同步,如下命令:
sh run_sync_tool.sh --jdbc-url jdbc:hive2:\/\xxxx:10000 --user hive --pass hive --partitioned-by partition --partition-value-extractor org.apache.hudi.hive.SlashEncodedHourPartitionValueExtractor --base-path s3://xxx/raw/order_business_db/ord_basics --auto-create-database --database order_business_db_ods_raw_hive_sync --table ord_basics
但存在分区不满足上述格式,如果使用non分区同步,则会出现查询不到数据的问题,这个时候需要自己实现一个Extractor,实现代码位于package org.apache.hudi.hive,继承 PartitionValueExtractor 定义 SlashEncodedHourPartitionValueExtractor 实现extractPartitionValuesInPath 方法,代码片段如下,实现格式 dd-MM-yy,代码片段截取如下:
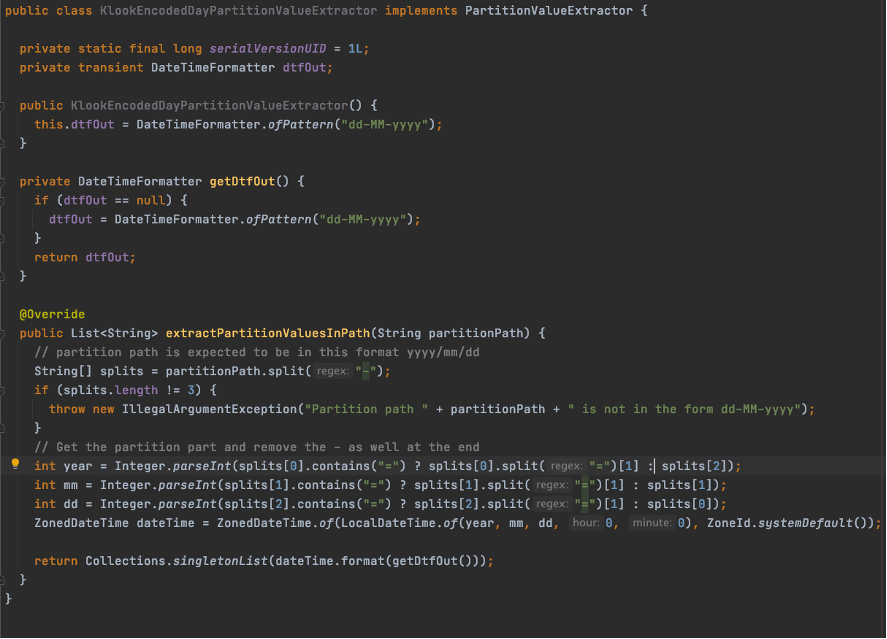
然后重新打包,执行如下命令,随后在PrestoDB/Hive/Trino 均可直接进行查询。
sh run_sync_tool.sh --jdbc-url jdbc:hive2:\/\/xxxx10000 --user hive --pass hive --partitioned-by partition --partition-value-extractor org.apache.hudi.hive.KlookEncodedDayPartitionValueExtractor --base-path s3://xxxx/raw/order_business_db/ord_basics --auto-create-database --database order_business_db_ods_raw_hive_sync --table ord_basics
AWS EMR 上需要注意的:
- 找不到log4j 修改
run_sync_tool.sh HADOOP_HIVE_JARS=${HIVE_JARS}:${HADOOP_HOME}/*:${HADOOP_HOME}/lib/*:/usr/lib/hadoop-hdfs/*:/usr/lib/hadoop-mapreduce/*:/usr/share/aws/emr/emrfs/lib/*:/usr/share/aws/emr/emrfs/auxlib/*:${GLUE_JARS} - 找不到libfb修改
java -cp $HUDI_HIVE_UBER_JAR:${HADOOP_HIVE_JARS}:${HIVE_CONF_DIR}:${HADOOP_CONF_DIR}:${EMRFS_CONF_DIR}:/usr/lib/hudi/cli/lib/libfb303-0.9.3.jar org.apache.hudi.hive.HiveSyncTool "$@"
4. 经验总结
- 当前整体RDS数据同步解决了对数据时效性及灵活扩展性的业务需求,但如上述,数据链路较长带来大量手动操作。因此,我们做了一些流程自动化的工作,使用Airflow 将DMS全量同步S3,S3同步Hudi的Flink 批作业进行自动调度触发,使得我们填写简单数据库同步参数就可完成一个链路的数据入湖。对于增量Debezium 数据同步,我们也通过编写一些脚本,在启动Flink Stream SQL作业时,同步拉取最新MySQL schema,生成解析binlog数据的SQL ,进行自动任务提交。
- 在稳定性方面,当前主要考虑增量流作业的稳定性,我们从kafka备份了binlog原始数据,这些数据会在S3保存30天,如果出现流作业写入Hudi异常,我们可以很快跑一个批任务将数据回溯。
- 该方案运行近一年时间,期间Hudi版本快速迭代fix很多问题,例如前期Hudi在增量接全量时开启index后,必须一次将index缓存在state,index阶段为了提升速度,我们设置了较大的并行度资源,需要人工值守等待一个checkpoint周期然后调低。初期,咨询社区后,提出了全量也使用流读等方式,避免增加改表参数的问题,后续社区也做了一些优化,异步执行index并发加载索引等,无需等待checkpoint完成,index不会阻塞数据写入checkpoint等。
- 在OLAP选择上,我们在采用Trino进行数据查询Hudi时,由于需要同步工具对Hudi所有分区进行索引同步,我们也遇到了需要兼容分区策略等问题。我们参考了Hudi同步metastore工具编写了转换类兼容了自定义分区。
5. 未来展望
在使用Hudi开源组件过程中,我们体会到必须紧密与社区保持沟通,及时反馈问题,也可以与来自其它公司不同业务场景的工程师进行交流,分享我们遇到的问题及解决思路。
后续的改进,我们会从脱离第三方服务DMS 试图直接使用Flink 进行全量数据同步,减少链路中组件的维护数量,同样的,我们将积极跟随Hudi及Flink的发展,优化整体链路的效率。
PS:如果您觉得阅读本文对您有帮助,请点一下“推荐”按钮,您的“推荐”,将会是我不竭的动力!
作者:leesf 掌控之中,才会成功;掌控之外,注定失败。
出处:http://www.cnblogs.com/leesf456/
本文版权归作者和博客园共有,欢迎转载,但未经作者同意必须保留此段声明,且在文章页面明显位置给出原文连接,否则保留追究法律责任的权利。
如果觉得本文对您有帮助,您可以请我喝杯咖啡!


