模型训练脚本
1.新建txt文件
右键重命名:
quick_start.py
脚本内容如下: quick_start.py
import autogluon.core as ag
from autogluon.vision import ImagePredictor, ImageDataset

if __name__ == '__main__':
    train_dataset, _, test_dataset = ImageDataset.from_folders(
        'https://autogluon.s3.amazonaws.com/datasets/shopee-iet.zip')
    print(train_dataset)

    predictor = ImagePredictor()
    # since the original dataset does not provide validation split, the `fit` function splits it randomly with 90/10 ratio
    predictor.fit(train_dataset, hyperparameters={
        'epochs': 2})  # you can trust the default config, we reduce the # epoch to save some build time

    fit_result = predictor.fit_summary()
    print('Top-1 train acc: %.3f, val acc: %.3f' % (fit_result['train_acc'], fit_result['valid_acc']))

    image_path = test_dataset.iloc[0]['image']
    result = predictor.predict(image_path)
    print(result)

    proba = predictor.predict_proba(image_path)
    print(proba)

    bulk_result = predictor.predict(test_dataset)
    print(bulk_result)

    image_path = test_dataset.iloc[0]['image']
    feature = predictor.predict_feature(image_path)
    print(feature)

    test_acc = predictor.evaluate(test_dataset)
    print('Top-1 test acc: %.3f' % test_acc['top1'])

    filename = 'predictor.ag'
    predictor.save(filename)
    predictor_loaded = ImagePredictor.load(filename)
    # use predictor_loaded as usual
    result = predictor_loaded.predict(image_path)
    print(result)
2.开始训练
在文件路径下打开cmd窗口运行如下命令
python quick_start.py
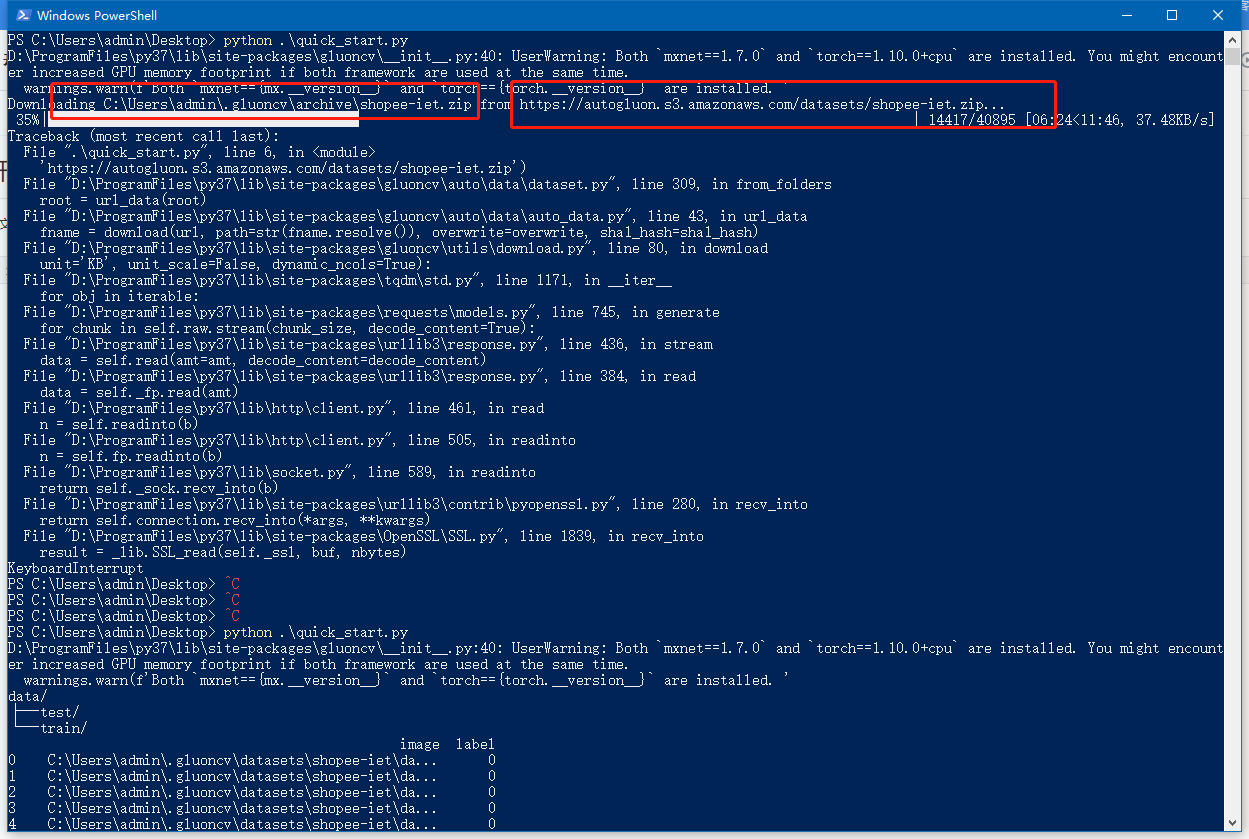
如图:

如果觉得下载慢可以手动复制红框地址,地址如下:
https://autogluon.s3.amazonaws.com/datasets/shopee-iet.zip
下载后放入第一个红框路径不用解压,
完成后继续第一步骤命令:
python quick_start.py
如果有如下图日志输出:

请卸载mxnet,验证结果集,命令如下:
pip uninstall mxnet
重新跑命令:
python quick_start.py
运行完成后出现下图结果:


 浙公网安备 33010602011771号