如何在ASP.NET中使用Windows Live Web Bar
前言
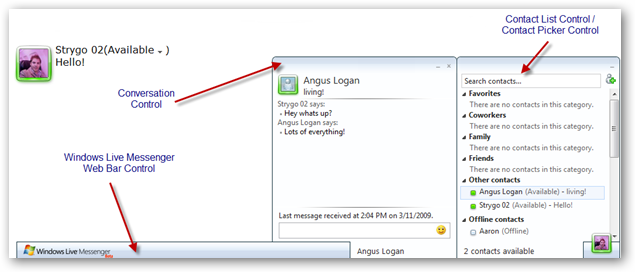
Messenger Platform 团队将在 Mix 09 上推出新的 Windows Live Messenger Web Toolkit 和 Web Bar 控件,其中Web Bar控件包含完整的 Messenger 体验,功能包括:  联系人列表 — 管理、搜索、发起对话,还支持 Favorites 联系人;
  对话列表 — 用户切换、管理活动对话;
  用户区 — 显示用户状态,并允许用户更新信息,;
  跨页导航 — 能在站内切换页面的同时,保持 Windows Live Messenger 的登录状态。
  Web Bar Control 将会显示在网站的底部,从各个方面来看很类似 Facebook Chat 功能。
若网站已经整合 Web Bar 控件,访客即可通过 Windows Live Messenger 用户熟悉的界面发起对话。同时,所有访问该站点的访客都可通过该控件进行交互,甚至不必加入对方好友列表就可聊天,还能通过客户端。
网站管理员可以将 Web Bar 作为独立的控件使用,也可对 Web Toolkit 扩展开发,当然,也可以通过 CSS 定制自己的应用样式,以及提供大量的设置项。目前为止,微软官方已经大量使用了 Messenger Library,就已推出的 Windows Live Messenger Web Toolkit 和 Web Bar 意味着什么?就目前的信息来看,这两款新控件所做的就是帮助站长增强网站的交互性,提高网站黏度,毕竟即时聊天的优势还是不容轻视的。

本文将介绍如何容易的将Web Bar整合到自己的网站中。
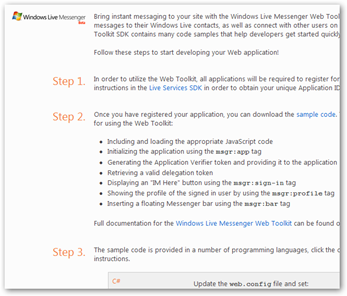
首先,下载Windows Live™ Messenger Web Toolkit SDK
可以在这个网站中下载应用程序的所有示例代码:http://messenger.mslivelabs.com/。
只需下载sample code即可:http://messenger.mslivelabs.com/Samples.zip。

其次,在Windows Azure development portal中获取application ID 和 secret Key
首先,使用Windows Live帐号登录到Azure,
当你登录到Azure后,你需要新建一个项目,在IE 左上角可以看到一个“新建项目的(New Project )”超链接。
点击链接进去后,你可以看到4种不同类型的项目,这里我们选择最下面的“Live Services: Existing APIs”申请注册。
在注册表单中请填写项目名称,以及在网络有效的域名,请注意,这里的填写的域名必须在网络上真实存在。返回的地址是登录成功后Windows Live返回的地址,。
填写完后,点击创建按钮。如果创建成功,我们将得到Azure提供的application ID 和 secret Key。
最后,整合到您的ASP.NET网站
首先用Visual Studio2008或者2005创建一个Asp.Net网站,如果你没有下载Windows Live™ Messenger Web Toolkit SDK的示例,那么你需要有一个Privacy.htm页面和一个Channel.htm页面,这里我们可以按照我们下载好的Windows Live™ Messenger Web Toolkit SDK教程中完全相同的代码来做,教程的示例在?:\\?\Samples\WebToolkit\GettingStarted\CSharp里面。
第一步是打开Web.config文件,在AppSettings节中配置我们获取的application ID( 应用程序ID) 和 secret Key(密钥 )。

再打开Default.aspx,
<%@ Page Language="C#" AutoEventWireup="true" CodeFile="Default.aspx.cs" Inherits="DefaultPage" %>
<!DOCTYPE html PUBLIC "-//W3C//DTD XHTML 1.0 Transitional//EN" "http://www.w3.org/TR/xhtml1/DTD/xhtml1-transitional.dtd">
<html xmlns="http://www.w3.org/1999/xhtml" xmlns:msgr="http://messenger.live.com/2009/ui-tags">
<head>
    <title>Get Started with the Windows Live Messenger Web Toolkit</title>
    <script type="text/javascript" src="http://www.wlmessenger.net/api/3.0/loader.js"></script>
    <script type="text/javascript">
        Microsoft.Live.Core.Loader.load(['Messenger.UI', 'Messenger.UI.Styles.Core'], null);
    </script>
    <style type="text/css">html, body{font-family: Verdana, Arial, Tahoma;margin: 0px;   } .content { margin-left: 10px;}</style>
</head>
<body>
    <!-- Initialize the application -->
    <msgr:app
        id="appTag"
        application-verifier-token="<%= ApplicationVerifier %>"
        privacy-url="Privacy.html"
        channel-url="Channel.html"
        token-url="RefreshMessengerToken.aspx">
    </msgr:app> </body>
</html>
在上述HTML代码中,我们引用了最新的Windows Live 3.0的API ,并使用Load方法加载初始化,
    <script type="text/javascript" src="http://www.wlmessenger.net/api/3.0/loader.js"></script>
    <script type="text/javascript">
        Microsoft.Live.Core.Loader.load(['Messenger.UI', 'Messenger.UI.Styles.Core'], null);
    </script>
其次,在页面中还增加了一个XML架构链接,
<html xmlns="http://www.w3.org/1999/xhtml" xmlns:msgr="http://messenger.live.com/2009/ui-tags">
这个架构可以使我们在页面中使用<msgr:>标签来显示即时通讯的用户界面,比如Web Messenger的<msgr:app>标记。
    <msgr:app
        id="appTag"
        application-verifier-token="<%= ApplicationVerifier %>"
        privacy-url="Privacy.html"
        channel-url="Channel.html"
        token-url="RefreshMessengerToken.aspx">
    </msgr:app>
在<msgr:app>的链接中,我们可以看到privacy-url属性链接到频道页面, channel-url属性链接到隐私页面,而token-url链接到应用程序的验证页面(RefreshMessengerToken.aspx),
RefreshMessengerToken.aspx页面将通过Windows Live服务验证您的Windows Azure development portal申请是否有效以及从本机删除COOKIE,以及登出等所有事情,具体代码如下:
1: <%@ Page Language="C#" %>
2: <%@ Import Namespace="WindowsLive" %>
3:
4: <!DOCTYPE html PUBLIC "-//W3C//DTD XHTML 1.0 Transitional//EN" "http://www.w3.org/TR/xhtml1/DTD/xhtml1-transitional.dtd">
5:
6: <!--
7: Copyright (c) Microsoft Corporation. All rights reserved.
8: -->
9:
10: <script runat="server">
11: /*
12: * Configuration:
13: * The minimum requirement is to specify the application id and application secret in web.config
14: * Refer to the boolean constructor of the WindowsLiveLogin for additional configuration options.
15: */
16:
17: /// <summary>
18: /// The name of the consent token cookie
19: /// </summary>
20: private const string ConsentTokenCookieName = "msgr-consent-token";
21:
22: /// <summary>
23: /// The name of the delegation token cookie
24: /// </summary>
25: private const string DelegationTokenCookieName = "msgr-delegation-token";
26:
27: /// <summary>
28: /// Current consent token that is stored in the conset cookie
29: /// </summary>
30: private string consentToken = null;
31:
32: /// <summary>
33: /// Provides token processing functionality
34: /// </summary>
35: private WindowsLiveLogin windowsLiveLogin;
36:
37: /// <summary>
38: /// Occurs when the page loads
39: /// </summary>
40: /// <param name="sender"></param>
41: /// <param name="e"></param>
42:
43: private void Page_Load(object sender, EventArgs e)
44: {
45: try
46: {
47: if (IsConsentCookieAvailable())
48: {
49: RefreshDelegatedAuthenticationCookie();
50: }
51: }
52: catch (Exception ex)
53: {
54: HandleException(ex);
55: }
56: }
57:
58: /// <summary>
59: /// Tests whether the consent token cookie is available
60: /// </summary>
61: /// <returns>'true' if the consent token cookie is available</returns>
62: private bool IsConsentCookieAvailable()
63: {
64: HttpCookie consentTokenCookie = Request.Cookies[ConsentTokenCookieName];
65:
66: if (consentTokenCookie == null)
67: {
68: return false;
69: }
70:
71: this.consentToken = consentTokenCookie.Value;
72:
73: return !string.IsNullOrEmpty(this.consentToken);
74: }
75:
76: /// <summary>
77: /// Refreshes the token
78: /// </summary>
79: private void RefreshDelegatedAuthenticationCookie()
80: {
81: this.windowsLiveLogin = new WindowsLiveLogin(true);
82: WindowsLiveLogin.ConsentToken token =
83: this.windowsLiveLogin.ProcessConsentToken(this.consentToken);
84: bool expireDelegationToken = false;
85:
86: if (token == null)
87: {
88: expireDelegationToken = true;
89: }
90: else
91: {
92: if (!token.IsValid())
93: {
94: if (token.Refresh())
95: {
96: UpdateDelegatedAuthenticationCookie(token);
97: }
98: else
99: {
100: expireDelegationToken = true;
101: }
102: }
103: else if (!IsDelegationTokenCookiePresent())
104: {
105: UpdateDelegatedAuthenticationCookie(token);
106: }
107: }
108:
109: if (expireDelegationToken)
110: {
111: ExpireDelegatedAuthenticatonCookie();
112: }
113: }
114:
115: /// <summary>
116: /// Updates the cookies with a refreshed token
117: /// </summary>
118: /// <param name="token">The refreshed token</param>
119: private void UpdateDelegatedAuthenticationCookie(WindowsLiveLogin.ConsentToken token)
120: {
121: HttpCookie delAuthCookie = new HttpCookie(DelegationTokenCookieName);
122: delAuthCookie.Value = token.DelegationToken;
123: delAuthCookie.Path = "/";
124: Response.Cookies.Add(delAuthCookie);
125:
126: HttpCookie consentCookie = new HttpCookie(ConsentTokenCookieName);
127: consentCookie.Value = token.Token;
128: consentCookie.Path = "/";
129: Response.Cookies.Add(consentCookie);
130: }
131:
132: /// <summary>
133: /// Expires the delegation token cookie
134: /// </summary>
135: private void ExpireDelegatedAuthenticatonCookie()
136: {
137: ExpireCookie(DelegationTokenCookieName);
138: }
139:
140: /// <summary>
141: /// Expires a given cookie
142: /// </summary>
143: /// <param name="cookieName">The name of the cookie to expire</param>
144: private void ExpireCookie(string cookieName)
145: {
146: HttpCookie cookie = new HttpCookie(cookieName);
147: cookie.Expires = DateTime.Now.AddYears(-1);
148: cookie.Path = "/";
149: Response.Cookies.Add(cookie);
150: }
151:
152: /// <summary>
153: /// Checks if the delegation token cookie is present
154: /// </summary>
155: /// <returns>'true' is returned if the delegation cookie is present</returns>
156: private bool IsDelegationTokenCookiePresent()
157: {
158: HttpCookie cookie = Request.Cookies[DelegationTokenCookieName];
159: return cookie != null && !string.IsNullOrEmpty(cookie.Value);
160: }
161:
162: private void HandleException(Exception e)
163: {
164: // The application should log the exception as it may be caused due to a configuration issue
165: }
166:
167: </script>
168:
169: <html xmlns="http://www.w3.org/1999/xhtml">
170: <head runat="server">
171: <title></title>
172: </head>
173: <body>
174: <form id="form1" runat="server">
175: <div>
176:
177: </div>
178: </form>
179: </body>
180: </html>
在Default.aspx中的最下面,还有一个<msgr:bar></msgr:bar>标记,这个标记将在我们的网页底部显示即时通讯的Messenger Web Bar。。最后,在Default.aspx的代码隐藏文件有一个服务端的变量,它将取出Web.config中的数据。此外,在App_Code文件夹中的WindowsLiveLogin.cs是网站的登录助手。
第一次登陆测试
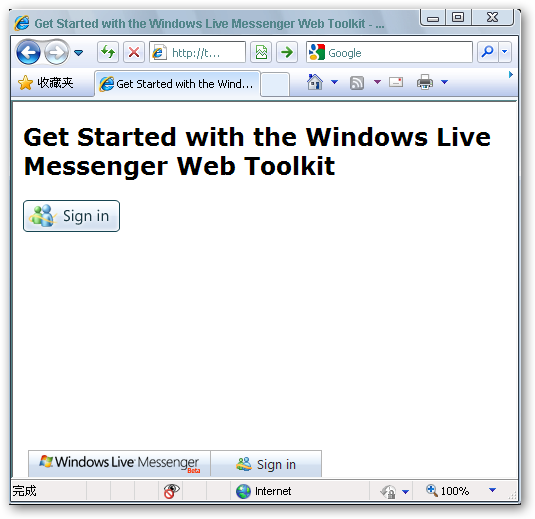
第一次打开网站,我们可以看到在网页的下边

点击登录链接( “Sign in” )
![]()
完毕!

