Vue学习系列(二)——组件详解
前言
在上一篇初识Vue核心中,我们已经熟悉了vue的两大核心,理解了Vue的构建方式,通过基本的指令控制DOM,实现提高应用开发效率和可维护性。而这一篇呢,将对Vue视图组件的核心概念进行详细说明。
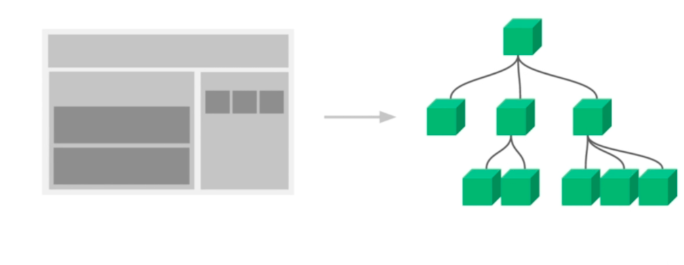
什么是组件呢?
组件可以扩展HTML元素,封装可重用的HTML代码,我们可以将组件看作自定义的HTML元素。
为什么要用到组件呢?
为了可重用性高,减少重复性开发,让我们可以使用独立可复用的小组件来构建大型应用。
基本
一、组件注册
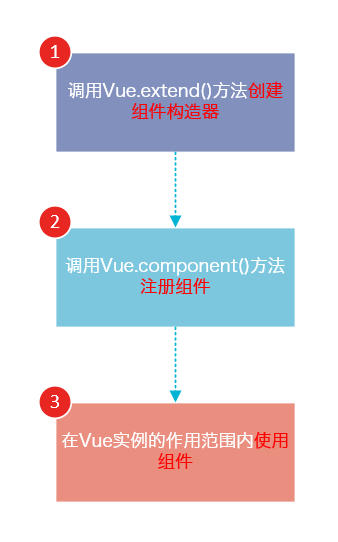
1.通过Vue.extend()创建,然后由component来注册
//  extend 创建组件
var MyComponent = Vue.extend({
  template: '<div>A custom component!</div>'
});

// component注册 组件
Vue.component('my-component', MyComponent);//使用到了 extend 创建的组件
var vm = new Vue({
  el: '#app',
  data: {

  }
})
说明:
- 1. Vue.extend()是Vue构造器的扩展,调用Vue.extend()创建的是一个组件构造器。
- 2. Vue.extend()构造器有一个选项对象,选项对象的template属性用于定义组件要渲染的HTML。
- 3. 使用Vue.component()注册组件时,需要提供2个参数,第1个参数时组件的标签,第2个参数是组件构造器。
- 4. 组件应该挂载到某个Vue实例下,否则它不会生效。
extend 是构造创建一个组件的语法器,你给它参数 他给你创建一个组件, 然后这个组件,你可以作用到Vue.component 这个全局注册方法里, 也可以在任意vue模板里使用组件
var demo= Vue.extend({
….
})
Vue.component(‘demo’,demo)
可见上边的定义过程比较繁琐,也可以不用每次都调用两个,可以直接用 Vue.component 创建 ,也可以取组件 例如下
var demo= Vue.component(‘demo’)
2.全局注册
如果我们定义了多个 vue实例,我们都可以使用这一个组件
<div id="app">
    <my-component></my-component>
</div>
<script>

//注意要在vue实例之前去定义,不然渲染页面的时候,会报错
  // 定义一个名为 myComponent 的新组件
 Vue.component(' myComponent ', {
     template: `
             <div id=" my-component ">
                 <p>2018 <a href="#">艾三元</a> - Hosted by <a href="#" style="font-weight: bold">Coding Pages</a></p>
                 <p>
                     <a href="#">京ICP备00000000号</a>
                 </p>
             </div>
             `,
     data () {
         return {
             message: 'hello world'
         }
     }
 })

  var app = new Vue({
    el: '#app',//没错,vue实例所定义的DOM元素就是这个,超过了这个区域,定义的组件会无效
    data: {
    },
  })
</script>
3.局部注册
表示只有在当前页面的app元素内使用
var app = new Vue({
    el: '#app',
    data: {
    },
    components: {
          'my-component': {//这个就是我们局部组件的名字 在页面内使用 <my-component></my-component>
         template: `
             <ul class ="contact-list non-style-list">
              <li>
                 <b class ="component">组件</b>: <a href="#">@艾三元</a>
              </li>
              </ul>`,
      data () {
          return {
              message: 'hello world'
          }
      },
      directives:{//自定义局部指令,使用的时候,直接可以 <my-component v-focus><my-component>
        focus;{
          inserted(el){
            el.focus();
          }
        }
      }
      }
    }
  })
注意:全局的组件是 component,而 局部的是 components
属性

定义了这个组件有哪些可配置的属性,组件的核心功能也是由它确定。props最好用对象写法,这样可以针对属性设置类型,默认值或自定义校验属性的值。
 <script>
export default {
  name: "PropsDemo",
  props: {
    name: String,
    type: {
      validator: function(value) {
        //从父级传入的 type,它的值必须是指定的 'success', 'warning', 'danger'中的一个,如果传入这三个以外的值,都会抛出一条警告
        return ["success", "warning", "danger"].includes(value);
      }
    },
    list: {
      type: Array,
      // 对象或数组默认值必须从一个工厂函数获取
      default: () => []
    },
    isVisible: {
      type: Boolean,
      default: false
    },
    onChange: {
      type: Function,
      default: () => {}
    }
  },
  methods: {
    handleClick() {
      // 不要这么做、不要这么做、不要这么做
      // this.type = "warning";

      // 可以,还可以更好
      this.onChange(this.type === "success" ? "warning" : "success");
    }
  }
};
</script>


//用法
<props name='Hello World' //原生属性
           :type='type'
           :is-visible="false"
           :on-change="handlePropChange"
           :list=[22,33,44]
           title="Demo"  //原生属性
           class="test1"   //原生属性
           :class="['test2']"
           :style="{ marginTop: '15px' }" //注意:style 的优先级是要高于 style
           style="margin-top: 10px">
通讯

一、父子通讯
1.父向子传值:
语法:在父组件中使用子组件时候,通过以下方式传递数据
<child-component v-bind:子组件prop="父组件数据属性"></child-component>
//定义一个组件,并在vue实例中定义了data选项

var vm = new Vue({
    el: '#app',
    data: {
        name: 'keepfool',
        age: 28
    },
    components: {
        'my-component': {
            template: '#myComponent',
            props: ['myName', 'myAge']
        }
    }
})

定义一个组件
Vue.component('my-component', {
     template: `
             <div id="myComponent">
              <table>
                <tr>
                  <th colspan="2">
                  子组件数据
                  </th>
               </tr>
            <tr>
                <td>my name</td>
                <td>{{ myName }}</td>
           </tr>
           <tr>
            <td>my age</td>
            <td>{{ myAge }}</td>
           </tr>
     </table>
     </div>`,
     props: ['foo'],//这里根据组件的props属性,来被动接受组件传递来的参数
     data () {
         return {
             message: 'hello world'
         }
     }
 })

//将父组件数据通过已定义好的props属性传递给子组件:
<div id="app">
    <my-component v-bind:my-name="name" v-bind:my-age="age"></my-component>
</div>
注意:在子组件中定义prop时,使用了camelCase命名法。由于HTML特性不区分大小写,浏览器会把所有大写字符解释为小写字符,所以camelCase的prop用于特性时,需要转为 kebab-case(短横线分割命名)。例如,在prop中定义的myName,在用作特性时需要转换为my-name。
2.子向父传值:自定义事件
1) v-on绑定自定义事件:
每个 Vue 实例都实现了事件接口,即:$on(eventName) 监听事件 和 $emit(eventName) 触发事件
在父组件中:
<my-component  v-on:child-say="listenToMyBoy"></my-component> //3、父组件通过监听,来获取到这个广播信号 child-say ,然后触发 listenToMyBoy 方法
<p>Do you like me? {{childWords}}</p>
 methods: {
            listenToMyBoy: function (somedata){  //4、incrementTotal 被触发,获取到参数 counter 值,执行相应的操作
              this.childWords = somedata
            }
        }
在子组件my-component中
<button v-on:click="onClickMe">like!</button>  ////1、子组件内,有一个click,当点击的时候 触发 onClickMe 方法

methods: {
      onClickMe: function(){
        this.$emit('child-say',this.somedata);  //2、方法被触发以后,向父组件 发送一个信号广播,并传递参数 somedata,名字就是 child-say
      }
    }
通过子组件注册触发事件,父组件注册 触发子组件事件后的方法,传递参数,父组件通过监听子组件的事件,获取参数,执行响应的变化操作
完整示列
<my-component  v-on:child-say="listenToMyBoy"></my-component> //3、父组件通过监听,来获取到这个广播信号 child-say ,然后触发 listenToMyBoy 方法
<p>Do you like me? {{childWords}}</p>

Vue.component('my-component', {
  template: '<button v-on:click="onClickMe">like!</button>',   //1、子组件内,有一个click,当点击的时候 触发 onClickMe 方法
  methods:{
      onClickMe: function(){
        this.$emit('child-say',this.somedata);  //2、方法被触发以后,向父组件 发送一个信号广播,并传递参数 somedata,名字就是 child-say
      }
  }
})

var vm = new Vue({
  el: '#app',
  data: {
       childWords:''
  },
  methods:{
    listenToMyBoy: function (somedata){  //4、incrementTotal 被触发,获取到参数 counter 值,执行相应的操作
              this.childWords = somedata
    }
  }
})
插槽
Vue中的插槽,是组件的一块模板,由使用父组件提供。简单的说,就是子组件暴露一个让父组件传入自定义内容的接口,这样可以让使用者更好的拓展组件,进行更丰富的复用和定制化组件。
插槽Slot的三大分类:默认插槽、具名插槽和作用域插槽
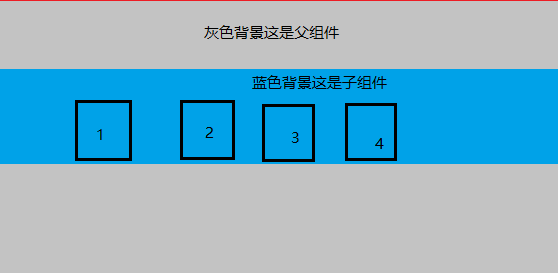
1.默认插槽:直接在子组件的标签内写入内容即可
//父组件
<template>
    <div class="father">
        <h3>灰色背景这是父组件</h3>
        <child>
            <div class="tmpl">
              <span>1</span>
              <span>2</span>
              <span>3</span>
              <span>4</span>
            </div>
        </child>
    </div>
</template>
//子组件
<template>
    <div class="child">
        <h3>蓝色背景这是子组件</h3>
        <slot></slot>
    </div>
</template>
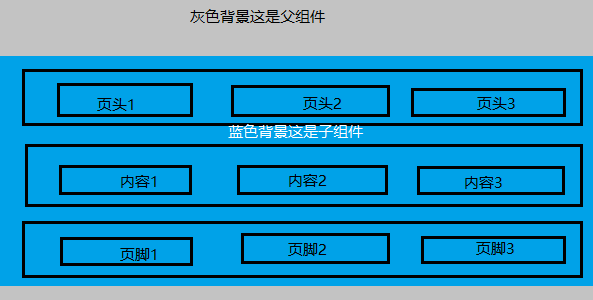
2.具名插槽: 用name属性来表示插槽的名字,不传为默认插槽
//父组件
<template>
  <div class="father">
    <h3>灰色背景这是父组件</h3>
    <child>
      <div slot="header">
        <span>页头1</span>
        <span>页头2</span>
        <span>页头3</span>
      </div>
      <div>   //一个不带 name 的 <slot> 出口会带有隐含的名字“default”。
        <span>内容1</span>
        <span>内容2</span>
        <span>内容3</span>
      </div>
      <div slot="footer">
        <span>页脚1</span>
        <span>页脚2</span>
        <span>页脚3</span>
      </div>
    </child>
  </div>
</template>
//子组件
<template>
  <div class="child">
    // 具名插槽
    <slot name="header"></slot>
    <h3>蓝色背景这是子组件</h3>
    // 具名插槽
    <slot></slot>  //一个不带 name 的 <slot> 出口会带有隐含的名字“default”。
    // 匿名插槽
    <slot name="footer"></slot>
  </div>
</template>
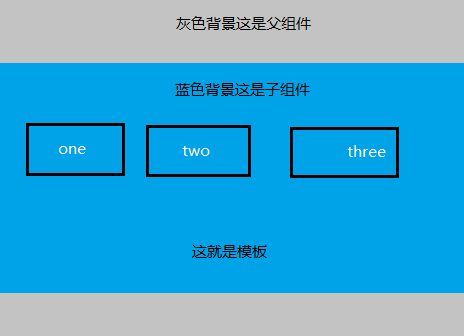
3.作用域插槽: 在作用域上绑定属性来将子组件的信息传给父组件使用,这些属性会被挂在父组件slot-scope接受的对象上
//父组件
<template>
  <div class="father">
    <h3>灰色背景这是父组件</h3>
    <child>
      <template slot-scope="number">
        <div>
          <span v-for="item in number.data">{{item}}</span>
        </div>
      </template>

    </child>

    <child>
      这就是模板
    </child>
  </div>
</template>

//子组件
<template>
  <div class="child">

    <h3>蓝色背景这是子组件</h3>
    // 作用域插槽
    <slot  :data="data"></slot>
  </div>
</template>

 export default {
    data: function(){
      return {
        data: ['one','two','three']
      }
    }
}
注意:

内置指令v-slot,可以缩写为【#】
子组件用法保持不变,父组件中
slot属性弃用,具名插槽通过指令参数v-slot:插槽名的形式传入,可以简化为#插槽名。
<template #header>
     <div>具名插槽</div>
   </template>
slot-scope属性弃用,作用域插槽通过v-slot:xxx="slotProps"的slotProps来获取子组件传出的属性
<!--作用域插槽-->
   <template #footer="slotProps">
     <div>
      {{slotProps.testProps}}
     </div>
   </template>
v-slot属性只能在<template>上使用,但在【只有默认插槽时】可以在组件标签上使用
<template v-slot>
     <div>默认插槽</div>
 </template>
总结
1.通过上述的描述,关于组件的了解有了更加进一步的认识,从组件的创建构造器到组件的组成,进而到组件的使用,已经丰富了多样式的组件,提高了复用性。
2.从组件的基本使用、组件属性,以及自定义事件实现父子通讯和巧妙运用插槽slot分发内容,进一步的认识到组件在Vue中的核心地位
3.参考资料官方文档


