
docker-compose 部署gitlab和gitlab-runner注册和自动化部署
首先需要安装docker和docker-compose
yum install -y wget
wget https://mirrors.aliyun.com/docker-ce/linux/centos/docker-ce.repo -O /etc/yum.repos.d/docker-ce.repo
yum -y install docker-ce-18.06.1.ce-3.el7
mkdir -p /etc/docker/
docker --version
#docker镜像加速器
cat >/etc/docker/daemon.json << EOF
{
  "registry-mirrors": ["https://b9pmyelo.mirror.aliyuncs.com"],
  "insecure-registries": ["https://repo.xxx.com"],
  "log-driver":"json-file",
  "log-opts": {"max-size":"200m", "max-file":"10"}
}
EOF
systemctl enable docker && systemctl start docker
docker info

curl -L "https://github.com/docker/compose/releases/download/1.23.2/docker-compose-$(uname -s)-$(uname -m)" -o /usr/local/bin/docker-compose
chmod +x /usr/local/bin/docker-compose
编写docker-compose.yml
version: '3'
services:
    gitlab:
      image: 'twang2218/gitlab-ce-zh:11.1.4'  # 镜像版本
      #image: 'gitlab/gitlab-ce'              # 镜像版本,也可以是官方的镜像
      container_name: "gitlab"
      restart: unless-stopped
      privileged: true
      hostname: 'gitlab'                      #主机名,要跟主机名一直
      environment:
        TZ: 'Asia/Shanghai'
        GITLAB_OMNIBUS_CONFIG: |
         external_url 'http://192.168.10.216'         # 服务器本地IP地址
         gitlab_rails['time_zone'] = 'Asia/Shanghai'  # 时区
         #gitlab_rails['smtp_enable'] = true          # 下面是否开启邮箱验证
         #gitlab_rails['smtp_address'] = "smtp.xxx.com"
         #gitlab_rails['smtp_port'] = 465
         #gitlab_rails['smtp_user_name'] = "xxx@xxx.com"
         #gitlab_rails['smtp_password'] = "xxxxxx"
         #gitlab_rails['smtp_domain'] = "xxx.com"
         #gitlab_rails['smtp_authentication'] = "login"
         #gitlab_rails['smtp_enable_starttls_auto'] = true
         #gitlab_rails['smtp_tls'] = true
         #gitlab_rails['gitlab_email_from'] = 'xxxx@xxx.com'
         gitlab_rails['gitlab_shell_ssh_port'] = 222   # gitlab远程执行的端口
         nginx['listen_port'] = 80
      ports:
        - '80:80'
        - '443:443'
        - '222:22'
      volumes:
        - /opt/gitlab/config:/etc/gitlab
        - /opt/gitlab/data:/var/opt/gitlab
        - /opt/gitlab/logs:/var/log/gitlab
      logging:
          driver: "json-file"
          options:
              max-size: "200m"
              max-file: "10"
启动
docker-compose -f docker-compose.yml up -d
需要等待2-4分钟左右,也看机器的配置情况
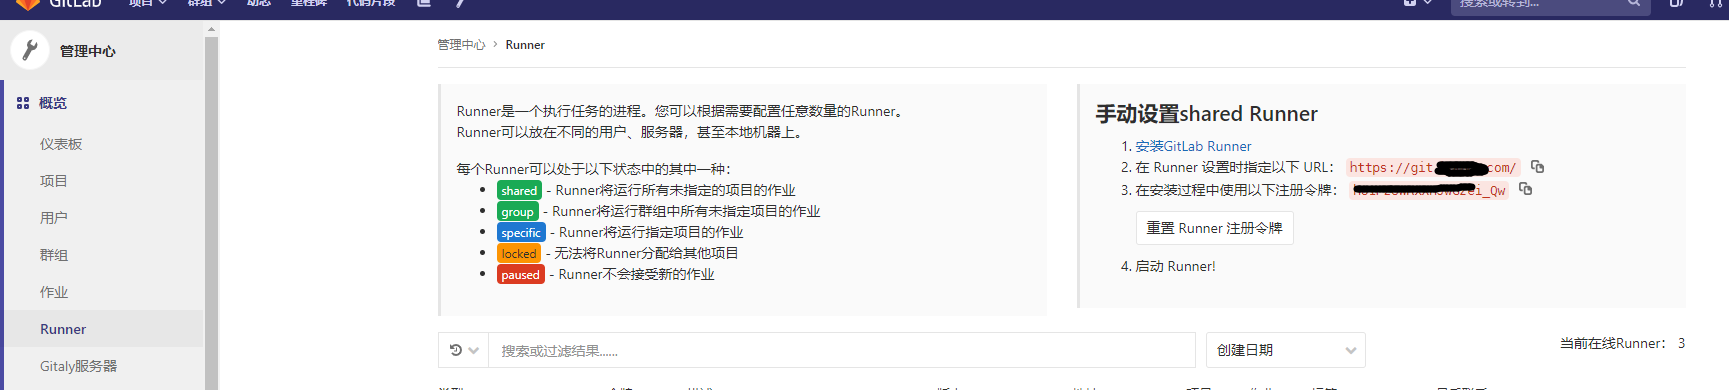
gitlab-runner注册到gitlab上
#!/bin/bash

docker run -d --name gitlab-runner \
-v /home/apps/gitlab-runner/config:/etc/gitlab-runner \
-v /var/run/docker.sock:/var/run/docker.sock \
-v /root/.docker/:/root/.docker/ \
-v /etc/hosts:/etc/hosts \
--net=host \
--restart always \
--privileged=true \
gitlab/gitlab-runner:v13.12.0
获取注册地址和令牌需要管理登录进行查
[root@172-13-1-52 runner]# docker exec -it gitlab-runner /bin/bash
root@172-13-1-52:/# gitlab-runner register
Runtime platform                                    arch=amd64 os=linux pid=39 revision=7a6612da version=13.12.0
Running in system-mode.

Enter the GitLab instance URL (for example, https://gitlab.com/):
https://gitlab.xxx.com/
Enter the registration token:
xxxxxxx
Enter a description for the runner:
[172-13-1-52.lightspeed.mssnks.sbcglobal.net]: global-runner-new
Enter tags for the runner (comma-separated):
global-runner-new
Registering runner... succeeded                     runner=hU1PzUWR
Enter an executor: custom, docker, ssh, docker-ssh+machine, kubernetes, docker-ssh, parallels, shell, virtualbox, docker+machine:
docker
Enter the default Docker image (for example, ruby:2.6):
repo.rdvalidasi.com/middle-end/docker:stable-dind
Runner registered successfully. Feel free to start it, but if it's running already the config should be automatically reloaded!
root@172-13-1-52:/#
[root@172-13-1-52 runner]#
注册完成后配置文件需要增加docker.sock
[root@172.13.1.52 runner]# cat config/config.toml
concurrent = 10
check_interval = 0

[session_server]
  session_timeout = 1800
[[runners]]
  name = "runner_my"
  url = "https://gitlab.xxxxx.com"
  token = "xxxxxxxxxxx"
  executor = "docker"
  [runners.custom_build_dir]
  [runners.cache]
    [runners.cache.s3]
    [runners.cache.gcs]
    [runners.cache.azure]
  [runners.docker]
    tls_verify = false
    image = "repo.rdvalidasi.com/middle-end/docker:stable-dind"
    privileged = false
    disable_entrypoint_overwrite = false
    oom_kill_disable = false
    disable_cache = false
    volumes = ["/cache","/var/run/docker.sock:/var/run/docker.sock"]
    shm_size = 0
[root@172-13-1-52 runner]#
注册完成后需要在注册进来的runner进行设置一下,允许分配使用

保存好就可以使用了
免交互式注册,前提是需要改好gitlab访问地址和token,docker方式启动直接使用容器名称进去执行即可
docker exec -it gitlab-runner-1 /bin/bash
gitlab-runner register \
--host="gitlab.xxx.com:192.168.1.200" \
--url="http://gitlab.xxx.com" \
--non-interactive \
--executor "docker" \
--registration-token "xxxxxxxxx" \
--description "描述信息" \
--tag-list "build,deploy" \
--run-untagged="true" \
--locaked="false"
执行完的runner状态是可用的
.gitlab-ci.yml
variables:
  REPO_HARBOR: "repo.xxxxxx.com"
  REPO_PATH:  "oversea/game/coin"
  REPO_PROJECT: "xxx"
  REPO_HARBOR_USER: "repo-user"
  REPO_HARBOR_PASS: "xxxxxxxxx"
  TEST_ADDR : "th-test-server" # runner-shell的hosts配置的映射域名地址
  DEV_ADDR : "th-dev-server"   # runner-shell的hosts配置的映射域名地址
  AREA : "tha"     # 区域标识
  IMAGE_NAME : "$REPO_HARBOR/$REPO_PATH/$REPO_PROJECT:$CI_COMMIT_REF_NAME"
  LATEST_IMAGE_NAME : "$REPO_HARBOR/$REPO_PATH/$REPO_PROJECT:latest"
  CHAT_ID : "834593034"   # 飞机的群组ID,需要被脚本调用

stages:
- build
- test
- deploy
build:
  stage: build
  tags:
  - runner-1
  script:
  - echo "代码编译"
test:
  stage: test
  tags:
  - runner-1
  script:
  - echo "测试代码"
deploy:
  only:
    - tags
    - echo "部署项目"
  stage: deploy
  tags:
    - runner-shell
  script:
    - ssh $TEST_ADDR '/usr/local/gitlab-runner/game/xxx/deploy.sh' $IMAGE_NAME
    - ssh $TEST_ADDR '/usr/local/gitlab-runner/game/111_notice.sh' $CHAT_ID $AREA $REPO_PROJECT $IMAGE_NAME
辅助脚本:在每个项目中都需要的有
cat deploy.sh
#!/bin/bash
GAME_A=/usr/local/gitlab-runner/game/xxx/normal_a/xxx-a.yml

IMAGE_NAME=$1

docker-compose -f ${GAME_A} -p xxx down

sleep 3

docker rmi -f ${IMAGE_NAME}
OLD_IMAGE=`grep image ${GAME_A} |head -1`
echo ${OLD_IMAGE}
sed -i "s#${OLD_IMAGE}#    image: ${IMAGE_NAME}#g" ${GAME_A}

docker-compose -f ${GAME_A} -p xxx  up -d

docker ps -a | grep "${IMAGE_NAME}"
cat  111_notice.sh
#!/bin/bash

CHAT_ID=$1
curl -X POST https://api.telegram.org/bot6129909638:AAHL5pWgp58Q9PTDIJ_Q5OTePIbHJl9K990/sendMessage -d "chat_id=-${CHAT_ID}&text=[${2}-${3}]构建部署测试服完成,当前镜像版本:${4}"
runner-shell 配置,需要挂载runner本机的ssh-key到指定路径进行免密才能通过runner-shell进行远程执行脚本和命令

注:
renner-shell启动配置
cat start-runner-1.sh
#!/bin/bash

docker run -d --name runner-shell \
-v /data/runner/runner-shell/config:/etc/gitlab-runner \
-v /var/run/docker.sock:/var/run/docker.sock \
-v /root/.docker/:/root/.docker/ \
-v /etc/hosts:/etc/hosts \
-v /data/runner/runner-shell/ssh:/home/gitlab-runner/.ssh \
-e DEBUG=true \
--net=host \
--restart always \
--privileged=true \
gitlab/gitlab-runner:v13.12.0

docker ps -a | grep runner-shell
exit 0
配置和ssh
cat config/config.toml
concurrent = 10
check_interval = 0

[session_server]
  session_timeout = 1800

[[runners]]
  name = "runner-shell"
  url = "https://git.xxx.com/"
  token = "xxx-xxx"
  executor = "shell"
  [runners.custom_build_dir]
  [runners.cache]
    [runners.cache.s3]
    [runners.cache.gcs]
    [runners.cache.azure]
SSH相关
 cat ssh/config
Host th-test-server
    HostName xxx.xxx.xxx.xxx
    User root
    Port 22
    IdentityFile ~/.ssh/runner

Host test-server
    HostName xxx.xxx.xxx.xxx
    User root
    Port 22
    IdentityFile ~/.ssh/runner

Host 2-dev-server
    HostName 172.13.5.17
    User root
    Port 22
    IdentityFile ~/.ssh/runner

Host dev1-server
    HostName 172.13.7.19
    User root
    Port 22
    IdentityFile ~/.ssh/runner

Host dev2-server
    HostName 172.13.7.20
    User root
    Port 22
    IdentityFile ~/.ssh/runner
试试需要进入runner-shell容器进行远程生成免密文件和免密文件

被远程的机器

使劲折腾才会有更好的结果!!!!
如有不对请不吝赐教,感谢!
转载请注明出处!

