
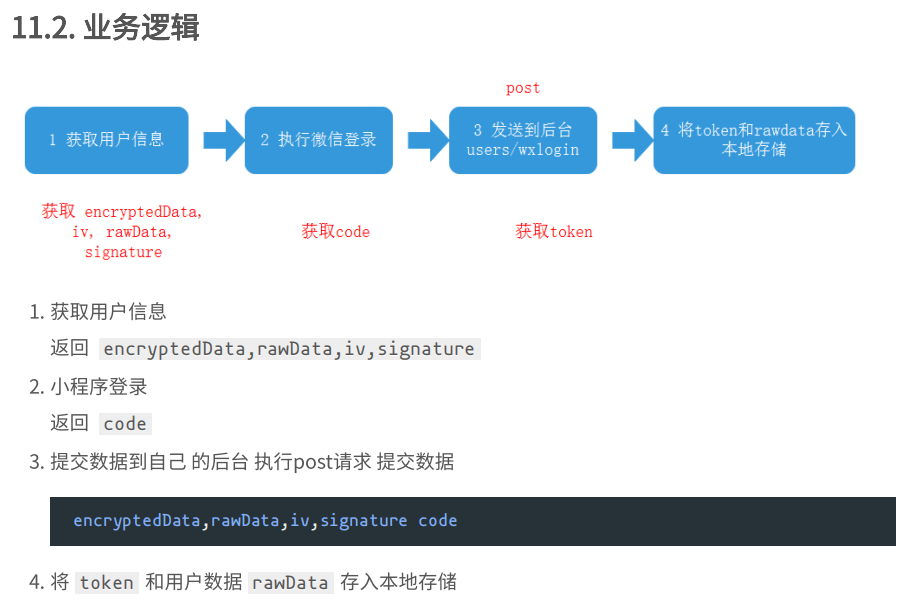
二 小程序项目实践
小程序项目实践
常用工具
1 请求(request目录下)


// 同时发送异步代码的次数
let ajaxTimes=0;
export const request=(params)=>{
  // 判断 url中是否带有 /my/ 请求的是私有的路径 带上header token
  let header={...params.header};
  if(params.url.includes("/my/")){
    // 拼接header 带上token
    header["Authorization"]=wx.getStorageSync("token");
  }


  ajaxTimes++;
  // 显示加载中 效果
  wx.showLoading({
    title: "加载中",
    mask: true
  });


  // 定义公共的url
  // const baseUrl="https://api.zbztb.cn/api/public/v1";
  const baseUrl ="https://api-hmugo-web.itheima.net/api/public/v1"
  return new Promise((resolve,reject)=>{
    wx.request({
     ...params,
     header:header,
     url:baseUrl+params.url,
     success:(result)=>{
       resolve(result.data.message);
     },
     fail:(err)=>{
       reject(err);
     },
     complete:()=>{
      ajaxTimes--;
      if(ajaxTimes===0){
        //  关闭正在等待的图标
        wx.hideLoading();
      }
     }
    });
  })
}
调用示例:
// 0 引入 用来发送请求的 方法 一定要把路径补全
import { request } from "../../request/index.js";
Page({
  data: {
    // 轮播图数组
    swiperList: [],
    // 导航 数组
    catesList:[],
    // 楼层数据
    floorList:[]
  },
  // 页面开始加载 就会触发
  onLoad: function (options) {
    // 1 发送异步请求获取轮播图数据  优化的手段可以通过es6的 promise来解决这个问题
    // wx.request({
    //   url: 'https://api.zbztb.cn/api/public/v1/home/swiperdata',
    //   success: (result) => {
    //     this.setData({
    //       swiperList: result.data.message
    //     })
    //   }
    // });

    this.getSwiperList();
    this.getCateList();
    this.getFloorList();

  },

  // 获取轮播图数据
  getSwiperList(){
    request({ url: "/home/swiperdata" })
    .then(result => {
      this.setData({
        swiperList: result
      })
    })
  },
  // 获取 分类导航数据
  getCateList(){
    request({ url: "/home/catitems" })
    .then(result => {
      this.setData({
        catesList: result
      })
    })
  },
  // 获取 楼层数据
  getFloorList(){
    request({ url: "/home/floordata" })
    .then(result => {
      this.setData({
        floorList: result
      })
    })
  },
})
2 数据存储(缓存)
import { request } from "../../request/index.js";
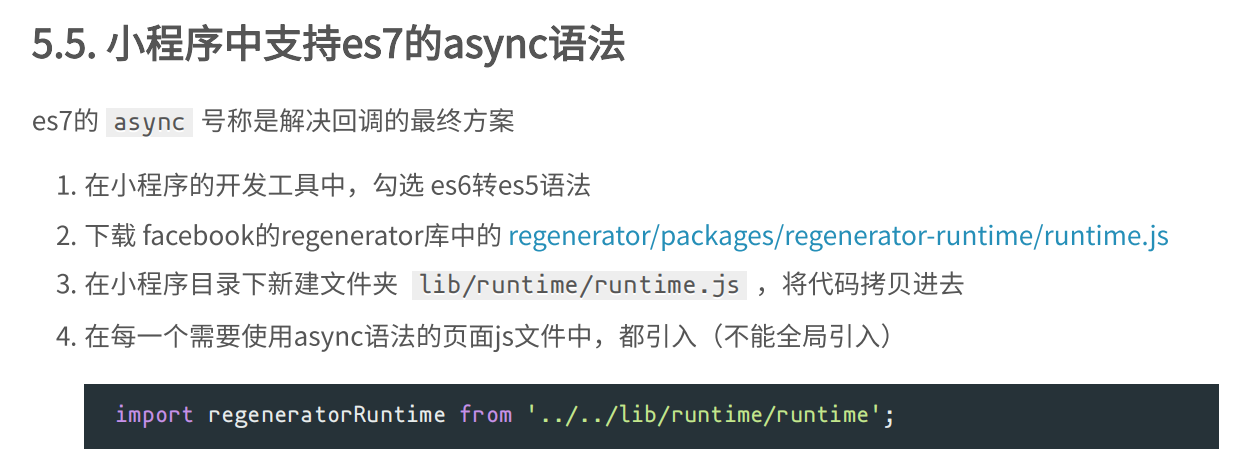
import regeneratorRuntime from '../../lib/runtime/runtime';
Page({
data: {
// 左侧的菜单数据
leftMenuList: [],
// 右侧的商品数据
rightContent: [],
// 被点击的左侧的菜单
currentIndex: 0,
// 右侧内容的滚动条距离顶部的距离
scrollTop: 0
},
// 接口的返回数据
Cates: [],
onLoad: function (options) {
/*
0 web中的本地存储和 小程序中的本地存储的区别
1 写代码的方式不一样了
web: localStorage.setItem("key","value") localStorage.getItem("key")
小程序中: wx.setStorageSync("key", "value"); wx.getStorageSync("key");
2:存的时候 有没有做类型转换
web: 不管存入的是什么类型的数据,最终都会先调用以下 toString(),把数据变成了字符串 再存入进去
小程序: 不存在 类型转换的这个操作 存什么类似的数据进去,获取的时候就是什么类型
1 先判断一下本地存储中有没有旧的数据
{time:Date.now(),data:[...]}
2 没有旧数据 直接发送新请求
3 有旧的数据 同时 旧的数据也没有过期 就使用 本地存储中的旧数据即可
*/
// 1 获取本地存储中的数据 (小程序中也是存在本地存储 技术)
const Cates = wx.getStorageSync("cates");
// 2 判断
if (!Cates) {
// 不存在 发送请求获取数据
this.getCates();
} else {
// 有旧的数据 定义过期时间 10s 改成 5分钟
if (Date.now() - Cates.time > 1000 * 10) {
// 重新发送请求
this.getCates();
} else {
// 可以使用旧的数据
this.Cates = Cates.data;
let leftMenuList = this.Cates.map(v => v.cat_name);
let rightContent = this.Cates[0].children;
this.setData({
leftMenuList,
rightContent
})
}
}
},
// 获取分类数据
async getCates() {
// request({
// url: "/categories"
// })
// .then(res => {
// this.Cates = res.data.message;
// // 把接口的数据存入到本地存储中
// wx.setStorageSync("cates", { time: Date.now(), data: this.Cates });
// // 构造左侧的大菜单数据
// let leftMenuList = this.Cates.map(v => v.cat_name);
// // 构造右侧的商品数据
// let rightContent = this.Cates[0].children;
// this.setData({
// leftMenuList,
// rightContent
// })
// })
// 1 使用es7的async await来发送请求
const res = await request({ url: "/categories" });
// this.Cates = res.data.message;
this.Cates = res;
// 把接口的数据存入到本地存储中
wx.setStorageSync("cates", { time: Date.now(), data: this.Cates });
// 构造左侧的大菜单数据
let leftMenuList = this.Cates.map(v => v.cat_name);
// 构造右侧的商品数据
let rightContent = this.Cates[0].children;
this.setData({
leftMenuList,
rightContent
})
},
// 左侧菜单的点击事件
handleItemTap(e) {
/*
1 获取被点击的标题身上的索引
2 给data中的currentIndex赋值就可以了
3 根据不同的索引来渲染右侧的商品内容
*/
const { index } = e.currentTarget.dataset;
let rightContent = this.Cates[index].children;
this.setData({
currentIndex: index,
rightContent,
// 重新设置 右侧内容的scroll-view标签的距离顶部的距离
scrollTop: 0
})
}
})
3 es7的async语法(category使用实列)
组件
1 搜索框(Searchinput)
// components/SearchInput/SearchInput.js
Component({
  /**
   * 组件的属性列表
   */
  properties: {

  },

  /**
   * 组件的初始数据
   */
  data: {

  },

  /**
   * 组件的方法列表
   */
  methods: {

  }
})
{
  "component": true,
  "usingComponents": {}
}
<view class="search_input">
  <navigator url="/pages/search/index" open-type="navigate"> 搜索 </navigator>
</view>
.search_input {
  height: 90rpx;
  padding: 10rpx;
  background-color: var(--themeColor);
}
.search_input navigator {
  height: 100%;
  display: flex;
  justify-content: center;
  align-items: center;
  background-color: #fff;
  border-radius: 15rpx;
  color: #666;
}
2 Tabs组件(goods使用)
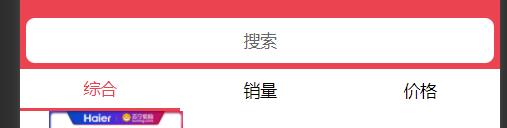
// components/Tabs/Tabs.js
Component({
  /**
   * 组件的属性列表
   */
  properties: {
    tabs:{
      type:Array,
      value:[]
    }
  },

  /**
   * 组件的初始数据
   */
  data: {

  },

  /**
   * 组件的方法列表
   */
  methods: {
    // 点击事件
    handleItemTap(e){
      // 1 获取点击的索引
      const {index}=e.currentTarget.dataset;
      // 2 触发 父组件中的事件 自定义
      this.triggerEvent("tabsItemChange",{index});
    }
  }
})
{
  "component": true,
  "usingComponents": {}
}
<view class="tabs">
  <view class="tabs_title">
    <view
    wx:for="{{tabs}}"
    wx:key="id"
    class="title_item  {{item.isActive?'active':''}} "
    bindtap="handleItemTap"
    data-index="{{index}}"
    >

    {{item.value}}
  </view>
  </view>
  <view class="tabs_content">
    <slot></slot>
  </view>
</view>
.tabs{}
.tabs_title{
  display: flex;

}
.title_item{
  display: flex;
  justify-content: center;
  align-items: center;
  flex: 1;
  padding: 15rpx 0;
}
.active{
  color:var(--themeColor);
  border-bottom: 5rpx solid currentColor;
}
.tabs_content{}
1 项目搭建


搭建 项目tabbar结构
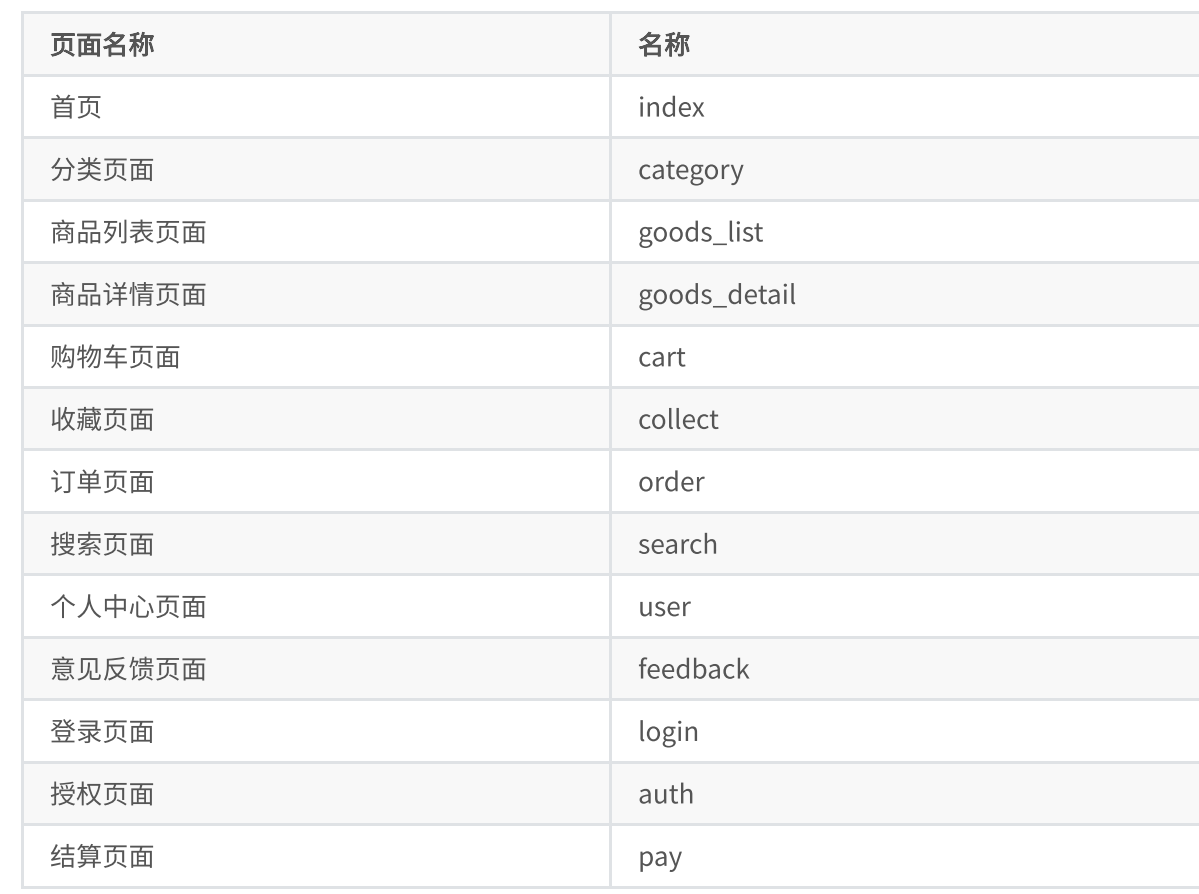
{
  "pages": [
    "pages/index/index",
    "pages/category/index",
    "pages/goods_list/index",
    "pages/goods_detail/index",
    "pages/cart/index",
    "pages/collect/index",
    "pages/order/index",
    "pages/search/index",
    "pages/user/index",
    "pages/feedback/index",
    "pages/login/index",
    "pages/auth/index",
    "pages/pay/index"
  ],
  "window": {
    "backgroundTextStyle": "light",
    "navigationBarBackgroundColor": "#eb4450",
    "navigationBarTitleText": "黑马优购",
    "navigationBarTextStyle": "white"
  },
  "tabBar": {
    "color": "#999",
    "selectedColor": "#ff2d4a",
    "backgroundColor": "#fafafa",
    "position": "bottom",
    "borderStyle": "black",
    "list": [
      {
        "pagePath": "pages/index/index",
        "text": "首页",
        "iconPath": "icons/home.png",
        "selectedIconPath": "icons/home-o.png"
      },
      {
        "pagePath": "pages/category/index",
        "text": "分类",
        "iconPath": "icons/category.png",
        "selectedIconPath": "icons/category-o.png"
      }
      ,
      {
        "pagePath": "pages/cart/index",
        "text": "购物车",
        "iconPath": "icons/cart.png",
        "selectedIconPath": "icons/cart-o.png"
      }
      ,
      {
        "pagePath": "pages/user/index",
        "text": "我的",
        "iconPath": "icons/my.png",
        "selectedIconPath": "icons/my-o.png"
      }
    ]
  },


  "sitemapLocation": "sitemap.json"
}
2 首页(index)
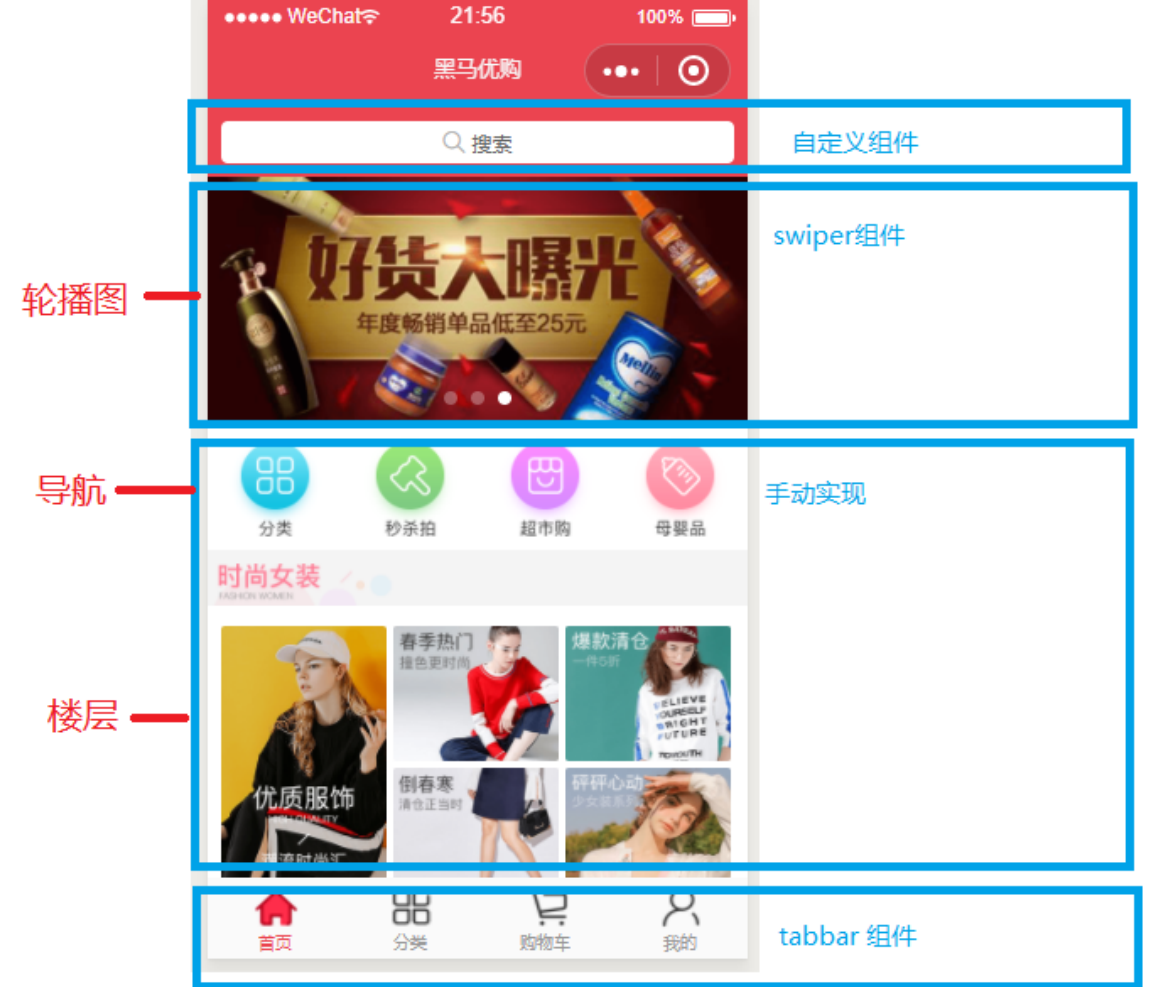
// 0 引入 用来发送请求的 方法 一定要把路径补全
import { request } from "../../request/index.js";
Page({
  data: {
    // 轮播图数组
    swiperList: [],
    // 导航 数组
    catesList:[],
    // 楼层数据
    floorList:[]
  },
  // 页面开始加载 就会触发
  onLoad: function (options) {
    // 1 发送异步请求获取轮播图数据  优化的手段可以通过es6的 promise来解决这个问题
    // wx.request({
    //   url: 'https://api.zbztb.cn/api/public/v1/home/swiperdata',
    //   success: (result) => {
    //     this.setData({
    //       swiperList: result.data.message
    //     })
    //   }
    // });

    this.getSwiperList();
    this.getCateList();
    this.getFloorList();

  },

  // 获取轮播图数据
  getSwiperList(){
    request({ url: "/home/swiperdata" })
    .then(result => {
      this.setData({
        swiperList: result
      })
    })
  },
  // 获取 分类导航数据
  getCateList(){
    request({ url: "/home/catitems" })
    .then(result => {
      this.setData({
        catesList: result
      })
    })
  },
  // 获取 楼层数据
  getFloorList(){
    request({ url: "/home/floordata" })
    .then(result => {
      this.setData({
        floorList: result
      })
    })
  },
})
{
  "usingComponents": {
    "SearchInput":"../../components/SearchInput/SearchInput"
  },
  "navigationBarTitleText": "优购首页"
}
<view class="pyg_index">
  <!-- 搜索框 开始 -->
  <SearchInput></SearchInput>
  <!-- 搜索框 结束 -->
  <!-- 轮播图 开始 -->
  <view class="index_swiper">
    <!--
      1 swiper标签存在默认的宽度和高度
        100% * 150px
      2 image标签也存在默认的宽度和高度
        320px * 240px
      3 设计图片和轮播图
        1 先看一下原图的宽高  750 * 340
        2 让图片的高度自适应 宽度 等于100%
        3 让swiper标签的高度 变成和图片的高一样即可
      4 图片标签
        mode属性 渲染模式
          widthFix  让图片的标签宽高 和 图片标签的内容的宽高都等比例的发生变化
     -->
    <swiper autoplay indicator-dots circular>
      <swiper-item
      wx:for="{{swiperList}}"
      wx:key="goods_id"

      >
        <navigator url="{{item.navigator_url}}">
          <image mode="widthFix" src="{{item.image_src}}"></image>
        </navigator>
      </swiper-item>
    </swiper>
  </view>
  <!-- 轮播图 结束 -->

  <!-- 导航 开始 -->
  <view class="index_cate">
    <navigator
    wx:for="{{catesList}}"
    wx:key="name"
    url="/pages/category/index"
    open-type="switchTab"
    >
    <image mode="widthFix" src="{{item.image_src}}" ></image>
  </navigator>
  </view>
  <!-- 导航 结束 -->

  <!-- 楼层 开始 -->
  <view class="index_floor">
    <view class="floor_group"
    wx:for="{{floorList}}"
    wx:for-item="item1"
    wx:for-index="index1"
    wx:key="floor_title"
    >
      <!-- 标题 -->
      <view class="floor_title">
        <image mode="widthFix" src="{{item1.floor_title.image_src}}"></image>
      </view>
      <!-- 内容 -->
      <view class="floor_list">
        <navigator
        wx:for="{{item1.product_list}}"
        wx:for-item="item2"
        wx:for-index="index2"
        wx:key="name"
        url="{{item2.navigator_url}}"
        >
        <image mode="{{index2===0?'widthFix':'scaleToFill'}}" src="{{item2.image_src}}"></image>
      </navigator>
      </view>
    </view>
  </view>
  <!-- 楼层 结束 -->
</view>
.index_swiper swiper {
  width: 750rpx;
  height: 340rpx;
}
.index_swiper swiper image {
  width: 100%;
}
.index_cate {
  display: flex;
}
.index_cate navigator {
  padding: 20rpx;
  flex: 1;
}
.index_cate navigator image {
  width: 100%;
}
.index_floor .floor_group .floor_title {
  padding: 10rpx 0;
}
.index_floor .floor_group .floor_title image {
  width: 100%;
}
.index_floor .floor_group .floor_list {
  overflow: hidden;
}
.index_floor .floor_group .floor_list navigator {
  float: left;
  width: 33.33%;
  /* 后四个超链接 */
  /* 2 3 两个超链接 */
}
.index_floor .floor_group .floor_list navigator:nth-last-child(-n+4) {
  /* 原图的宽高 232 *386 */
  height: 27.72711207vw;
  border-left: 10rpx solid #fff;
}
.index_floor .floor_group .floor_list navigator:nth-child(2),
.index_floor .floor_group .floor_list navigator:nth-child(3) {
  border-bottom: 10rpx solid #fff;
}
.index_floor .floor_group .floor_list navigator image {
  width: 100%;
  height: 100%;
}
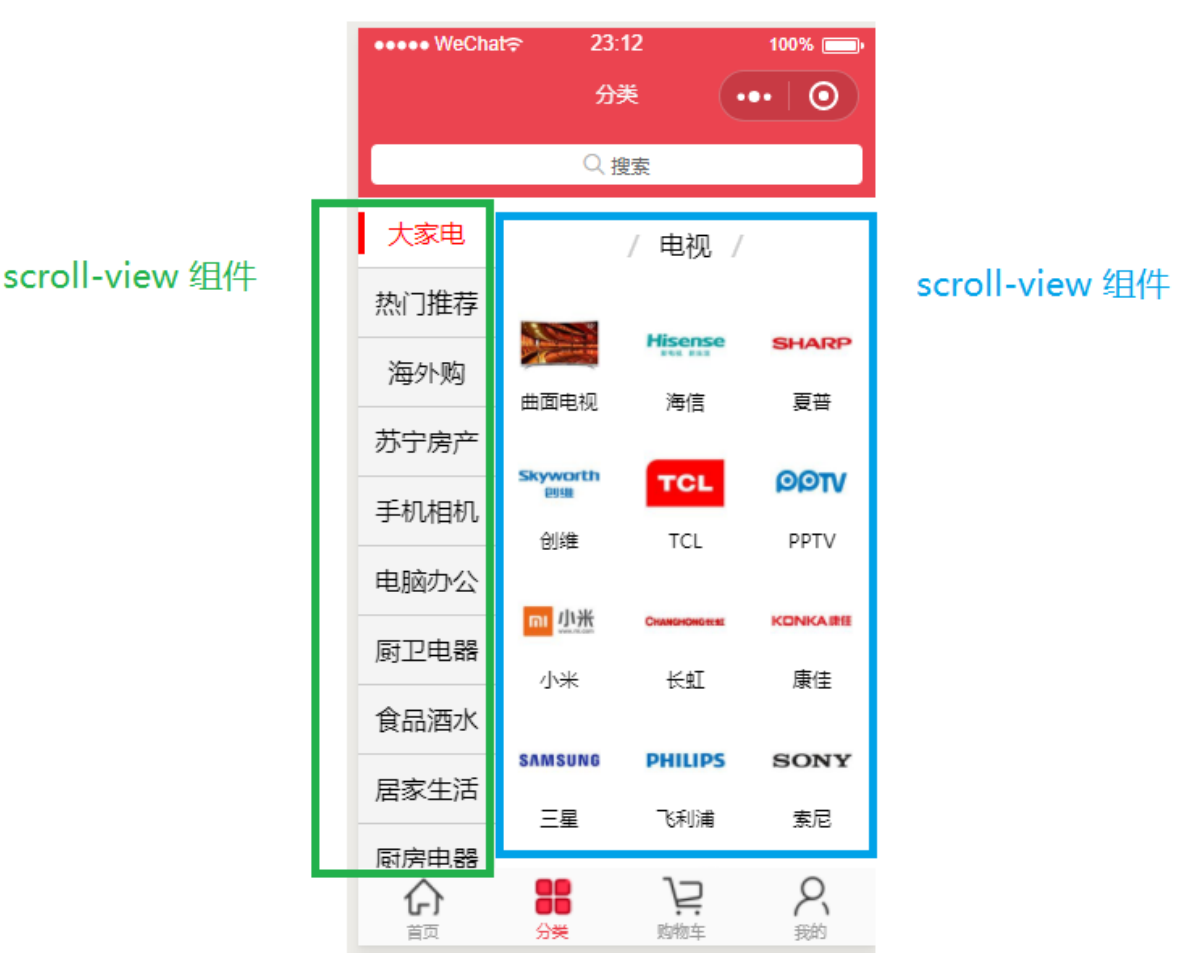
3 分类页面(category)
import { request } from "../../request/index.js";
import regeneratorRuntime from '../../lib/runtime/runtime';
Page({
  data: {
    // 左侧的菜单数据
    leftMenuList: [],
    // 右侧的商品数据
    rightContent: [],
    // 被点击的左侧的菜单
    currentIndex: 0,
    // 右侧内容的滚动条距离顶部的距离
    scrollTop: 0
  },
  // 接口的返回数据
  Cates: [],

  onLoad: function (options) {
    /*
    0 web中的本地存储和 小程序中的本地存储的区别
      1 写代码的方式不一样了
        web: localStorage.setItem("key","value") localStorage.getItem("key")
    小程序中: wx.setStorageSync("key", "value"); wx.getStorageSync("key");
      2:存的时候 有没有做类型转换
        web: 不管存入的是什么类型的数据,最终都会先调用以下 toString(),把数据变成了字符串 再存入进去
      小程序: 不存在 类型转换的这个操作 存什么类似的数据进去,获取的时候就是什么类型
    1 先判断一下本地存储中有没有旧的数据
      {time:Date.now(),data:[...]}
    2 没有旧数据 直接发送新请求
    3 有旧的数据 同时 旧的数据也没有过期 就使用 本地存储中的旧数据即可
     */

    //  1 获取本地存储中的数据  (小程序中也是存在本地存储 技术)
    const Cates = wx.getStorageSync("cates");
    // 2 判断
    if (!Cates) {
      // 不存在  发送请求获取数据
      this.getCates();
    } else {
      // 有旧的数据 定义过期时间  10s 改成 5分钟
      if (Date.now() - Cates.time > 1000 * 10) {
        // 重新发送请求
        this.getCates();
      } else {
        // 可以使用旧的数据
        this.Cates = Cates.data;
        let leftMenuList = this.Cates.map(v => v.cat_name);
        let rightContent = this.Cates[0].children;
        this.setData({
          leftMenuList,
          rightContent
        })
      }
    }

  },
  // 获取分类数据
  async getCates() {
    // request({
    //   url: "/categories"
    // })
    //   .then(res => {
    //     this.Cates = res.data.message;

    //     // 把接口的数据存入到本地存储中
    //     wx.setStorageSync("cates", { time: Date.now(), data: this.Cates });


    //     // 构造左侧的大菜单数据
    //     let leftMenuList = this.Cates.map(v => v.cat_name);
    //     // 构造右侧的商品数据
    //     let rightContent = this.Cates[0].children;
    //     this.setData({
    //       leftMenuList,
    //       rightContent
    //     })
    //   })

    // 1 使用es7的async await来发送请求
    const res = await request({ url: "/categories" });
    // this.Cates = res.data.message;
    this.Cates = res;
    // 把接口的数据存入到本地存储中
    wx.setStorageSync("cates", { time: Date.now(), data: this.Cates });
    // 构造左侧的大菜单数据
    let leftMenuList = this.Cates.map(v => v.cat_name);
    // 构造右侧的商品数据
    let rightContent = this.Cates[0].children;
    this.setData({
      leftMenuList,
      rightContent
    })
  },
  // 左侧菜单的点击事件
  handleItemTap(e) {
    /*
    1 获取被点击的标题身上的索引
    2 给data中的currentIndex赋值就可以了
    3 根据不同的索引来渲染右侧的商品内容
     */
    const { index } = e.currentTarget.dataset;

    let rightContent = this.Cates[index].children;
    this.setData({
      currentIndex: index,
      rightContent,
      // 重新设置 右侧内容的scroll-view标签的距离顶部的距离
      scrollTop: 0
    })

  }
})
{
  "usingComponents": {
    "SearchInput":"../../components/SearchInput/SearchInput"
  },
  "navigationBarTitleText": "商品分类"
}
<view class="cates">
  <SearchInput></SearchInput>
  <view class="cates_container">
    <!-- 左侧菜单 -->
    <scroll-view scroll-y class="left_menu">
      <view
      class="menu_item {{index===currentIndex?'active':''}}"
      wx:for="{{leftMenuList}}"
      wx:key="*this"
      bindtap="handleItemTap"
      data-index="{{index}}"
      >
      {{item}}
      </view>
    </scroll-view>
    <!-- 右侧商品内容 -->
    <scroll-view scroll-top="{{scrollTop}}" scroll-y class="right_content">
      <view class="goods_group"
      wx:for="{{rightContent}}"
      wx:for-index="index1"
      wx:for-item="item1"
      >
        <view class="goods_title">
          <text class="delimiter">/</text>
          <text class="title">{{item1.cat_name}}</text>
          <text class="delimiter">/</text>
        </view>
        <view class="goods_list">
          <navigator
          wx:for="{{item1.children}}"
          wx:for-index="index2"
          wx:for-item="item2"
          wx:key="cat_id"
          url="/pages/goods_list/index?cid={{item2.cat_id}}"
          >
          <image mode="widthFix" src="{{item2.cat_icon}}"></image>
          <view class="goods_name">{{item2.cat_name}}</view>
          </navigator>
        </view>
      </view>
    </scroll-view>
  </view>
</view>
page {
  height: 100%;
}
.cates {
  height: 100%;
}
.cates .cates_container {
  /* less中使用calc的时候要注意 */
  height: calc( 100vh - 90rpx );
  display: flex;
}
.cates .cates_container .left_menu {
  /* 子项 高度 100% flex */
  flex: 2;
}
.cates .cates_container .left_menu .menu_item {
  height: 80rpx;
  display: flex;
  justify-content: center;
  align-items: center;
  font-size: 30rpx;
}
.cates .cates_container .left_menu .active {
  color: var(--themeColor);
  border-left: 5rpx solid currentColor;
}
.cates .cates_container .right_content {
  /* 子项 高度 100% flex */
  flex: 5;
}
.cates .cates_container .right_content .goods_group .goods_title {
  height: 80rpx;
  display: flex;
  justify-content: center;
  align-items: center;
}
.cates .cates_container .right_content .goods_group .goods_title .delimiter {
  color: #ccc;
  padding: 0 10rpx;
}
.cates .cates_container .right_content .goods_group .goods_list {
  display: flex;
  flex-wrap: wrap;
}
.cates .cates_container .right_content .goods_group .goods_list navigator {
  width: 33.33%;
  text-align: center;
}
.cates .cates_container .right_content .goods_group .goods_list navigator image {
  width: 50%;
}
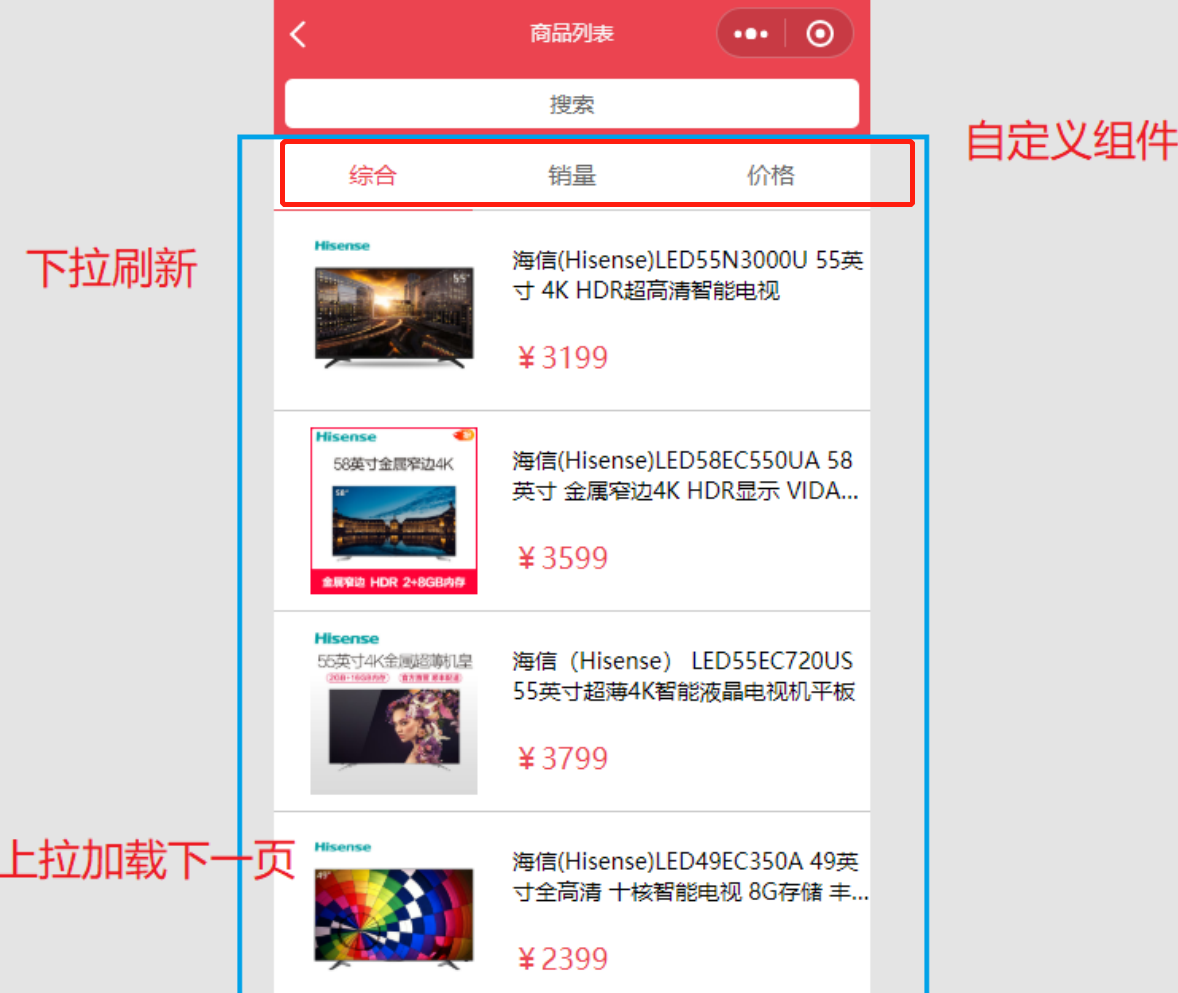
4 商品列表页面(goods_list)
/*
1 用户上滑页面 滚动条触底 开始加载下一页数据
  1 找到滚动条触底事件  微信小程序官方开发文档寻找
  2 判断还有没有下一页数据
    1 获取到总页数  只有总条数
      总页数 = Math.ceil(总条数 /  页容量  pagesize)
      总页数     = Math.ceil( 23 / 10 ) = 3
    2 获取到当前的页码  pagenum
    3 判断一下 当前的页码是否大于等于 总页数
      表示 没有下一页数据

  3 假如没有下一页数据 弹出一个提示
  4 假如还有下一页数据 来加载下一页数据
    1 当前的页码 ++
    2 重新发送请求
    3 数据请求回来  要对data中的数组 进行 拼接 而不是全部替换!!!
2 下拉刷新页面
  1 触发下拉刷新事件 需要在页面的json文件中开启一个配置项
    找到 触发下拉刷新的事件
  2 重置 数据 数组
  3 重置页码 设置为1
  4 重新发送请求
  5 数据请求回来 需要手动的关闭 等待效果

 */
import { request } from "../../request/index.js";
import regeneratorRuntime from '../../lib/runtime/runtime';
Page({
  data: {
    tabs: [
      {
        id: 0,
        value: "综合",
        isActive: true
      },
      {
        id: 1,
        value: "销量",
        isActive: false
      },
      {
        id: 2,
        value: "价格",
        isActive: false
      }
    ],
    goodsList:[]
  },
  // 接口要的参数
  QueryParams:{
    query:"",
    cid:"",
    pagenum:1,
    pagesize:10
  },
  // 总页数
  totalPages:1,
  /**
   * 生命周期函数--监听页面加载
   */
  onLoad: function (options) {
    this.QueryParams.cid=options.cid||"";
    this.QueryParams.query=options.query||"";
    this.getGoodsList();


  },

  // 获取商品列表数据
  async getGoodsList(){
    const res=await request({url:"/goods/search",data:this.QueryParams});
    // 获取 总条数
    const total=res.total;
    // 计算总页数
    this.totalPages=Math.ceil(total/this.QueryParams.pagesize);
    // console.log(this.totalPages);
    this.setData({
      // 拼接了数组
      goodsList:[...this.data.goodsList,...res.goods]
    })

    // 关闭下拉刷新的窗口 如果没有调用下拉刷新的窗口 直接关闭也不会报错
    wx.stopPullDownRefresh();

  },


  // 标题点击事件 从子组件传递过来
  handleTabsItemChange(e){
    // 1 获取被点击的标题索引
    const {index}=e.detail;
    // 2 修改源数组
    let {tabs}=this.data;
    tabs.forEach((v,i)=>i===index?v.isActive=true:v.isActive=false);
    // 3 赋值到data中
    this.setData({
      tabs
    })
  },
  // 页面上滑 滚动条触底事件
  onReachBottom(){
  //  1 判断还有没有下一页数据
    if(this.QueryParams.pagenum>=this.totalPages){
      // 没有下一页数据
      //  console.log('%c'+"没有下一页数据","color:red;font-size:100px;background-image:linear-gradient(to right,#0094ff,pink)");
      wx.showToast({ title: '没有下一页数据' });

    }else{
      // 还有下一页数据
      //  console.log('%c'+"有下一页数据","color:red;font-size:100px;background-image:linear-gradient(to right,#0094ff,pink)");
      this.QueryParams.pagenum++;
      this.getGoodsList();
    }
  },
  // 下拉刷新事件
  onPullDownRefresh(){
    // 1 重置数组
    this.setData({
      goodsList:[]
    })
    // 2 重置页码
    this.QueryParams.pagenum=1;
    // 3 发送请求
    this.getGoodsList();
  }
})
{
  "usingComponents": {
    "SearchInput":"../../components/SearchInput/SearchInput",
    "Tabs":"../../components/Tabs/Tabs"

  },
  "navigationBarTitleText": "商品列表",
  "enablePullDownRefresh":true,
  "backgroundTextStyle":"dark"
}
<SearchInput></SearchInput>
<!-- 监听自定义事件 -->
<Tabs tabs="{{tabs}}" bindtabsItemChange="handleTabsItemChange" >

  <block wx:if="{{tabs[0].isActive}}">
    <view class="first_tab">
        <navigator class="goods_item"
        wx:for="{{goodsList}}"
        wx:key="goods_id"
        url="/pages/goods_detail/index?goods_id={{item.goods_id}}"
        >
            <!-- 左侧 图片容器 -->
            <view class="goods_img_wrap">
              <image mode="widthFix" src="{{item.goods_small_logo?item.goods_small_logo:'https://ww1.sinaimg.cn/large/007rAy9hgy1g24by9t530j30i20i2glm.jpg'}}"></image>
            </view>
            <!-- 右侧 商品容器 -->
            <view class="goods_info_wrap">
              <view class="goods_name">{{item.goods_name}}</view>
              <view class="goods_price">¥{{item.goods_price}}</view>
            </view>
          </navigator>
    </view>
  </block>
  <block wx:elif="{{tabs[1].isActive}}">1</block>
  <block wx:elif="{{tabs[2].isActive}}">2</block>

</Tabs>
/* pages/goods_list/index.wxss */
.first_tab .goods_item {
  display: flex;
  border-bottom: 1px solid #ccc;
}
.first_tab .goods_item .goods_img_wrap {
  flex: 2;
  display: flex;
  justify-content: center;
  align-items: center;
}
.first_tab .goods_item .goods_img_wrap image {
  width: 70%;
}
.first_tab .goods_item .goods_info_wrap {
  flex: 3;
  display: flex;
  flex-direction: column;
  justify-content: space-around;
}
.first_tab .goods_item .goods_info_wrap .goods_name {
  display: -webkit-box;
  overflow: hidden;
  -webkit-box-orient: vertical;
  -webkit-line-clamp: 2;
}
.first_tab .goods_item .goods_info_wrap .goods_price {
  color: var(--themeColor);
  font-size: 32rpx;
}
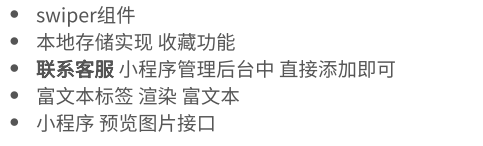
4 商品详情页面(goods_detail)
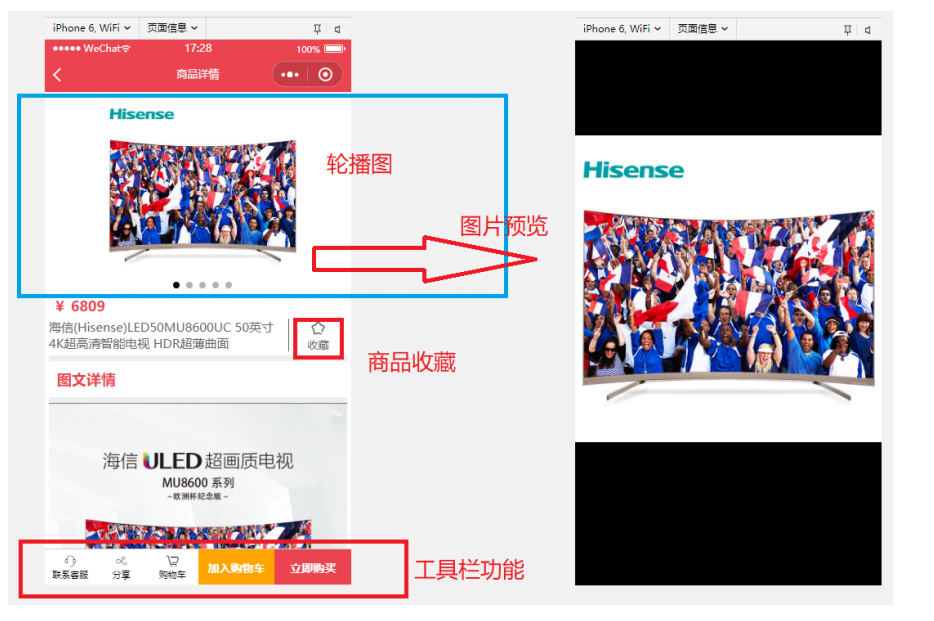
业务逻辑:
1 渲染商品详情数据
2 点击图片,调出图片画廊,进行预览
3 点击收藏
4 联系客服
5分享功能
6加入购物车
关键技术:
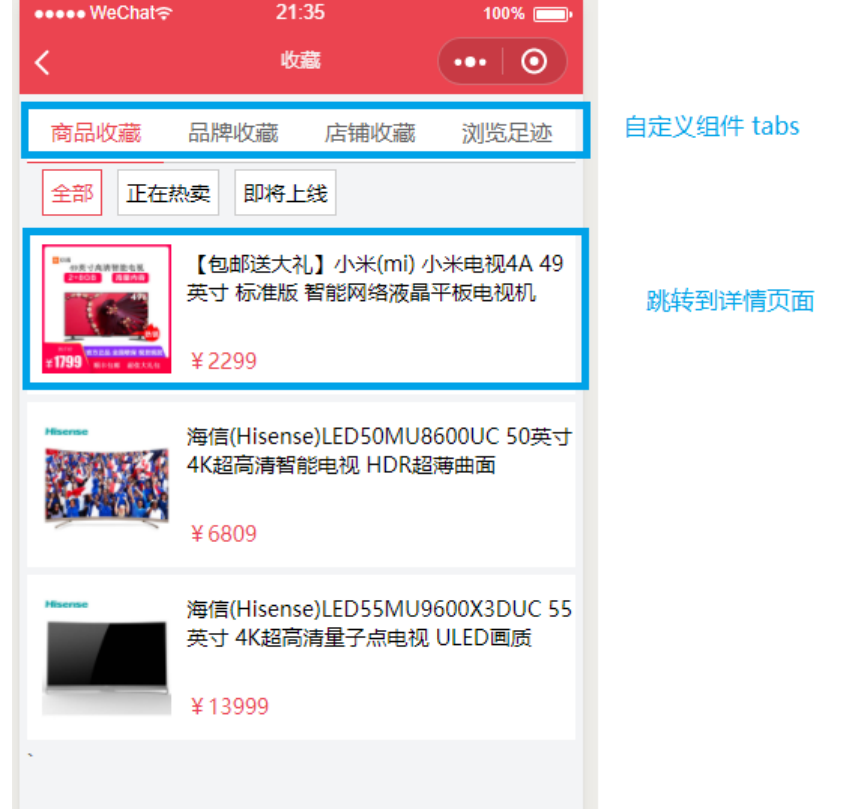
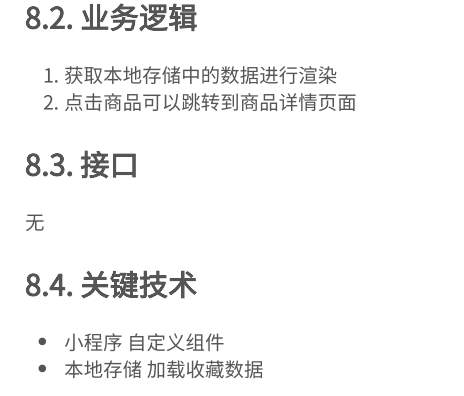
5 收藏页
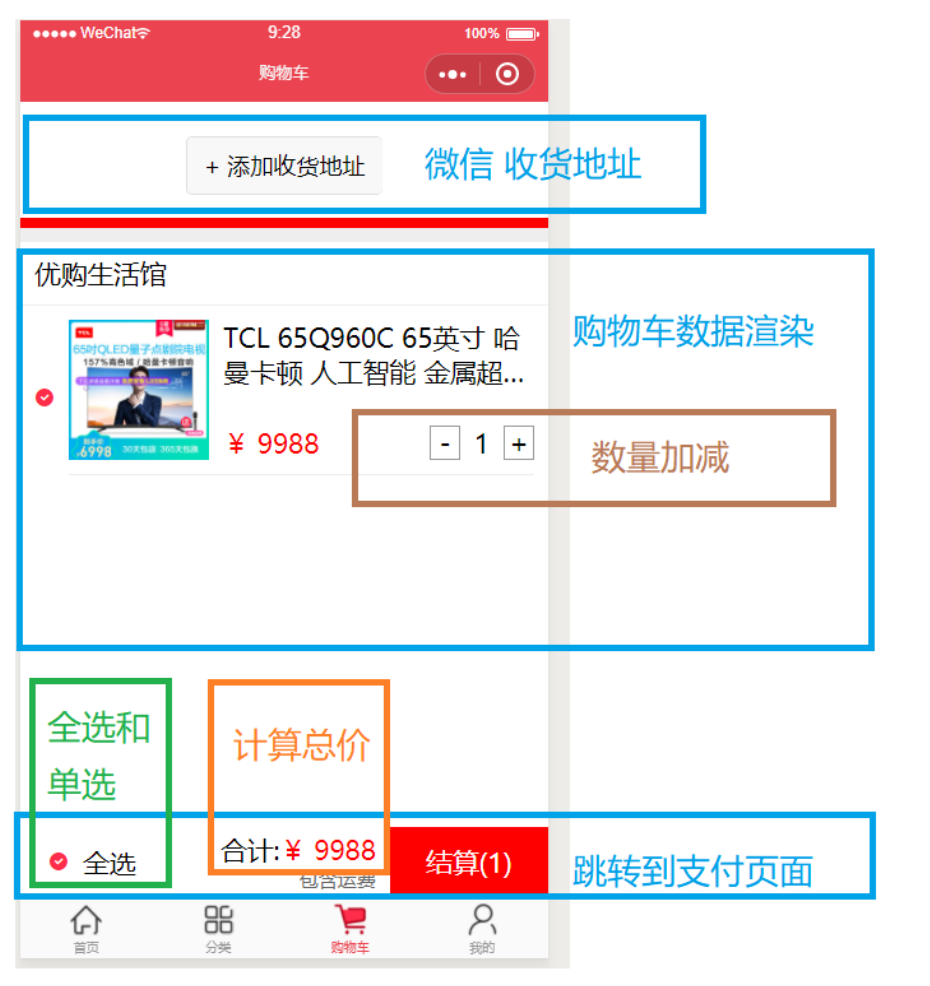
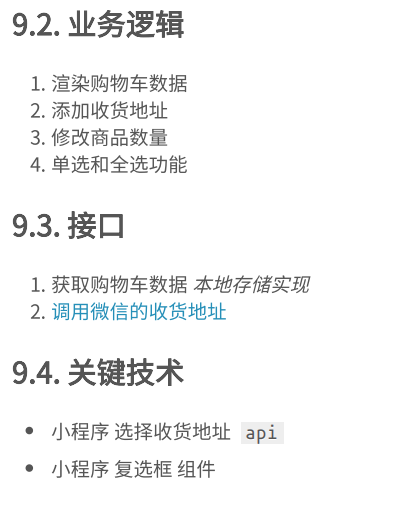
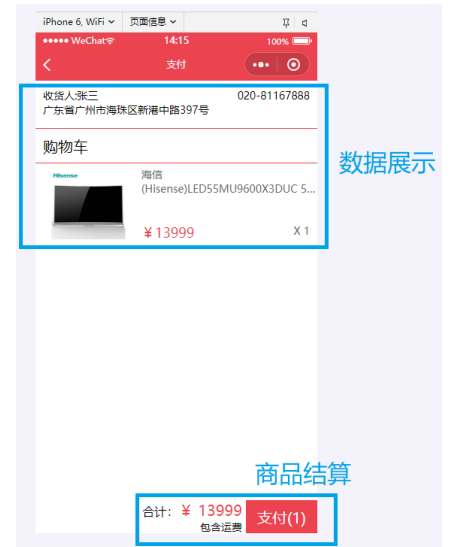
6 购物车页面
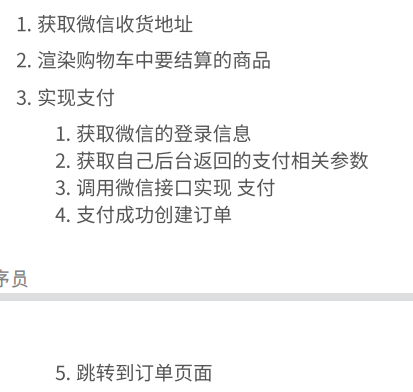
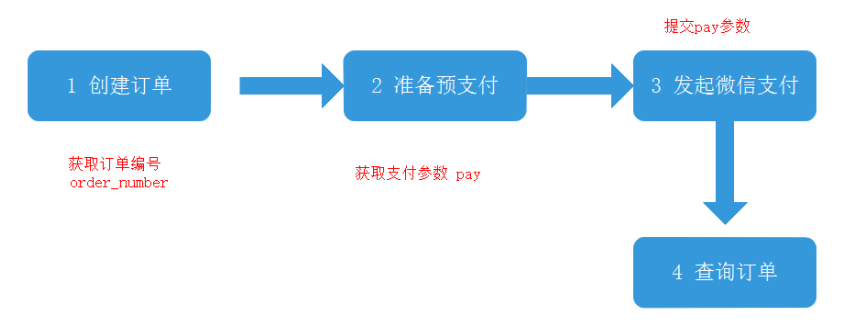
7 支付页面
8 授权页面

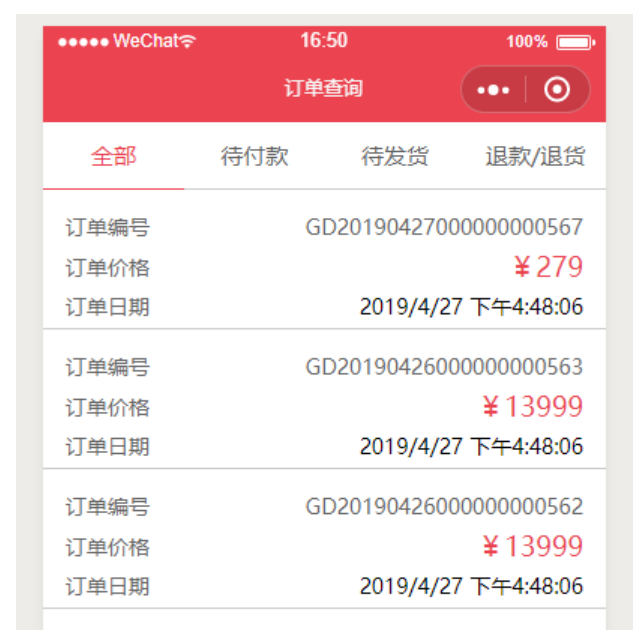
9 订单列表页面
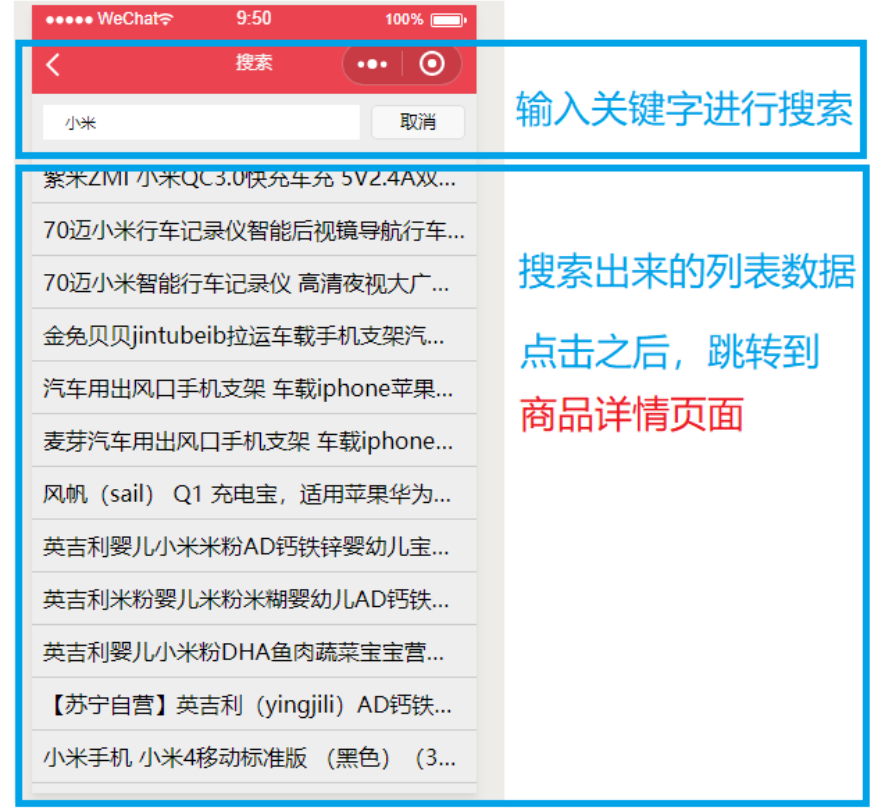
10 搜索页面
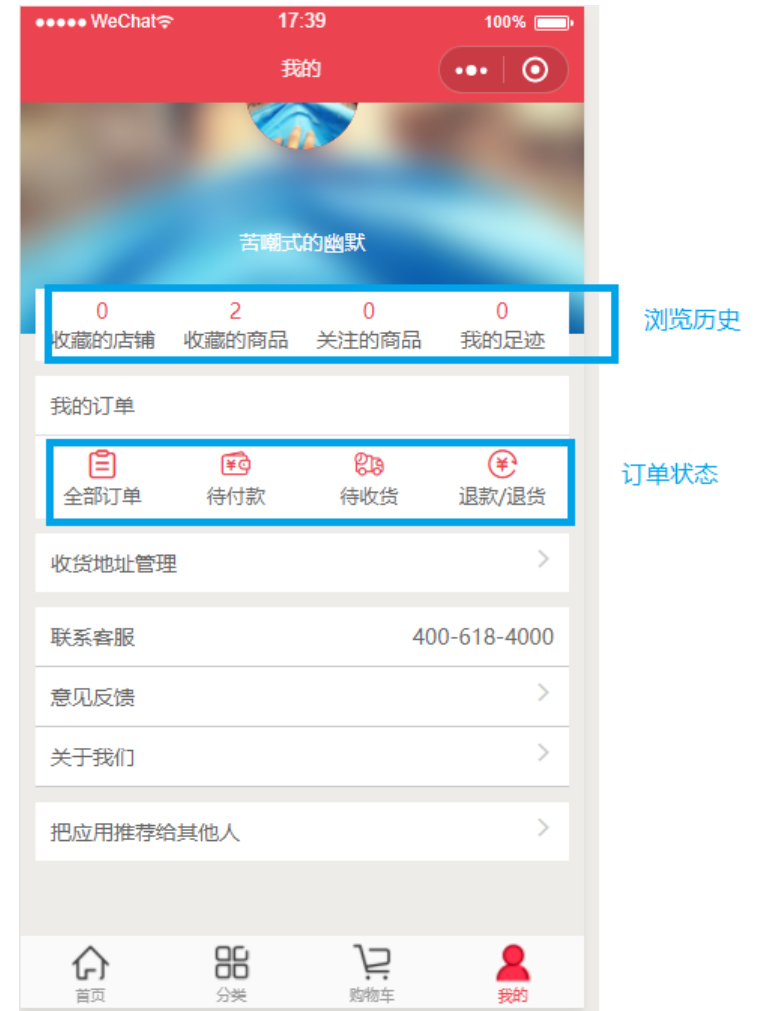
11 个人中心页面
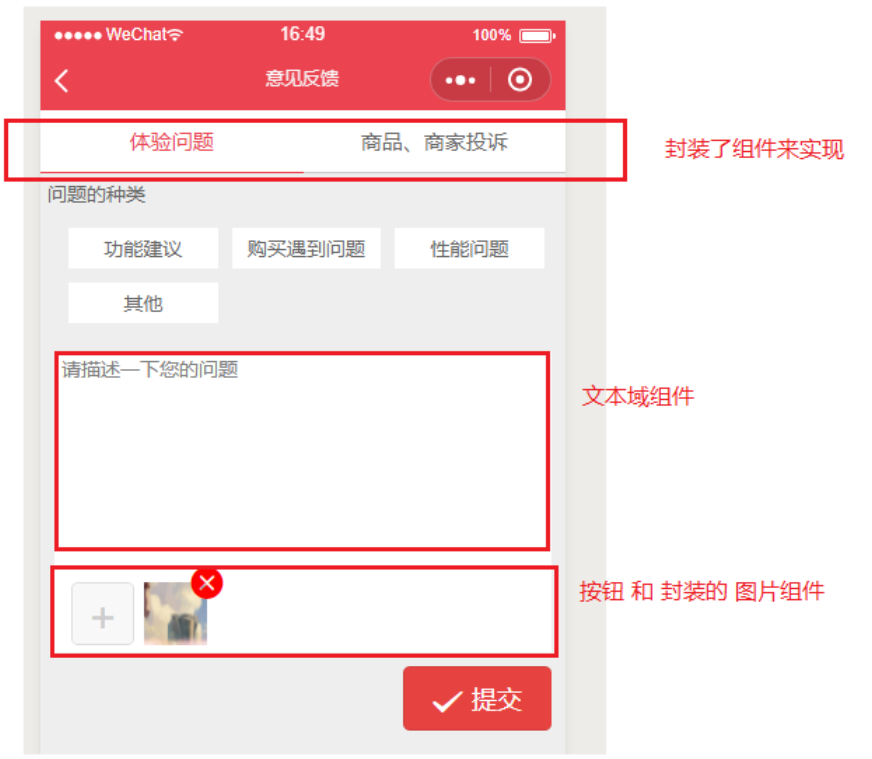
12 意见反馈页面

作者:华王
博客:https://www.cnblogs.com/huahuawang/

 浙公网安备 33010602011771号