


flutter android 开发笔记(二.module集成,混合页面)
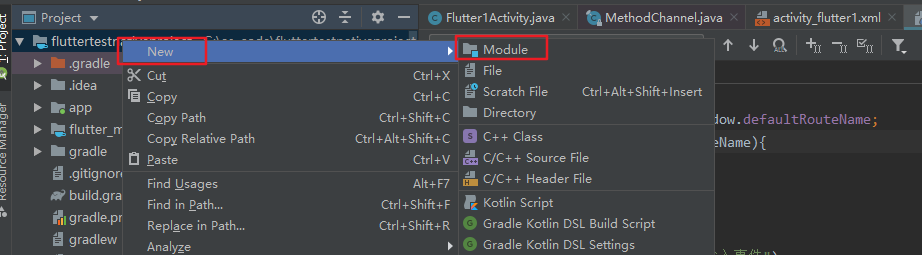
1,在as已有的安卓项目中,新建flutter项目
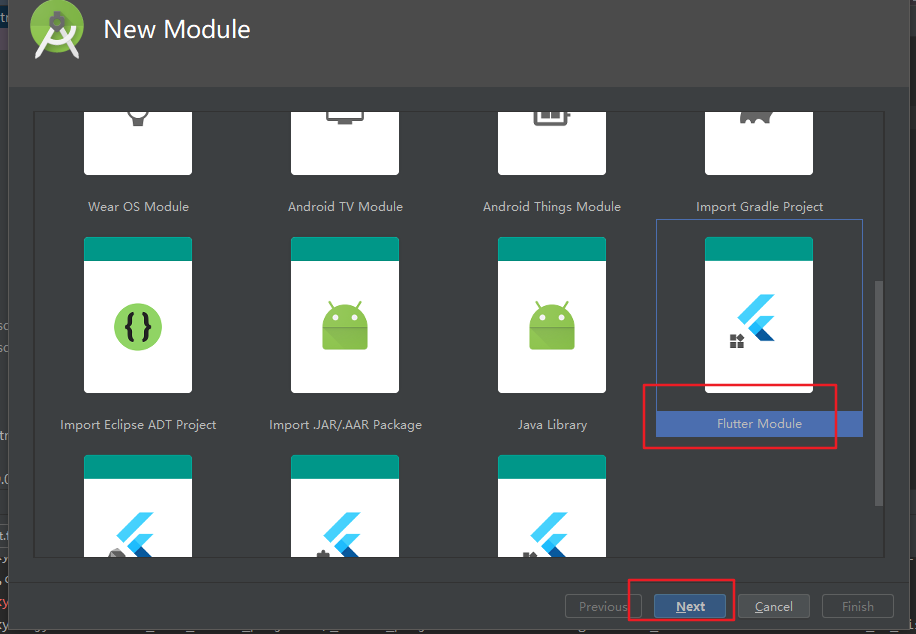
选择新建flutter module

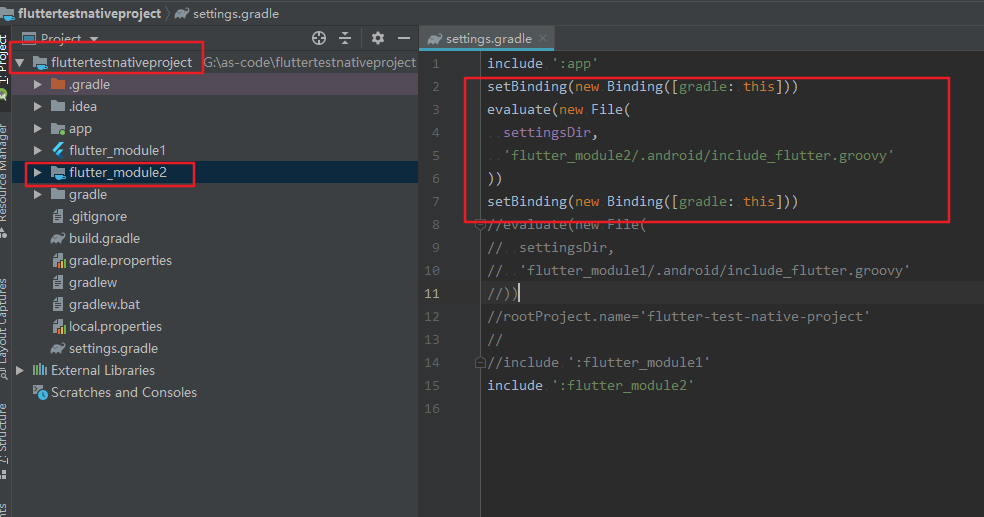
项目的setting.gradle文件已经自动引入flutter_module2,确认下路径是否正确
安卓原生代码
2,初始化flutter的控制器
 mFlutter1Engine = new FlutterEngine(this);
 mFlutter1Engine.getDartExecutor().executeDartEntrypoint(
         DartExecutor.DartEntrypoint.createDefault()
 );
3,创建flutterview
 FlutterView flutterView = new FlutterView(this);
 FrameLayout.LayoutParams lp = new FrameLayout.LayoutParams(
         ViewGroup.LayoutParams.MATCH_PARENT,
         ViewGroup.LayoutParams.MATCH_PARENT);
 FrameLayout flContainer = findViewById(R.id.fl_flutter);
 flContainer.addView(flutterView, lp);
 flContainer.setVisibility(View.INVISIBLE);
 FlutterUiDisplayListener listener = new FlutterUiDisplayListener() {
     @Override
     public void onFlutterUiDisplayed() {
         flContainer.setVisibility(View.VISIBLE);//当flutter ui展示出来的时候,显示flutterview内容
     }
     @Override
     public void onFlutterUiNoLongerDisplayed() {
     }
 };
 flutterView.addOnFirstFrameRenderedListener(listener);
4,展示flutter
mFlutter1View.attachToFlutterEngine(mFlutter1Engine);
整体android代码
package xyz.djytest.flutter_test_native_project;

import android.os.Bundle;
import android.view.View;
import android.view.ViewGroup;
import android.widget.FrameLayout;

import androidx.appcompat.app.AppCompatActivity;
import io.flutter.embedding.android.FlutterView;
import io.flutter.embedding.engine.FlutterEngine;
import io.flutter.embedding.engine.FlutterEngineCache;
import io.flutter.embedding.engine.dart.DartExecutor;
import io.flutter.embedding.engine.renderer.FlutterUiDisplayListener;

public class Flutter2Activity extends AppCompatActivity {
    FlutterEngine mFlutter1Engine;
    FlutterView   mFlutter1View;
    @Override
    protected void onCreate(Bundle savedInstanceState) {
        super.onCreate(savedInstanceState);
        setContentView(R.layout.activity_flutter2);
        initFlutterEngine();
        mFlutter1View = createFlutterView();
        mFlutter1View.attachToFlutterEngine(mFlutter1Engine);
    }

    private FlutterView createFlutterView() {
        FlutterView flutterView = new FlutterView(this);
        FrameLayout.LayoutParams lp = new FrameLayout.LayoutParams(
                ViewGroup.LayoutParams.MATCH_PARENT,
                ViewGroup.LayoutParams.MATCH_PARENT);
        FrameLayout flContainer = findViewById(R.id.fl_flutter);
        flContainer.addView(flutterView, lp);
        flContainer.setVisibility(View.INVISIBLE);
        FlutterUiDisplayListener listener = new FlutterUiDisplayListener() {
            @Override
            public void onFlutterUiDisplayed() {
                flContainer.setVisibility(View.VISIBLE);
            }

            @Override
            public void onFlutterUiNoLongerDisplayed() {

            }
        };
        flutterView.addOnFirstFrameRenderedListener(listener);
        return flutterView;
    }

    private void initFlutterEngine() {
        mFlutter1Engine = FlutterEngineCache.getInstance().get("flutter");
        if (mFlutter1Engine == null){
            mFlutter1Engine = new FlutterEngine(this);
            mFlutter1Engine.getDartExecutor().executeDartEntrypoint(
                    DartExecutor.DartEntrypoint.createDefault()
            );
            FlutterEngineCache.getInstance().put("flutter", mFlutter1Engine);
        }
    }
}
xml文件
<?xml version="1.0" encoding="utf-8"?>
<FrameLayout xmlns:android="http://schemas.android.com/apk/res/android"
    android:layout_width="match_parent"
    android:layout_height="match_parent"
    android:orientation="vertical">


    <FrameLayout
        android:id="@+id/fl_flutter"
        android:layout_width="match_parent"
        android:layout_height="match_parent"
        android:orientation="vertical">

    </FrameLayout>

   <LinearLayout
       android:layout_gravity="bottom"
       android:layout_marginBottom="20dp"
       android:layout_width="match_parent"
       android:layout_height="wrap_content"
       android:orientation="vertical">
       <TextView
           android:layout_width="match_parent"
           android:layout_height="wrap_content"
           android:text="我是Flutter2Activity的native的text" />
       <Button
           android:id="@+id/button2"
           android:layout_width="wrap_content"
           android:text="修改text内容"
           android:layout_height="wrap_content"/>
   </LinearLayout>
</FrameLayout>
flutter代码
flutter页面入口
默认页面内容
import 'package:flutter/material.dart';

void main() => runApp(MyApp());

class MyApp extends StatelessWidget {
  // This widget is the root of your application.
  @override
  Widget build(BuildContext context) {
    return MaterialApp(
      title: 'Flutter Demo',
      theme: ThemeData(
        // This is the theme of your application.
        //
        // Try running your application with "flutter run". You'll see the
        // application has a blue toolbar. Then, without quitting the app, try
        // changing the primarySwatch below to Colors.green and then invoke
        // "hot reload" (press "r" in the console where you ran "flutter run",
        // or press Run > Flutter Hot Reload in a Flutter IDE). Notice that the
        // counter didn't reset back to zero; the application is not restarted.
        primarySwatch: Colors.blue,
      ),
      home: MyHomePage(title: 'Flutter Demo Home Page'),
    );
  }
}

class MyHomePage extends StatefulWidget {
  MyHomePage({Key key, this.title}) : super(key: key);

  // This widget is the home page of your application. It is stateful, meaning
  // that it has a State object (defined below) that contains fields that affect
  // how it looks.

  // This class is the configuration for the state. It holds the values (in this
  // case the title) provided by the parent (in this case the App widget) and
  // used by the build method of the State. Fields in a Widget subclass are
  // always marked "final".

  final String title;

  @override
  _MyHomePageState createState() => _MyHomePageState();
}

class _MyHomePageState extends State<MyHomePage> {
  int _counter = 0;

  void _incrementCounter() {
    setState(() {
      // This call to setState tells the Flutter framework that something has
      // changed in this State, which causes it to rerun the build method below
      // so that the display can reflect the updated values. If we changed
      // _counter without calling setState(), then the build method would not be
      // called again, and so nothing would appear to happen.
      _counter++;
    });
  }

  @override
  Widget build(BuildContext context) {
    // This method is rerun every time setState is called, for instance as done
    // by the _incrementCounter method above.
    //
    // The Flutter framework has been optimized to make rerunning build methods
    // fast, so that you can just rebuild anything that needs updating rather
    // than having to individually change instances of widgets.
    return Scaffold(
      appBar: AppBar(
        // Here we take the value from the MyHomePage object that was created by
        // the App.build method, and use it to set our appbar title.
        title: Text(widget.title),
      ),
      body: Center(
        // Center is a layout widget. It takes a single child and positions it
        // in the middle of the parent.
        child: Column(
          // Column is also a layout widget. It takes a list of children and
          // arranges them vertically. By default, it sizes itself to fit its
          // children horizontally, and tries to be as tall as its parent.
          //
          // Invoke "debug painting" (press "p" in the console, choose the
          // "Toggle Debug Paint" action from the Flutter Inspector in Android
          // Studio, or the "Toggle Debug Paint" command in Visual Studio Code)
          // to see the wireframe for each widget.
          //
          // Column has various properties to control how it sizes itself and
          // how it positions its children. Here we use mainAxisAlignment to
          // center the children vertically; the main axis here is the vertical
          // axis because Columns are vertical (the cross axis would be
          // horizontal).
          mainAxisAlignment: MainAxisAlignment.center,
          children: <Widget>[
            Text(
              'You have pushed the button this many times:',
            ),
            Text(
              '$_counter',
              style: Theme.of(context).textTheme.display1,
            ),
          ],
        ),
      ),
      floatingActionButton: FloatingActionButton(
        onPressed: _incrementCounter,
        tooltip: 'Increment',
        child: Icon(Icons.add),
      ), // This trailing comma makes auto-formatting nicer for build methods.
    );
  }
}
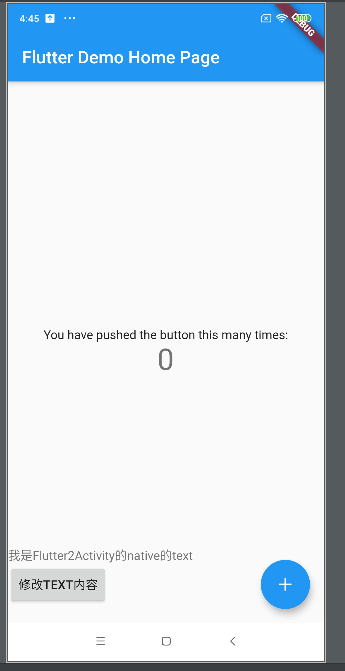
打开Flutter2Activity时的展示效果

 浙公网安备 33010602011771号