如何解决 React 官方脚手架不支持 Less 的问题
说在前面
create-react-app 是由 React 官方提供并推荐使用构建新的 React 单页面应用程序的最佳方式,不过目前版本(1.5.x)其构建的项目中默认是不支持动态样式语言 Less 的。如果我们的项目必须要使用 Less 呢,这就需要我们手动集成一下。本篇主要针对集成的过程做一个简要记录。
环境准备
本小节先用 create-react-app 构建一个全新的 React 项目作为实验环境。
如果您之前未曾使用过 create-react-app,请先通过如下命令全局安装(假定您本机已经安装了 Node.js):
npm install -g create-react-app
然后,通过如下命令构建一个新的项目my-app:
npx create-react-app my-app
通过cd my-app命令进入项目文件夹,执行yarn start命令启动程序,成功运行,则实验环境准备完毕。
最终项目结构:
├─ node_modules
├─ public
├─ src
├─ .gitignore
├─ package.json
├─ README.md
└─ yarn.lock
安装 less & less-loader
要使 create-react-app 构建的项目能正常解析 less 文件,只需要让 webpack 能够把 less 文件编译成 css 文件即可。
所以,首先要把 less 和 less-loader (less 编译器)添加到项目中:
yarn add less less-loader
这样就 OK 了?以上只是在项目中安装了 less 和 less-loader ,但还未曾通过 webpack 使用 less-loader。
至于怎么使用?几种使用方式?请参见 webpack 文档 ,这里不再赘述。
假定您已经仔细阅读过上述 webpack 文档,想必您也清楚我们应该选择在webpack.config.js文件中配置 less-loader。
暴露 webpack 配置文件
突然,您会发现在我们实验项目中找不到 webpack 相关配置文件。
因为脚手架为了实现“零配置”,会默认把一些通用的脚本和配置集成到 react-scripts,目的是让我们专注于src目录下的开发工作,不再操心环境配置。同时,被其集成的脚本和配置也会从程序目录中消失 ,程序目录也会变得干净许多。
如果我们要自定义环境配置怎么办?
项目构建完成后,会提供一个命令yarn eject,通过这个命令,我们可以把被 react-scripts 集成的配置和脚本暴露出来。
以下是脚手架关于yarn eject命令的介绍:
yarn eject
Removes this tool and copies build dependencies, configuration files and scripts into the app directory. If you do this, you can’t go back!
大概意思是,执行该命令后会把已构建依赖项、配置文件和脚本复制到程序目录中。该操作是不可逆转的,执行完成后会删除这个命令,也就是说只能执行一次。
至于 react-scripts 都集成了哪些东西,通过yarn eject命令的执行记录也能看出个大概:
λ yarn eject
yarn run v1.6.0
$ react-scripts eject
? Are you sure you want to eject? This action is permanent. Yes
Ejecting...

Copying files into E:\React\my-app
  Adding \config\env.js to the project
  Adding \config\paths.js to the project
  Adding \config\polyfills.js to the project
  Adding \config\webpack.config.dev.js to the project
  Adding \config\webpack.config.prod.js to the project
  Adding \config\webpackDevServer.config.js to the project
  Adding \config\jest\cssTransform.js to the project
  Adding \config\jest\fileTransform.js to the project
  Adding \scripts\build.js to the project
  Adding \scripts\start.js to the project
  Adding \scripts\test.js to the project

Updating the dependencies
  Removing react-scripts from dependencies
  Adding autoprefixer to dependencies
  Adding babel-core to dependencies
  Adding babel-eslint to dependencies
  Adding babel-jest to dependencies
  Adding babel-loader to dependencies
  Adding babel-preset-react-app to dependencies
  Adding babel-runtime to dependencies
  Adding case-sensitive-paths-webpack-plugin to dependencies
  Adding chalk to dependencies
  Adding css-loader to dependencies
  Adding dotenv to dependencies
  Adding dotenv-expand to dependencies
  Adding eslint to dependencies
  Adding eslint-config-react-app to dependencies
  Adding eslint-loader to dependencies
  Adding eslint-plugin-flowtype to dependencies
  Adding eslint-plugin-import to dependencies
  Adding eslint-plugin-jsx-a11y to dependencies
  Adding eslint-plugin-react to dependencies
  Adding extract-text-webpack-plugin to dependencies
  Adding file-loader to dependencies
  Adding fs-extra to dependencies
  Adding html-webpack-plugin to dependencies
  Adding jest to dependencies
  Adding object-assign to dependencies
  Adding postcss-flexbugs-fixes to dependencies
  Adding postcss-loader to dependencies
  Adding promise to dependencies
  Adding raf to dependencies
  Adding react-dev-utils to dependencies
  Adding resolve to dependencies
  Adding style-loader to dependencies
  Adding sw-precache-webpack-plugin to dependencies
  Adding url-loader to dependencies
  Adding webpack to dependencies
  Adding webpack-dev-server to dependencies
  Adding webpack-manifest-plugin to dependencies
  Adding whatwg-fetch to dependencies

Updating the scripts
  Replacing "react-scripts start" with "node scripts/start.js"
  Replacing "react-scripts build" with "node scripts/build.js"
  Replacing "react-scripts test" with "node scripts/test.js"

Configuring package.json
  Adding Jest configuration
  Adding Babel preset
  Adding ESLint configuration

Ejected successfully!

Please consider sharing why you ejected in this survey:
  http://goo.gl/forms/Bi6CZjk1EqsdelXk1

Done in 5.37s.
说了这么多,现在怎样才能在我们的项目中暴露 webpack 的配置文件?没错,你没猜错,只需要运行一下yarn eject即可。
再来看我们的实验项目的目录,您会发现其中多了一个config文件夹,其中就有三个关于 webpack 的配置文件:
webpack.config.dev.js       # 开发环境配置
webpack.config.prod.js      # 生产环境配置
webpackDevServer.config.js  # 开发服务器配置
我们需要关注的是前两个,最后一个是关于本地开发服务器http://localhost:3000的一些相关配置。
修改 webpack 配置
理论上讲,需要同步修改 webpack.config.dev.js 和 webpack.config.prod.js 配置文件:
在module.rules节点中找到 css 文件的加载规则:
test: /\.css$/修改为test: /\.(css|less)$/;- 在
use数组最后新增一个对象元素{loader: require.resolve('less-loader')}。
修改完成后:
// "postcss" loader applies autoprefixer to our CSS.
// "css" loader resolves paths in CSS and adds assets as dependencies.
// "style" loader turns CSS into JS modules that inject <style> tags.
// In production, we use a plugin to extract that CSS to a file, but
// in development "style" loader enables hot editing of CSS.
{
  test: /\.(css|less)$/,
  use: [
    require.resolve('style-loader'),
    {
      loader: require.resolve('css-loader'),
      options: {
        importLoaders: 1,
      },
    },
    {
      loader: require.resolve('postcss-loader'),
      options: {
        // Necessary for external CSS imports to work
        // https://github.com/facebookincubator/create-react-app/issues/2677
        ident: 'postcss',
        plugins: () => [
          require('postcss-flexbugs-fixes'),
          autoprefixer({
            browsers: [
              '>1%',
              'last 4 versions',
              'Firefox ESR',
              'not ie < 9', // React doesn't support IE8 anyway
            ],
            flexbox: 'no-2009',
          }),
        ],
      },
    },
    {
      loader: require.resolve('less-loader')
    }
  ],
},
至此,就已经完成了 create-react-app 对 Less 的支持。
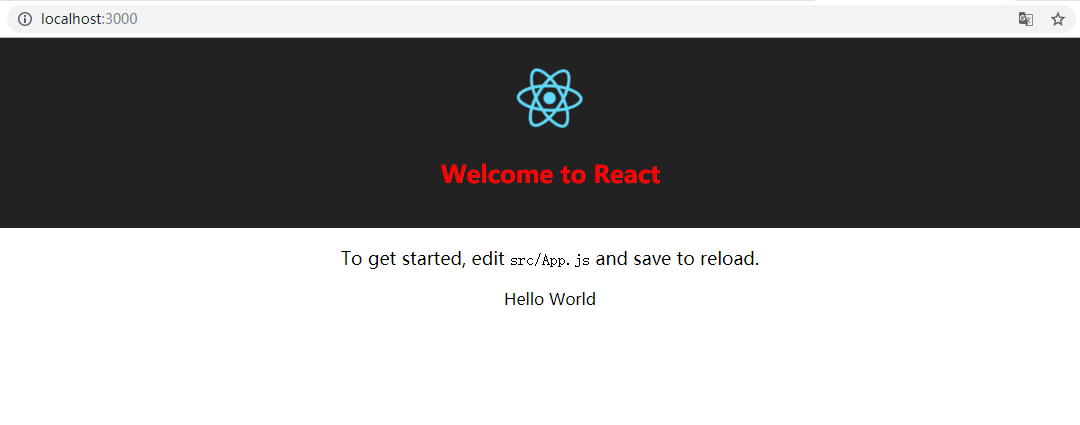
效果验证
最后,在我们的实验项目中验证一下配置是否生效。
首先在src根目录下使用 Less 语法创建一个 less 文件,取名为Test.less:
@title-color:#f00;

.App-title {
    color: @title-color
  }
然后在App.js文件中通过如下API导入上述的 less 文件:
import './Test.less';
再次yarn start运行我们的程序,如果标题Welcome to React变成红色则说明配置没有问题。