
WebAPI接口设计:SwaggerUI文档 / 统一响应格式 / 统一异常处理 / 统一权限验证
为什么还要写这类文章?因为我看过网上很多讲解的都不够全面,而本文结合实际工作讲解了swaggerui文档,统一响应格式,异常处理,权限验证等常用模块,并提供一套完善的案例源代码,在实际工作中可直接参考使用。
一、先看看最终效果
这是最后生成的swagerui文档,大家可以直接访问这个地址体验:
http://sapi.daimali.com/swagger/ui/index
(若无法访问,请公众号CodeL联系)
git源码地址:https://gitee.com/daimali/WebApiDemo (推荐直接看源码)
文档效果图:

响应的内容:
注意看红色部分,所有的响应内容都将自动封装成如下格式:由code,msg,data三部分组成
{
  "code": 200,
  "msg": "OK",
  "data": {
    "List": [
      {
        "OrderId": 1001,
        "UserName": "绿巨人",
        "OrderDate": "2018-11-18T09:39:36.0404502+08:00"
      },
      {
        "OrderId": 1002,
        "UserName": "钢铁侠",
        "OrderDate": "2018-11-17T09:39:36.0404502+08:00"
      }
    ],
    "total": 20
  }
}
实现以上API的整体思路是:
1. 使用SwaggerUI自动生成接口文档、便于团队协作,减少工作量
2. 通过ActionFilter实现权限控制与响应格式的统一封装
3. 通过ExceptionFilter实现异常的统一处理
我觉得大部分人阅读到这里就可以了,剩下的时间去看看源码,需要用的时候边用边学就好了
二、接口文档 - SwaggerUI注意点
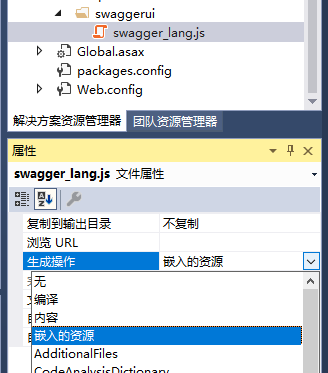
1. swagger汉化,注意swagger_lang.js 属性生成操作需要选择"嵌入的资源"
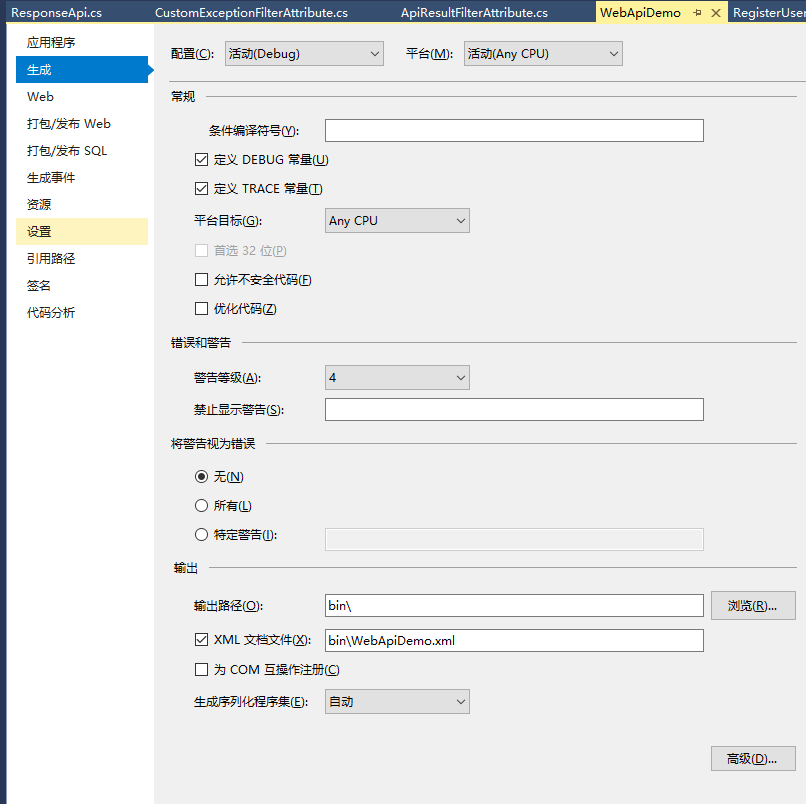
2. 项目右键-属性-生成:输出项勾选XML文档文件
三、统一响应格式说明
通过 ApiResultFilterAttribute 类实现响应参数的统一封装:ApiResultFilterAttribute继承自ActionFilterAttribute
这里封装的响应格式由如下三部分组成: code:跟随HttpCode,msg:返回的描述信息, data:接口返回的业务数据统一放在data中
{

     "code": 200,

     "msg": "OK",

     "data": null

}
    /// <summary>
    /// 响应数据
    /// </summary>
    /// <typeparam name="T">自定义响应的内容</typeparam>
    public class ResponseApi<T>
    {
        /// <summary>
        /// 错误代码
        /// </summary>
        public int code { get; set; }
        /// <summary>
        /// 错误信息
        /// </summary>
        public string msg { get; set; }
        /// <summary>
        /// 响应数据
        /// </summary>
        public T data { get; set; }

    }
通过actionfilter统一封装:


public class ApiResultFilterAttribute : ActionFilterAttribute
    {
        /// <summary>
        /// 进入action之前做权限验证
        /// </summary>
        public override void OnActionExecuting(HttpActionContext actionContext)
        {
            var token = true;
            //权限验证省略
            if (token)
            {
                ResponseApi<object> result = new ResponseApi<object>();
                // 取得由 API 返回的状态代码
                result.code = (int)HttpStatusCode.Unauthorized;
                // 取得由 API 返回的资料
                result.data = null;
                result.msg = "invalid ticket value";

                HttpResponseMessage response = new HttpResponseMessage
                {
                    Content = new StringContent(JsonConvert.SerializeObject(result),
                       Encoding.GetEncoding("UTF-8"), "application/json")
                };
                //结果转为自定义消息格式
                HttpResponseMessage httpResponseMessage = response;

                // 重新封装回传格式
                actionContext.Response = httpResponseMessage;
            }
        }
        /// <summary>
        /// 统一响应格式
        /// </summary>
        public override void OnActionExecuted(HttpActionExecutedContext filterContext)
        {
            base.OnActionExecuted(filterContext);

            if (filterContext.ActionContext.Response != null)
            {
                ResponseApi<object> result = new ResponseApi<object>();
                // 取得由 API 返回的状态代码
                result.code = (int)filterContext.ActionContext.Response.StatusCode;
                // 取得由 API 返回的资料
                result.data = filterContext.ActionContext.Response.Content.ReadAsAsync<object>().Result;
                HttpResponseMessage response = new HttpResponseMessage
                {
                    Content = new StringContent(JsonConvert.SerializeObject(result),
                       Encoding.GetEncoding("UTF-8"), "application/json")
                };
                //结果转为自定义消息格式
                HttpResponseMessage httpResponseMessage = response;

                // 重新封装回传格式
                filterContext.Response = httpResponseMessage;

            }
        }
    }
四、自定义异常信息
针对于所有的异常信息,接口也会返回对应的code,msg,data的格式:
通过CustomException和CustomExceptionFilterAttribute实现:
public class CustomExceptionFilterAttribute : ExceptionFilterAttribute
    {
        /// <summary>
        /// 统一对调用异常信息进行处理,返回自定义的异常信息
        /// </summary>
        /// <param name="context">HTTP上下文对象</param>
        public override void OnException(HttpActionExecutedContext context)
        {
            //自定义异常的处理
            if (context.Exception is CustomException)
            {
                var exception = (CustomException)context.Exception;
                ResponseApi<object> result = new ResponseApi<object>()
                {
                    code = exception.GetErrorCode(),
                    msg = exception.Message
                };
                throw new HttpResponseException(new HttpResponseMessage(HttpStatusCode.OK)
                {
                    //封装处理异常信息,返回指定JSON对象
                    Content = new StringContent(JsonConvert.SerializeObject(result),
                    Encoding.GetEncoding("UTF-8"), "application/json"),
                    ReasonPhrase = "InternalServerErrorException",
                });
            }
            else
            {
                ResponseApi<object> result = new ResponseApi<object>()
                {
                    code = -1,
                    msg = context.Exception.Message
                };
                throw new HttpResponseException(new HttpResponseMessage(HttpStatusCode.InternalServerError)
                {
                    //封装处理异常信息,返回指定JSON对象
                    Content = new StringContent(JsonConvert.SerializeObject(result)),
                    ReasonPhrase = "InternalServerErrorException"
                });
            }
        }
    }
看源码
需要说的东西太多,直接看源码更方便:
接口预览地址:http://sapi.daimali.com/swagger/ui/index
(若无法访问,请公众号联系)
git源码地址:https://gitee.com/daimali/WebApiDemo
继续看详细步骤:
1. 新建空ASP.NET MVC空应用程序,选择WebApi
2. Nuget引用Swashbuckle.Core (demo目前用的v5.6.0最新稳定版)
3. 将App_Start中的类复制到你的新项目中,然后更改命名空间为你自己项目
4. 按需调整SwaggerConfig.cs 配置
5. 将Scripts文件复制到你的项目中,同时设置 swagger_lang.js 文件 属性- 生成操作为"嵌入的资源",按需调整 swagger_lang.js文件内容
6. 注意你的WebApiConfig中需要添加 ApiResultFilterAttribute 和 CustomExceptionFilterAttribute
7. 项目右键-属性-生成:输出项勾选XML文档文件
此时,你新建的webapi控制器已经支持swagger,并且会统一封装成code,msg,data的格式了
修正:
1. HttpGet 请求接收参数时需要加 [FromUri]
2. token验证不应该放在OnActionExecuted中,应该在接口执行之前,比如:AuthorizeAttribute中,或者 ActionFilterAttribute里面的OnActionExecuting方法(源码已调整为OnActionExecuting )
评论区已知问题(待解决,后续将持续更新Demo,感兴趣的同学多多关注):
1. 解决swagger 文件上传问题
相关资源获取或其他疑问可在公众号CodeL留言。

