Js 面向对象-Class补充
上篇讲了 js 继承的各种实现方式, 最终推演出通过寄生组合继承的方式, 完美实现了类继承, 其背后还是靠的 原型方式特性的.
// 辅助函数
function createChildObj(parentObj) {
  function Foo()  {}
  Foo.prototype = parentObj
  return new Foo()
}

// 继承实现
function inherit(SubType, SuperType) {
  // 修改子类原型对象 -> 父类显示原型对象
  SubType.prototype = createChildObj(SuperType)
  // 子类添加 constructor 属性
  Object.defineProperty(SubType.prototype, "constructor", {
    configurable: true,
    enumerable: false,
    writable: true,
    value: SubType
  })
}
而本篇则是对类的一些常用方法补充, 还有 ES6 的 class 语法糖的使用, 算是对 js 面向对象的最后完结篇吧.
对象方法补充
就介绍几个常用的, 用来判断对象属性是属于自己, 还是属于原型的.
- hasOwnProperty(): 对象是否有某个自己属性 (非在原型上)
- in / for in 操作符: 判断某个属性是否在某个对象, 或者对象的原型上 (找到就算)
- instanceof(): 检测 构造函数的 prototype 是否出现在某实例对象的原型链上
- isPrototypeOf(): 检测某个对象, 是否出现在某个实例对象的原型链上
// 对象常用方法: 属性是自己的 vs 属性都访问到自己 + 原型的

var obj = {
  name: 'youge',
  age: 18
}

var info = Object.create(obj, {
  address: {
    value: '长安镇',
    enumerable: true
  }
})

// hasOwnProperty(): 判断 info 对象是否有自己的 address 属性
console.log(info.hasOwnProperty("address"))  // true

console.log(info.name) // youge; 从原型能找到
console.log(info.hasOwnProperty("name")) // false


// in 操作符: 不管在自己对象还是原型上能找到都算
console.log('address' in info) // true
console.log('name' in info) // true

// for-in: 同 in
for (var key in info) {
  console.log(key) // address; name; age 都能有
}
就 in 会连同原型链上的属性都遍历出来, 不够纯粹, hasOwnProperty() 只找自己对象的.
// instanceof, 类型检测

function Person() {}
function Student() {}

// 让 Student 继承 Person
Student.prototype = Object.create(Person.prototype)
Student.prototype.constructor = Student


var stu = new Student()
console.log(stu) // Student {}

// 判断 stu 对象的[[prototype]]链中, 是否存在某构造函数的显示 prototype
console.log(stu instanceof Student) // true
console.log(stu instanceof Person)  // true
console.log(stu instanceof Object) // true
console.log(Student instanceof Object) // true
instanceof 的工作原理是沿着对象的原型链(通过 [[Prototype]] 链接,通常可通过 __proto__ 访问)向上查找,检查是否存在等于 constructor.prototype 的对象.
除了 null, undefined 和 Object.create(null) 之外的对象, 它们的原型链最终都会指向 Object.prototype, 因此 它们 instanceof Object 通常都为 true
- **typeof: ** 用于检测基本数据类型, 即 number, string, boolean, undefined, symbol, function, object
- **instanceof: ** 用于检测 对象是有哪个构造函数创建的, 或者说属于哪个类的实例
var arr = [1, 2, 3]

console.log(typeof arr) // object, 不够具体
console.log(arr instanceof Array) // true, 更具体
这, typeof undefined -> undefined; 而 typeof null -> object; 后者是语言设计错误, 只能 " value === null"
永远不要用 typeof x === "object" 来判断对象, 因为 null 也被认为对象, 因此要先考虑 null
If (x !== null && typeof x === "object" {}
// 检测某对象, 是否出现在另一个对象的原型链上

var obj = {
  name: "youge",
  age: 18
}

var info = Object.create(obj)

console.log(obj.isPrototypeOf(info)) // true
本质上 obj.isPrototypeOf(info) 等价于 info instanceof obj.
| 特性 | isPrototypeOf() |
instanceof |
|---|---|---|
| 类型 | 方法 (对象上的方法) | 运算符 |
| 语法 | prototypeObj.isPrototypeOf(object) |
object instanceof Constructor |
| 检查目标 | 检查一个对象 (prototypeObj) 是否在原型链上 |
检查 Constructor.prototype 是否在原型链上 |
| 等价关系 | A instanceof B 等价于 B.prototype.isPrototypeOf(A) |
B.prototype.isPrototypeOf(A) 等价于 A instanceof B |
| 灵活性 | 更灵活,可以直接传入任何对象进行检查 | 只能传入构造函数 |
原型继承关系
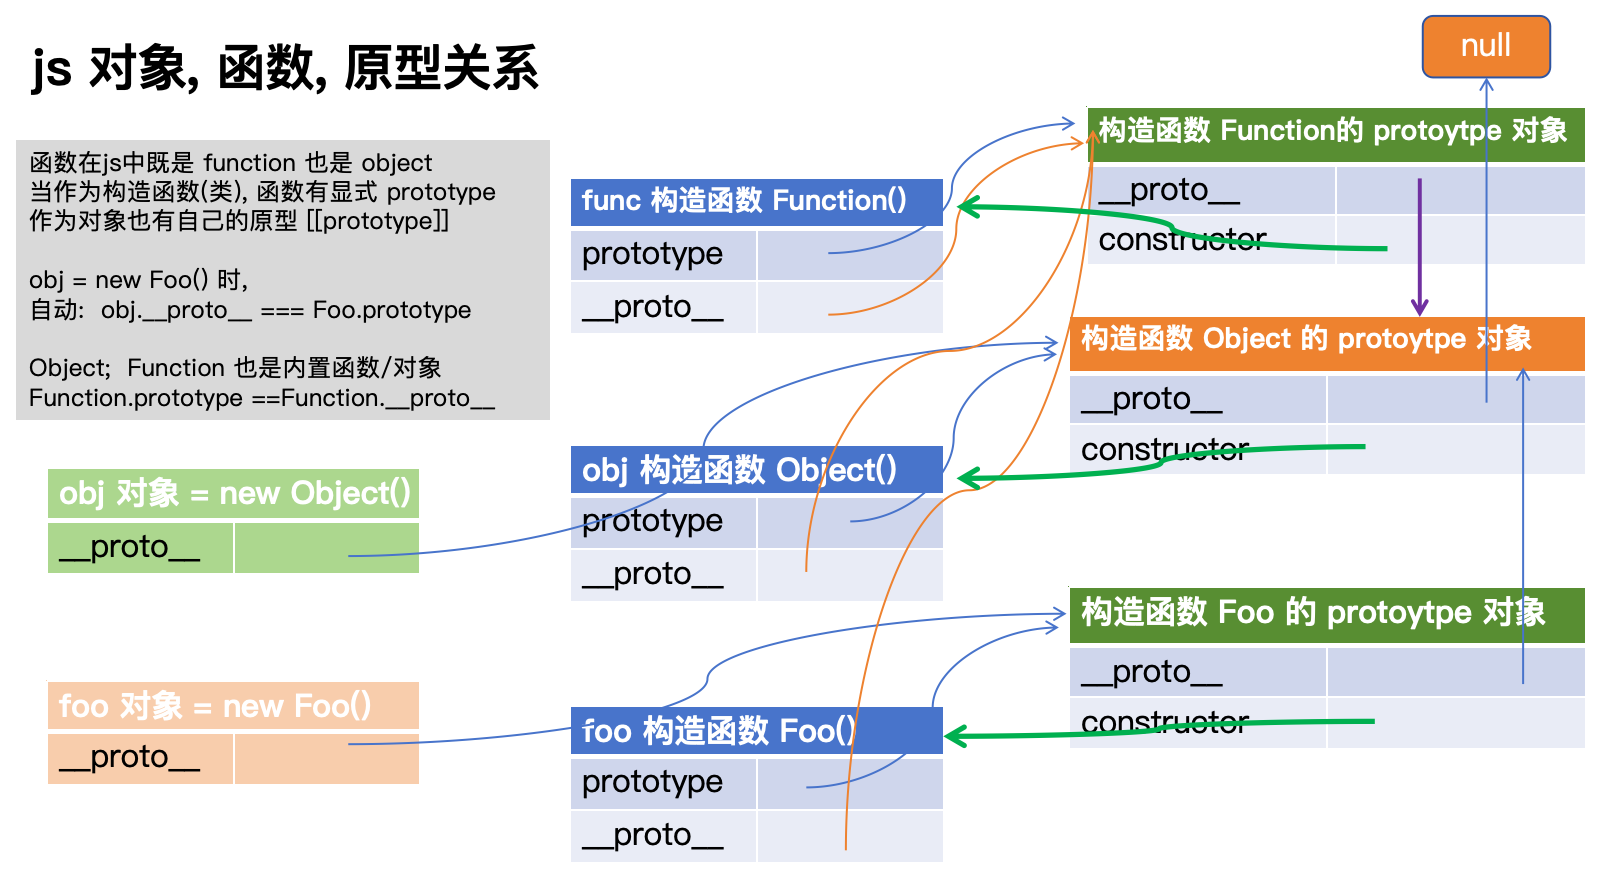
整体还是加深对 js 函数原型, 对象原型, 原型链的理解而已.
- js 函数既是函数, 也是特殊对象
- 函数作为构造函数 (类) 时, 函数对象有一个显式的
prototype对象, 给实例共享用的 - 函数作为对象, 也有自己的隐式原型 [[prototype]]
- Object 是所有普通对象的最终原型, 但函数原型除外 (它是 Function)
- Function 构造函数是所有函数对象的 "创建者", 所有函数对象的 [[prototype]] 都指向 Function.prototype
Function 的原型是 Function.prototype 自指啦
// 原型的继承关系

// 从原型链和对象角度, Object 是由元构造函数 Function new 出来的
// 但从js引擎角度, 先创建 Object.prototype 对象, 再是 Object(), 再 Function
console.log(Object.__proto__ === Function.prototype) // true

// 互相依赖, 而非同时
console.log(Object instanceof Function) // true
console.log(Function instanceof Object) // true

// null -> Object.prototype -> Object() -> Function.prototype -> Function()
console.log(Function.prototype.__proto__ === Object.prototype) // true
console.log(Object.prototype.__proto__) // null
就 js 引擎, 如 v8 启动时, 大致会按照这样一个顺序来创建核心对象.
-
创建
null原始值(非对象), 作为一个指针标记, 是原型链的终点 (undefined 也是原始值) -
创建
Object.prototype空对象, 将它作为所有对象共享的 "爸爸" (原型模板), 并添加很多内置方法-
添加 toString(), valueOf(), hasOwnProperty() ... 等内置方法
-
-
创建
Function.prototype空对象, 将它的原型 [[prototype]] 设置为Object.prototype对象, 添加方法-
Function.prototype.__ proto __ === Object.prototype 即 Function 继承 Object
-
-
创建
Function()构造函数自身, 通过 "元构造函数" 或者C++ 函数创建函数对象, 而非 "自己创建自己的悖论"-
元方法创建的函数对象命名为 Function
设置 Function.
prototype=== Function.prototype 对象设置 Function.prototype.constructor 去指向 Function
设置 Function.__ proto __ === Function.prototype 对象
即使得 Function 对象成为 Function 自己的实例, Function.__ proto __ === Function.prototype
这样就实现了一个可以创建函数的的构造函数 Function, 且和 Function.prototype 的关系也建立
-
-
创建
Object()构造函数, 先创建函数对象, 再设置原型-
用 Function() 构造函数 (或内部等效机制) 来创建 Object() 函数, 类似 Object = new Function()
即可得到 Object.__ proto __ === Function.prototype; 即建立 Object 是一个函数啦
设置
Object.prototype为Object函数对象的prototype属性, 添加 constructor 指向 Object
-
-
基于 Function 和 Object, 则可创建其他内置的各种对象
                              null
                                ▲
                                │
                                │ [[Prototype]] (__proto__)
                                │
                        ┌───────────────┐
                        │  Object.prot  │
                        │    otype      │
                        └───────┬───────┘
                                │ [[Prototype]] (__proto__)
                                │
               ┌────────────────┼────────────────┐
               │                │                │
               │                │                │
               ▼                ▼                ▼
      ┌─────────────────┐  ┌─────────────────┐  ┌─────────────────┐
      │  Function.prot  │  │     Object      │  │    Array.prot   │
      │     otype       │  │ (function object)│  │     otype       │
      └─────────────────┘  └─────────────────┘  └─────────────────┘
               │                │ [[Prototype]] (__proto__)       │
               │                │─────────────────────────────────┘
               │                ▼                                 ▼
               │        ┌─────────────────┐           ┌─────────────────┐
               │        │     Function    │           │      Array      │
               │        │ (function object)│           │ (function object)│
               │        └─────────────────┘           └─────────────────┘
               │
               └─────────────────────────────────────┐
                                                     │
                                                     ▼
                                          ┌───────────────────────────┐
                                          │ (其他继承自 Function.prot │
                                          │         otype 的对象)     │
                                          └───────────────────────────┘
ES6 中 class 定义类
我们前面讨论的所有对象, 继承啥的都是通过 js函数 (构造函数) 来实现类的效果的, 就搞起来有点不太直观和麻烦, 对比 java, python, c++ 等语言来说. 因此在 es6 直接引入了一个关键字 class 来定义类.
js 中的 class 本质上是一个 语法糖, 内部还是通过之前学的寄生组合继承方式实现的, 只是语法上和 java 很像
// 语法糖
class Person {
  constructor(name, age) {
    this.name = name
    this.age = age
  }
}

// 类继承
class Student extends Person {
  constructor(name, age, sno) {
    super(name, age) // Person.call(this, ...)
    this.sno = sno  // 自己的属性
  }
}
内部转为原来的代码就是这样的:
// 内部转化: 构造函数, 原型继承
function Person(name, age) {
  this.name = name
  this.age = age
}

function Student(name, age, sno) {
  Person.call(this, name, age)
  this.sno = sno
}

// 工具函数, 实现 Object.create() 方法
function createObj(o) {
  function Fn() {}
  Fn.prototype = o
  return new Fn()
}

// Student 继承 Person
Student.prototype = createObj(Person.prototype)
Student.prototype.constructor = Student


// var stu = new Student('cj', 18, 123)
// console.log(stu)
果然一旦理解了这个原型机制, 函数和对象的特性, 这些东西就是 so easy 啦.
当然这也是逐步发展的过程, 就 js 早期仅是作为一个运行在客户端 (浏览器) 的脚本语言, 用来做一些简单的表单验证, 简单动画之类的, 就直接写在 script 标签内部的即可, 越少越好.
后来随着发展开始支持 js 函数式编程, 后面又开始支持面向对象编程 (采用原型的方式实现). 因此要理解 js 的面向对象, 必须先理解 js 函数, 对象, 原型, 原型链的东西才能行.
但从现在的新兴的语言来看, 似乎用 class 的传统实现方式也没有那么流行了, 像 go 和 rust 则更倾向用 组合 的方式来实现面相对象的编程范式了, 同时函数式编程也变流行了起来 , 尤其在数据处理 (scala), 分布式系统, AI运算等.
class 是构造函数的语法糖
// 类定义和 构造函数是一样的, 语法糖啦

class Person {}

// Person 是函数对象, 它是有 new Funcion() 出来的
console.log(Person.__proto__ === Function.prototype) // true

// Person 的显示原型 prototype -> (普通对象)的 隐式原型 [[prototype]] 是 顶层原型对象
console.log(Person.prototype.__proto__ === Object.prototype) // true

// 显示原型对象上的 constructor 也是指向自身
console.log(Person.prototype.constructor === Person) // true

var p = new Person()
console.log(p.__proto__ == Person.prototype) // true
这和原来构造函特性的也差不多, 但是写法上就简单很多啦.
class 构造方法
就是在创建对象的时候, 自动调用的方法, 类似原来的构造函数传参, class 是这样的:
- 每个 class 都仅有一个固定的
constructor()方法, 不像 java 有什么有参, 无参构造器的设置 - 当通过
new操作符实例化对象时, 会自动调用 constructor 方法
再回顾一下, new 一个对象的时候, 除了自动调用 constructor 函数外, 还会做如下 4步操作:
-
创建一个新的空对象
-
让该对象的 [[prototype]] 属性赋值为 类的显式 prototype 属性
-
绑定 this 为当前创建的对象, 并执行构造函数体代码
-
若构造函数无返回非空对象, 则 返回创建出来的新对象
// class 构造方法

class Person {
  constructor(name, age) {
    this.name = name
    this.age = age
  }
}

var p1 = new Person('youge', 18)
var p2 = new Person('cj', 30)

console.log(p1) // Person { name: 'youge', age: 18 }
console.log(p2) // Person { name: 'cj', age: 30 }
class 实例方法
就每个实例都能 "共享" 的方法, 按照原来的方式, 是需要将方法添加到构造函数的 prototype 对象中共享, 而这个 class 已经帮我内部实现了, 直接用就行.
// class 实例方法, 自动加在原型上的啦

class Person {
  // 构造函数
  constructor(name, age) {
    this.name = name
    this.age = age
  }

  // 实例方法
  running() {
    console.log(this.name + ' is running...')
  }

}

var p1 = new Person('youge', 18)
var p2 = new Person('cj', 30)
p1.running() // youge is running...

// 验证实例方法都是加在原型上的
console.log(p1.running === p2.running) // true

// 也可以通过看原型上的属性来验证
console.log(Object.getOwnPropertyDescriptors(Person.prototype))
{
  constructor: {
    value: [class Person],
    writable: true,
    enumerable: false,
    configurable: true
  },
  running: {
    value: [Function: running],
    writable: true,
    enumerable: false,
    configurable: true
  }
而原来的方式是要自己单独去加的, 感觉代码没有包裹在一个块块还有点割裂的感觉.
function Person(name, age) {
  this.name = name
  this.age = age
}

// 方法添加到原型上,实现共享
Person.prototype.running = function() {
  cosole.log(this.name + ' is running...')
}
class 访问器方法
前面在将对象的属性描述符时, 给以给对象添加 set() / get() 函数的, 那么类也是可以的啦.
// class 类访问器方法

class Person {
  constructor(name, age) {
    this.name = name
    this._age = age
  }

  // 访问器方法
  get age() {
    console.log('拦截 age 属性访问操作~')
    return this._age
  }

  set age(newAge) {
    console.log('拦截 age 属性将更值为: ', newAge + ' 操作~')
    this._name = newAge
  }

}

var p1 = new Person('youge', 18)
console.log(p1.age)
p1.age = 40
拦截 age 属性访问操作~
18
拦截 age 属性将更值为:  40 操作~
Person { name: 'cj', _age: 30 }
在 js 中的 set() 和 get() 函数, 或者更准确成为 访问器属性 getter / setter 的底层原理是基于对象的 属性描述符 中的访问器描述符.
读取操作会自动触发 set() 函数, 赋值操作会自动触发 set() 函数. 我们可以基于业务逻辑去添加一些东西, 告诉别的地方这个值被访问或者修改, 然后同时做一些别的事情, 这其实就是 vue2 的响应式系统原理.
class 静态方法
也称为 类方法 即这个方法是给类进行调用的, 而非实例, 它用 static 关键字定义
比如我们现在要实现一个 类的方法, 它的作用是随机生成一个对象出来.
// class 静态方法 (类方法)

class Person {
  constructor(name, age) {
    this.name = name
    this._age = age
  }

  // 静态方法
  static randomPerson() {
    var names = ['youge', 'cjj', 'yaya', 'bob']
    var index = Math.floor(Math.random() * names.length)

    var name = names[index]
    var age = Math.floor(Math.random() * 100)

    return new Person(name, age)
  }

}

// 类方法
for (var i = 0; i < 5; i++) {
  console.log(Person.randomPerson())
}
Person { name: 'youge', _age: 45 }
Person { name: 'yaya', _age: 96 }
Person { name: 'youge', _age: 5 }
Person { name: 'yaya', _age: 59 }
Person { name: 'bob', _age: 71 }
关于类的这四种种方法: 构造方法, 实例方法, 访问器方法, 静态方法, 都涉及了. 就只要是用过其他面向对象编程语言的, 这些东西就是秒懂.
ES6 中类继承- extends
前面我们花了大量的精力去逐步探索各方方式来实现继承, 包括原型链继承, 借用构造函数继承, 寄生式函数继承等,
最终通过寄生组合的方式实现了相对满意的继承机制, 这个过程真的是要深入了解 js 原型机制才能搞定的.
// 继承核心步骤

function Person() {}

// 传参则通过 Person.call(this, ...) 借用
function Student() {}

// Student 继承 Person, 通过改变原型对象指向
Student.prototype = Object.object(Person.prototype)
// 类型修改
Student.prototype.constructor = Student
而现在的 class 直接封装好了 extends 关键字, 用就行了.
// 继承 extends

class Person {}

class Student extends Person {}
果然强大呀, 但是我觉得还是要去尽可能背后的实现原理, 这样才能更深刻地掌握这些知识呢.
super 关键字
在子类 / 派生类的构造函数中使用 this 或者返回默认对象之前, 必须先通过 super 调用父类 构造函数.
Super 的使用位置有 三个: 子类的构造函; 实例方法; 静态方法;
就子类在继承父类的时候, 要继承父类的一些属性啥的, 就要先调用 super , 之前是通过在子类中 call 调用父类实现借用的.
这个 super() 最常用的位置是在 constructor() 中的第一句调用父类, 实现属性继承.
// 类继承 super()

class Person {
  constructor(name, age) {
    this.name = name
    this._age = age
  }
}

class Student extends Person {
  constructor(name, age, sno) {
    super(name, age) // 原来是 Person.call(this, name, age)
    this.sno = sno // 自己的
  }

}

var stu1 = new Student('cj', 18, 123)
var stu2 = new Student('youge', 30, 456)

console.log(stu1) // Student { name: 'cj', _age: 18, sno: 123 }
console.log(stu2) // Student { name: 'youge', _age: 30, sno: 456 }
只要理解前面说的 借用构造函数 实现继承的方式 (call + this) 则就很好理解这个 super 背后做的事情啦.
除了属性外, super() 也可调用父类方法的同时, 并进行额外拓展, 也算是重写父类方法吧, 类方法也是行的哈.
// super

class Person {
  constructor(name, age) {
    this.name = name
    this._age = age
  }

  running() {
    console.log(this.name + ' is running...')
  }

  personMethod() {
    console.log('处理逻辑1')
    console.log('处理逻辑2')
    console.log('处理逻辑3')
  }

  static staticMethod() {
    console.log('call Person static method')
  }
}

class Student extends Person {
  constructor(name, age, sno) {
    super(name, age)
    this.sno = sno
  }

  // 子类重写父类方法-完全覆盖
  running() {
    console.log('Student ' + this.name + ' is running' )
  }

  // 子类重写父类方法-部分拓展
  personMethod() {
    super.personMethod() // 调用父类方法, 继续拓展

    console.log('子类拓展-处理逻辑04')
    console.log('子类拓展-处理逻辑05')
  }

  // 子类重写父类静态方法
  static staticMethod() {
    super.staticMethod()  // 调用父类的
    console.log('子类拓展-父类的静态方法')
  }

}


var stu = new Student('cj', 18, 123)

stu.running()
stu.personMethod()

Student.staticMethod()
处理逻辑1
处理逻辑2
处理逻辑3
子类拓展-处理逻辑04
子类拓展-处理逻辑05
call Person static method
子类拓展-父类的静态方法
这样对于 super 关键的用法就清楚了, 构造函数时候 super() 父类属性 和在子类要重写父类方法时可以调用父类一些其他方法进行拓展.
继承内置类
可以让我们自定义的类继承自 js 的内置类, 如 Array, 当然所有类都是默认继承自 Object 类的.
// 继承内置类

class CjArray extends Array {
  // 获取到内置的 Array 类的所有东西后, 还能自己拓展

  // 拓展一把
  firstItem() {
    return this[0]
  }

  lastItem() {
    return this[this.length -1]
  }
}

var arr = new CjArray(1, 2, 3, 4, 5)

console.log(arr.firstItem()) // 1
console.log(arr.lastItem()) // 5
这种继承内置类在传统面向对象语言如 java, c++ 等还是用的比较多, 因为也不可能全部从零开始完全造轮子吧.
但是这种在 js 中还是比较少见的, 当然 js 支持多种编程范式, 因此这样写也是可以的.
类的混入mixin
js 中的类只支持单继承, 即只能有一个父类. 如果我们需要在一个类中添加更多相似的功能的时候, 就可以使用混入的这种小技巧.
// js 支持单继承

class Person {}

class Runner {
  running() {

  }
}

// js 不支持多继承 (python 可以)
class Student extends Person, Runner {
  // 这样是不行滴!
}
但还是可以通过一些小技巧来实现 mixin
// 类的混入 mixin

function mixinRunner(BaseClass) {
  class NewClass extends BaseClass {
    // 额外拓展
    running() {
      console.log('running...')
    }
  }
  // 返回拓展后的新类
  return NewClass
}

function mixinEater(BaseClass) {
  return class extends BaseClass {
    eating() {
      console.log('eating...')
    }
  }
}


class Person {}

class Student extends Person {

}

// 给 Student 混入两个东西
var NewStudent = mixinEater(mixinRunner(Student))

var stu = new NewStudent()
stu.running() // 来自 Runner Class
stu.eating()  // 来自 Eater  Class
就是一个函数封装的小技巧而已, 也没有啥特别的地方, 当然用的场景也比较少吧, 但要知道它是可以实现混合的.
js 多态实现
面向对象的三大特性: 封装, 继承, 多态. 前2者我们已经了解非常仔细了, 现在简单来讨论一些 js 中的多态.
很多人觉得 js 是没有多态的. 多态 (polymorphism) 指为不同数据类型的实体提供统一的接口, 或使用一个单一的符号来表示多个不同的类型.
简单说就是针对多个不同的数据类型, 提供同一个操作, 表现出不同的行为, 这个就是多态. 比如 eat() 这个方法,
人可以吃, 小狗可以吃, 但表现形式和吃的东西是不一样的, 是一种高层一点的抽象.
// js 多态

class Shape {
  getArea() {}
}

// 矩形
class Rectangle extends Shape {

}

// 圆形
class Circle extends Shape {

}

var r = new Rectangle()
var c = new Circle()

// 对不同数据类型, 执行同一个操作, 表现出的形态不一样, 是多态
// 这里,r, c 的数据类型不同, 但行为是一样的, 因此不是多态
function calcArea(shap: Shape) {
  console.log(shap.getArea())
}

calcArea(r)
calcArea(c)
要实现表现的行为也是不一样的, 则对不同的类中, 对父类 getArea() 方法进行重写即可.
// 矩形
class Rectangle extends Shape {
  getArea() {
    return 100
  }
}

// 圆形
class Circle extends Shape {
  getArea() {
    return 200
  }
}
这样对于这个同名的 getArea() 函数, 即可接收不同的类型, 也能表现不同的行为, 即实现了多态.
至此, 关于 js 面相对象 class 的补充就差不多啦, 主要理解 es6 中的 class 关键字是语法糖而已, 背后的还是之前讲的原型继承, 借用构造函数等东西, 然后会使用 class 语法即可, 包括创建类, 构造方法, 实例方法, 访问器方法, 静态方法, 类继承, 类混入, 类多态等, 学以致用即可.

 浙公网安备 33010602011771号