CSharpGL(18)分别处理glDrawArrays()和glDrawElements()两种方式下的拾取(ColorCodedPicking)
CSharpGL(18)分别处理glDrawArrays()和glDrawElements()两种方式下的拾取(ColorCodedPicking)
我在(Modern OpenGL用Shader拾取VBO内单一图元的思路和实现)记录了基于Color-Coded-Picking的拾取方法。
最近在整理CSharpGL时发现了一个问题:我只解决了用glDrawArrays();渲染时的拾取问题。如果是用glDrawElements();进行渲染,就会得到错误的图元。
本文就分别解决这两种情况下的拾取的问题。
下载
CSharpGL已在GitHub开源,欢迎对OpenGL有兴趣的同学加入(https://github.com/bitzhuwei/CSharpGL)
两种Index Buffer
ZeroIndexBuffer
用 glDrawArrays(uint mode, int first, int count); 进行渲染时,本质上是用这样一个(特殊索引+ glDrawElements(uint mode, int count, uint type, void* indices); )进行渲染:
uint[] index = { 0, 1, 2, 3, 4, 5, 6, 7, 8, … }
这个特殊索引的特点就是(i == index[i])且(index buffer的长度==position buffer的长度)。
所以我们可以把这个索引看做一个经过优化的VertexBufferObject(VBO)。优化的效果就是:此VBO占用的GPU内存空间(几乎)为零。所以我把这种索引buffer命名为ZeroIndexBuffer。
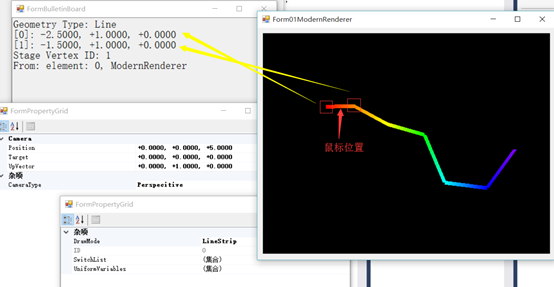
在之前的文章里,我拾取到了图元的最后一个顶点在position buffer里的索引值。由于index的特殊性质,position buffer前方(左侧)的连续几个顶点就属于拾取到的图元。所以glDrawArrays方式下的拾取问题就解决了。
像下面这个BigDipper的模型,是用glDrawArrays方式渲染的。其拾取功能完全正常。

OneIndexBuffer
我把用glDrawElements进行渲染的index buffer命名为OneIndexBuffer。(因为实在想不出合适的名字了,就模仿一下编译原理里的0型文法、1型文法的命名方式)
lastVertexID
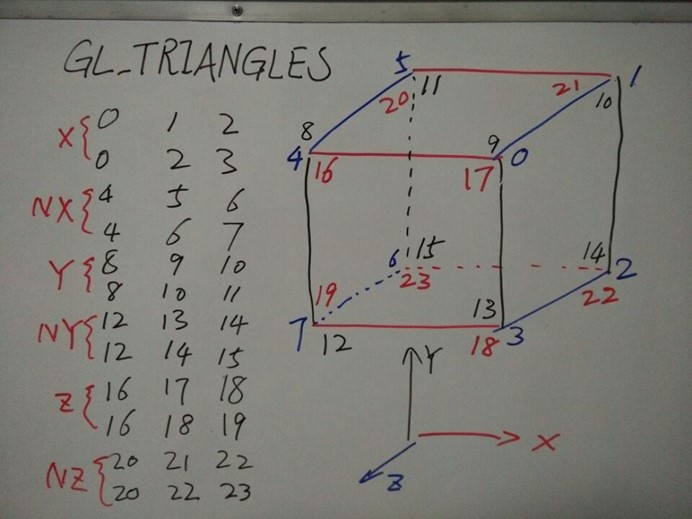
为便于说明,以下面的模型为例:

此模型描述了一个立方体,每个面都由4个顶点组成,共24个顶点。其索引(index buffer)用GL_TRIANGLES方式渲染,索引内容如上图如下:
index = { 0, 1, 2, 0, 2, 3, 4, 5, 6, 4, 6, 7, 8, 9, 10, 8, 10, 11, 12, 13, 14, 12, 14, 15, 16, 17, 18, 16, 18, 19, 20, 21, 22, 20, 22, 23 };
此index buffer的长度为36个uint(36*sizeof(uint)个字节)。
这个模型的position buffer长度(24)不等于index buffer的长度(36)。
所以,继续用上面的拾取方式,只能拾取到图元的最后一个顶点(此例为三角形的第3个顶点)在position buffer中的索引值。
假设拾取到的是第二个三角形,如下图所示,那么拾取到的图元的最后一个顶点在position buffer的索引值就是3。(此图只渲染了前2个三角形)
如果像之前那样,连续向前(向左)取3个顶点,就会得到position[1],position[2],position[3]。但是,如图所见,正确的3个顶点应该是position[0],position[2],position[3]。
就是说,由于index buffer内容是任意的,导致描述一个图元的各个顶点在position buffer中并非连续排列。
lastVertexID -> lastIndexIDList
继续这个例子,现在已经找到了lastVertexID为3。为了找到这个三角形所有的顶点,我们先在index buffer里找到内容为3的索引。
index = { 0, 1, 2, 0, 2, 3, 4, 5, 6, 4, 6, 7, 8, 9, 10, 8, 10, 11, 12, 13, 14, 12, 14, 15, 16, 17, 18, 16, 18, 19, 20, 21, 22, 20, 22, 23 };
只需遍历一下就会发现index[5] = 3。
所以,拾取到的三角形的三个顶点就是position[ index[5 – 2] ],position[ index[5 – 1] ],position[ index[5 – 0] ]。(index buffer中描述同一个图元的索引值是紧挨着排列的)
PrimitiveRecognizer
这个例子里,要识别的是三角形。实际上可能会识别点(Points)、线段(Lines、LineStrip、LineLoop)、四边形(Quads、QuadStrip)、多边形(Polygon)。所以我需用一个简单的工厂来提供各种PrimitiveRecognizer。
用于识别三角形的TriangleRecognizer如下:


 1     class TrianglesRecognizer : PrimitiveRecognizer
 2     {
 3         public override List<RecognizedPrimitiveIndex> Recognize(
 4             uint lastVertexID, IntPtr pointer, int length)
 5         {
 6             var lastIndexIDList = new List<RecognizedPrimitiveIndex>();
 7             unsafe
 8             {
 9                 var array = (uint*)pointer.ToPointer();
10                 for (uint i = 2; i < length; i += 3)
11                 {
12                     if (array[i] == lastVertexID)
13                     {
14                         var item = new RecognizedPrimitiveIndex(lastVertexID);
15                         item.IndexIDList.Add(array[i - 2]);
16                         item.IndexIDList.Add(array[i - 1]);
17                         item.IndexIDList.Add(array[i - 0]);
18                         lastIndexIDList.Add(item);
19                     }
20                 }
21             }
22
23             return lastIndexIDList;
24         }
25 }
26
27     class RecognizedPrimitiveIndex
28     {
29         public RecognizedPrimitiveIndex(uint lastIndexID, params uint[] indexIDs)
30         {
31             this.LastIndexID = lastIndexID;
32             this.IndexIDList = new List<uint>();
33             this.IndexIDList.AddRange(indexIDs);
34         }
35
36         public uint LastIndexID { get; set; }
37
38         public List<uint> IndexIDList { get; set; }
39     }
lastIndexIDList -> lastIndexID
这个例子里,只有一个index[5]=3。实际上可能会有多个index[i]=索引值。
所以要想办法从这些候选图元中找到真正拾取到的那个。
那么,什么时候会出现多个候选图元?就是这几个图元共享最后一个顶点的时候。例如下面的例子:在鼠标所在位置执行拾取时,会找到[0 1 3]、[0 2 3]和[1 2 3]这三组lastIndexID。
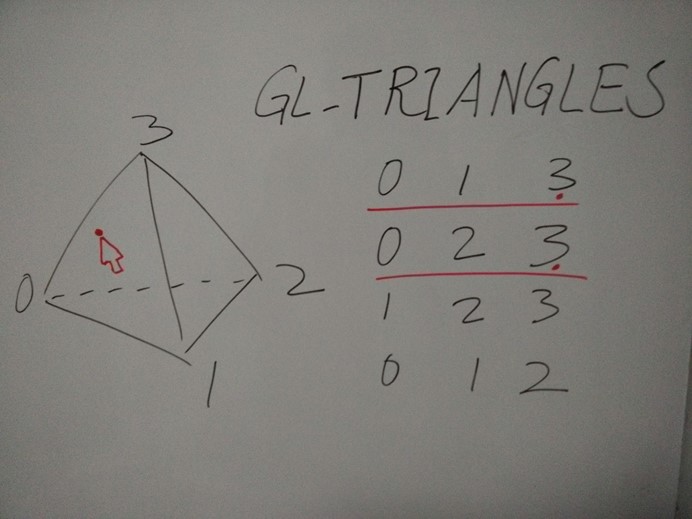
那么如何分辨出我们拾取到的是[0 1 3]而不是另2个?
我想到的方法是,将共享点前移,然后重新渲染、拾取。在这个例子里,就是把[0 1 3]和[0 2 3]变成[3 0 1]和[3 0 2],然后渲染[3 0 1 3 0 2]这个小小的index buffer(即仅渲染这2个图元)。这样是能够拾取到[3 0 1]的,这就排除了[3 0 2]。然后继续用同样的方法排除[1 2 3]。这就找到了[0 1 3]这个正确的目标。
 1         /// <summary>
 2         /// 在所有可能的图元(<see cref="lastVertexId"/>匹配)中,
 3         /// 逐个测试,找到最接近摄像机的那个图元,
 4         /// 返回此图元的最后一个索引在<see cref="indexBufferPtr"/>中的索引(位置)。
 5         /// </summary>
 6         /// <param name="lastIndexIdList"></param>
 7         /// <returns></returns>
 8         private RecognizedPrimitiveIndex GetLastIndexId(
 9             ICamera camera,
10             List<RecognizedPrimitiveIndex> lastIndexIdList,
11             int x, int y, int canvasWidth, int canvasHeight)
12         {
13             if (lastIndexIdList.Count == 0) { throw new ArgumentException(); }
14
15             int current = 0;
16             foreach (var item in lastIndexIdList[0].IndexIdList)
17             {
18                 if (item == uint.MaxValue) { throw new Exception(); }
19             }
20             for (int i = 1; i < lastIndexIdList.Count; i++)
21             {
22                 foreach (var item in lastIndexIdList[i].IndexIdList)
23                 {
24                     if (item == uint.MaxValue) { throw new Exception(); }
25                 }
26                 OneIndexBufferPtr twoPrimitivesIndexBufferPtr;
27                 uint lastIndex0, lastIndex1;
28                 AssembleIndexBuffer(
29                     lastIndexIdList[current], lastIndexIdList[i], this.indexBufferPtr.Mode,
30                     out twoPrimitivesIndexBufferPtr, out lastIndex0, out lastIndex1);
31                 uint pickedIndex = Pick(camera, twoPrimitivesIndexBufferPtr, x, y, canvasWidth, canvasHeight);
32                 if (pickedIndex == lastIndex1)
33                 { current = i; }
34                 else if (pickedIndex == lastIndex0)
35                 { /* nothing to do */}
36                 else if (pickedIndex == uint.MaxValue)
37                 { /* nothing to do */}
38                 else
39                 { throw new Exception("This should not happen!"); }
40             }
41
42             return lastIndexIdList[current];
43         }
lastIndexID -> PickedGeometry
现在得到了图元的所有顶点在position buffer中的索引(上面的例子中,是[0 1 3]),只需一步就可以找到顶点了。(上面的例子中,是position[ index[0] ],position[ index[1] ],position[ index[3] ])
 1         private PickedGeometry GetGeometry(RecognizedPrimitiveIndex lastIndexId, uint stageVertexId)
 2         {
 3             var pickedGeometry = new PickedGeometry();
 4             pickedGeometry.GeometryType = this.indexBufferPtr.Mode.ToPrimitiveMode().ToGeometryType();
 5             pickedGeometry.StageVertexId = stageVertexId;
 6             pickedGeometry.From = this;
 7             pickedGeometry.Indexes = lastIndexId.IndexIdList.ToArray();
 8             GL.BindBuffer(BufferTarget.ArrayBuffer, this.positionBufferPtr.BufferId);
 9             IntPtr pointer = GL.MapBuffer(BufferTarget.ArrayBuffer, MapBufferAccess.ReadOnly);
10             unsafe
11             {
12                 var array = (vec3*)pointer.ToPointer();
13                 List<vec3> list = new List<vec3>();
14                 for (int i = 0; i < lastIndexId.IndexIdList.Count; i++)
15                 {
16                     list.Add(array[lastIndexId.IndexIdList[i]]);
17                 }
18                 pickedGeometry.Positions = list.ToArray();
19             }
20             GL.UnmapBuffer(BufferTarget.ArrayBuffer);
21             GL.BindBuffer(BufferTarget.ArrayBuffer, 0);
22
23             return pickedGeometry;
24         }
测试用例
ZeroIndexBuffer
这个情况属于早就解决了的,可以在(CSharpGL(17)重构CSharpGL)中查看。
OneIndexBuffer
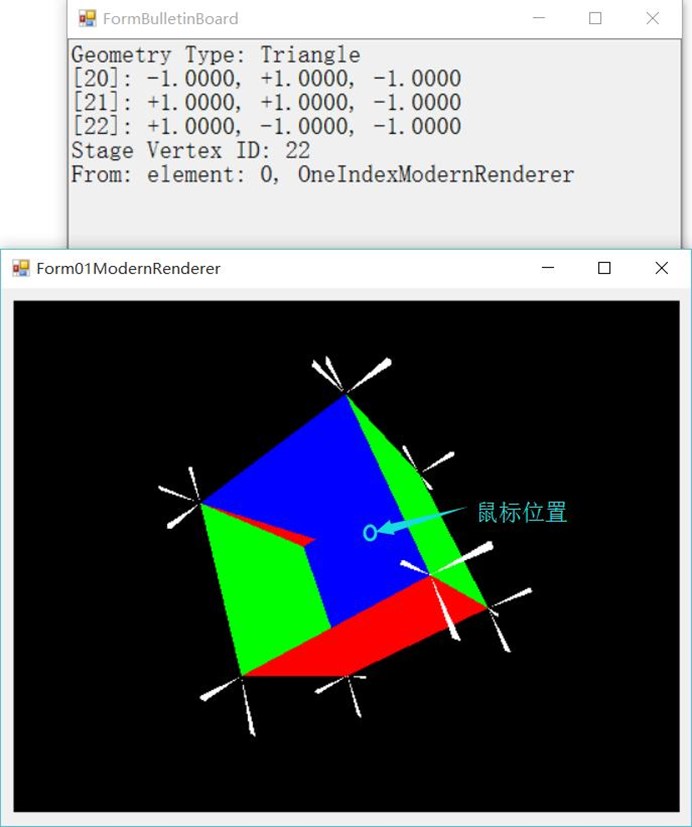
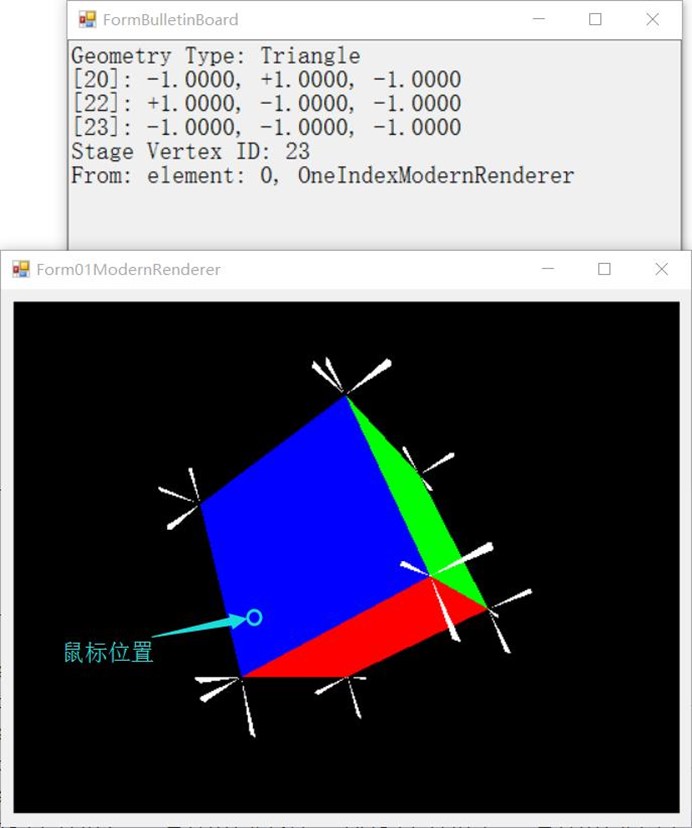
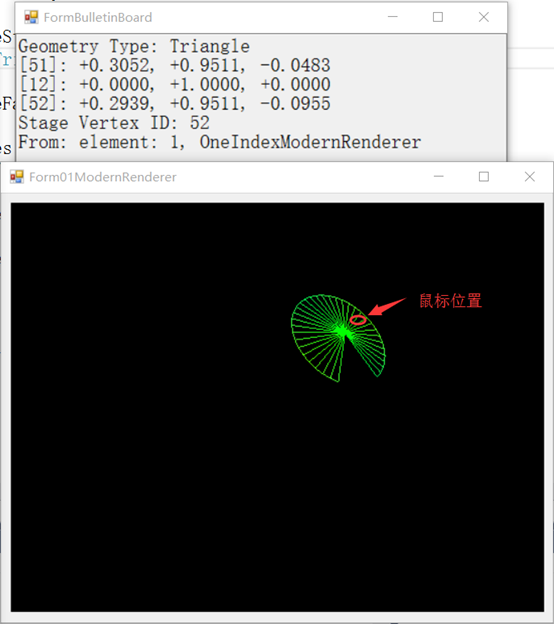
Cube
下图中的Cube模型就可以用来测试OneIndexBuffer的拾取功能。
下面12个测试用例测试了拾取CubeModel的12个三角形的情况。结果显示完全符合对Cube的定义。
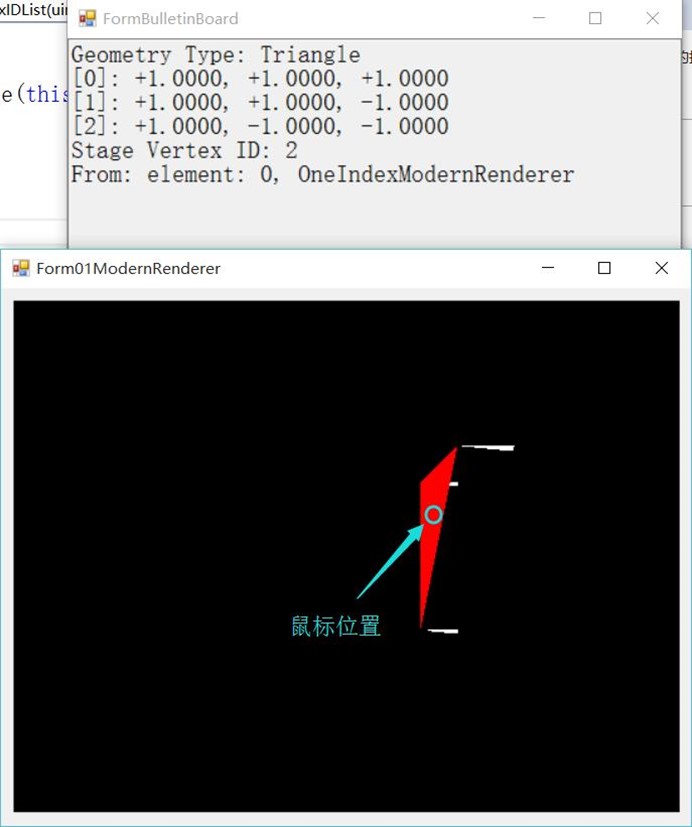


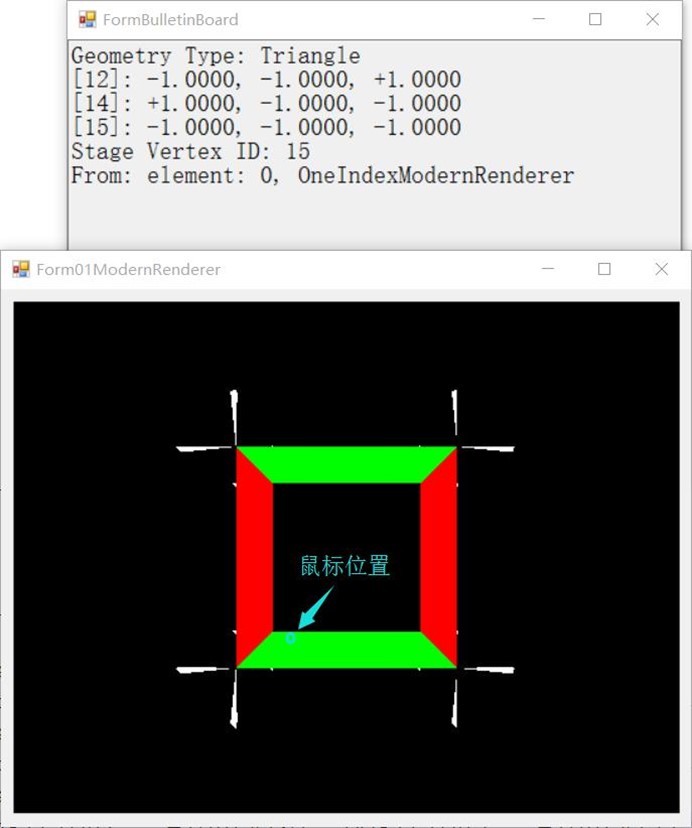

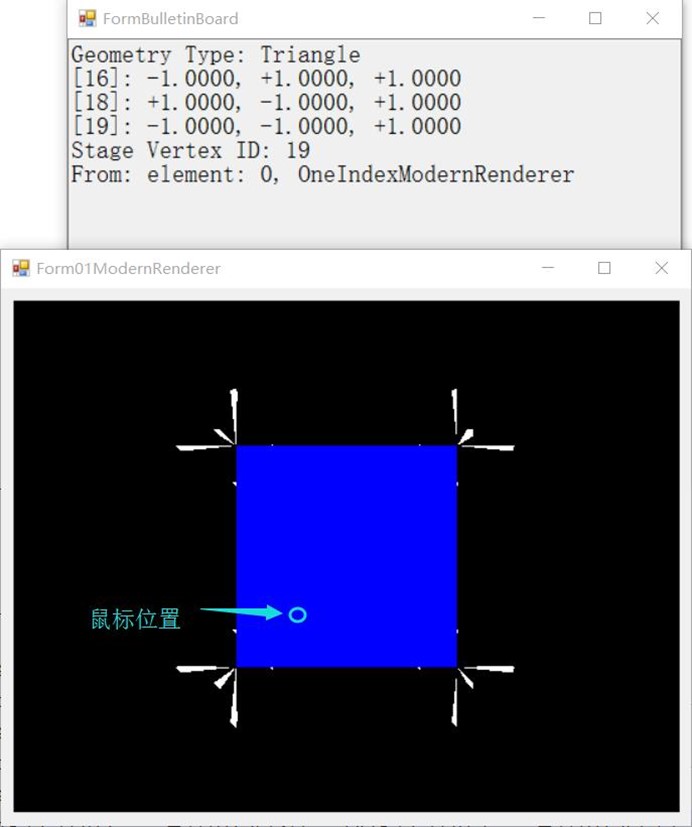
最后一个面在背面,所以需要旋转过来。
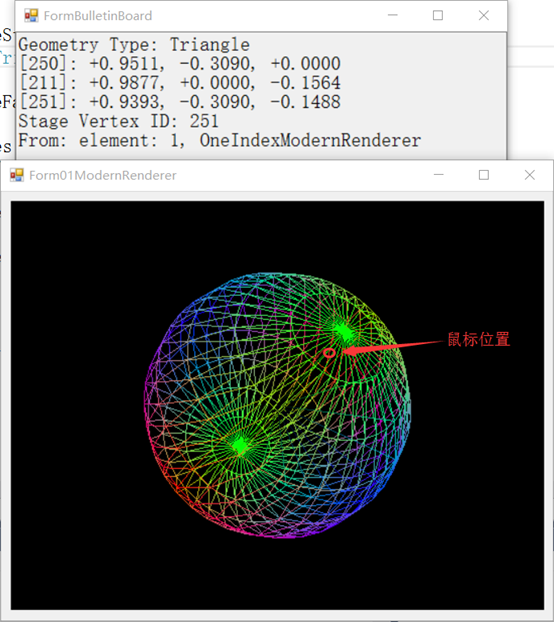
Sphere
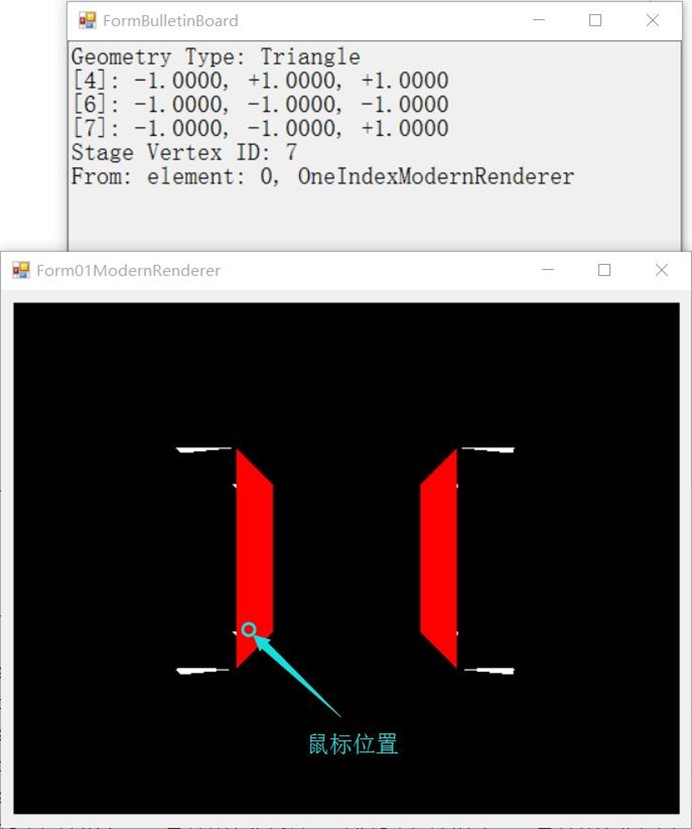
当然,Cube是不足以完全测试OneIndexBuffer的拾取的。因为Cube里不存在共享最后一个顶点的情况。
Sphere里就有。

Teapot
Teapot的顶点组织方式我没有查看,权且充个数吧。

2016-04-26
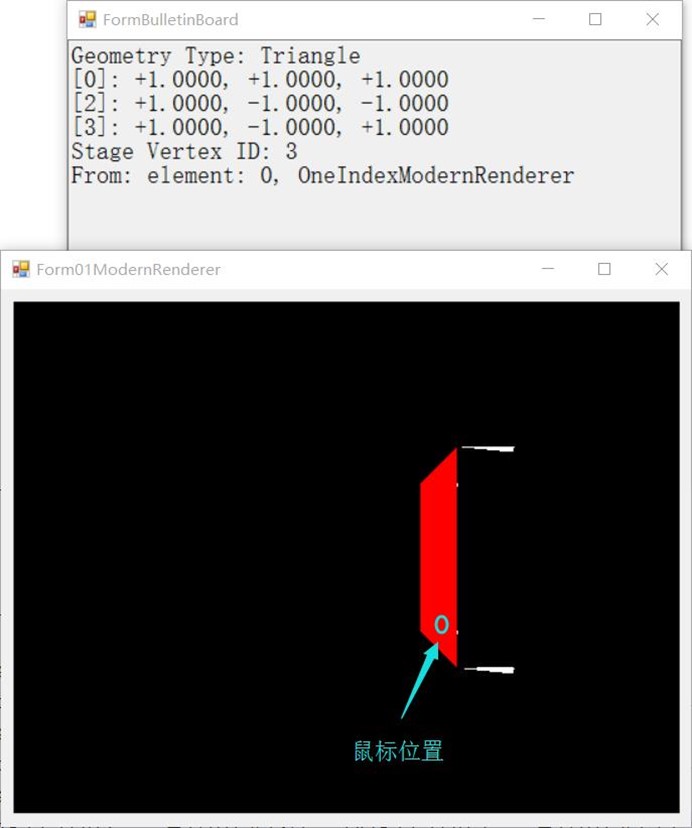
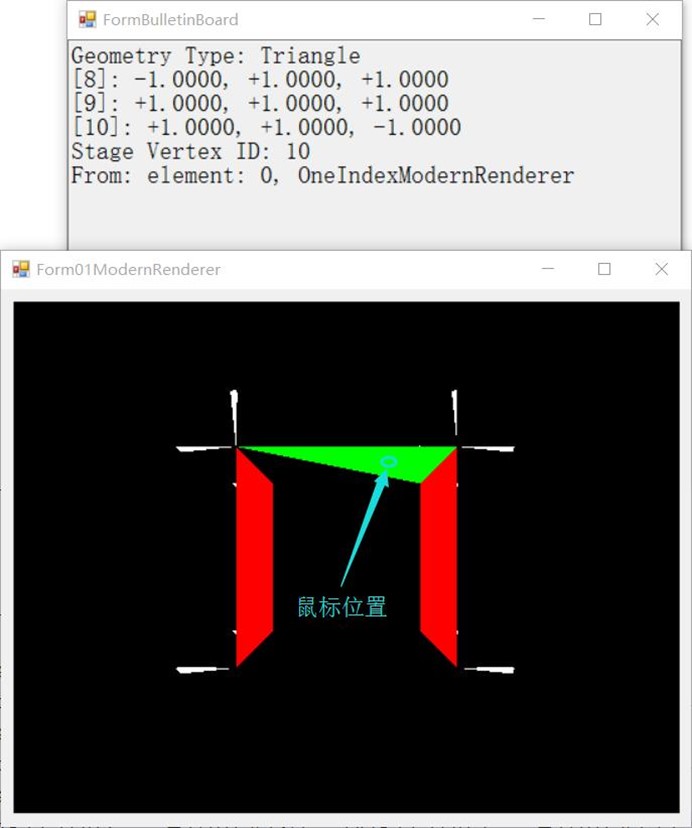
为了严格测试OneIndexBuffer时存在“多个图元共享同一个最后的顶点”的情况,我制作了下面这个四边形模型。这验证了下图的情况。
Tetrahedron
根据上图,我设计了这样的模型数据:

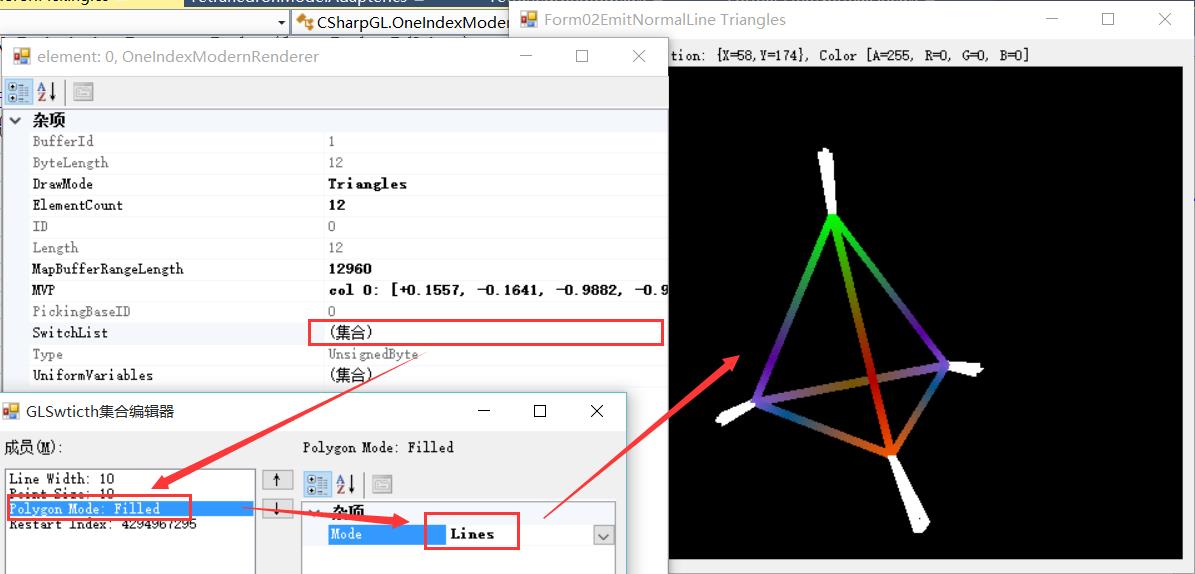
首先看一下这个四边形的结构。通过设置GLSwitch里的PolygonModeSwtich为Lines,就可以看到这确实是个四边形。
(白色部分是geometry shader制造的法线,不必理会)
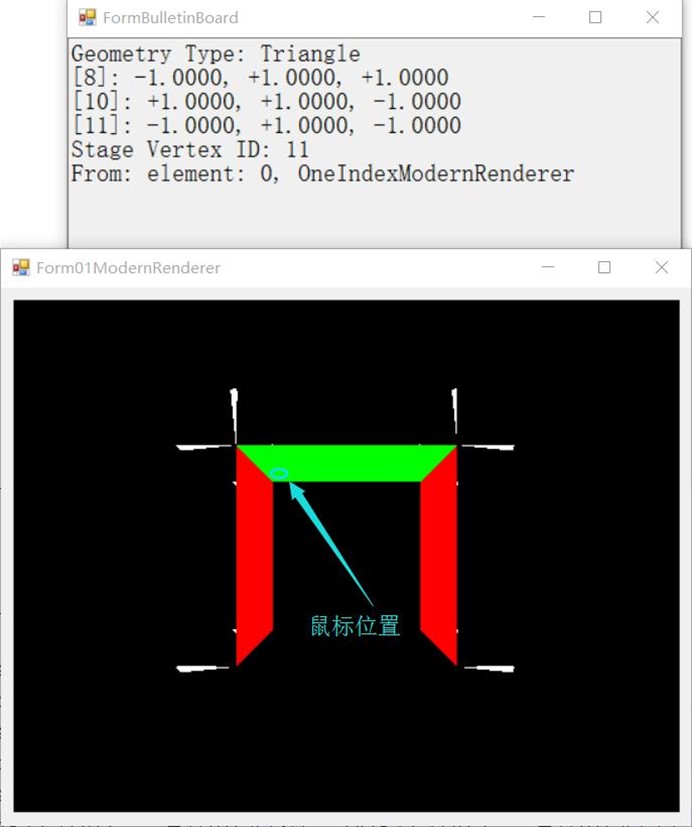
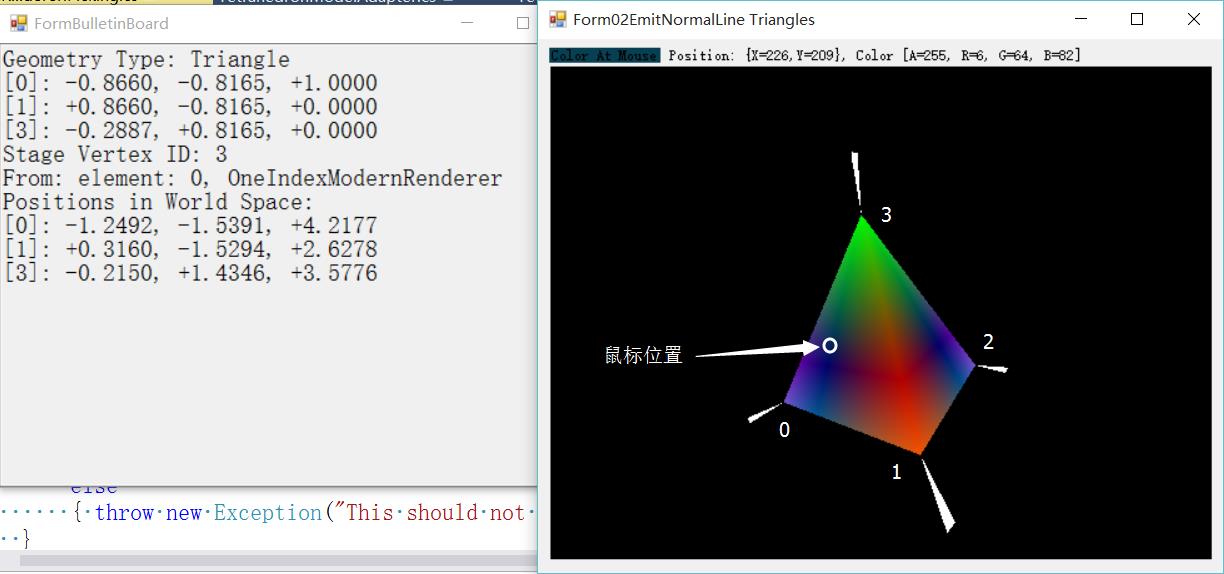
然后恢复到Filled模式下开始测试。下图中右边标明了各个顶点的索引(白色的0 1 2 3)。
可以看到这正是本文示例中描述的情况。结果完全符合预期。
然后我们在其他位置都试试看。


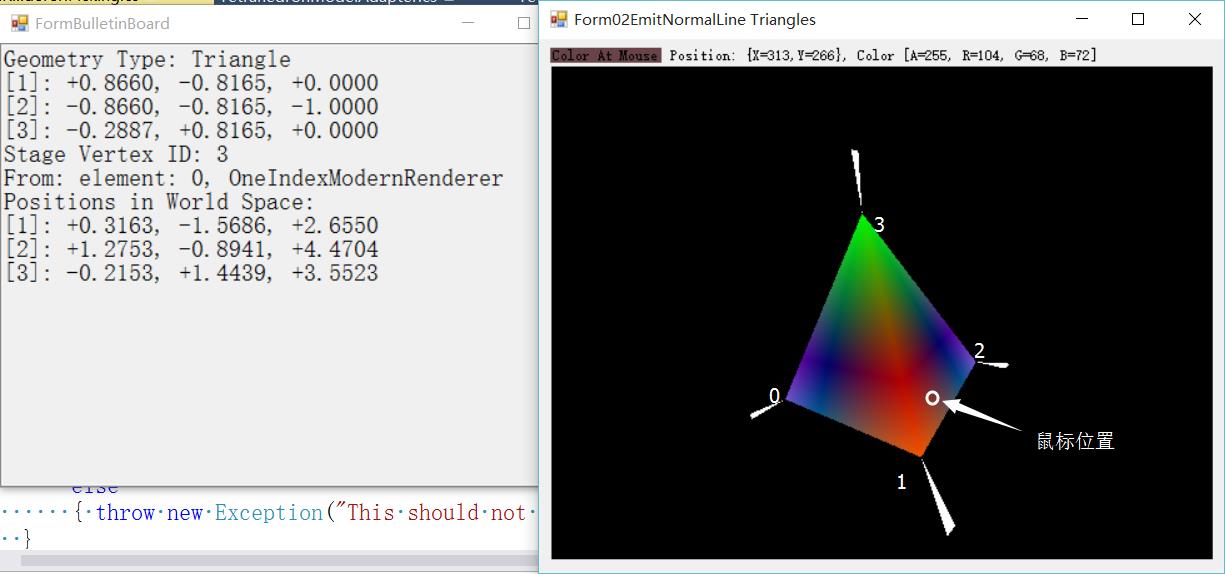
其余位置就不贴图了。
总结
解决拾取问题的过程也是整理ModernRenderer的过程。由于两种渲染方式的巨大差异,我设计了对应的ModernRenderer(即ZeroIndexModernRenderer和OneIndexModernRenderer)。再配合工厂模式,既封装了细节,实现了功能,又易于使用。
原CSharpGL的其他功能(UI、3ds解析器、TTF2Bmp、CSSL等),我将逐步加入新CSharpGL。
欢迎对OpenGL有兴趣的同学关注(https://github.com/bitzhuwei/CSharpGL)

|
微信扫码,自愿捐赠。天涯同道,共谱新篇。
微信捐赠不显示捐赠者个人信息,如需要,请注明联系方式。 |

