八、Abp vNext 基础篇丨标签聚合功能
介绍
本章节先来把上一章漏掉的上传文件处理下,然后实现Tag功能。
上传文件
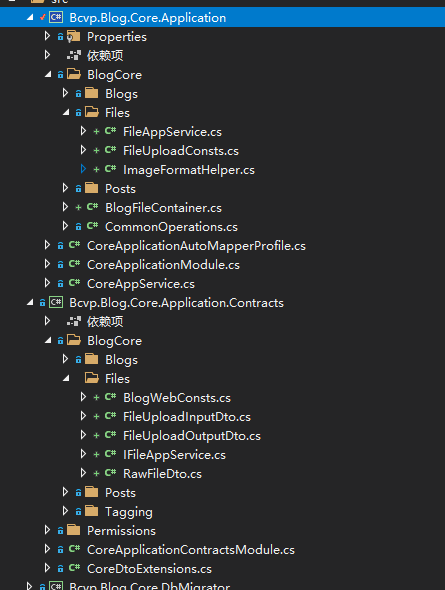
上传文件其实不含在任何一个聚合中,它属于一个独立的辅助性功能,先把抽象接口定义一下,在Bcvp.Blog.Core.Application.Contracts层Blog内新建File文件夹。
一个是根据文件name获取文件,一个是创建文件,另外BlogWebConsts是对上传文件的约束。
    public interface IFileAppService : IApplicationService
    {
        Task<RawFileDto> GetAsync(string name);

        Task<FileUploadOutputDto> CreateAsync(FileUploadInputDto input);
    }


    public class RawFileDto
    {
        public byte[] Bytes { get; set; }

        public bool IsFileEmpty => Bytes == null || Bytes.Length == 0;

        public RawFileDto()
        {

        }

        public static RawFileDto EmptyResult()
        {
            return new RawFileDto() { Bytes = new byte[0] };
        }
    }


    public class FileUploadInputDto
    {
        [Required]
        public byte[] Bytes { get; set; }

        [Required]
        public string Name { get; set; }
    }


    public class FileUploadOutputDto
    {
        public string Name { get; set; }

        public string WebUrl { get; set; }
    }


    public class BlogWebConsts
    {
        public class FileUploading
        {
            /// <summary>
            /// Default value: 5242880
            /// </summary>
            public static int MaxFileSize { get; set; } = 5242880; //5MB

            public static int MaxFileSizeAsMegabytes => Convert.ToInt32((MaxFileSize / 1024f) / 1024f);
        }
    }
在Bcvp.Blog.Core.Application层实现抽象接口
    public class FileAppService : CoreAppService, IFileAppService
    {
        // Nuget: Volo.Abp.BlobStoring   https://docs.abp.io/en/abp/latest/Blob-Storing
        protected IBlobContainer<BloggingFileContainer> BlobContainer { get; }

        public FileAppService(
            IBlobContainer<BloggingFileContainer> blobContainer)
        {
            BlobContainer = blobContainer;
        }

        public virtual async Task<RawFileDto> GetAsync(string name)
        {
            Check.NotNullOrWhiteSpace(name, nameof(name));

            return new RawFileDto
            {
                Bytes = await BlobContainer.GetAllBytesAsync(name)
            };
        }

        public virtual async Task<FileUploadOutputDto> CreateAsync(FileUploadInputDto input)
        {
            if (input.Bytes.IsNullOrEmpty())
            {
                ThrowValidationException("上传文件为空!", "Bytes");
            }

            if (input.Bytes.Length > BlogWebConsts.FileUploading.MaxFileSize)
            {
                throw new UserFriendlyException($"文件大小超出上限 ({BlogWebConsts.FileUploading.MaxFileSizeAsMegabytes} MB)!");
            }

            if (!ImageFormatHelper.IsValidImage(input.Bytes, FileUploadConsts.AllowedImageUploadFormats))
            {
                throw new UserFriendlyException("无效的图片格式!");
            }

            var uniqueFileName = GenerateUniqueFileName(Path.GetExtension(input.Name));

            await BlobContainer.SaveAsync(uniqueFileName, input.Bytes);

            return new FileUploadOutputDto
            {
                Name = uniqueFileName,
                WebUrl = "/api/blog/files/www/" + uniqueFileName
            };
        }

        private static void ThrowValidationException(string message, string memberName)
        {
            throw new AbpValidationException(message,
                new List<ValidationResult>
                {
                    new ValidationResult(message, new[] {memberName})
                });
        }

        protected virtual string GenerateUniqueFileName(string extension, string prefix = null, string postfix = null)
        {
            return prefix + GuidGenerator.Create().ToString("N") + postfix + extension;
        }
    }


    public class FileUploadConsts
    {
        public static readonly ICollection<ImageFormat> AllowedImageUploadFormats = new Collection<ImageFormat>
        {
            ImageFormat.Jpeg,
            ImageFormat.Png,
            ImageFormat.Gif,
            ImageFormat.Bmp
        };

        public static string AllowedImageFormatsJoint => string.Join(",", AllowedImageUploadFormats.Select(x => x.ToString()));
    }


    public class ImageFormatHelper
    {
        public static ImageFormat GetImageRawFormat(byte[] fileBytes)
        {
            using (var memoryStream = new MemoryStream(fileBytes))
            {
                return System.Drawing.Image.FromStream(memoryStream).RawFormat;
            }
        }

        public static bool IsValidImage(byte[] fileBytes, ICollection<ImageFormat> validFormats)
        {
            var imageFormat = GetImageRawFormat(fileBytes);
            return validFormats.Contains(imageFormat);
        }
    }
结构目录如下
思考
这个接口的创建文件和返回都是用的byte这个适用于服务间调用,但是如果我们是前端调用根本没法用,我们传统开发的上传文件都是通过IFormFile来做的这里咋办?
ABP为我们提供Bcvp.Blog.Core.HttpApi远程服务层,用于定义 HTTP APIs,在Controllers文件夹下创建BlogFilesController控制器,简单点理解就是文件创建还是由上面的FileAppService来完成,我们通过BlogFilesController扩展了远程服务传输文件的方式。
    [RemoteService(Name = "blog")] // 远程服务的组名
    [Area("blog")]// Mvc里的区域
    [Route("api/blog/files")] //Api路由
    public class BlogFilesController : AbpController, IFileAppService
    {
        private readonly IFileAppService _fileAppService;

        public BlogFilesController(IFileAppService fileAppService)
        {
            _fileAppService = fileAppService;
        }

        [HttpGet]
        [Route("{name}")]
        public Task<RawFileDto> GetAsync(string name)
        {
            return _fileAppService.GetAsync(name);
        }

        [HttpGet]
        [Route("www/{name}")]
        public async Task<FileResult> GetForWebAsync(string name)
        {
            var file = await _fileAppService.GetAsync(name);
            return File(
                file.Bytes,
                MimeTypes.GetByExtension(Path.GetExtension(name))
            );
        }

        [HttpPost]
        public Task<FileUploadOutputDto> CreateAsync(FileUploadInputDto input)
        {
            return _fileAppService.CreateAsync(input);
        }


        [HttpPost]
        [Route("images/upload")]
        public async Task<JsonResult> UploadImage(IFormFile file)
        {
            //TODO: localize exception messages

            if (file == null)
            {
                throw new UserFriendlyException("没找到文件");
            }

            if (file.Length <= 0)
            {
                throw new UserFriendlyException("上传文件为空");
            }

            if (!file.ContentType.Contains("image"))
            {
                throw new UserFriendlyException("文件不是图片类型");
            }

            var output = await _fileAppService.CreateAsync(
                new FileUploadInputDto
                {
                    Bytes = file.GetAllBytes(),
                    Name = file.FileName
                }
            );

            return Json(new FileUploadResult(output.WebUrl));
        }

    }


    public class FileUploadResult
    {
        public string FileUrl { get; set; }

        public FileUploadResult(string fileUrl)
        {
            FileUrl = fileUrl;
        }
    }
标签聚合
标签应该是最简单的了,它就一个功能,获取当前博客下的标签列表,在之前我们写文章聚合的时候已经把标签的仓储接口和实现都完成了,这里补一下业务接口。
    public interface ITagAppService : IApplicationService
    {
        Task<List<TagDto>> GetPopularTags(Guid blogId, GetPopularTagsInput input);

    }

    public class GetPopularTagsInput
    {
        public int ResultCount { get; set; } = 10;

        public int? MinimumPostCount { get; set; }
    }


    public class TagAppService : CoreAppService, ITagAppService
    {
        private readonly ITagRepository _tagRepository;

        public TagAppService(ITagRepository tagRepository)
        {
            _tagRepository = tagRepository;
        }

        public async Task<List<TagDto>> GetPopularTags(Guid blogId, GetPopularTagsInput input)
        {
            var postTags = (await _tagRepository.GetListAsync(blogId)).OrderByDescending(t=>t.UsageCount)
                .WhereIf(input.MinimumPostCount != null, t=>t.UsageCount >= input.MinimumPostCount)
                .Take(input.ResultCount).ToList();

            return new List<TagDto>(
                ObjectMapper.Map<List<Tag>, List<TagDto>>(postTags));
        }
    }
查缺补漏
前面写了这么多结果忘了配置实体映射了,我们在AutoMapper的时候是需要配置Dto和实体的映射才是使用的,在Bcvp.Blog.Core.Application层有一个CoreApplicationAutoMapperProfile.cs,把漏掉的映射配置补一下。
        public CoreApplicationAutoMapperProfile()
        {
            /* You can configure your AutoMapper mapping configuration here.
             * Alternatively, you can split your mapping configurations
             * into multiple profile classes for a better organization. */

            CreateMap<BlogCore.Blogs.Blog, BlogDto>();
            CreateMap<IdentityUser, BlogUserDto>();

            CreateMap<Post, PostCacheItem>().Ignore(x => x.CommentCount).Ignore(x => x.Tags);
            CreateMap<Post, PostWithDetailsDto>().Ignore(x => x.Writer).Ignore(x => x.CommentCount).Ignore(x => x.Tags);
            CreateMap<PostCacheItem, PostWithDetailsDto>()
                .Ignore(x => x.Writer)
                .Ignore(x => x.CommentCount)
                .Ignore(x => x.Tags);

            CreateMap<Tag, TagDto>();

        }
结语
本节知识点:
- 1.远程服务层的使用
- 2.标签聚合的完成
- 3.AutoMapper配置
联系作者:加群:867095512 @MrChuJiu


 浙公网安备 33010602011771号