 6
6 实验7:基于REST API的SDN北向应用实践
实验7:基于REST API的SDN北向应用实践
实验步骤
一、搭建拓扑,连接 OpenDaylight,下发流表
- 编写Python程序,调用OpenDaylight的北向接口下发指令删除s1上的流表数据
#!/usr/bin/python
import requests
from requests.auth import HTTPBasicAuth
def http_delete(url):
    url= url
    headers = {'Content-Type':'application/json'}
    resp = requests.delete(url,headers=headers,auth=HTTPBasicAuth('admin', 'admin'))
    return resp

if __name__ == "__main__":
    url='http://127.0.0.1:8181/restconf/config/opendaylight-inventory:nodes/node/openflow:1/'
    resp = http_delete(url)
    print (resp.content)
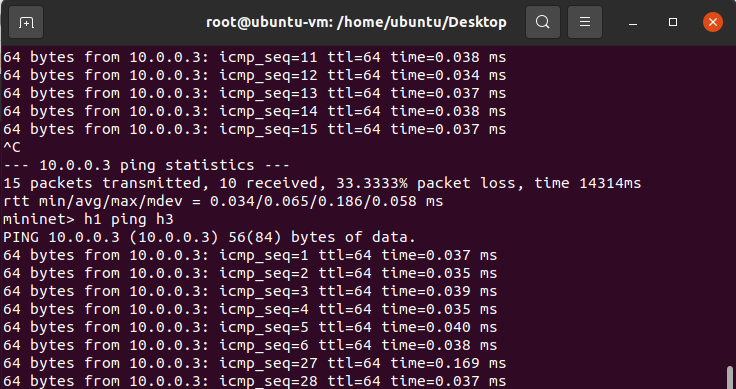
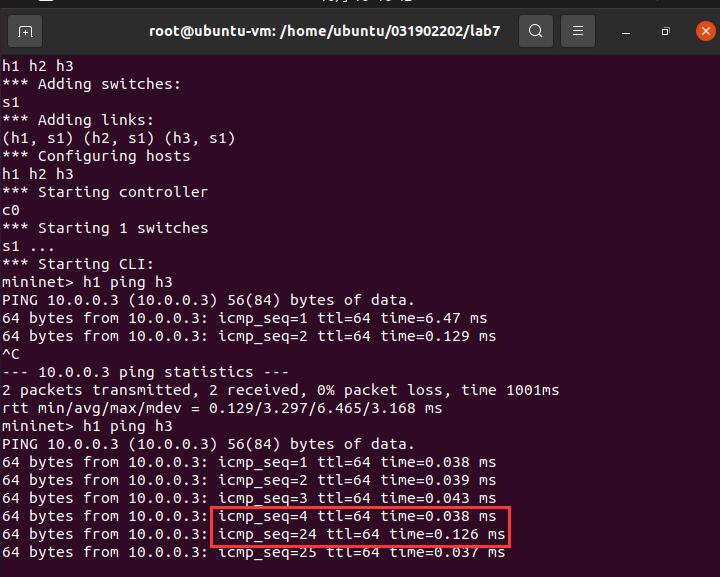
- 编写Python程序,调用OpenDaylight的北向接口下发硬超时流表,实现拓扑内主机h1和h3网络中断20s
#!/usr/bin/python
import requests
from requests.auth import HTTPBasicAuth
def http_put(url,jstr):
    url= url
    headers = {'Content-Type':'application/json'}
    resp = requests.put(url,jstr,headers=headers,auth=HTTPBasicAuth('admin', 'admin'))
    return resp

if __name__ == "__main__":
    url='http://127.0.0.1:8181/restconf/config/opendaylight-inventory:nodes/node/openflow:1/flow-node-inventory:table/0/flow/1'
    with open('h_timeout.json') as f:
        jstr = f.read()
    resp = http_put(url,jstr)
    print (resp.content)
{
    "flow": [
        {
            "id": "1",
            "match": {
                "in-port": "1",
                "ethernet-match": {
                    "ethernet-type": {
                        "type": "0x0800"
                    }
                },
                "ipv4-destination": "10.0.0.3/32"
            },
            "instructions": {
                "instruction": [
                    {
                        "order": "0",
                        "apply-actions": {
                            "action": [
                                {
                                    "order": "0",
                                    "drop-action": {}
                                }
                            ]
                        }
                    }
                ]
            },
            "flow-name": "flow1",
            "priority": "65535",
            "hard-timeout": "20",
            "cookie": "2",
            "table_id": "0"
        }
    ]
}
- 编写Python程序,调用OpenDaylight的北向接口获取s1上活动的流表数
#!/usr/bin/python
import requests
import json
from requests.auth import HTTPBasicAuth
def http_get(url):
    url= url
    headers = {'Content-Type':'application/json'}
    resp = requests.get(url,headers=headers,auth=HTTPBasicAuth('admin','admin'))
    return resp

if __name__ == "__main__":
    url='http://127.0.0.1:8181/restconf/config/opendaylight-inventory:nodes/node/openflow:1/flow-node-inventory:table/0'
    resp = http_get(url)
    res = json.loads(resp.text)
    # print(resp.text)
    print(len(res['flow-node-inventory:table'][0]['flow']))

二、搭建拓扑,连接 Ryu,下发流表
- 编写Python程序,调用Ryu的北向接口,实现上述OpenDaylight实验拓扑上相同的硬超时流表下发
#!/usr/bin/python
import requests
from requests.auth import HTTPBasicAuth
def http_post(url,jstr):
    url= url
    headers = {'Content-Type':'application/json'}
    resp = requests.post(url,jstr,headers=headers)
    return resp

if __name__ == "__main__":
    url='http://127.0.0.1:8080/stats/flowentry/add'
    with open('ryu_htimeout.json') as f:
        jstr = f.read()
    resp = http_post(url,jstr)
    print (resp.content)
{
    "dpid": 1,
    "cookie": 1,
    "cookie_mask": 1,
    "table_id": 0,
    "hard_timeout": 20,
    "priority": 65535,
    "flags": 1,
    "match":{
        "in_port":1
    },
    "actions":[
        {
            "type":"OUTPUT",
            "port": 2
        }
    ]
 }
个人总结
-
本次实验难度适中,实验期间遇到的第一个问题是运行上一次实验创建的 L2Switch.py 出现错误,报错“AttributeError: module 'ryu.ofproto.ofproto_v1_0' has no attribute 'OFPET_EXPERIMENTER'
”,未找到最终原因。改用安装 Ryu 时自带的 simple_switch_13.py,成功启动。 -
第二个问题是启动 simple_switch_13.py 时没有一起运行 ofctl_rest.py 开启控制器的北向接口,导致下发流表失败。
-
通过这次实验学习了使用 python 向指定 url 发送请求来调用 REST API,了解了相关 API 的使用。

