
WSSv3 Technical Articles_Windows SharePoint Services 3.0编码开发工具和技巧(Part 2 of 2)
2007-07-23 12:09 努力学习的小熊 阅读(4772) 评论(7) 编辑 收藏 举报WSSv3 Technical Articles_Windows SharePoint Services 3.0编码开发工具和技巧(Part 2 of 2)
摘要:研究Windows SharePoint Services解决方案,解决方案架构,创建、部署、维护升级Windows SharePoint Services解决
方案的技术。这是文章的第二部分。
Patrick Tisseghem, U2U
June 2007
应用:Microsoft Windows SharePoint Services 3.0, Visual Studio 2005 Extensions for Windows SharePoint Services 3.0
内容:
Ø 部署Windows SharePoint Services解决方案
Ø 手动打包Windows SharePoint Services解决方案
Ø 管理解决方案
Ø 结论
Ø 关于作者
Ø 其他资源
部署Windows SharePoint Services解决方案
在Web前端服务器或应用服务器上部署Windows SharePoint Services解决方案需要经过两个阶段。

Steps for deploying a SharePoint solution
Adding a Solution to the Solution Store(将解决方案添加到解决方案存储)
使一个SharePoint解决方案在服务器场中可用,首先要将它添加到解决方案存储中。解决方案存储是配置数据库的一部
分,其中存储了很多的.wsp文件。使用编程的方法通过stsadm.exe命令行的方式将解决方案添加到存储中。
Using Stsadm.exe
可以调用Stsadm.exe的addsolution操作并指定.wsp文件的相对路径即可。下面是一个例子:
|
stsadm –o addsolution –filename mysolution.wsp |
注意:
如果需要localizing the solution,可以使用第三个参数:lcid。
Using the Windows SharePoint Services 3.0 Object Model(使用Windows SharePoint Services 3.0对象模型)
另一种方法,可以创建一个.NET Framework应用程序使用Windows SharePoint Services暴露的对象模型。可以仅使用一行代
码就将SharePoint解决方案添加到解决方案存储中。
|
SPSolution solution = SPFarm.Local.Solutions.Add(@"C:\Package\MySol.wsp"); |
SPFarm类在Microsoft.SharePoint.Administration命名空间中,可以连接到服务器场(本地远程均可)。可以使用
SPSolutionCollection对象的Add方法将新的解决方案添加到集合中,参数可以是一个SPSolution类的实例或者是一个SharePoint
解决方案文件。这个方法会返回一个SPSolution实例。这个级别还暴露了许多其它的属性和方法。
Deploying a Solution(部署解决方案)
下一步就是在一个或多个运行Windows SharePoint Services的Web前端服务器或应用服务器上部署解决方案。部署解决方案
有三种方案:
l 使用Stsadm.exe
l 使用Windows SharePoint Services 3.0对象模型
l 使用SharePoint管理中心站点
下面将详细介绍这三种方法。
使用Stsadm.exe
Stsadm.exe有个操作选项,deploysolution,这样可以通过命令行的方式部署解决方案。存储在解决方案存储中的解决方
案的名称是一个参数,指向网站集的URL也是其中一个参数。下面是一个例子:
|
stsadm -o deploysolution -name mysolution.wsp -url http://moss.litwareinc.com |
如果不使用这个参数指向一个网站集,还有另一个参数可选,这个参数会将这个解决方案包部署到服务器场中所有的可
用网站集中。这个参数是allcontenturls。
|
stsadm -o deploysolution -name mysolution.wsp -allcontenturls |
默认情况下,解决方案会被立即部署,但也可以使用time参数来计划部署。
allowgacdeployment和allowcaspolicies参数也很重要,后面会详细讨论。
简单来说,allowgacdeployment默认值为true,表示允许Windows SharePoint Services将组件部署到GAC中。allowcaspolicies
表示允许创建自定义代码访问安全(CAS)策略文件,并在指定的网站集的web.config文件中激活它。
Deploying a Solution via the Windows SharePoint Services 3.0 Object Model(使用WSS3对象模型部署)
在SPSolution级别,有两种方法编程实现解决方案的部署:Deploy和DeployLocal。两种方式都可以接收一个
SPWebApplication对象的集合,这些对象是在IIS上想要进行部署的目标Web应用程序集合。例如:
|
Collection<SPWebApplication> webapps = new Collection<SPWebApplication>(); SPWebApplication webapp = SPWebApplication.Lookup(new Uri("http://wss.litwareinc.com")); webapps.Add(webapp); |
两种方法都可以将包含在Web Part解决方案中的组件部署到GAC中。不同之处在于调用Deploy需要一个DateTime类型的参
数,指定进行部署解决方案的时间。

SharePoint solution scheduled for deployment

我做的实验J(尝试部署上篇文章中开发的helloworldwebpart)
代码如下:
|
SPSolution solution = SPFarm.Local.Solutions.Add(@"C:\HelloWorldWebPart.wsp"); Collection<SPWebApplication> webapps = new Collection<SPWebApplication>(); SPWebApplication webapp = SPWebApplication.Lookup(new Uri("http://mossweb:25655")); webapps.Add(webapp); solution.Deploy(DateTime.Now.AddMinutes(30), true, webapps, true); Console.WriteLine("Deploy Success:)"); |
使用Deploy方法的例子:
|
solution.Deploy(DateTime.Now.AddMinutes(5), true, webapps, true); |
使用DelopyLocal方法部署的例子:
|
solution.DeployLocal(true, webapps, true); |
Deploying a Solution via the SharePoint Central Administration Web Site(在SharePoint管理中心部署)
管理员在管理中心中导航到操作页面,在“全局配置”部分找到“解决方案管理”,打开后可以看到有处于未部署状态
的解决方案。其中可以看到刚才部署的helloworldwebpart。我将它的部署给取消了,所以它的状态是未部署。

点击解决方案的名称后会转到部署该解决方案配置的页面。

点击“部署解决方案”。

这里可以设置是立即部署还是指定时间计划部署。并可以在部署位置中进行选择。
当解决方案中的manifest文件需要将一些组件部署到GAC中时管理页面会显示一个警告提示给管理员。
Manually Packaging a Windows SharePoint Services Solution(手工打包WSS解决方案)
Windows SharePoint Services的Developer经常手工创建SharePoint解决方案包。通常为如下情况:
l 不在GAC而在一个应用程序中部署.NET组件。
l 在部署过程中必须添加代码访问安全权限。
l 使用不同于默认Feature文件夹的名字。
l 本地化Windows SharePoint Services解决方案。
l 关联Windows SharePoint Services解决方案中特定类型和Feature Event Handler,例如Web Part解决方案。
l 在解决方案包中添加资源(XML文件,图片等等)。
手工创建解决方案文件,需要经过以下几个基本步骤:
l 将解决方案中需要的各个文件搜集到一个文件夹内。关于这个怎么做没有什么具体的指导,但是最佳实践是将不同类
型的解决方案文件分别放到他们自己的子文件夹中。
l 创建一个.ddf文件(Diamond Directive File的缩写),它定义了Windows SharePoint Services解决方案文件的结构。这个文
件中包含了解决方案中各个文件的列表并以此来决定输出的.wsp文件。
l 在命令行中运行MakeCab.exe来生成解决方案文件,.ddf文件作为输入,输出.wsp文件。
下面这个简短的Walkthrough演示了这些步骤:
Walkthrough: Generating and Deploying a Custom Web Part Solution Package(生成并部署自定义Web Part解决方案
包)
Windows SharePoint Services提供给开发人员一个选项,当Feature安装、激活、停用、卸载的时候可以执行自定义的代码。
例如一个依赖于任务列表的Web Part。当这个Web Part的Feature激活的时候,自定义代码会检查任务列表是否是当前站点所有
列表中的一个。如果不是,代码会创建这个列表,然后在Feature被停用的时候移除这个列表。代码被包装在.NET组件中并被
Feature Receiver Assembly引用。
这个Walkthrough假设已经创建好一个Web Part项目,在上篇文章中提到的Development Tools and Techniques for Working
with Code in Windows SharePoint Services 3.0 (Part 1 of 2)。当Web Part Feature安装、激活、停用、卸载的时候Windows
SharePoint Services触发异步事件。你可以在一个.NET组件中操作这些事件,需要创建一个继承
Microsoft.SharePoint.SPFeatureReceiver抽象类的类。下面是类的例子和4类操作示例。
|
using System; using System.Collections.Generic; using System.Text; using Microsoft.SharePoint; namespace MSDN.Samples { public class MSDNTaskListEventHandler : SPFeatureReceiver { public override void FeatureActivated(SPFeatureReceiverProperties properties) { SPSite sitecollection = (SPSite)properties.Feature.Parent; SPWeb web = sitecollection.RootWeb; try { // -- Check if list exists. SPList list = web.Lists["MSDN Tasks"]; } catch { // -- If not, create the list. web.Lists.Add("MSDN Tasks", "A custom list", SPListTemplateType.Tasks); } } public override void FeatureDeactivating(SPFeatureReceiverProperties properties) { SPSite sitecollection = (SPSite)properties.Feature.Parent; SPWeb web = sitecollection.RootWeb; try { // -- Check if list is there, and if so, delete it. SPList list = web.Lists["MSDN Tasks"]; web.Lists.Delete(list.ID); } catch (Exception ex) { } } public override void FeatureInstalled(SPFeatureReceiverProperties properties) { } public override void FeatureUninstalling(SPFeatureReceiverProperties properties) { } } } |
编码工作会产生两个组件。一个组件是提供Web Part代码的。另一个组件包含了上面的代码。写入的时候,Visual Studio
Extensions for Windows SharePoint Services 3.0不允许连接到Web Part Feature定义文件的Event Handler。此外,Web Part组件必须
部署在一个应用程序中,而不是GAC中。因此,需要手工创建解决方案包。
注意:
以下步骤中,组织不同文件或组件的方式也适合你自己的方式并可作为Visual Studio 2005解决方案的一部分。
创建一个有两个子文件夹的文件夹来搜集所有的解决方案组件。第一个子文件夹存储组件(命名为Assemblies),第二个
子文件夹存储定义Feature的不同的XML文件(命名为Features)。将Web Part和Event Handler组件拷贝到Assemblies文件夹中。
在Features文件夹下为每一个包含在SharePoint解决方案中的Feature创建一个子文件夹。这个Walkthrough仅有一个
Feature。假设命名为MSDNTaskCreator;Features文件夹下就会包含一个名为MSDNTaskCreator的子文件夹。在
MSDNTaskCreator文件夹下添加一个名为feature.xml的文件,输入以下内容:
|
<Feature Title="MSDNTaskCreator" Id="55312295-a323-4333-b875-1bbe8ef7fd04" Description="Small Web Part creating a custom task item" Version="1.0.0.0" Scope="Site" Hidden="FALSE" ReceiverAssembly="MSDNFeatureEventhandlers, Version=1.0.0.0, Culture=neutral, PublicKeyToken=5e5a470a5445a8f1" ReceiverClass="MSDN.Samples.MSDNTaskListEventHandler" DefaultResourceFile="core" xmlns="http://schemas.microsoft.com/sharepoint/"> <ElementManifests> <ElementManifest Location="elementManifest.xml" /> <ElementFile Location="MSDNTaskCreator.webpart" /> </ElementManifests> </Feature> |
这个XML与使用Visual Studio Extensions for Windows SharePoint Services 3.0生成的XML有何不同呢?在这个feature.xml文件中
添加了两个附加的特性:
l ReceiverAssembly包含Event Handler代码的强命名.NET组件。
l ReceiverClass存储组件中类的名称。
需要在根文件夹(与Features文件夹同一级别)创建一个manifest文件。它与使用Visual Studio Extensions for Windows
SharePoint Services 3.0生成的内容不同。内容如下:
|
<Solution SolutionId="d63d0395-96a4-449e-83ce-5f7239bbd3ad" xmlns="http://schemas.microsoft.com/sharepoint/" > <FeatureManifests> <FeatureManifest Location="MSDNTaskCreator\feature.xml" /> </FeatureManifests> <Assemblies> <Assembly Location="MSDNTaskCreator.dll" DeploymentTarget="WebApplication" > <SafeControls> <SafeControl Assembly="MSDNTaskCreator, Version=1.0.0.0, Culture=neutral, PublicKeyToken=9f4da00116c38ec5" Namespace="MSDN.Samples" TypeName="MSDNTaskCreator" Safe="True" /> </SafeControls> </Assembly> <Assembly Location="MSDNFeatureEventHandlers.dll" DeploymentTarget="GlobalAssemblyCache" /> </Assemblies> </Solution> |
可以注意到Feature的名字中不再包含GUID。第一个Assembly元素具有一个名为DeploymentTarget的特性,值为
WebApplication而不是GlobalAssemblyCache。第二个Assembly元素是包含Event Handler代码的.NET组件,部署在GAC中。
现在可以创建.ddf文件了,名字为wsp_structure.ddf。直接在部署文件夹(和Features文件夹同一级别)中创建。首先添加
以下头部信息。
|
; ; *** .ddf file for generating SharePoint solution. ; .OPTION EXPLICIT ; Generate errors .Set CabinetNameTemplate=MSDNTaskCreatorWebPart.wsp .set DiskDirectoryTemplate=CDROM ; All cabinets go in a single directory .Set CompressionType=MSZIP;** All files are compressed in cabinet files .Set UniqueFiles="ON" .Set Cabinet=on .Set DiskDirectory1=Package |
其中可以清楚地看到两个动态的部分:
l CabinetNameTemplate设置为SharePoint解决方案文件的名称(MSDNTaskCreatorWebPart.wsp)
l DiskDirectory1设置为Package。生成.wsp文件包含进解决方案文件。
.ddf文件的第二部分定义了包的结构。
|
; *** the manifest file manifest.xml manifest.xml ; *** the feature files Features\MSDNTaskCreator\feature.xml MSDNTaskCreator\feature.xml Features\MSDNTaskCreator\elementManifest.xml MSDNTaskCreator\elementManifest.xml Features\MSDNTaskCreator\MSDNTaskCreator.webpart MSDNTaskCreator\MSDNTaskCreator.webpart ; *** the assemblies Assemblies\MSDNTaskCreator.dll MSDNTaskCreator.dll Assemblies\MSDNFeatureEventhandlers.dll MSDNFeatureEventhandlers.dll |
.ddf文件作为MakeCab.exe命令的输入,这个工具可以在安装Microsoft Cabinet SDK后获得(C:\Program Files\Microsoft
Cabinet SDK),也是Smart Devices SDK的一部分(C:\Program Files\Microsoft Visual Studio 8\SmartDevices\SDK\SDKTools)。
注意:
你可以在这个地方下载Microsoft Cabinet SDK,Internet Client SDK: Microsoft Cabinet SDK
为了更容易的打包和部署,创建一个批处理文件,内容如下:
|
set MakeCabTool=c:\Program Files\Microsoft Visual Studio 8\SmartDevices\SDK\SDKTools\makecab.exe set SPAdminTool=%CommonProgramFiles%\Microsoft Shared\web server extensions\12\BIN\stsadm.exe "%MakeCabTool%" /f wsp_structure.ddf "%SPAdminTool%" -o addsolution -filename package\ MSDNTaskCreatorWebPart.wsp "%SPAdminTool%" -o deploysolution -name MSDNTaskCreatorWebPart.wsp -immediate -allowGACDeployment -url http://moss.litwareinc.com |
前两行设置MakeCab和Stsadm命令行工具的路径。然后,下一行是创建解决方案包。
|
"%MakeCabTool%" /f wsp_structure.ddf |
执行后,MSDNTaskCreatorWebPart.wsp会出现在Package文件夹中。下一行是将MSDNTaskCreatorWebPart.wsp添加到服务
器场中的解决方案存储中。
|
"%SPAdminTool%" -o addsolution -filename package\ MSDNTaskCreatorWebPart.wsp |
批处理文件的最后一行是将解决方案部署到一个指定的站点集中。也可以在管理中心操作选项卡下的解决方案管理页
面,或者打开Windows命令提示符来执行下面的命令。
|
"%SPAdminTool%" -o deploysolution -name MSDNTaskCreatorWebPart.wsp -immediate -allowGACDeployment -url http://moss.litwareinc.com |
(注:上一篇文章并没有创建这个Web Part,所以如果需要实验需要自己创建相应的Web Part。)
Web Part Feature已经被安装,但是并没有被激活。为了激活这个Feature,打开网站集功能页面,找到这个Featuer点击激
活按钮即可。由于激活这个Feature时会触发FeatureActivated事件并执行相应的代码,会创建一个MSDN Task列表。停用
Feature的时候会将任务列表从网站集的根站点中删除。
代码访问安全和Web Part解决方案
在很多环境中,管理员不允许自定义代码组件具有全部权限。管理员可能会选择将解决方案部署到Web应用程序的bin文
件夹中,bin文件夹的权限可以被特殊指定。下面会有相关步骤。
我们使用一个小Web Part来演示这些,这个Web Part连接到一个Web Service然后返回指定城市的天气。如果使用Visual
Studio Extensions for Windows SharePoint Services 3.0创建并部署Web Part,.NET组件会被部署在GAC中。在开发计算机上你不能
通过配置解决方案的生成过程和部署来干预其中的操作。由于Web Part被部署在了GAC中,Web Part就获取了全部的权限,所
以连接Web Service也就不会出现安全问题。
这种场景是管理员允许你将Web Part组件部署在GAC中。但是,现在要求你的Web Part必须在IIS的Web应用程序bin文件夹
下,并且不能被共享也不能获取全部的权限。作为Web Part开发人员,需要依赖管理员在web.config文件中配置的信任级别。
最后你会碰到和这个天气的Web Part同样的安全问题,下面的Walkthrough会描述。
Walkthrough: Code Access Security and Web Part Solutions(代码访问安全和Web Part解决方案)
假设已经有了一个Web Service来返回不同城市的天气情况,然后有一个Web Part来显示这些信息。

Web Part consuming a weather Web service
在IIS的单独Web应用程序中部署Web Part而不是在GAC中(如果使用Visual Studio Extensions for Windows SharePoint Services
3.0来部署),可以在manifest文件中来强制修改这个设置。设置Assembly元素的DeploymentTarget特性值可以达到这个目的,
将GlobalAssemblyCache修改为WebApplication,如下:
|
<Solution SolutionId="1de3b0fc-78e9-4fe6-ae63-51ea50109982" xmlns="http://schemas.microsoft.com/sharepoint/" > <FeatureManifests> <FeatureManifest Location="WeatherWebPart\feature.xml" /> </FeatureManifests> <Assemblies> <Assembly Location="WeatherWebPart.dll" DeploymentTarget="WebApplication" > <SafeControls> <SafeControl Assembly="WeatherWebPart, Version=1.0.0.0, Culture=neutral, PublicKeyToken=9f4da00116c38ec5" Namespace="WeatherWebPart" TypeName="WeatherWebPart" Safe="True" /> </SafeControls> </Assembly> </Assemblies> </Solution> |
下一步,必须手工来创建Windows SharePoint Services解决方案。下面的.ddf文件显示如何打包不同的组件来构建Web Part
解决方案。
|
.OPTION EXPLICIT .Set CabinetNameTemplate=WeatherWebPart.wsp .set DiskDirectoryTemplate=CDROM ; All cabinets go in a single directory .Set CompressionType=MSZIP ;** All files are compressed in cabinet files .Set UniqueFiles="OFF" .Set Cabinet=on .Set DiskDirectory1=Package manifest.xml manifest.xml assemblies\WeatherWebPart.dll WeatherWebPart.dll Features\WeatherWebPart\feature.xml WeatherWebPart\feature.xml Features\WeatherWebPart\elementManifest.xml WeatherWebPart\elementManifest.xml Features\WeatherWebPart\WeatherWebPart.webpart WeatherWebPart\WeatherWebPart.webpart |
然后调用MakeCab.exe,以这个.ddf文件作为输入生成Windows SharePoint Services解决方案。
|
makecab.exe /f WeatherWebPart.ddf |
在Windows命令提示符下输入以下命令可以将解决方案添加到解决方案存储中。
|
stsadm.exe -o addsolution -filename package\weatherwebpart.wsp |
现在,打开管理中心的解决方案管理。在这里可以部署你的解决方案。
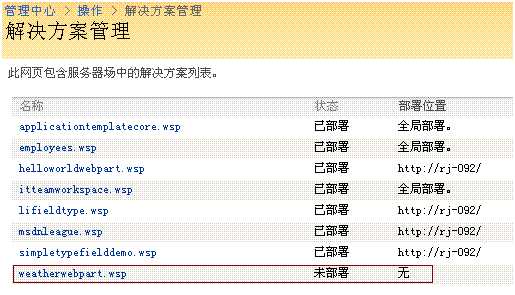
点击打开后,进入如下页面

再点击部署解决方案可以看到部署配置

可以看到这里不像上次一样出现了警告,因为manifest文件中的描述不需要将组件部署到GAC中。继续将解决方案部署到
你IIS的Web应用程序中。去IIS中Web应用程序关联的物理地址上确认一下是否组件在bin文件夹下
(Inetpub\wwwroot\wss\VirtualDirectories\IIS Web application name)。
假设在web.config中trust level(信任级别)没有设置为Full,那么在运行Web Part的时候会出现如下的错误。
MSDN的截图

Weather Web Part deployed in private application folder
我的截图(添加时就出现错误了,上面那个应该是已经添加好了)
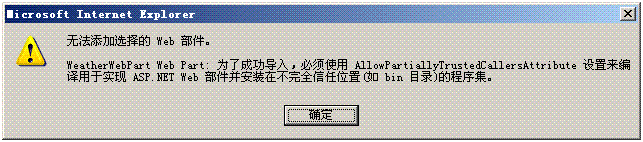
这时在Web Part项目的Assembly.cs文件中添加System.Security命名空间的引用并在下面添加
[assembly: AllowPartiallyTrustedCallers()]
即可解决这个错误问题。
然后点击按钮开始调用Web Service,这时就会出现上面的错误。

继续正文:
Weather Web Part部署在了单独的Web应用程序文件夹中引起了这个异常。但是,我们不希望有这个问题。打开Windows
事件查看器(在管理工具中)会找到错误的详细信息:“Request for the permission of type 'System.Net.WebPermission, System,
Version=2.0.0.0, Culture=neutral, PublicKeyToken=b77a5c561934e089' failed.”
我做的实验在系统事件查看器中的错误信息“请求“System.Security.Permissions.EnvironmentPermission, mscorlib,
Version=2.0.0.0, Culture=neutral, PublicKeyToken=b77a5c561934e089”类型的权限已失败。”这是因为WebService部署在了我本地
计算机上。将WebService部署在其他的局域网机器中就会出现文章中的错误信息“请求“System.Net.WebPermission, System,
Version=2.0.0.0, Culture=neutral, PublicKeyToken=b77a5c561934e089”类型的权限已失败。”。
换句话说,Web Part没有被授予与Web Service进行通话的权限。如何解决呢?一种方法是在web.config文件中提升trust
level的级别,但是这是比较危险的。因为这时所有在这个单独应用程序下部署的组件都具有了如同将组件部署在GAC中的权限
一样。更好的解决方案是manifest文件中描述好在SharePoint页面中正确运行Web Part需要的权限。部署解决方案的管理员会接
收到一个通知,请求的权限未被许可,这样他们可以决定是否授予这些权限。在执行的时候,策略文件会对其进行拷贝并激
活,Web Part请求的权限也会被添加进来。这个新的策略文件会在web.config文件中被激活。现在我们可以来详细实验这些步
骤。
现在有一条可用的信息了。已经具有请求权限的详细信息了(前面提到的)。另一个信息是组件的full public key blob。可
以通过打开Visual Studio 2005命令提示符并运行如下命令来获取这个信息。
|
Secutil.exe -hex -s WeatherWebPart.dll > keyblob.txt |
这样会生成一个文本文件,其中包含了组件的full public key。使用的secutil命令是.NET Framework SDK中的一部分。
然后,打开manifest文件,添加CodeAccessSecurity元素(位于FeatureManifests元素和Assemblies元素之间)。
|
<CodeAccessSecurity> <PolicyItem> <PermissionSet class="NamedPermissionSet" version="1" Description="My webpart's permission set"> <IPermission class="AspNetHostingPermission" version="1" Level="Minimal"/> <IPermission class="SecurityPermission" version="1" Flags="Execution" /> <IPermission version="1" Unrestricted="True" class="Microsoft.SharePoint.Security.SharePointPermission, Microsoft.SharePoint.Security, Version=12.0.0.0, Culture=neutral, PublicKeyToken=71e9bce111e9429c" /> <IPermission class="System.Net.WebPermission, System, Version=2.0.0.0, Culture=neutral, PublicKeyToken=b77a5c561934e089" Unrestricted="True" version="1"> <ConnectAccess> <URI uri="$OriginHost$"/> <URI uri="http://moss:95/webservices/.*"/> </ConnectAccess> </IPermission> </PermissionSet> <Assemblies> <Assembly Name="WeatherwebPart" Version="1.0.0.0" PublicKeyBlob="0x00240000048000009400000006020000002400005253413100040000010001000DAF8ED8D945CD2ABB </Assemblies> </PolicyItem> </CodeAccessSecurity> |
上面的代码中,IPermission元素和Assembly元素比较重要。首先,IPermission元素请求与Web Service通话的权限(假设这
个Web Service架设在http://moss:95的IIS Web应用程序上)。然后,Assembly元素包含了组件的详细信息:name,version和
blob,通过刚才使用secutil.exe命令生成的keyblob.txt文件中获取。
修改好manifest文件后,需要重新生成Windows SharePoint Services解决方案并重新将其添加到解决方案存储中。当部署解
决方案的时候,在页面下方会出现一个警告,显示解决方案包含代码访问安全策略,继续部署的话会使其生效。如果管理员
没有看到这样的问题,可以继续部署,然后Web Part就可以使用了。

Deploying a Web Part solution with a code access security policy
如果你按照上面的步骤正确操作后,这个Weather Web Part会再次正常工作。在后台,web.config文件中会有一个新的
SecurityPolicy元素实例,如下:
|
<securityPolicy> <trustLevel name="WSS_Medium" policyFile="D:\Program Files\Common Files\Microsoft Shared\Web Server Extensions\12\config\wss_mediumtrust.config" /> <trustLevel name="WSS_Minimal" policyFile="D:\Program Files\Common Files\Microsoft Shared\Web Server Extensions\12\config\wss_minimaltrust.config" /> <trustLevel name="WSS_Custom" policyFile="D:\Program Files\Common Files\Microsoft Shared\Web Server Extensions\12\config\wss_custom_wss_minimaltrust.config" /> </securityPolicy> |
一个新的level——WSS_Custom——在web.config文件中激活。
Windows SharePoint Services 3.0也提供管理SharePoint解决方案。你可以从解决方案存储中收回解决方案、移除解决方案,
并有很多种升级解决方案的方法。
Retracting Solutions(收回解决方案)
当你收回SharePoint解决方案的时候,Windows SharePoint Services会将解决方案组件从部署的物理位置上移除。收回解决
方案有三种方法:
l 使用Stsadm.exe
l 使用管理中心
l 使用Windows SharePoint Services对象模型
下面具体描述这些方法。
Using Stsadm.exe(使用命令行工具Staadm.exe)
retractsolution选项可以接收很多的参数。解决方案名称是必须参数。可选项,可以指定IIS Web Applicaion和网站集的
URL,或者使用allcontenturls参数将解决方案从所有部署的地方移除。time参数可以计划收回解决方案的job定义。也可以使用
immediate参数立刻执行解决方案的部署。
下面是一个立刻收回解决方案的例子。
|
stsadm.exe –o retractsolution –name hellowebpart.wsp -immediate |
Using Central Administration(使用管理中心)
解决方案在解决方案存储中可用后,可以从管理中心中的解决方案管理中访问它。在这里,你可以开始收回解决方案的
操作。

Using the Windows SharePoint Services 3.0 Object Model(使用Windows SharePoint Services 3.0对象模型)
收回解决方案的最后一种方法就是通过Windows SharePoint Services 3.0对象模型。SPSolution类暴露了Retract和
RetractLocal两个方法。可以使用Retract来计划收回解决方案。两个方法都提供从所有内容Web应用程序移除或从一个单独的
中移除(使用SPWebApplication对象)。下面的例子是从本地计算机的所有IIS Web Application中收回一个Web Part解决方案。
|
SPSolution solution = SPFarm.Local.Solutions["hellowebpart.wsp"]; solution.RetractLocal(); |
Retracting Web Part Solutions(收回Web Part解决方案)
你可以使用前面提到的方法来收回提供Web Part的解决方案。但是,需要注意收回Web Part并不会将.webpart实例从Web
Part库中删除。因此,Web Part仍然会留在添加Web部件的对话框中,用户仍然可以看到它。当用户将这个Web Part添加到页
面的时候会出现错误,因为Web Part不再注册为一个SafeControl,而且组件也从本地的bin文件夹或GAC中删除了。这时也会注
意到由于收回了Web Part解决方案而导致页面中的所有这个Web Part的实例不能继续工作而出现错误。可以通过停用并从Web
Part库中删除.webpart文件来解决。
Retracting Schema-based Solutions(收回基于Schema的解决方案)
当你收回基于Schema的解决方案时要十分小心,例如自定义列表定义。可能存在很多实例,你很可能不想破坏他们。因
此,最佳实践是将这类型的解决方案以Feature的方式部署,然后停用Feature的时候就可以使得用户不可见,这要比收回解决
方案更好一些。下面是一个小的Walkthrough来演示升级解决方案,文章后面会演示其他的不同步骤。
Removing Windows SharePoint Services Solutions(移除Windows SharePoint Services解决方案)
Windows SharePoint Services解决方案部署中如果不再需要,可以将它从解决方案存储中移除。有三种方法:
l 使用Stsadm.exe
l 使用管理中心
l 使用Windows SharePoint Services对象模型
下面具体描述这些方法。
Using Stsadm.exe(使用命令行工具Staadm.exe)
管理员可以使用命令行工具Stsadm.exe,然后执行deletesolution选项。name参数是解决方案的名称。使用下面的命令来
移除解决方案。
|
stsadm.exe –o deletesolution –name hellowebpart.wsp |
Using Central Administration(使用管理中心)
在解决方案管理页面,在操作选项卡下面,移除一个不再部署的解决方案。至需要点解决方案然后使用工具条中的删除
解决方案按钮即可。
Using the Windows SharePoint Services 3.0 Object Model(使用Windows SharePoint Services 3.0对象模型)
你也可以在SPSolutionCollection调用Remove方法来删除解决方案。这个集合可以通过SPFarm类来得到,无论是本地Farm还
是加入的Farm。下面的代码是从解决方案存储中删除一个解决方案。
|
SPFarm.Local.Solutions.Remove("hellowebpart.wsp"); |
Upgrading Solutions(升级解决方案)
管理SharePoint解决方案的最后一项就是升级部署的解决方案到一个新的版本。需要明白很重要的一点是在Windows
SharePoint Services解决方案级别并没有显示出版本。实际的版本在解决方案的组件级别(Feature,Assemblies等等)。
下图显示了如何完成升级解决方案。

Upgrading the SharePoint solution
假设MySolution.wsp的1.0.0.0版本已经添加到解决方案存储中并部署到一个或多个Web Application中。第二个版本的
Windows SharePoint Services解决方案必须具有和第一个版本相同的SolutionID才能保证升级成功。升级至第二个版本通过调用命
令行工具Stsadm.exe和upgradesolution操作来完成。在解决方案存储中,需要提供升级解决方案的名称,解决方案新的版本,
然后指定是立刻升级还是计划时间升级。你也需要指定操作部署到GAC并允许自定义代码访问安全策略。
Guidelines for Upgrading SharePoint Solutions(升级SharePoint解决方案指南)
当讨论SharePoint解决方案升级的指南时,我们必须知道基于代码解决方案(例如Web Part)和基于Schema解决方案(例
如自定义列表定义)之间的区别。
l Upgrading Web Part solutions (升级Web Part解决方案)
Web Part就是基于代码的解决方案。升级基于代码的解决方案通常包括在IIS Web Application或GAC中替换需要进行升
级版本的组件。

Upgrading Web Parts
如果你没有改变.NET组件的版本号,升级过程会很平稳。现在不考虑版本号没有改变的情况,你需要确定元数据存
储并可用,例如在Web Part注册的Web Part库表单中就不需要进行修改。所有已存在的Web Part实例均会自动更新。
如果组件的强命名变换了,那么升级就会比较复杂一些,例如版本号从1.0.0.0变为2.0.0.0。如果网站集中还没有创建
Web Part实例,那么你不会碰到问题。直接更新Web Part库中的.webpart文件,并将新版的组件放到bin文件夹或GAC中。
页面中再添加新的Web Part就会更新并具备了新的工能。
尽管如此,如果页面上还存在旧版本的Web Part实例用户就会收到错误信息,这时也需要做一些升级工作。这些组件
仍然在查找第一版本的组件。当使用upgradesolution操作,老版本的组件实际上被删掉了,在web.config文件中的注册也
被删掉了。
所以你需要完成两部分的工作,更新Web Part解决方案的新版本组件,更新运行SharePoint网站的IIS Web Application
的web.config文件。更新web.config有两个工作,找到第一版本组件的SafeControl元素,第二,再有请求老版本组件的时候
用bindingRedirect命令ASP.NET绑定第二版本的组件。
Walkthrough: Upgrading a Web Part Project(升级Web Part项目)
To upgrade a Web Part project
开始创建了一个小的Web Part Project输出显示一个字符串,例如,版本信息。你可以使用Visual Studio 2005 Extensions
for Windows SharePoint Services 3.0,但你必须手工进行打包部署。项目的结构大概如下所示。所有前面讨论过关于
SharePoint 解决方案手工打包的技术在这里使用到了。

Project structure for a Web Part solution
部署解决方案并在网站集中激活Feature后,就可以将这个Web Part添加到页面中了。

First version of the Web Part
假设有升级Web Part的请求。用户需要在Web Part中看到更明亮的字符串。修改Web Part输出显示的内容,然后将
Web Part的版本在项目属性中由1.0.0.0修改为2.0.0.0。生成项目。
打开.webpart文件然后在type元素中更新版本号。
生成项目并重新生成SharePoint解决方案。使用下面的命令来更新解决方案。

Web Part displaying error and rendering correctly
解决显示的问题:
在web.config文件中SafeControl元素中添加1.0.0.0版本的注册。
|
<SafeControl Assembly="VersionDemo, Version=1.0.0.0, Culture=neutral, PublicKeyToken=9f4da00116c38ec5" Namespace="MSDN.Samples" TypeName="VersionDemo" Safe="True" /> |
在web.config文件assemblyBinding下添加重定向的元素。
|
<runtime> <assemblyBinding xmlns="urn:schemas-microsoft-com:asm.v1"> <dependentAssembly> <assemblyIdentity name="VersionDemo" publicKeyToken="9f4da00116c38ec5" culture="neutral" /> <bindingRedirect oldVersion="1.0.0.0" newVersion="2.0.0.0" /> </dependentAssembly> … </assemblyBinding> </runtime> |
刷新包含两个版本Web Part实例的页面。老版本和新版本的同时可用了。

l Upgrading Schema-Based Solutions(升级基于Schema的解决方案)
基于Schema的一个例子就是自定义列表定义。一般升级这类基于Schema定义的解决方案,部署一个新版本的Feature
然后将旧版本的对用户隐藏起来。这种方法,实例不会被破坏,新实例会使用升级的定义。
Walkthrough: Upgrading Schema-Based Solutions
现在找到上篇文章我们定义部署的Employees列表模板SharePoint解决方案。假设用户已经创建了一些列表实例。这样
会造成一些改变,或者很有可能要完全删除列表定义。不能从SharePoint的计算机上简单的删除掉解决方案文件。对于管
理员和用户你需要保证它们继续工作但并不可见。这种方法也是前面提到的收回解决方案的一种方法。
下面是完成升级基于Schema解决方案的步骤。
To upgrade a schema-based solution
打开包含列表定义解决方案组件的文件夹,然后打开feature.xml文件。
将Feature元素下的Hidden特性设置为TRUE。
|
<Feature Id="{489C77F1-B064-408e-9B85-029A33BDF9D7}" Title="Employees" Description="This feature provides support for creating an Employee List." Version="1.0.0.0" Scope="Web" Hidden="TRUE" xmlns="http://schemas.microsoft.com/sharepoint/"> <ElementManifests> <ElementManifest Location="ListTemplates\Employees.xml"/> <ElementFile Location="Employees\allitems.aspx" /> <ElementFile Location="Employees\dispform.aspx" /> <ElementFile Location="Employees\editform.aspx" /> <ElementFile Location="Employees\newform.aspx" /> <ElementFile Location="Employees\schema.xml" /> </ElementManifests> </Feature> |
这样会使这个Feature从管理页面中隐藏起来,但是我们需要将它从创建页面中也隐藏起来。
打开employees.xml文件并添加Hidden特性。
|
<Elements xmlns="http://schemas.microsoft.com/sharepoint/"> <ListTemplate Name="Employees" Type="10100" BaseType="0" OnQuickLaunch="TRUE" SecurityBits="11" DisplayName="Employees" Description="Employees List Type" Hidden="TRUE" Image="/_layouts/images/CHNGCOL.GIF"/> </Elements> |
如果你仅想收回解决方案,上面的步骤就足够了。
如果你想用一个新的列表定义来替换以前的,需要添加下面的解决方案包:
l 新版的Feature(包含所有的相关文件)标识为不同的GUID。
l 一个扩展的manifest文件,包括老版本和新版本的安装步骤。
l 一个扩展的.ddf文件,包含完整的新Feature的打包文件和以前版本的.wsp文件。
然后需要重新创建SharePoint解决方案文件,并使用前面提到的Stsadm命令的upgradesolution操作部署它。
Windows SharePoint Services世界中的解决方案的概念对Developer和管理员来说是十分重要的。Developer有很多种建立和
扩展SharePoint站点的方法,但必须打包解决方案组件成SharePoint解决方案文件,然后将它们提供给管理员。管理员可以通过
一些操作来将解决方案提供给SharePoint站点的用户。这篇文章讨论了从解决方案管理中心中将解决方案部署到Web前端服务
器和应用服务器的新的操作。也讨论了维护、升级部署解决方案。
Patrick Tisseghem is a Microsoft Office SharePoint Server MVP, and is highly focused on Windows SharePoint Services 3.0 and
the Office SharePoint Server 2007. He created and delivered the ISV-focused early adopter material for Microsoft Redmond for the
latest version of SharePoint and has toured many countries with his developer-focused workshops. He is a frequent speaker at major
Microsoft conferences such as TechEd and SharePoint Connections, and is the author of numerous white papers published on MSDN.
He is also the author of a book titled Inside MOSS 2007, published by Microsoft Press. More information about Patrick can be found on
his blog.
Windows SharePoint Services Developer Center
SharePoint Server Developer Portal
Microsoft Office Developer Center
原文地址:

