
Shiro
上一篇博客介绍SpringBoot:集成SpringSecurity 地址:https://www.cnblogs.com/1693977889zz/p/14584718.html
这篇文章主要介绍一个强大且以用的Java 安全框架 Shiro。Shiro拥有易于理解的API,可以很轻松快捷的搭建应用程序,它没有SpringSecurity的功能强大,但是执行身份验证、授权、密码和会话管理,web集成,缓存它都能做。下面我们来一起学习一下吧:
- Shrio 官网 https://shiro.apache.org/
What is Apache Shiro?
Apache Shiro is a powerful and easy to use Java security framework that offers developers an intuitive yet comprehensive solution to authentication, authorization, cryptography, and session management.
In practical terms, it achieves to manage all facets of your application’s security, while keeping out of the way as much as possible. It is built on sound interface-driven design and OO principles, enabling custom behavior wherever you can imagine it. But with sensible defaults for everything, it is as “hands off” as application security can be. At least that’s what we strive for.
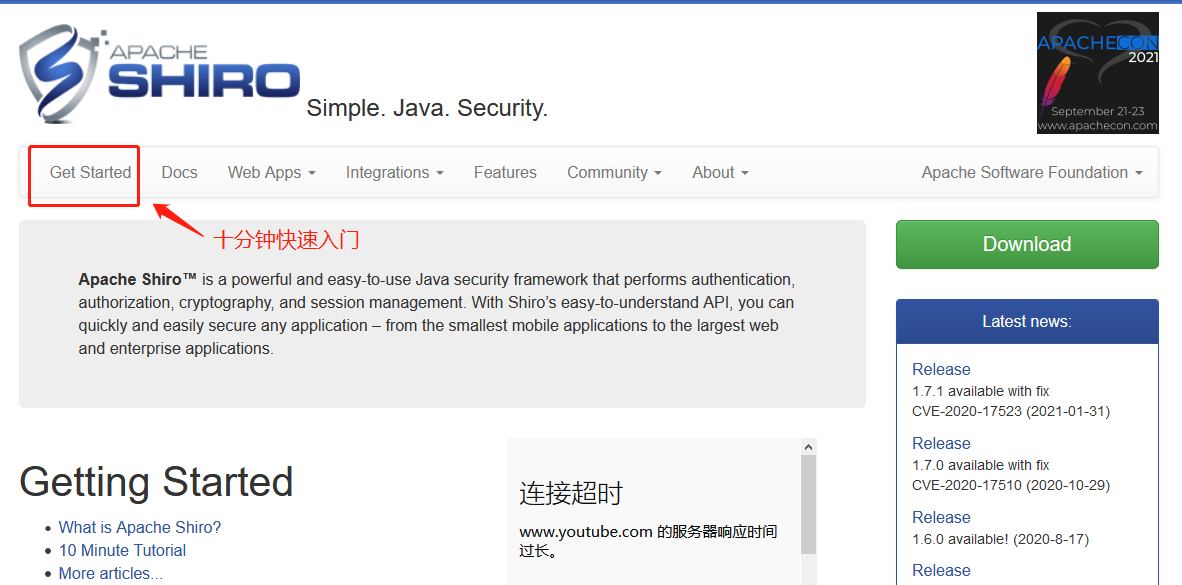
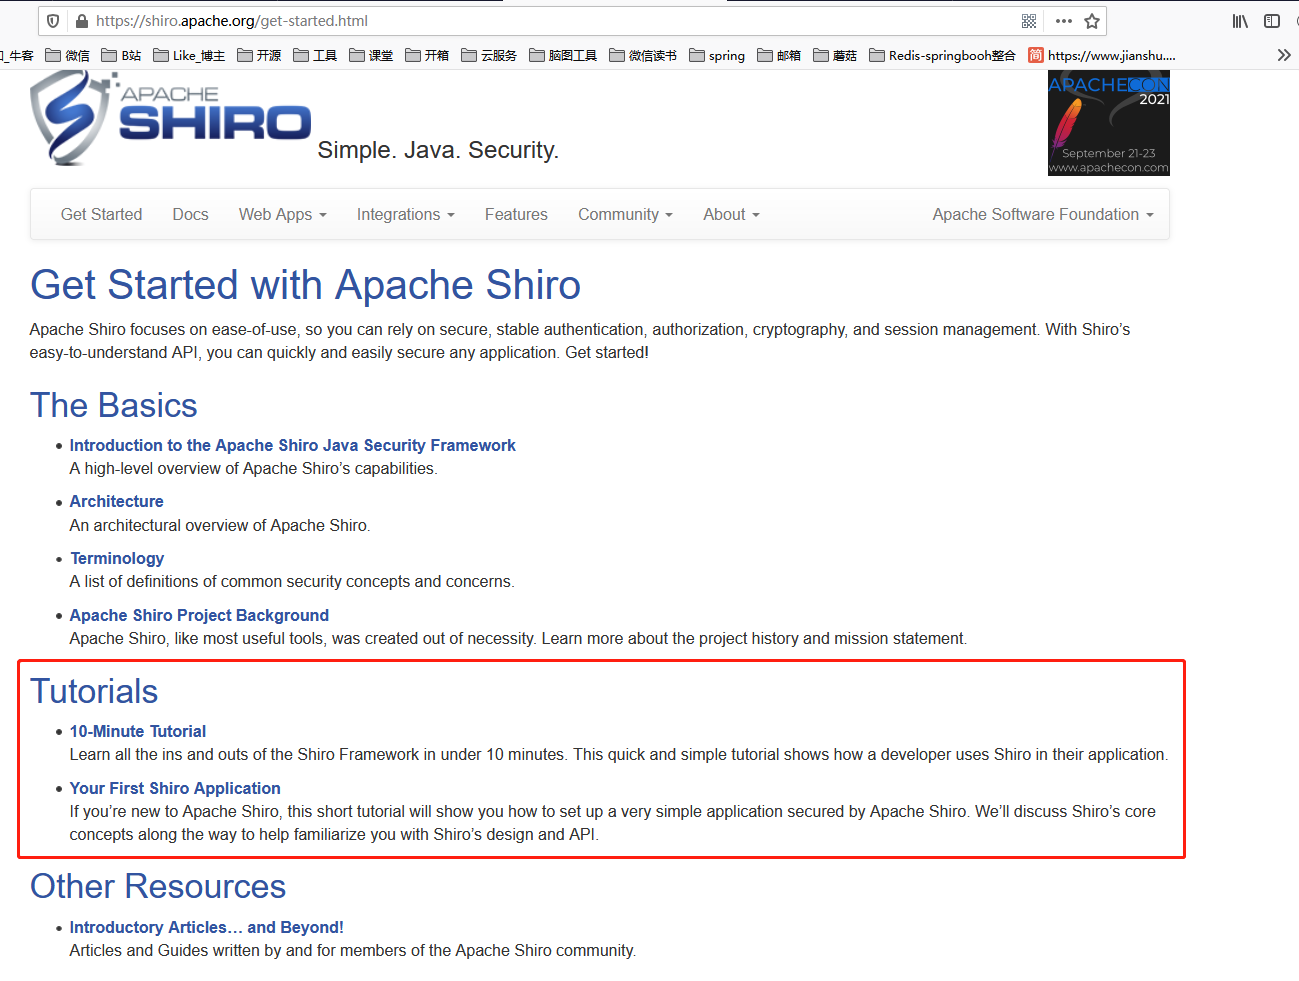
- Shiro 十分钟快速入门 https://shiro.apache.org/10-minute-tutorial.html
Mote

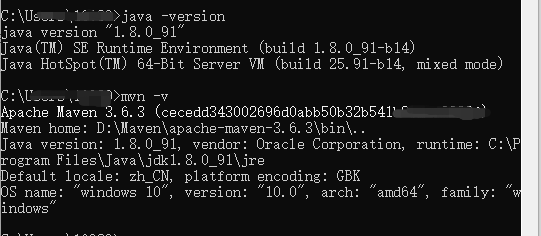
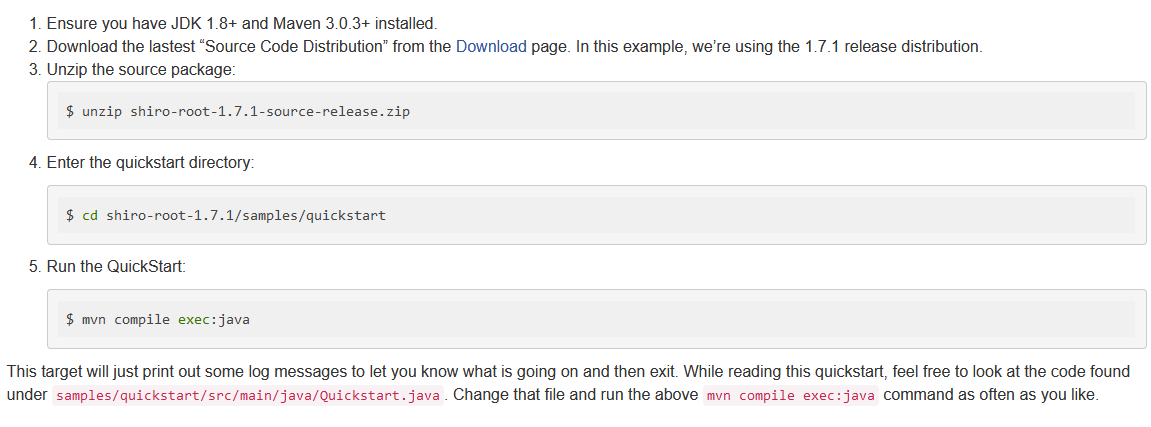
1.确定环境:JDK 1.8+ and Maven
2.The source can be cloned anonymously from Git with this command:(去 github 下载)
git clone https://github.com/apache/shiro.git
git checkout shiro-root-1.7.1 -b shiro-root-1.7.1
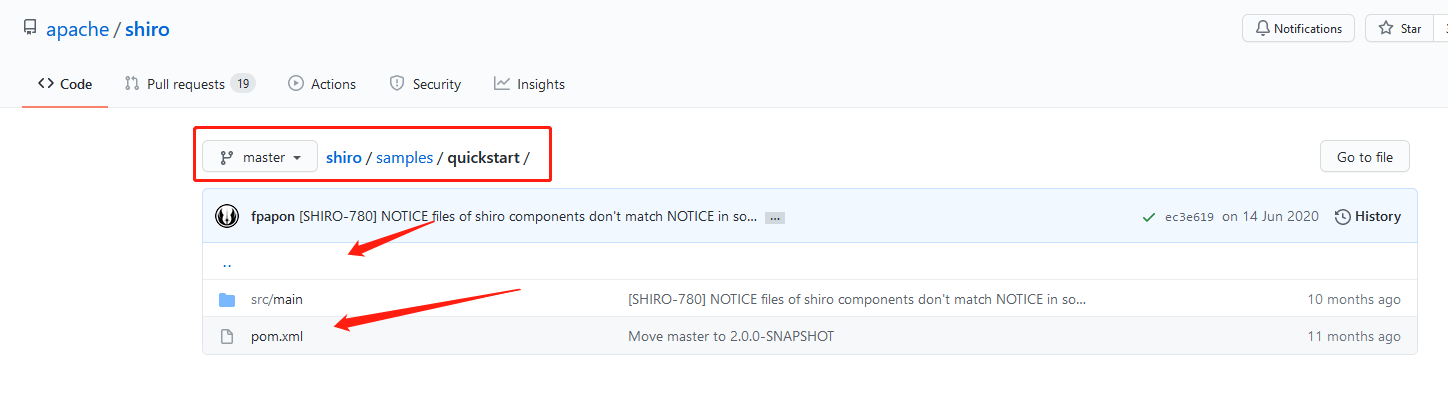
3.found under samples/quickstart/src/main/java/Quickstart.java
4.模仿 quickstart 搭建项目
5.创建 spring-boot-shiro 项目,创建 Maven 模块 hello-shiro
6.导入依赖
<dependencies>
        <dependency>
            <groupId>org.apache.shiro</groupId>
            <artifactId>shiro-core</artifactId>
            <version>1.7.1</version>
        </dependency>

        <!-- configure logging -->
        <dependency>
            <groupId>org.slf4j</groupId>
            <artifactId>jcl-over-slf4j</artifactId>
            <version>1.7.21</version>
        </dependency>
        <dependency>
            <groupId>org.slf4j</groupId>
            <artifactId>slf4j-log4j12</artifactId>
            <version>1.7.21</version>
        </dependency>
        <dependency>
            <groupId>log4j</groupId>
            <artifactId>log4j</artifactId>
            <version>1.2.17</version>
        </dependency>
    </dependencies>
7.创建 log4j.properties
log4j.rootLogger=INFO, stdout

log4j.appender.stdout=org.apache.log4j.ConsoleAppender
log4j.appender.stdout.layout=org.apache.log4j.PatternLayout
log4j.appender.stdout.layout.ConversionPattern=%d %p [%c] - %m %n

# General Apache libraries
log4j.logger.org.apache=WARN

# Spring
log4j.logger.org.springframework=WARN

# Default Shiro logging
log4j.logger.org.apache.shiro=INFO

# Disable verbose logging
log4j.logger.org.apache.shiro.util.ThreadContext=WARN
log4j.logger.org.apache.shiro.cache.ehcache.EhCache=WARN
8.创建 shiro.ini 文件
[users]
# user 'root' with password 'secret' and the 'admin' role
root = secret, admin
# user 'guest' with the password 'guest' and the 'guest' role
guest = guest, guest
# user 'presidentskroob' with password '12345' ("That's the same combination on
# my luggage!!!" ;)), and role 'president'
presidentskroob = 12345, president
# user 'darkhelmet' with password 'ludicrousspeed' and roles 'darklord' and 'schwartz'
darkhelmet = ludicrousspeed, darklord, schwartz
# user 'lonestarr' with password 'vespa' and roles 'goodguy' and 'schwartz'
lonestarr = vespa, goodguy, schwartz

# -----------------------------------------------------------------------------
# Roles with assigned permissions
#
# Each line conforms to the format defined in the
# org.apache.shiro.realm.text.TextConfigurationRealm#setRoleDefinitions JavaDoc
# -----------------------------------------------------------------------------
[roles]
# 'admin' role has all permissions, indicated by the wildcard '*'
admin = *
# The 'schwartz' role can do anything (*) with any lightsaber:
schwartz = lightsaber:*
# The 'goodguy' role is allowed to 'drive' (action) the winnebago (type) with
# license plate 'eagle5' (instance specific id)
goodguy = winnebago:drive:eagle5
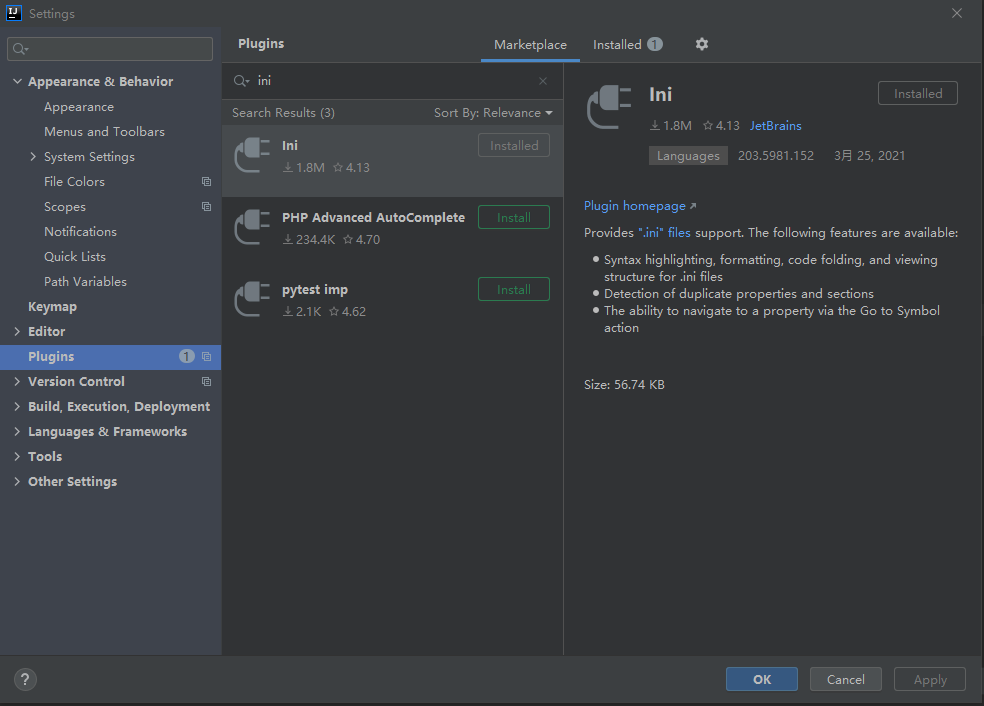
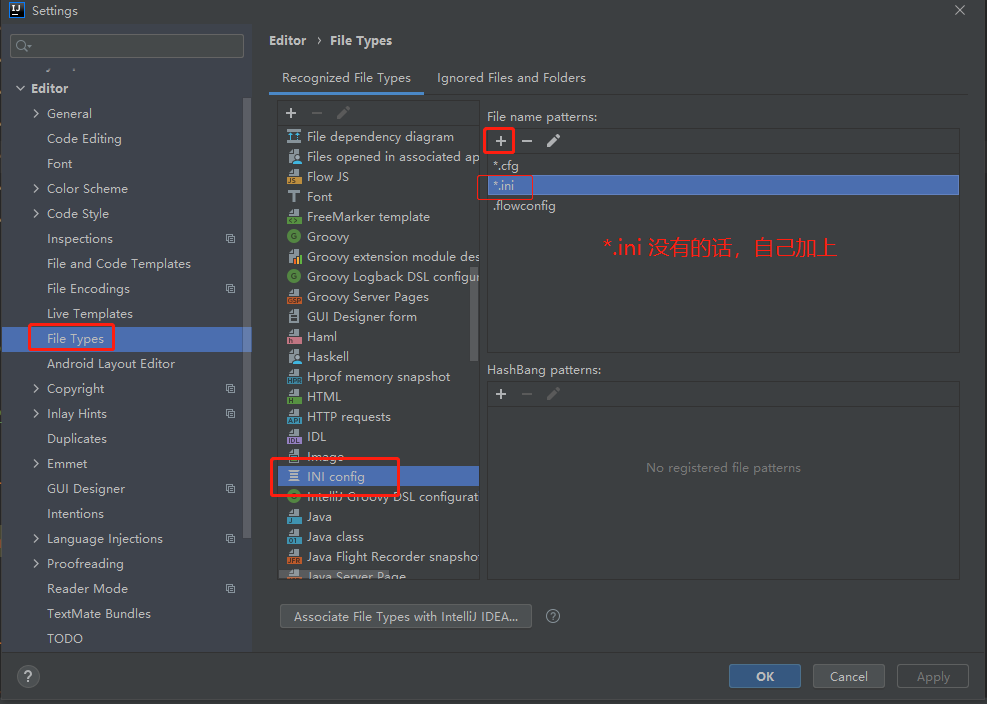
注意:ini 文件不高亮的话,记得安装插件
9.导入 QuickStart.java
马上报错:
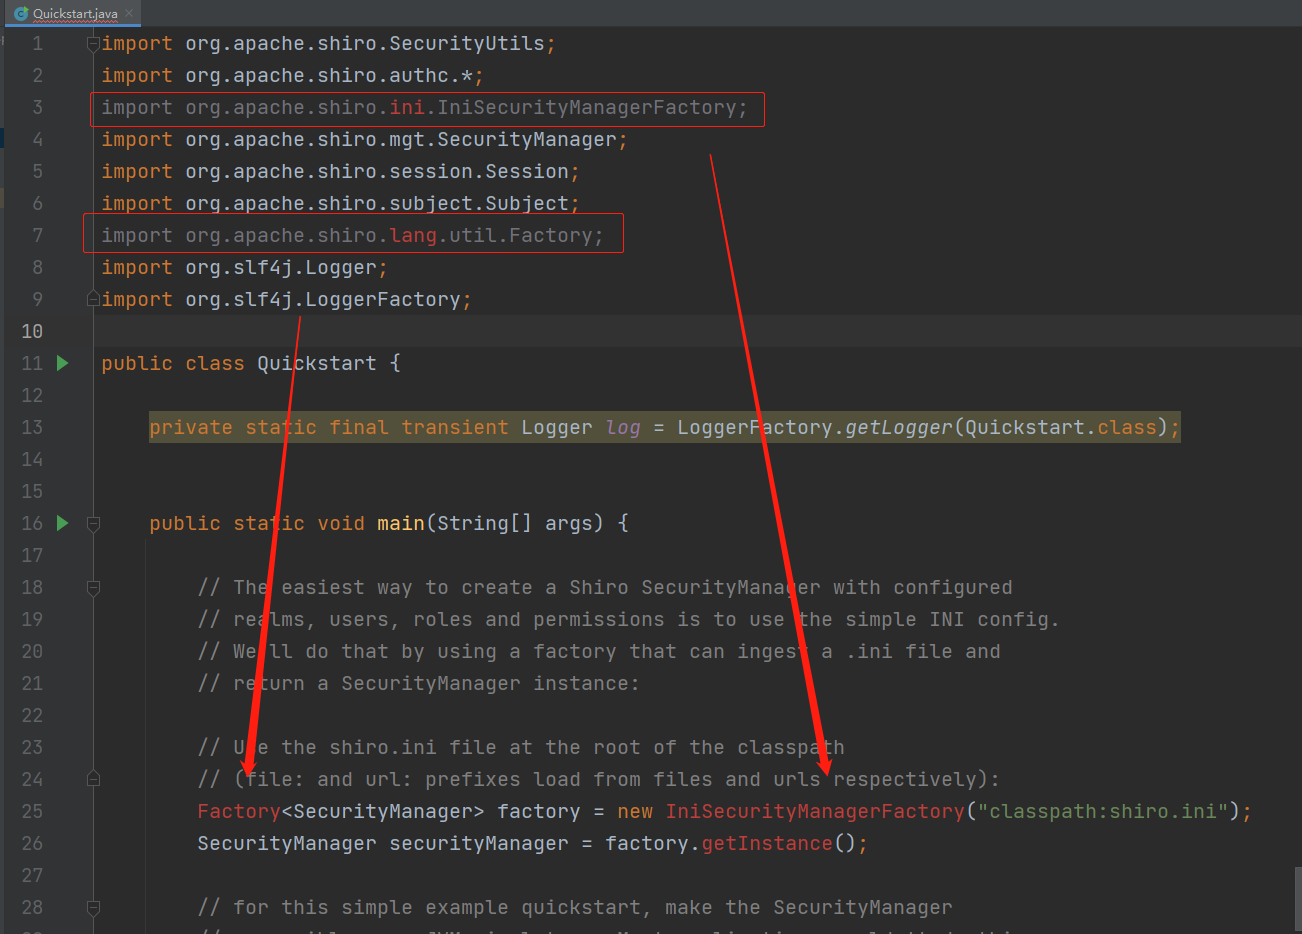
方式一:修改导包:
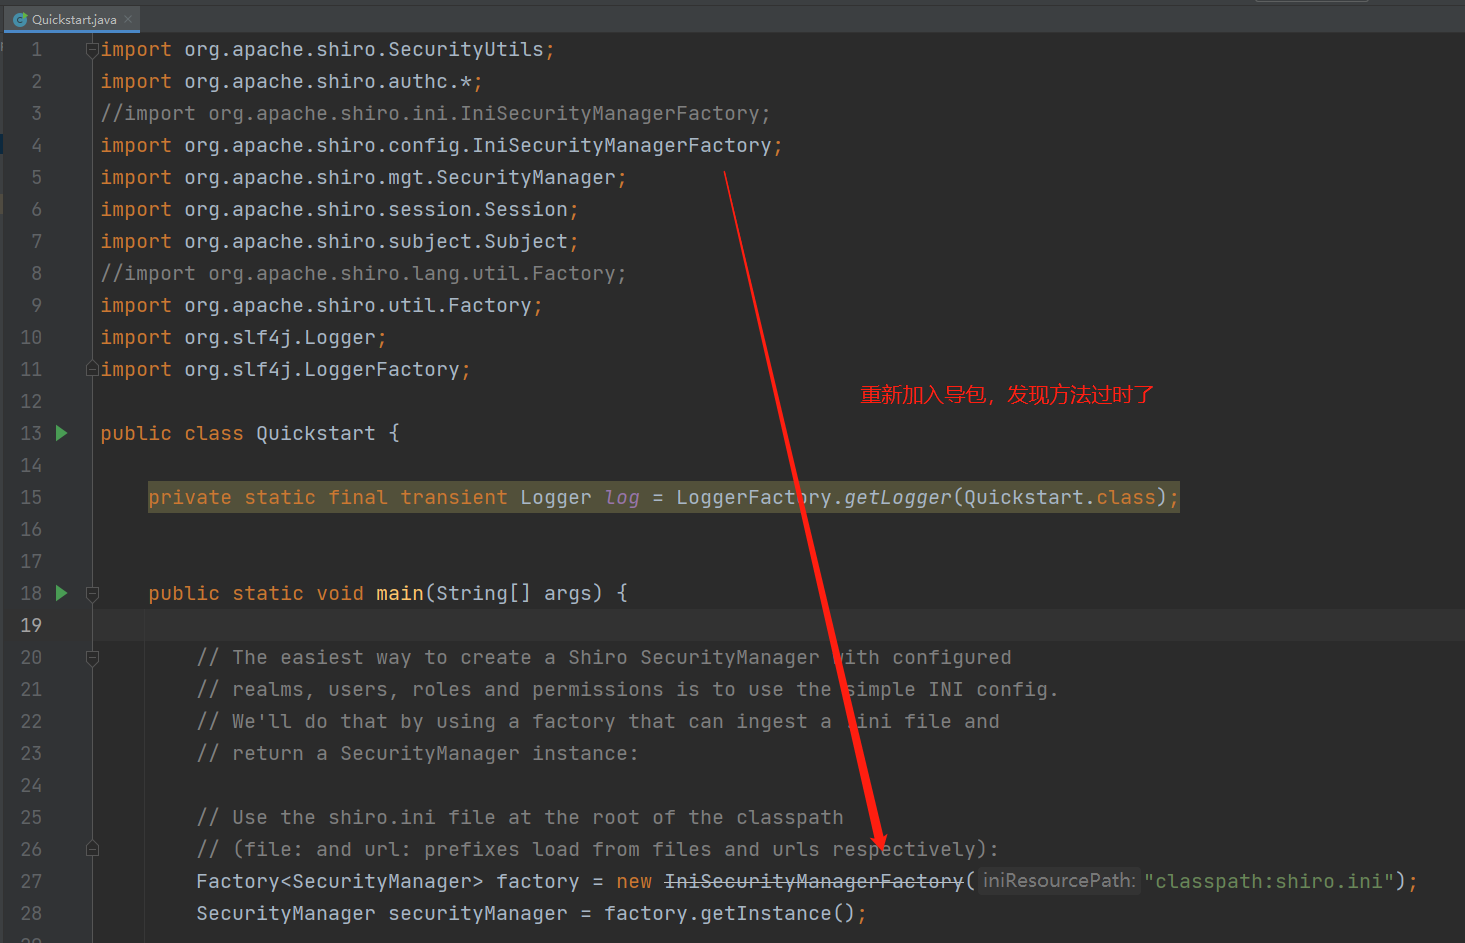
虽然此时方法显示过时了,但是运行起来,并不会报错。
方式二:与时俱进,使用 DefaultSecurityManager
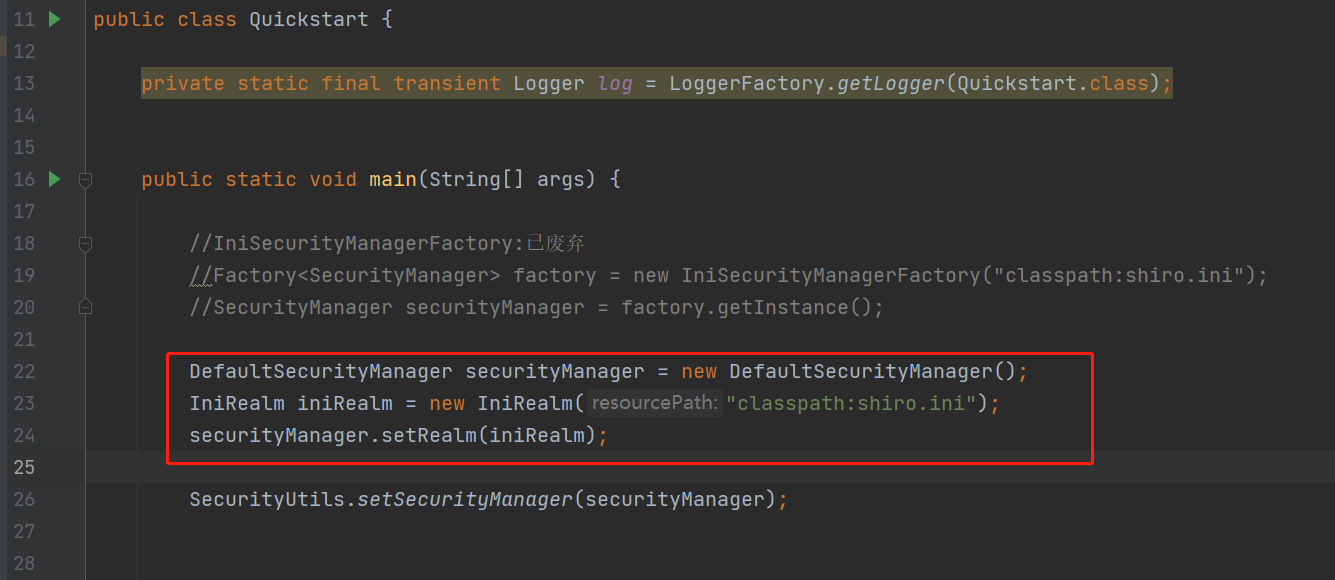
将如下代码:
Factory<SecurityManager> factory = new IniSecurityManagerFactory("classpath:shiro.ini");
SecurityManager securityManager = factory.getInstance();
替换为:
DefaultSecurityManager securityManager = new DefaultSecurityManager();
        IniRealm iniRealm = new IniRealm("classpath:shiro.ini");
        securityManager.setRealm(iniRealm);
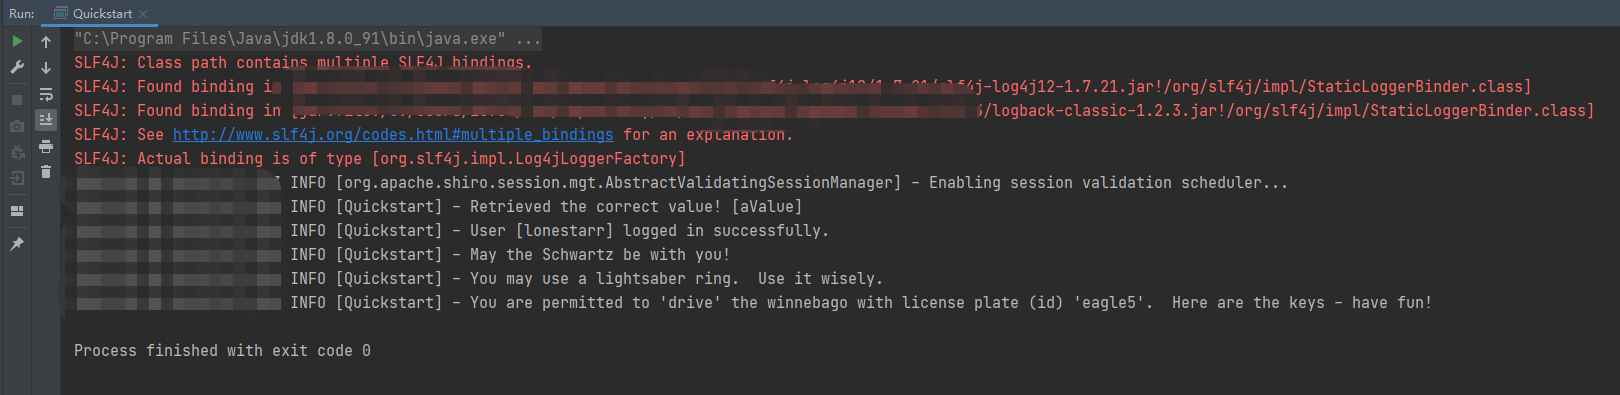
10.Run 测试 Ok!
- 阅读 QuickStart.java 源码:
Quickstart.java
import org.apache.shiro.SecurityUtils;
import org.apache.shiro.authc.*;
import org.apache.shiro.mgt.DefaultSecurityManager;
import org.apache.shiro.realm.text.IniRealm;
import org.apache.shiro.session.Session;
import org.apache.shiro.subject.Subject;

import org.slf4j.Logger;
import org.slf4j.LoggerFactory;

public class Quickstart {

    private static final transient Logger log = LoggerFactory.getLogger(Quickstart.class);


    public static void main(String[] args) {

        //IniSecurityManagerFactory:已废弃
        //Factory<SecurityManager> factory = new IniSecurityManagerFactory("classpath:shiro.ini");
        //SecurityManager securityManager = factory.getInstance();

        DefaultSecurityManager securityManager = new DefaultSecurityManager();
        IniRealm iniRealm = new IniRealm("classpath:shiro.ini");
        securityManager.setRealm(iniRealm);

        SecurityUtils.setSecurityManager(securityManager);


        // Now that a simple Shiro environment is set up, let's see what you can do:

        // get the currently executing user:
        //通过SecurityUtils 得到当前用户的对象 Subject
        Subject currentUser = SecurityUtils.getSubject();

        // Do some stuff with a Session (no need for a web or EJB container!!!)
        //这个session不是web、EJB容器,它是Shiro自己的session!!!
        //通过当前用户拿到 session
        Session session = currentUser.getSession();
        //设置
        session.setAttribute("someKey", "aValue");
        String value = (String) session.getAttribute("someKey");
        if (value.equals("aValue")) {
            log.info("Retrieved the correct value! [" + value + "]");
        }

        // let's login the current user so we can check against roles and permissions:
        //判断当前用户是否被认证
        if (!currentUser.isAuthenticated()) {
            //Token:令牌
            UsernamePasswordToken token = new UsernamePasswordToken("lonestarr", "vespa");
            token.setRememberMe(true);//记住我 功能
            try {
                currentUser.login(token); //执行登录操作
            } catch (UnknownAccountException uae) {
                log.info("There is no user with username of " + token.getPrincipal());//验证用户名
            } catch (IncorrectCredentialsException ice) {
                log.info("Password for account " + token.getPrincipal() + " was incorrect!");//验证密码
            } catch (LockedAccountException lae) {
                log.info("The account for username " + token.getPrincipal() + " is locked.  " +
                        "Please contact your administrator to unlock it.");//锁住用户
            }
            // ... catch more exceptions here (maybe custom ones specific to your application?
            catch (AuthenticationException ae) {
                //unexpected condition?  error? 认证异常!
            }
        }

        //say who they are:
        //print their identifying principal (in this case, a username):
        //获得当前用户的认证
        log.info("User [" + currentUser.getPrincipal() + "] logged in successfully.");

        //test a role: 获得该用户的角色,该角色拥有什么样的特权
        if (currentUser.hasRole("schwartz")) {
            log.info("May the Schwartz be with you!");
        } else {
            log.info("Hello, mere mortal.");
        }

        //test a typed permission (not instance-level)
        if (currentUser.isPermitted("lightsaber:wield")) {
            log.info("You may use a lightsaber ring.  Use it wisely.");
        } else {
            log.info("Sorry, lightsaber rings are for schwartz masters only.");
        }

        //a (very powerful) Instance Level permission:
        if (currentUser.isPermitted("winnebago:drive:eagle5")) {
            log.info("You are permitted to 'drive' the winnebago with license plate (id) 'eagle5'.  " +
                    "Here are the keys - have fun!");
        } else {
            log.info("Sorry, you aren't allowed to drive the 'eagle5' winnebago!");
        }

        //all done - log out! //注销
        currentUser.logout();
        //结束
        System.exit(0);
    }
}
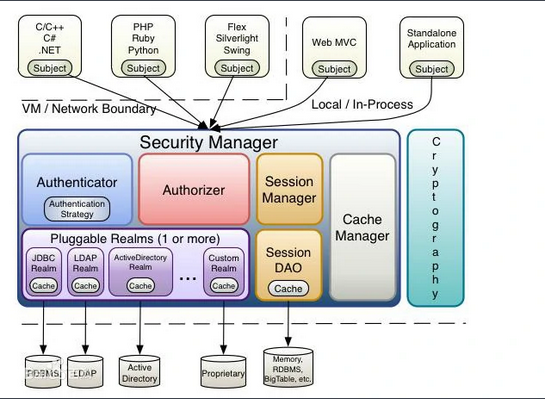
由上面 Quickstart.java 源码得出:
Shiro 三大核心组件
Subject, SecurityManager 和 Realms
(下面的图片来自百度百科)
- SpringBoot 整合 Shiro
1.创建 SpringBoot项目 shiro-springboot
2.导入 Thymeleaf 依赖
<!--Thymeleaf 模板引擎-->
<dependency>
	<groupId>org.thymeleaf</groupId>
	<artifactId>thymeleaf-spring5</artifactId>
</dependency>
<dependency>
	<groupId>org.thymeleaf.extras</groupId>
	<artifactId>thymeleaf-extras-java8time</artifactId>
</dependency>
3.编写 index.html
<!DOCTYPE html>
<html lang="en" xmlns:th="http://www.thymeleaf.org">
<head>
    <meta charset="UTF-8">
    <title>Title</title>
</head>
<body>
<h3>首页</h3>

<p th:text="${msg}"></p>
</body>
</html>
```C
4.编写 Controller
```java
package com.zhou.controller;

import org.springframework.stereotype.Controller;
import org.springframework.ui.Model;
import org.springframework.web.bind.annotation.RequestMapping;

@Controller
public class MyController {

    @RequestMapping({"/","index"})
    public String toIndex(Model model){
        model.addAttribute("msg","Hello,Shiro");
        return "index";
    }
}
5.Run 测试
package com.zhou;

import org.springframework.boot.SpringApplication;
import org.springframework.boot.autoconfigure.SpringBootApplication;

@SpringBootApplication
public class ShiroSpringbootApplication {

    public static void main(String[] args) {
        SpringApplication.run(ShiroSpringbootApplication.class, args);
    }

}

6.继续,导入 shiro-spring 依赖
<!-- https://mvnrepository.com/artifact/org.apache.shiro/shiro-spring -->
<dependency>
	<groupId>org.apache.shiro</groupId>
	<artifactId>shiro-spring</artifactId>
	<version>1.7.1</version>
</dependency>
7.编写 Config
a. 自定义 UserRealm
package com.zhou.config;

import org.apache.shiro.authc.AuthenticationException;
import org.apache.shiro.authc.AuthenticationInfo;
import org.apache.shiro.authc.AuthenticationToken;
import org.apache.shiro.authz.AuthorizationInfo;
import org.apache.shiro.realm.AuthorizingRealm;
import org.apache.shiro.subject.PrincipalCollection;
//自定义 UserRealm
public class UserRealm extends AuthorizingRealm {
    @Override
    protected AuthorizationInfo doGetAuthorizationInfo(PrincipalCollection principalCollection) {
        System.out.println("授权:doGetAuthorizationInfo");
        return null;
    }

    @Override
    protected AuthenticationInfo doGetAuthenticationInfo(AuthenticationToken authenticationToken) throws AuthenticationException {
        System.out.println("认证:doGetAuthenticationInfo");
        return null;
    }
}
b. 定义 ShiroConfig
package com.zhou.config;

import org.apache.shiro.spring.web.ShiroFilterFactoryBean;
import org.apache.shiro.web.mgt.DefaultWebSecurityManager;
import org.springframework.beans.factory.annotation.Qualifier;
import org.springframework.context.annotation.Bean;
import org.springframework.context.annotation.Configuration;

@Configuration
public class ShiroConfig {

    //1.创建 realm 对象,需要自定义
    @Bean
    public UserRealm userRealm(){
        return new UserRealm();
    }
    //2.DefaultWebSecurityManager
    @Bean(name = "SecurityManager")
    public DefaultWebSecurityManager getDefaultWebSecurityManager(@Qualifier("userRealm") UserRealm userRealm){
        DefaultWebSecurityManager defaultWebSecurityManager = new DefaultWebSecurityManager();
        //关联UserRealm
        defaultWebSecurityManager.setRealm(userRealm);
        return defaultWebSecurityManager;
    }
    //3.ShiroFilterFactoryBean
    @Bean
    public ShiroFilterFactoryBean getShiroFilterFactoryBean(@Qualifier("SecurityManager") DefaultWebSecurityManager defaultWebSecurityManager){
        ShiroFilterFactoryBean shiroFilterFactoryBean = new ShiroFilterFactoryBean();
        //设置安全管理器
        shiroFilterFactoryBean.setSecurityManager(defaultWebSecurityManager);
        return shiroFilterFactoryBean;
    }
}
- user 包下,创建三个页面(
(SpringSecurity中有个默认的登录,这里没有,自己创建一个登录页 login.html)
add.html
<!DOCTYPE html>
<html lang="en">
<head>
    <meta charset="UTF-8">
    <title>add</title>
</head>
<body>
添加
</body>
</html>
update.html
<!DOCTYPE html>
<html lang="en">
<head>
    <meta charset="UTF-8">
    <title>update</title>
</head>
<body>
更新
</body>
</html>
login.html
<!DOCTYPE html>
<html lang="en">
<head>
    <meta charset="UTF-8">
    <title>登录</title>
</head>
<body>
<form>
    <input type="text" placeholder="用户名" name="username">
    <br><br>
    <input type="password" placeholder="密码" name="password">
    <br><br>
    <input type="submit">
</form>
</body>
</html>
9.Controller
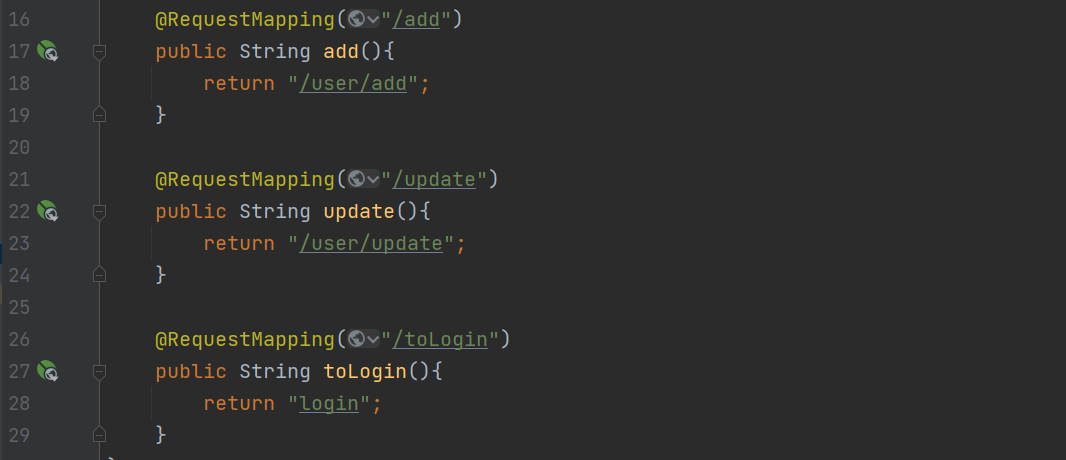
@RequestMapping("/add")
public String add(){
	return "/user/add";
}

@RequestMapping("/update")
public String update(){
	return "/user/update";
}

@RequestMapping("/toLogin")
public String toLogin(){
	return "login";
}
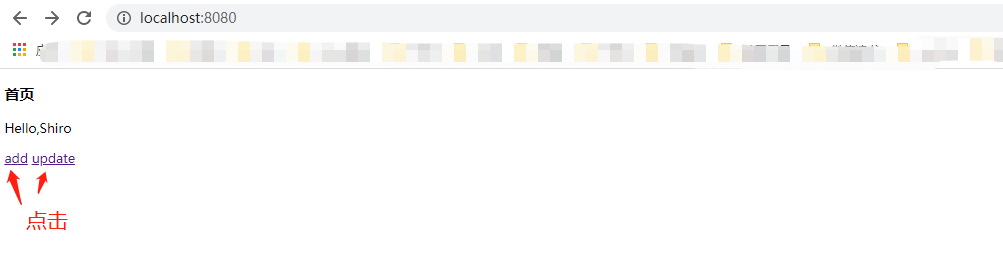
- index.html 添加代码
<a th:href="@{/add}">add</a>
<a th:href="@{/update}">update</a>
11.Run 访问:http://localhost:8080/
(一切正常,点击add、update 都能点进去)
- Shiro 实现登录拦截
1.添加 Shiro的内置过滤

    //3.ShiroFilterFactoryBean
    @Bean
    public ShiroFilterFactoryBean getShiroFilterFactoryBean(@Qualifier("SecurityManager") DefaultWebSecurityManager defaultWebSecurityManager){
        ShiroFilterFactoryBean shiroFilterFactoryBean = new ShiroFilterFactoryBean();
        //设置安全管理器
        shiroFilterFactoryBean.setSecurityManager(defaultWebSecurityManager);
        //设置 shiro 的内置过滤器
        /*
        anon:无需认证就可以访问
        authc:必须认证才能访问
        user:必须拥有 记住我 功能才能用
        perms:拥有对某个资源的权限才能访问
        role:拥有某个角色权限才能访问
         */
        Map<String, String> filterMap = new LinkedHashMap<>();
        filterMap.put("/add","authc");
        filterMap.put("/update","authc");

        shiroFilterFactoryBean.setFilterChainDefinitionMap(filterMap);

        //设置登录的请求
        shiroFilterFactoryBean.setLoginUrl("/toLogin");

        return shiroFilterFactoryBean;
    }
2.Run 访问:http://localhost:8080/ 并点击add、update
发现都被拦截了,并跳到了登录页。
- Shiro 实现用户认证
1.Controller
    @RequestMapping("/login")
    public String login(String username,String password,Model model){
        //获取当前的用户
        Subject subject = SecurityUtils.getSubject();
        //封装用户的登录数据
        UsernamePasswordToken token = new UsernamePasswordToken(username, password);
        try{
            subject.login(token);//执行登录方法,如果没有异常就说明OK了
            return "index";
        }catch (UnknownAccountException e){
            model.addAttribute("msg","用户名错误");
            return "login";
        }catch (IncorrectCredentialsException e){
            model.addAttribute("msg","密码错误");
            return "login";
        }
    }
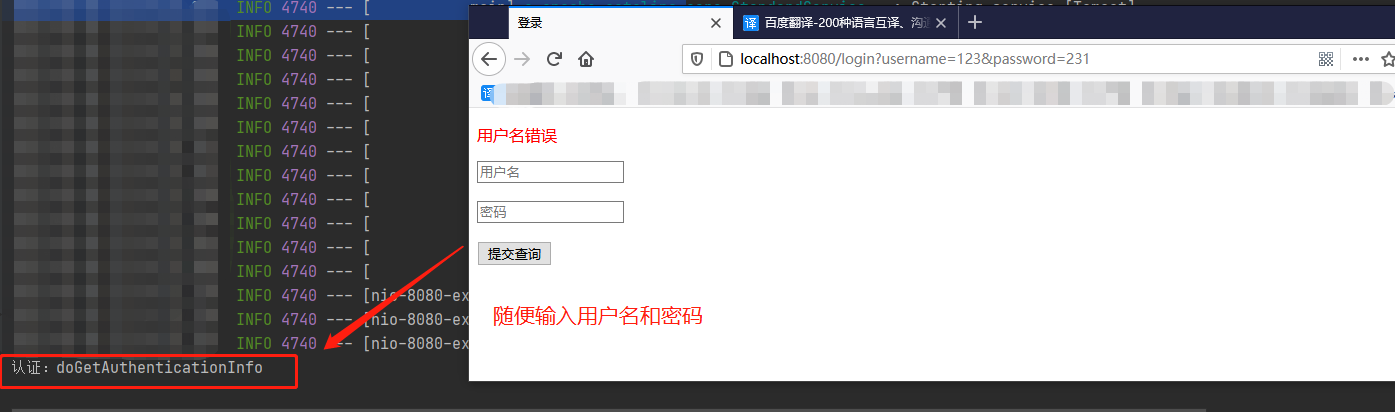
2.login.html 添加验证失败信息
<p th:text="${msg}" style="color: red"></p>
3.访问:随便输入用户名和密码,观察控制台
查看 AuthenticationInfo,发现它是一个接口:
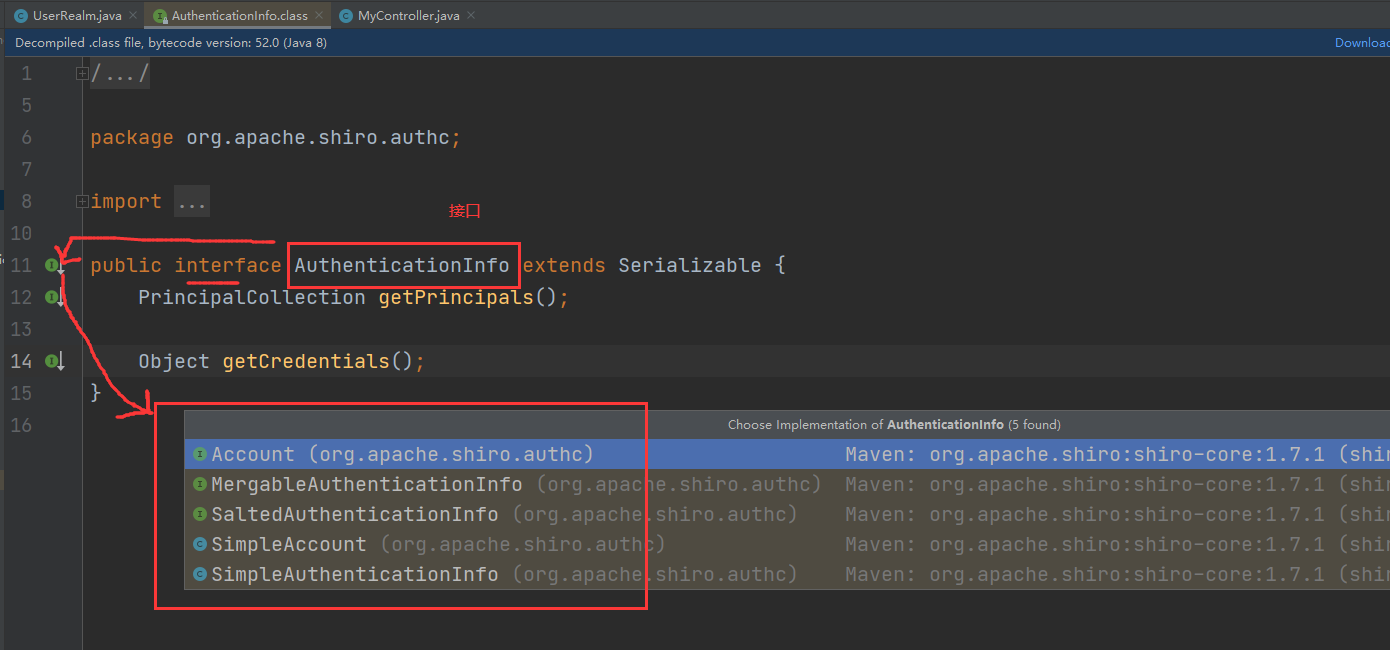
new SimpleAuthenticationInfo 的三个参数:
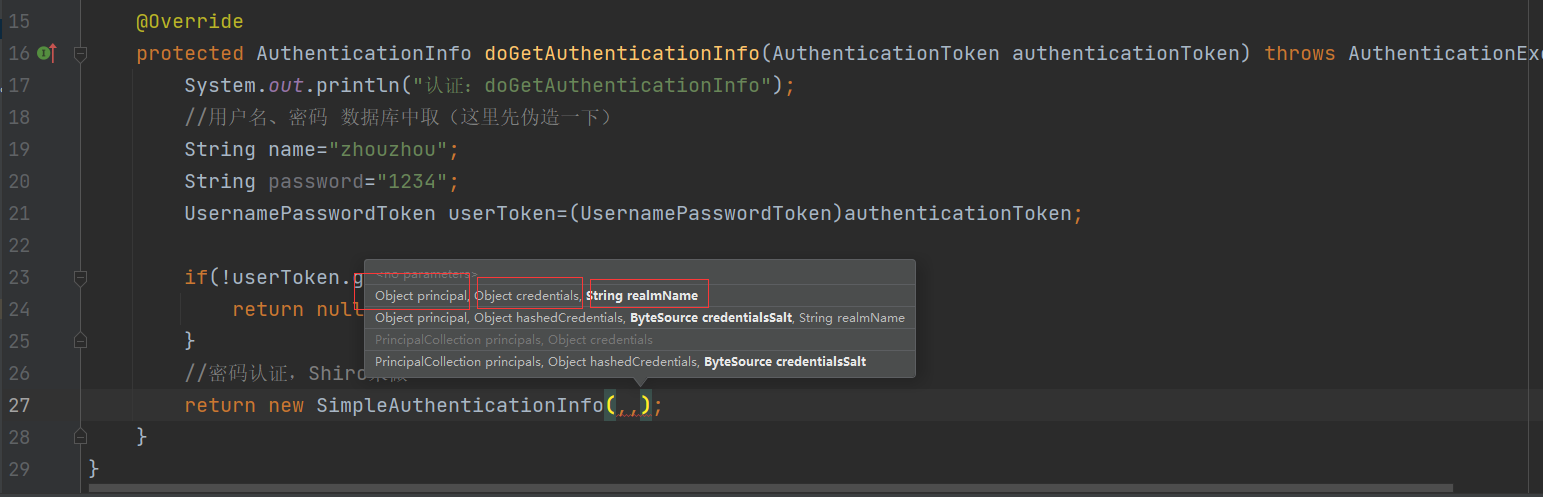
4.伪造一个用户和密码
    @Override
    protected AuthenticationInfo doGetAuthenticationInfo(AuthenticationToken authenticationToken) throws AuthenticationException {
        System.out.println("认证:doGetAuthenticationInfo");
        //用户名、密码 数据库中取(这里先伪造一下)
        String name="zhouzhou";
        String password="1234";
        UsernamePasswordToken userToken=(UsernamePasswordToken)authenticationToken;

        if(!userToken.getUsername().equals(name)){
            return null;//抛出异常 UnknownAccountException
        }
        //密码认证,Shiro来做
        return new SimpleAuthenticationInfo("",password,"");
    }
}
5.Run 测试 OK!
正确的用户名和密码才可以登录成功。
- Shiro 整合 Mybatis
1.添加依赖
<dependency>
	<groupId>org.projectlombok</groupId>
	<artifactId>lombok</artifactId>
</dependency>
<dependency>
	<groupId>mysql</groupId>
	<artifactId>mysql-connector-java</artifactId>
</dependency>
<dependency>
	<groupId>org.mybatis.spring.boot</groupId>
	<artifactId>mybatis-spring-boot-starter</artifactId>
	<version>2.1.3</version>
</dependency>
<dependency>
	<groupId>org.springframework.boot</groupId>
	<artifactId>spring-boot-starter-jdbc</artifactId>
</dependency>
<dependency>
	<groupId>com.alibaba</groupId>
	<artifactId>druid</artifactId>
	<version>1.2.5</version>
</dependency>
<dependency>
	<groupId>log4j</groupId>
	<artifactId>log4j</artifactId>
	<version>1.2.17</version>
</dependency>
注意,maven 资源过滤问题
(这里用了通配符,就不逐一添加 include 的了!因为之后整合太多东西,经常报错:Error resolving template [login], template might not exist or might not be a...,因为这些排错找了很久。)
 <!--在build中配置resources,来防止我们资源导出失败的问题-->
 <resources>
 	<resource>
 		<directory>src/main/resources</directory>
 			<includes>
 				<include>**/*.*</include>
 			</includes>
 			<filtering>false</filtering>
	 </resource>
 	<resource>
 		<directory>src/main/java</directory>
		 	<includes>
 				<include>**/*.*</include>
 			</includes>
 			<filtering>false</filtering>
 	</resource>
 </resources>
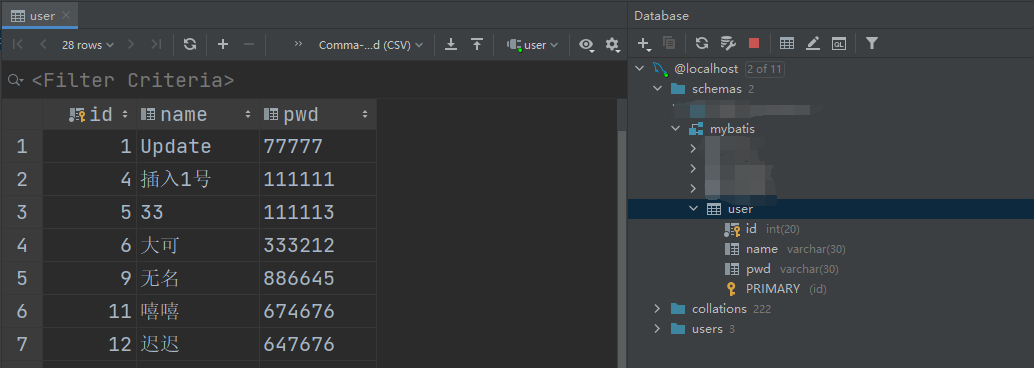
2.创建数据库
CREATE DATABASE `mybatis`

USE `mybatis`

DROP TABLE IF EXISTS `user`;

CREATE TABLE `user` (
  `id` INT(11) NOT NULL AUTO_INCREMENT,
  `name` VARCHAR(255) NOT NULL,
  `pwd` VARCHAR(255) NOT NULL,
  PRIMARY KEY (`id`)
) ENGINE=INNODB DEFAULT CHARSET=utf8;
3.插入一些数据,并让 idea 连上数据库
4.配置文件
application.yaml
spring:
  thymeleaf:
    cache: true

  datasource:
    username: root
    password: root
    url: jdbc:mysql://localhost:3306/mybatis?serverTimezone=UTC&useUnicode=true&characterEncoding=UTF-8
    driver-class-name: com.mysql.cj.jdbc.Driver
    type: com.alibaba.druid.pool.DruidDataSource #Druid

    #Spring Boot 默认是不注入这些属性值的,需要自己绑定
    #druid 数据源专有配置
    initialSize: 4
    minIdle: 4
    maxActive: 20
    maxWait: 30000
    timeBetweenEvictionRunsMillis: 50000
    minEvictableIdleTimeMillis: 300000
    validationQuery: SELECT 1 FROM DUAL
    testWhileIdle: true
    testOnBorrow: false
    testOnReturn: false
    poolPreparedStatements: true

    #配置监控统计拦截的filters,stat:监控统计、log4j:日志记录、wall:防御sql注入
    filters: stat,wall,log4j
    maxPoolPreparedStatementPerConnectionSize: 20
    useGlobalDataSourceStat: true
    connectionProperties: druid.stat.mergeSql=true;druid.stat.slowSqlMillis=500
application.properties
mybatis.type-aliases-package=com.zhou.pojo
mybatis.mapper-locations=classpath:mapper/*.xml

#声明thymeleaf使用非严格的html。
spring.thymeleaf.content-type=text/html
spring.thymeleaf.mode=LEGACYHTML5
spring.thymeleaf.cache=false
5.创建实体类
package com.zhou.pojo;

import lombok.AllArgsConstructor;
import lombok.Data;
import lombok.NoArgsConstructor;

import java.io.Serializable;

@Data
@NoArgsConstructor
@AllArgsConstructor
public class User implements Serializable{
    private int id;
    private String name;
    private String pwd;
}
6.mapper
UserMapper 接口
package com.zhou.mapper;

import com.zhou.pojo.User;
import org.apache.ibatis.annotations.Mapper;
import org.springframework.stereotype.Repository;

@Mapper
@Repository
public interface UserMapper {
    public User queryUserByName(String name);
}
UserMapper.xml
<?xml version="1.0" encoding="UTF-8" ?>
<!DOCTYPE mapper
        PUBLIC "-//mybatis.org//DTD Mapper 3.0//EN"
        "http://mybatis.org/dtd/mybatis-3-mapper.dtd">
<mapper namespace="com.zhou.mapper.UserMapper">
    <select id="queryUserByName" parameterType="String" resultType="User">
        select * from mybatis.user where name=#{name}
    </select>
</mapper>
7.service
UserService 接口
package com.zhou.service;

import com.zhou.pojo.User;

public interface UserService {
    public User queryUserByName(String name);
}
UserServiceImpl 实现类
package com.zhou.service;

import com.zhou.mapper.UserMapper;
import com.zhou.pojo.User;
import org.springframework.beans.factory.annotation.Autowired;
import org.springframework.stereotype.Service;

@Service
public class UserServiceImpl implements UserService {
    @Autowired
    UserMapper userMapper;
    @Override
    public User queryUserByName(String name) {
        return userMapper.queryUserByName(name);
    }
}
8.Test 测试
package com.zhou;

import com.zhou.service.UserServiceImpl;
import org.junit.jupiter.api.Test;
import org.mybatis.spring.annotation.MapperScan;
import org.springframework.beans.factory.annotation.Autowired;
import org.springframework.boot.test.context.SpringBootTest;

@SpringBootTest
class ShiroSpringbootApplicationTests {

    @Autowired
    UserServiceImpl userService;

    @Test
    void contextLoads() {
        System.out.println(userService.queryUserByName("大可"));
    }
}
9.成功,查到数据

- 连接真实的数据库
1.修改 AuthenticationInfo doGetAuthenticationInfo(AuthenticationToken authenticationToken)方法
 @Autowired
    UserService userService;
    @Override
    protected AuthenticationInfo doGetAuthenticationInfo(AuthenticationToken authenticationToken) throws AuthenticationException {
        System.out.println("认证:doGetAuthenticationInfo");
        //用户名、密码 数据库中取(这里先伪造一下)
        //String name="zhouzhou";
        //String password="1234";

        UsernamePasswordToken userToken=(UsernamePasswordToken)authenticationToken;
        //连接真实的数据库
        User user = userService.queryUserByName(userToken.getUsername());

        if(user==null){
            return null;//没有这个人
        }
        //密码认证,Shiro来做。可以加密 MD5、MD5盐值加密
        return new SimpleAuthenticationInfo("",user.getPwd(),"");
    }
2.Run 测试
用数据库里里面的数据测试,OK!
- Shiro 请求授权实现
首先,定制简单的请求授权
1.ShiroFilterFactoryBean getShiroFilterFactoryBean(@Qualifier("SecurityManager") DefaultWebSecurityManager defaultWebSecurityManager)方法中设置
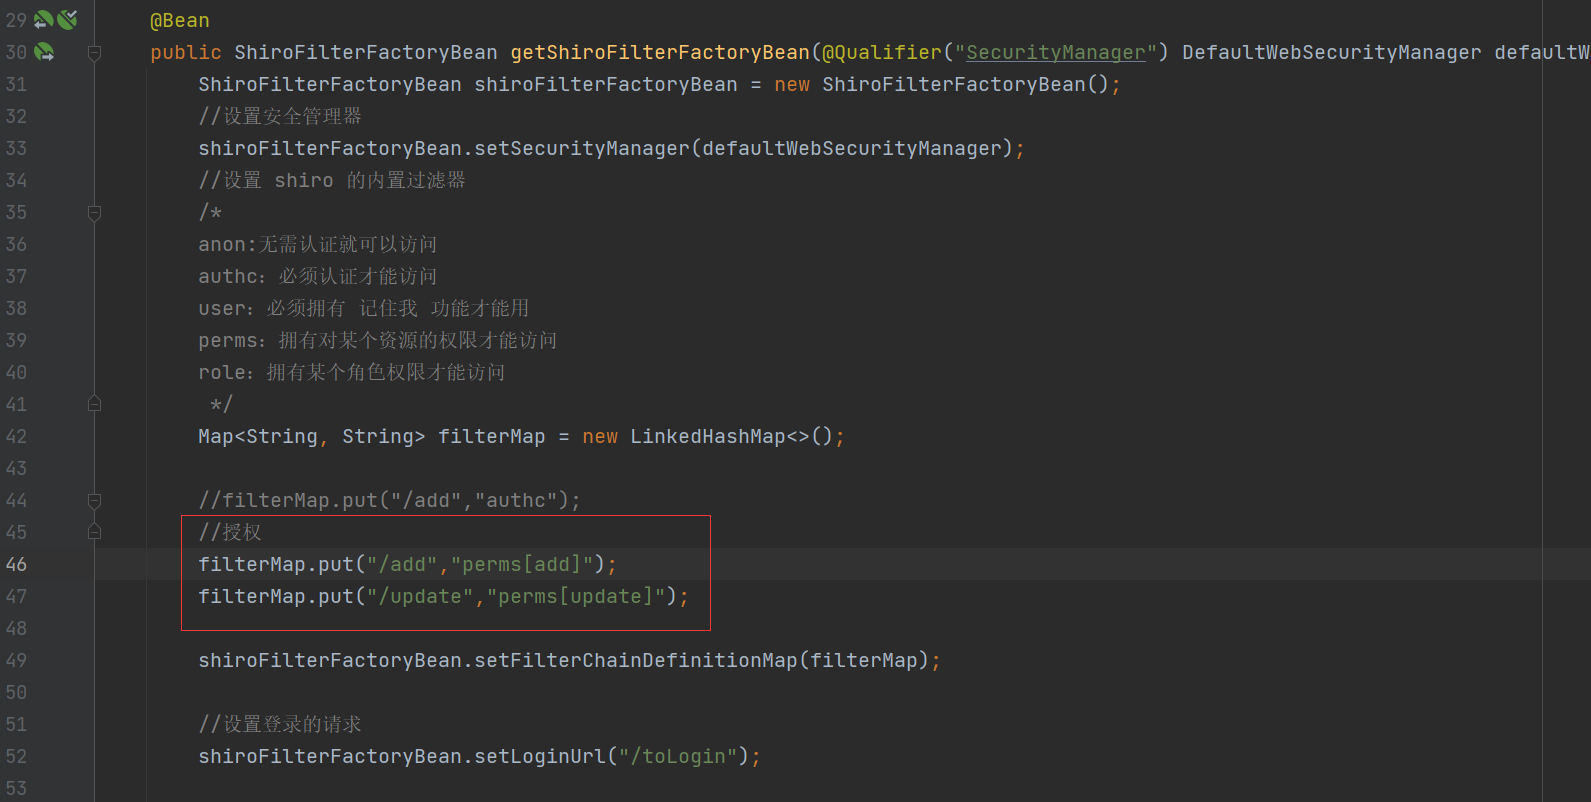
//授权
filterMap.put("/add","perms[add]");
filterMap.put("/update","perms[update]");
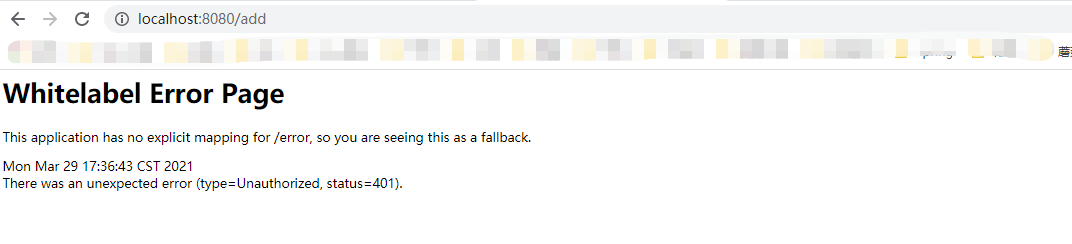
2.Run 测试
此时,update 和 add 不可访问了,并报 type=Unauthorized, status=401
- 可以自己设置未授权页面
1.Controller
    //未授权页面
    @RequestMapping("/unauthorized")
    @ResponseBody
    public String getUnauthorized(){
        return "您未授权,不可访问!";
    }
2.ShiroFilterFactoryBean getShiroFilterFactoryBean(@Qualifier("SecurityManager") DefaultWebSecurityManager defaultWebSecurityManager)方法中添加设置
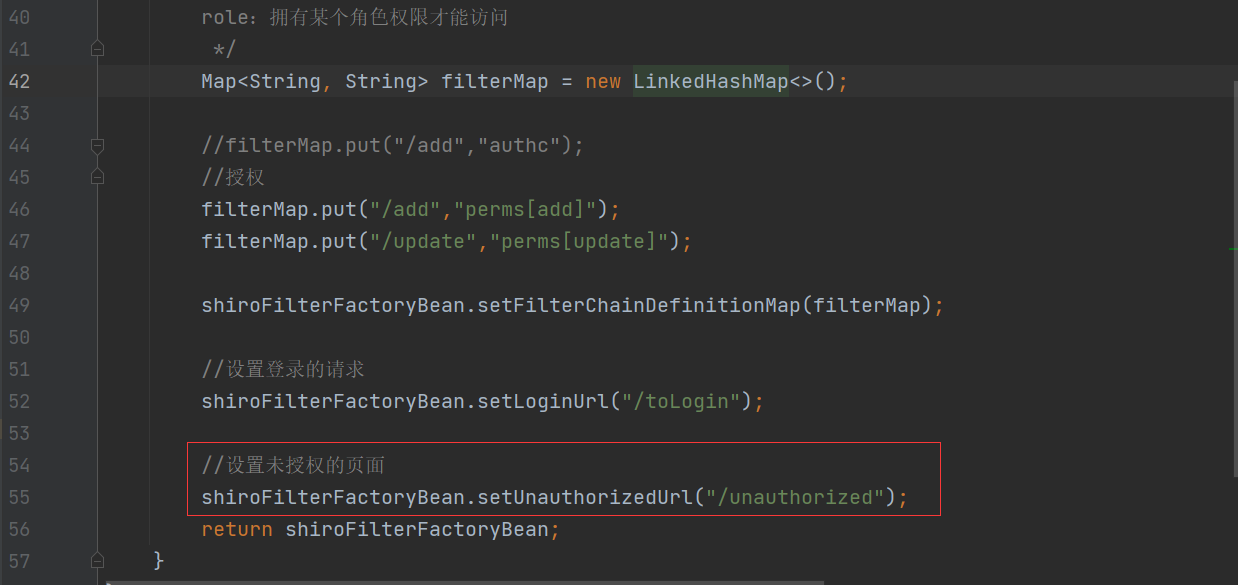
//设置未授权的页面
shiroFilterFactoryBean.setUnauthorizedUrl("/unauthorized");
3.Run 测试
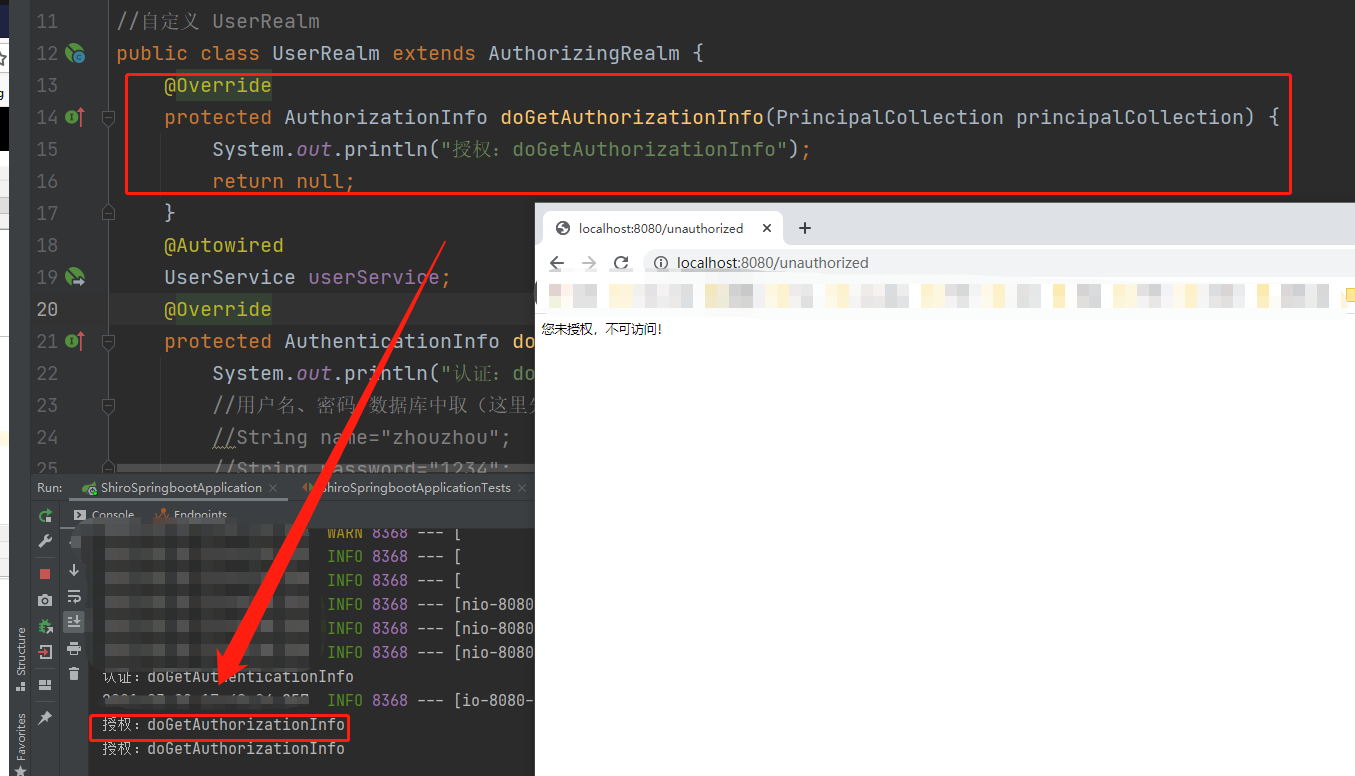
再者,将授权赋值给用户(难点)
在 AuthorizationInfo doGetAuthorizationInfo(PrincipalCollection principalCollection)方法中设置
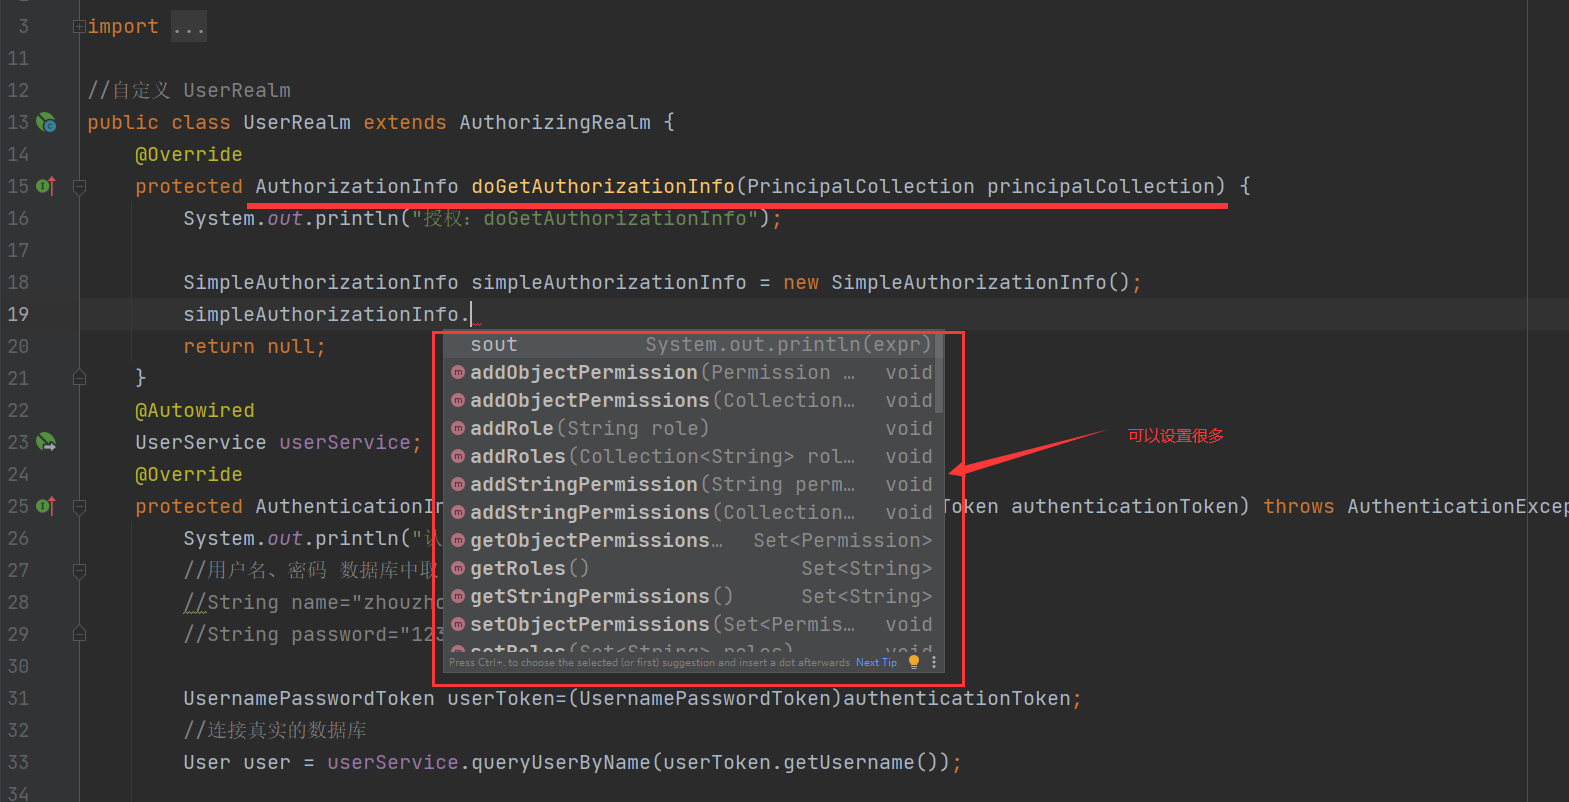
    @Override
    protected AuthorizationInfo doGetAuthorizationInfo(PrincipalCollection principalCollection) {
        System.out.println("授权:doGetAuthorizationInfo");

        SimpleAuthorizationInfo simpleAuthorizationInfo = new SimpleAuthorizationInfo();
        simpleAuthorizationInfo.addStringPermission("add");
        return simpleAuthorizationInfo;
    }
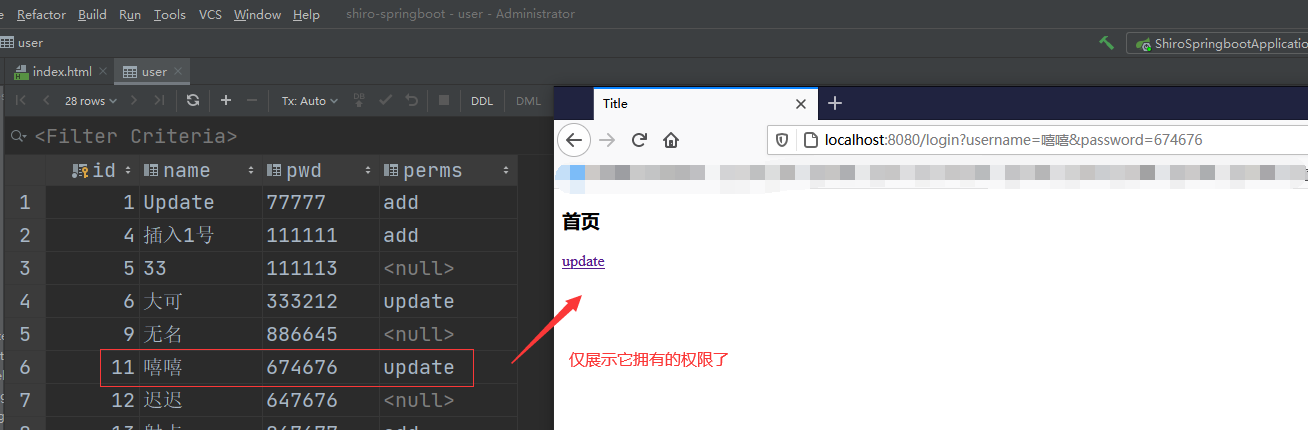
Run 测试 发现 每个登录成功的用户,都被授权了。
最后,在数据库给用过增加权限设置
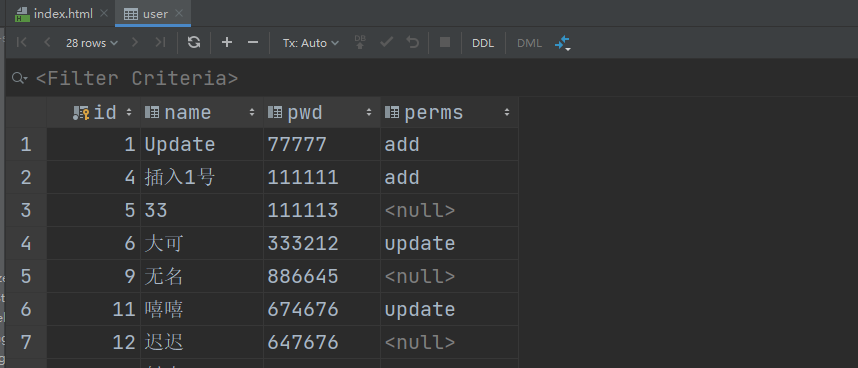
1.增加 perms
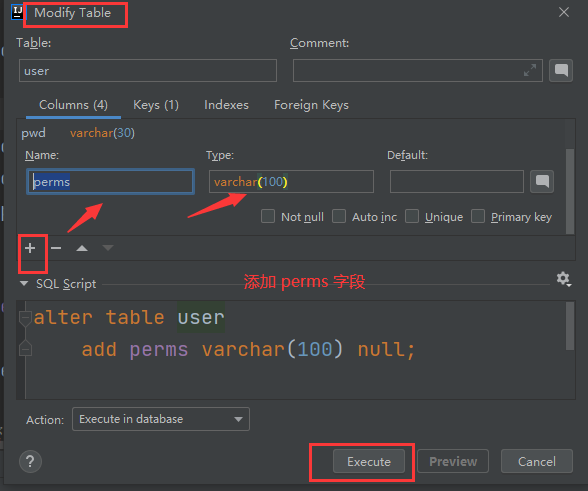
2.在 数据库 中给用户添加权限
3.修改 实体类
package com.zhou.pojo;

import lombok.AllArgsConstructor;
import lombok.Data;
import lombok.NoArgsConstructor;

import java.io.Serializable;

@Data
@NoArgsConstructor
@AllArgsConstructor
public class User implements Serializable{
    private int id;
    private String name;
    private String pwd;
    private String perms;
}
4.修改 自定义 UserRealm
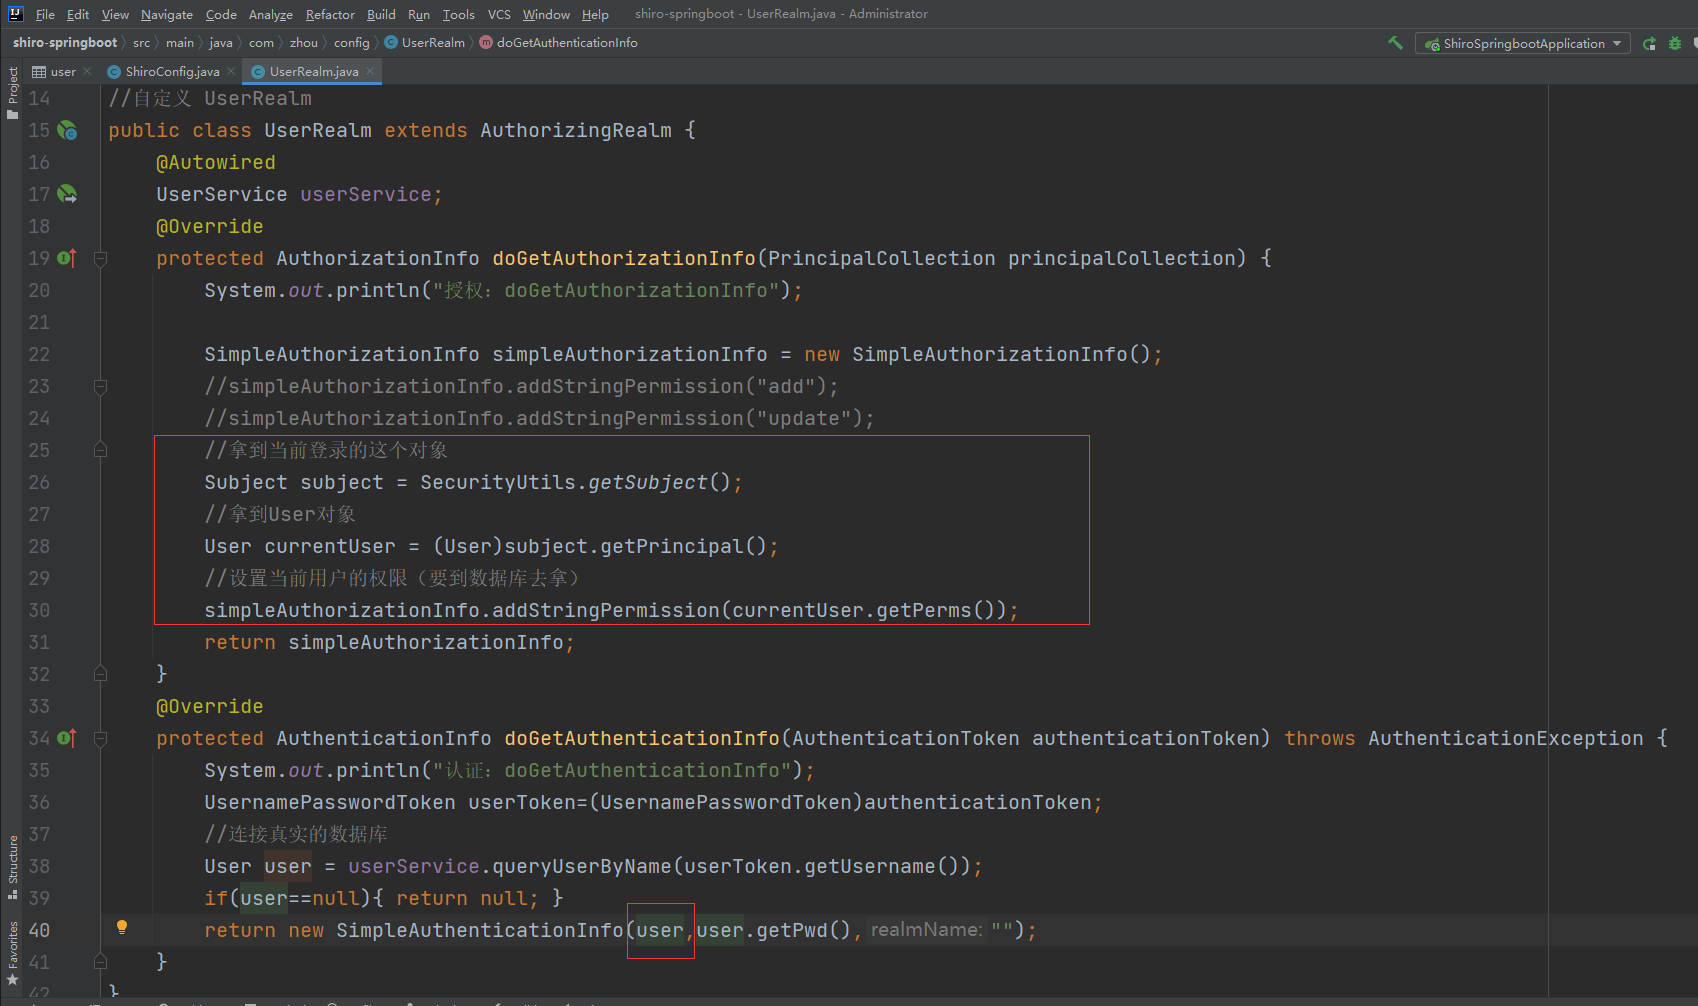
package com.zhou.config;

import com.zhou.pojo.User;
import com.zhou.service.UserService;
import org.apache.shiro.SecurityUtils;
import org.apache.shiro.authc.*;
import org.apache.shiro.authz.AuthorizationInfo;
import org.apache.shiro.authz.SimpleAuthorizationInfo;
import org.apache.shiro.realm.AuthorizingRealm;
import org.apache.shiro.subject.PrincipalCollection;
import org.apache.shiro.subject.Subject;
import org.springframework.beans.factory.annotation.Autowired;

//自定义 UserRealm
public class UserRealm extends AuthorizingRealm {
    @Autowired
    UserService userService;
    @Override
    protected AuthorizationInfo doGetAuthorizationInfo(PrincipalCollection principalCollection) {
        System.out.println("授权:doGetAuthorizationInfo");

        SimpleAuthorizationInfo simpleAuthorizationInfo = new SimpleAuthorizationInfo();
        //simpleAuthorizationInfo.addStringPermission("add");
        //simpleAuthorizationInfo.addStringPermission("update");
        //拿到当前登录的这个对象
        Subject subject = SecurityUtils.getSubject();
        //拿到User对象
        User currentUser = (User)subject.getPrincipal();
        //设置当前用户的权限(要到数据库去拿)
        simpleAuthorizationInfo.addStringPermission(currentUser.getPerms());
        return simpleAuthorizationInfo;
    }
    @Override
    protected AuthenticationInfo doGetAuthenticationInfo(AuthenticationToken authenticationToken) throws AuthenticationException {
        System.out.println("认证:doGetAuthenticationInfo");
        UsernamePasswordToken userToken=(UsernamePasswordToken)authenticationToken;
        //连接真实的数据库
        User user = userService.queryUserByName(userToken.getUsername());
        if(user==null){ return null; }
        return new SimpleAuthenticationInfo(user,user.getPwd(),"");
    }
}
5.Run 测试 到数据库找用户,测试一波,完全OK。
- Shiro 整合 thymeleaf
1.导入依赖
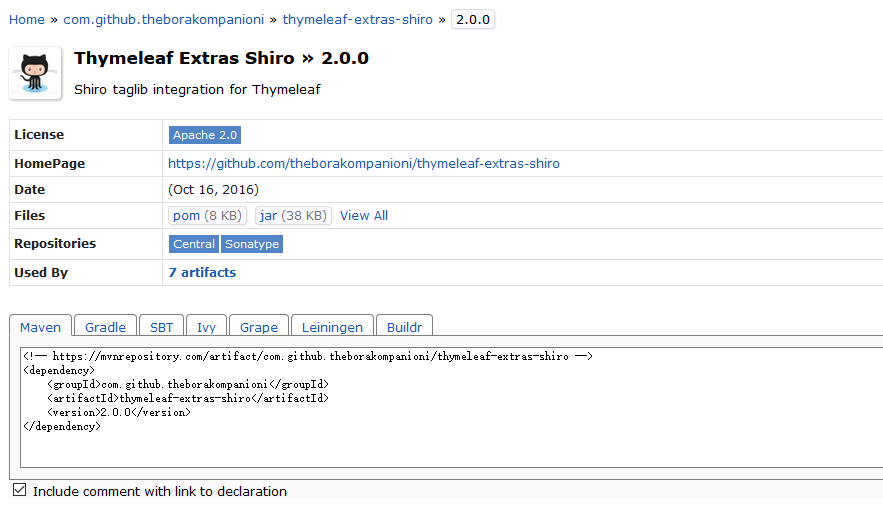
<!-- https://mvnrepository.com/artifact/com.github.theborakompanioni/thymeleaf-extras-shiro -->
<dependency>
    <groupId>com.github.theborakompanioni</groupId>
    <artifactId>thymeleaf-extras-shiro</artifactId>
    <version>2.0.0</version>
</dependency>
2.配置 Bean
(放在 ShiroConfig 类中即可)
    //Shiro 整合thymeleaf
    @Bean
    public ShiroDialect getShiroDialect(){
        return new ShiroDialect();
    }
3.修改 index.html
<!DOCTYPE html>
<html lang="en" xmlns:th="http://www.thymeleaf.org"
                xmlns:shiro="http://www.thymeleaf.org/thymeleaf-extras-shiro">
<head>
    <meta charset="UTF-8">
    <title>Title</title>
</head>
<body>
    <h3>首页</h3>
        <p shiro:notAuthenticated>
            <a th:href="@{/toLogin}">登录</a>
        </p>
        <p th:text="${msg}"></p>
        <div shiro:hasPermission="add">
            <a th:href="@{/add}">add</a>
        </div>
        <div shiro:hasPermission="update">
            <a th:href="@{/update}">update</a>
        </div>
</body>
</html>
4.Run 测试 OK!

 浙公网安备 33010602011771号