
Java迭代器Iterator
之前我们实现了迭代器模式,很多编程语言实际上已经内置了迭代器类,比如Java就为我们实现了迭代器Iterator。我们首先来看Iterator中的源码。
通过JDK源码我们发现Iterator是一个接口,包含三个方法:hasNext、next、remove。
 1 package java.util;
 2
 3 public interface Iterator<E> {
 4
 5     /**
 6     *如果迭代器中还有元素则返回true
 7     */
 8     boolean hasNext();
 9
10     /**
11     *返回迭代器中的下一个元素
12     */
13     E next();
14
15     /**
16     *通过迭代器删除处于集合中最底层的元素
17     */
18     void remove();
19 }
Iterator是一个接口,那如何来创建一个实例呢?要记住,迭代器和集合类的关系非常紧密,我们可以通过集合类来创建一个Iterator实例,ArrayList、LinkedList、Vector都有对它的实现。我们来看ArrayList是如何创建一个Iterator迭代器实例的。在此之前我们先来看看集合和迭代器之间的继承关系。
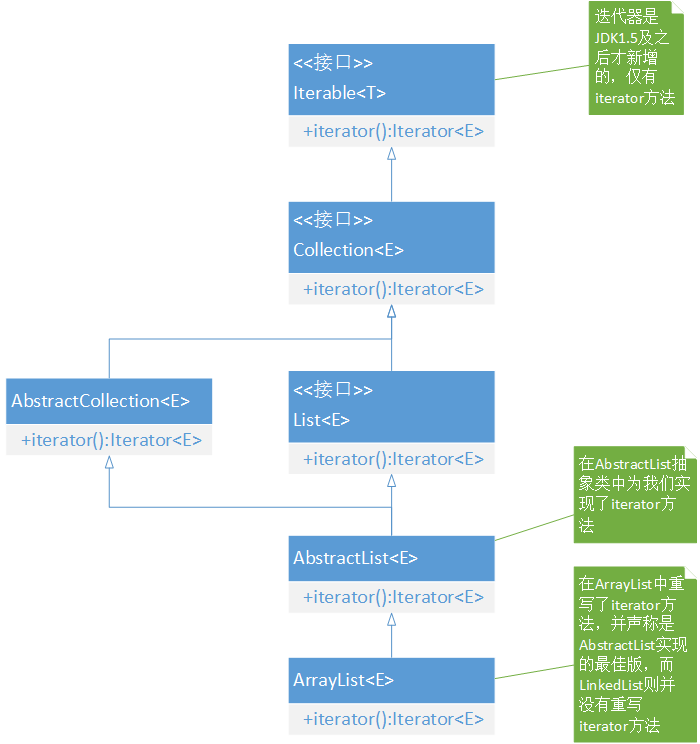
由于集合的关系相对来说比较复杂,在此我们主要看注释部分,通过阅读源代码会发现ArrayList覆写了AbstractList抽象类中的iterator方法并声称效果更佳,而LinkedList则没有覆写,由此可判断ArrayList的iterator方法比LinkedList中的iterator方法更为高效。
我们直接看ArrayList里中实现的iterator方法。
1 public Iterator<E> iterator() {
2     return new Itr();
3 }
从代码来看它返回类一个Itr的对象实例,顺着代码看看这个Itr类是什么。
 1 private class Itr implements Iterator<E> {
 2     int cursor;       // 返回下一个元素的索引
 3     int lastRet = -1; // 返回最后一个元素的索引;如果没有则返回-1
 4     int expectedModCount = modCount;
 5
 6     public boolean hasNext() {
 7         return cursor != size;
 8     }
 9
10     @SuppressWarnings("unchecked")
11     public E next() {
12         checkForComodification();
13         int i = cursor;
14         if (i >= size)
15             throw new NoSuchElementException();
16         Object[] elementData = ArrayList.this.elementData;
17         if (i >= elementData.length)
18             throw new ConcurrentModificationException();
19         cursor = i + 1;
20         return (E) elementData[lastRet = i];
21     }
22
23     public void remove() {
24         if (lastRet < 0)
25             throw new IllegalStateException();
26         checkForComodification();
27
28         try {
29             ArrayList.this.remove(lastRet);
30             cursor = lastRet;
31             lastRet = -1;
32             expectedModCount = modCount;
33         } catch (IndexOutOfBoundsException ex) {
34             throw new ConcurrentModificationException();
35         }
36     }
37
38     final void checkForComodification() {
39         if (modCount != expectedModCount)
40             throw new ConcurrentModificationException();
41     }
42 }
原来Itr它是一个私有的内部类,实现Iterator接口。
我们来一行一行读。在第3行中有一个modCount变量。跟踪这个变量,发现这个变量有点意思:
protected transient int modCount = 0;
发现有一个“transient”关键字,查阅资料发现这个关键字的意思是:表示一个域不是该对象序列化的一部分。意思是在对象被序列化时不包括这个变量,至于为什么要这么做呢,我们可以留下一个疑问。(JDk源码注释中是这么说的:The modCount value that the iterator believes that the backing List should have. If this expectation is violated, the iterator has detected concurrent modification.英语太次只能读懂最后一句:如果这个期望是可见性的,那么这个迭代器会检测到有一个并发的修改。猜测是和并发多线程相关。)
hasnext的实现较为简单:
1 public boolean hasNext() {
2     return cursor != size;  //下一个元素的索引是否等于ArrayList的大小
3 }
next的实现:
public E next() {
    checkForComodification();  //检查是否并发修改
    int i = cursor;
    if (i >= size)
        throw new NoSuchElementException();  //索引大于ArrayList大小抛出异常
    Object[] elementData = ArrayList.this.elementData;  //后面实际是在取ArrayList中的数据
    if (i >= elementData.length)
        throw new ConcurrentModificationException();
    cursor = i + 1;
    return (E) elementData[lastRet = i];
}
在next方法中我们看到有一个checkForCommodification方法:
final void checkForComodification() {
    if (modCount != expectedModCount)
        throw new ConcurrentModificationException();
}
看来这个modCount变量确实是和并发相关,如果expectedModCount和modCount这两个值不同,则抛出当前正在并发修改的异常。
最后我们来看remove方法的实现:
public void remove() {
    if (lastRet < 0)  //这个地方格外注意,不能在未调用next时直接调用remove方法,必须在remove调用前调用next方法,将通过cursor索引值将其值赋给lastRet
        throw new IllegalStateException();
    checkForComodification();

    try {
        ArrayList.this.remove(lastRet);
        cursor = lastRet;
        lastRet = -1;
        expectedModCount = modCount;
    } catch (IndexOutOfBoundsException ex) {
        throw new ConcurrentModificationException();
    }
}
在remove方法中我们要格外注意,在第一句是检测lastRet是否小于0,我们初始化了lastRet变量-1的值,这意味着,如果我们如果创建完Iterator实例后直接调用remove方法会抛出一个IllegalStateException异常,那怎么才能正确调用呢?那就是在调用remove方法前先调用next方法,此时lastReturn通过cursor索引被赋值,这个时候才能正确使用remove方法。同时它也会调用checkForCommodification方法做并发修改检测。其实我们可以看到JDK源码之所以写到好,是因为它每个方法都做了很多的检测,以确保在尽量多的场景下准确无误地运行。今天关于Java的迭代器就通过JDK源码简单介绍,通过对源码的阅读能够加深我们的理解,这还只是简单的阅读,并没有做很深的理解。最后,我们以为一个Iterator的例子结尾。
 1 package day_29_iterator;
 2
 3 import java.util.ArrayList;
 4 import java.util.Iterator;
 5 import java.util.List;
 6
 7 /**
 8  * @author turbo
 9  *
10  * 2016年9月29日
11  */
12 public class Main {
13
14     /**
15      * @param args
16      */
17     public static void main(String[] args) {
18         List list = new ArrayList();
19         list.add(1);
20         list.add(2);
21         Iterator iterator = list.iterator();
22         while (iterator.hasNext()){
23             System.out.println(iterator.next());
24         }
25     }
26
27 }

