
Python开发【第十篇】:RabbitMQ队列
简介
RabbitMQ是流行的开源消息队列系统,用erlang语言开发。RabbitMQ是AMQP(高级消息队列协议)的标准实现。
安装
首先安装erlang环境。
官网:http://www.erlang.org/
Windows版下载地址:http://erlang.org/download/otp_win64_20.0.exe
Linux版:yum安装
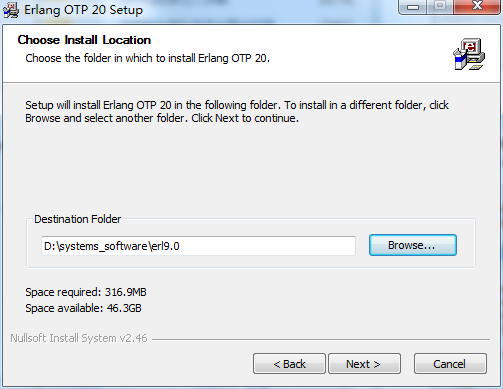
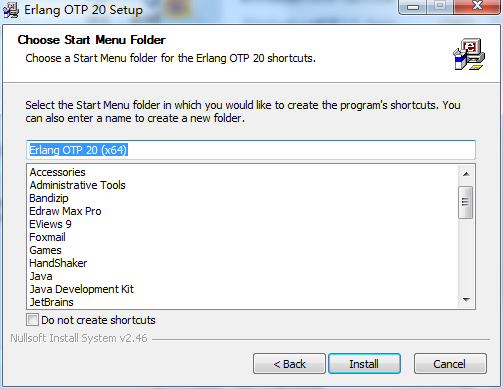
Windows安装步骤
第一步运行

第二步
第三步
第四步

第五步

Erlang安装完成。
然后安装RabbitMQ,首先下载RabbitMQ的Windows版本。
官网:http://www.rabbitmq.com/
Windows版下载地址:http://www.rabbitmq.com/releases/rabbitmq-server/v3.6.10/rabbitmq-server-3.6.10.exe
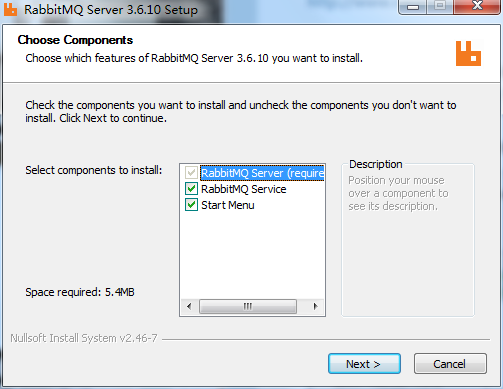
打开安装程序,按照下面步骤安装。


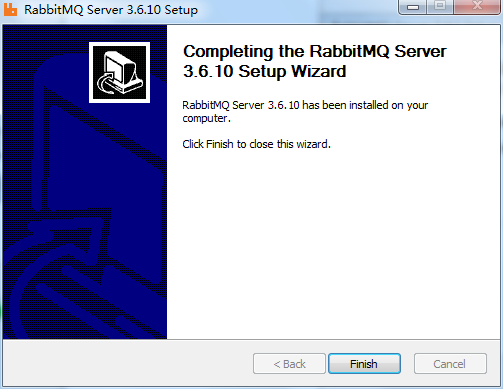
RabbitMQ安装完成。
开始菜单中进入管理工具。

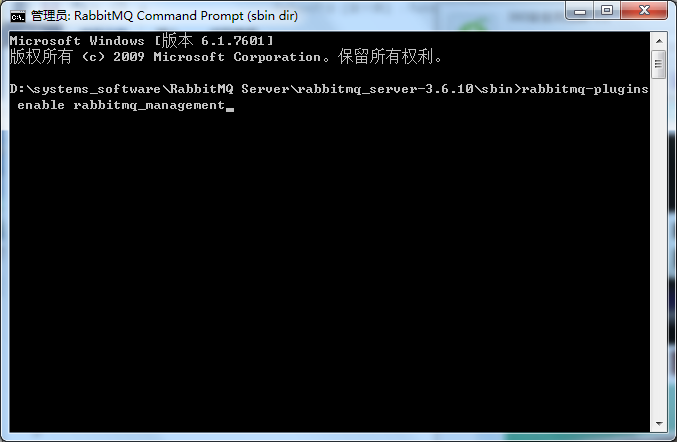
运行命令
- rabbitmq-plugins enable rabbitmq_management

查看RabbitMQ服务是否启动。


至此全部安装完成。
Linux安装步骤
安装erlang。
- yum -y install erlang
安装RabbitMQ。
- wget https://github.com/rabbitmq/rabbitmq-server/archive/rabbitmq_v3_6_10.tar.gz
- rpm -ivh rabbitmq-server-3.6.10-1.el6.noarch.rpm
RabbitMQ安装失败,报错如下。
- warning: rabbitmq-server-3.6.10-1.el6.noarch.rpm: Header V4 RSA/SHA512 Signature, key ID 6026dfca: NOKEY
- error: Failed dependencies:
- erlang >= R16B-03 is needed by rabbitmq-server-3.6.10-1.el6.noarch
- socat is needed by rabbitmq-server-3.6.10-1.el6.noarch
原因是yum安装的erlang版本太低,这里提供的RabbitMQ是最新版3.6.10,所需的erlang版本最低为R16B-03,否则编译时将失败,也就是上述错误。
重新安装erlang。
- wget http://erlang.org/download/otp_src_20.0.tar.gz
- tar xvzf otp_src_20.0.tar.gz
- cd otp_src_20.0
- ./configure
- make && make install
重新安装erlang完毕。
运行erlang。
- erl
- Erlang/OTP 20 [erts-9.0] [source] [64-bit] [smp:1:1] [ds:1:1:10] [async-threads:10] [hipe] [kernel-poll:false]
- Eshell V9.0 (abort with ^G)
安装socat。
- yum install -y socat
再次安装RabbitMQ。
- rpm -ivh rabbitmq-server-3.6.10-1.el6.noarch.rpm
- warning: rabbitmq-server-3.6.10-1.el6.noarch.rpm: Header V4 RSA/SHA512 Signature, key ID 6026dfca: NOKEY
- error: Failed dependencies:
- erlang >= R16B-03 is needed by rabbitmq-server-3.6.10-1.el6.noarch
上述错误信息显示安装失败,因为rabbitMQ的依赖关系所导致,所以要忽略依赖,执行以下命令。
- rpm -ivh --nodeps rabbitmq-server-3.6.10-1.el6.noarch.rpm
安装成功。
启动、停止RabbitMQ。
- rabbitmq-server start #启动
- rabbitmq-server stop #停止
- rabbitmq-server restart #重启
RabbitMQ使用
实现最简单的队列通信
send端(producer)
- __author__ = 'Golden'
- #!/usr/bin/env python3
- # -*- coding:utf-8 -*-
- import pika
- connection = pika.BlockingConnection(pika.ConnectionParameters('localhost'))
- channel = connection.channel()
- # 声明queue
- channel.queue_declare(queue='hello')
- channel.basic_publish(exchange='',
- routing_key='hello',
- body='hello word')
- print("[x] Sent 'hello word!'")
- connection.close()
receive端(consumer)
- __author__ = 'Golden'
- #!/usr/bin/env python3
- # -*- coding:utf-8 -*-
- import pika,time
- connection = pika.BlockingConnection(pika.ConnectionParameters('localhost'))
- channel = connection.channel()
- channel.queue_declare(queue='hello')
- def callback(ch,method,properties,body):
- print('-->',ch,method,properties)
- print("[x] Received %s" % body)
- channel.basic_consume(callback,
- queue='hello',
- no_ack=True
- )
- print('[*] waiting for messages.To exit press CTRL+C')
- channel.start_consuming()
no_ack分析
no_ack属性是在调用Basic.Consume方法时可以设置的一个重要参数。no_ack的用途是确保message被consumer成功处理了。这里成功的意识是,在设置了no_ack=false的情况下,只要consumer手动应答了Basic.Ack,就算其成功处理了。
no_ack=true(此时为自动应答)
在这种情况下,consumer会在接收到Basic.Deliver+Content-Header+Content-Body之后,立即回复Ack,而这个Ack是TCP协议中的Ack。此Ack的回复不关心consumer是否对接收到的数据进行了处理,当然也不关心处理数据所需要的耗时。
no_ack=False(此时为手动应答)
在这种情况下,要求consumer在处理完接收到的Basic.Deliver+Content-Header+Content-Body之后才回复Ack,而这个Ack是AMQP协议中的Basic.Ack。此Ack的回复与业务处理相关,所以具体的回复时间应该要取决于业务处理的耗时。
总结
Basic.Ack发给RabbitMQ以告知,可以将相应message从RabbitMQ的消息从缓存中移除。
Basic.Ack未被consumer发给RabbitMQ前出现了异常,RabbitMQ发现与该consumer对应的连接被断开,将该该message以轮询方式发送给其他consumer(需要存在多个consumer订阅同一个queue)。
在no_ack=true的情况下,RabbitMQ认为message一旦被deliver出去后就已被确认了,所以会立即将缓存中的message删除,因此在consumer异常时会导致消息丢失。
来自consumer的Basic.Ack与发送给Producer的Basic.Ack没有直接关系。
消息持久化
acknowledgment消息持久化
no-ack=False,如果consumer挂掉了,那么RabbitMQ会重新将该任务添加到队列中。
回调函数中
- ch.basic_ack(delivery_tag=method.delivery_tag)
basic_consume中
- no_ack=False
receive端(consumer)
- __author__ = 'Golden'
- #!/usr/bin/env python3
- # -*- coding:utf-8 -*-
- import pika,time
- connection = pika.BlockingConnection(pika.ConnectionParameters('localhost'))
- channel = connection.channel()
- channel.queue_declare(queue='hello')
- # 定义回调函数
- def callback(ch,method,properties,body):
- print('-->',ch,method,properties)
- print("[x] Received %s" % body)
- ch.basic_ack(delivery_tag=method.delivery_tag)
- # no_ack=False表示消费完以后不主动把状态通知RabbitMQ
- channel.basic_consume(callback,
- queue='hello',
- no_ack=False
- )
- print('[*] waiting for messages.To exit press CTRL+C')
- channel.start_consuming()
durable消息持久化
producer发送消息时挂掉了,consumer接收消息时挂掉了,以下方法会让RabbitMQ重新将该消息添加到队列中。
回调函数中
- ch.basic_ack(delivery_tag=method.delivery_tag)
basic_consume中
- no_ack=False
basic_publish中添加参数
- properties=pika.BasicProperties(delivery_mode=2)
channel.queue_declare中添加参数
- channel.queue_declare(queue='hello',durable=True)
send端(producer)
- __author__ = 'Golden'
- #!/usr/bin/env python3
- # -*- coding:utf-8 -*-
- import pika
- connection = pika.BlockingConnection(pika.ConnectionParameters('localhost'))
- channel = connection.channel()
- # 声明queue
- channel.queue_declare(queue='hello',durable=True)
- channel.basic_publish(exchange='',
- routing_key='hello',
- body='hello word',
- properties=pika.BasicProperties(delivery_mode=2))
- print("[x] Sent 'hello word!'")
- connection.close()
receive端(consumer)与acknowledgment消息持久化中receive端(consumer)相同。
消息分发
默认消息队列里的数据是按照顺序分发到各个消费者,但是大部分情况下,消息队列后端的消费者服务器的处理能力是不相同的,这就会出现有的服务器闲置时间较长,资源浪费的情况。那么,我们就需要改变默认的消息队列获取顺序。可以在各个消费者端配置prefetch_count=1,意思就是告诉RabbitMQ在这个消费者当前消息还没有处理完的时候就不要再发新消息了。

消费者端
- __author__ = 'Golden'
- #!/usr/bin/env python3
- # -*- coding:utf-8 -*-
- __author__ = 'Golden'
- #!/usr/bin/env python3
- # -*- coding:utf-8 -*-
- import pika,time
- connection = pika.BlockingConnection(pika.ConnectionParameters('localhost'))
- channel = connection.channel()
- channel.queue_declare(queue='hello2',durable=True)
- def callback(ch,method,properties,body):
- print('-->',ch,method,properties)
- print("[x] Received %s" % body)
- time.sleep(30)
- ch.basic_ack(delivery_tag=method.delivery_tag)
- channel.basic_qos(prefetch_count=1)
- channel.basic_consume(callback,
- queue='hello2',
- no_ack=False
- )
- print('[*] waiting for messages.To exit press CTRL+C')
- channel.start_consuming()
生产者端不变。
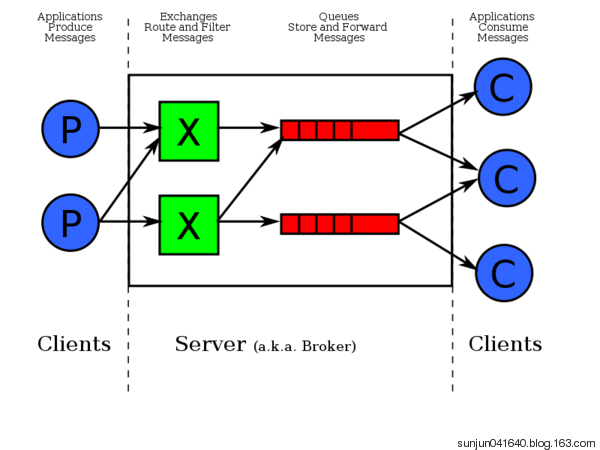
消息发布和订阅(publish\subscribe)
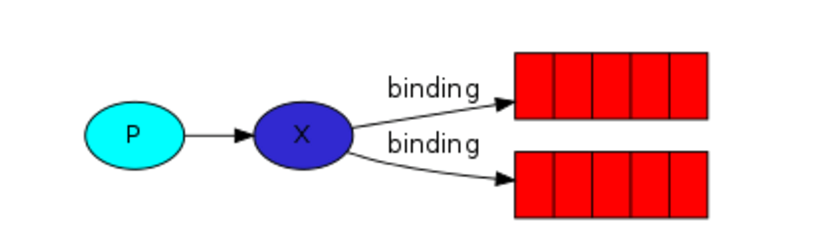
发布和订阅与简单的消息队列区别在于,发布和订阅会将消息发送给所有的订阅者,而消息队列中的数据被消费一次便消失。所以,RabbitMQ实现发布和订阅时,会为每一个订阅者创建一个队列,而发布者发布消息时,会将消息放置在所有相关队列中。类似广播的效果,这时候就要用到exchange。Exchange在定义的时候是有类型的,以决定到底是哪些Queue符合条件,可以接收消息。
fanout:所有bind到此exchange的queue都可以接收消息。
direct:通过routingKey和exchange决定的哪个唯一的queue可以接收消息。
topic:所有符合routingKey(可以是一个表达式)的routingKey所bind的queue可以接收消息。
表达式符号说明
#:一个或多个字符
*:任何字符
例如:#.a会匹配a.a,aa.a,aaa.a等。
*.a会匹配a.a,b.a,c.a等。
注意:使用RoutingKey为#,Exchange Type为topic的时候相对于使用fanout。
heaers:通过headers来决定把消息发给哪些queue。
publisher
- __author__ = 'Golden'
- #!/usr/bin/env python3
- # -*- coding:utf-8 -*-
- import pika,sys
- connection = pika.BlockingConnection(pika.ConnectionParameters(host='localhost'))
- channel = connection.channel()
- channel.exchange_declare(exchange='logs',type='fanout')
- message = ''.join(sys.argv[1:]) or 'info:Hello World!'
- channel.basic_publish(exchange='logs',
- routing_key='',
- body=message)
- print('[x] Send %r' % message)
- connection.close()
subscriber
- __author__ = 'Golden'
- #!/usr/bin/env python3
- # -*- coding:utf-8 -*-
- import pika
- connection = pika.BlockingConnection(pika.ConnectionParameters(host='localhost'))
- channel = connection.channel()
- channel.exchange_declare(exchange='logs',type='fanout')
- # 不指定queue名字,rabbit会随机分配一个名字,exclusive=True会在使用此queue的消费者断开后,自动将queue删除
- result = channel.queue_declare(exclusive=True)
- queue_name = result.method.queue
- channel.queue_bind(exchange='logs',queue=queue_name)
- print('[*]Waiting for logs.To exit press CTRL+C')
- def callback(ch,method,properties,body):
- print('[*] %s'%body)
- channel.basic_consume(callback,
- queue=queue_name,
- no_ack=True)
- channel.start_consuming()
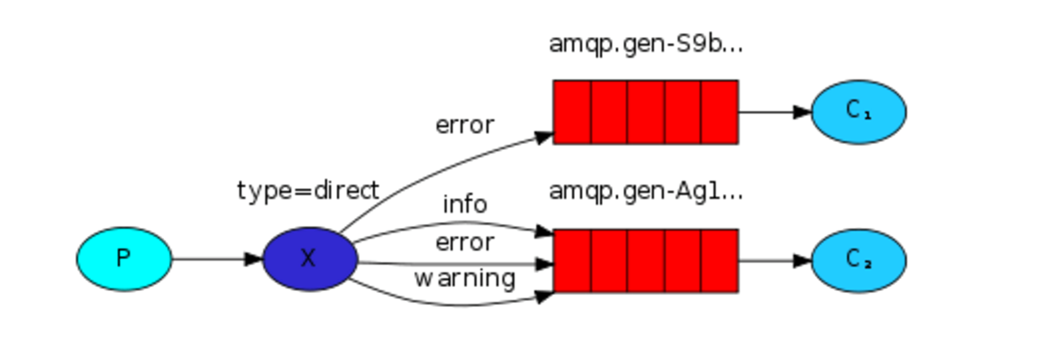
关键字发送(echange type=direct)
发送消息时明确指定某个队列并向其中发送消息,RabbitMQ还支持根据关键字发送,即队列绑定关键字,发送者将数据根据关键字发送到消息exchange,exchange根据关键字判定应该将数据发送至哪个队列。
publisher
- __author__ = 'Golden'
- #!/usr/bin/env python3
- # -*- coding:utf-8 -*-
- import pika,sys
- connection = pika.BlockingConnection(pika.ConnectionParameters(host='localhost'))
- channel = connection.channel()
- channel.exchange_declare(exchange='direct_logs',
- type='direct')
- # severity = 'error'
- severity = sys.argv[1] if len(sys.argv) > 1 else 'info'
- # message = 'Hello World!'
- message = ''.join(sys.argv[2:]) or 'Hello World!'
- channel.basic_publish(exchange='direct_logs',
- routing_key=severity,
- body=message)
- print('[x] Send %r:%r' % (severity,message))
- connection.close()
subscriber
- __author__ = 'Golden'
- #!/usr/bin/env python3
- # -*- coding:utf-8 -*-
- import pika,sys
- connection = pika.BlockingConnection(pika.ConnectionParameters(host='localhost'))
- channel = connection.channel()
- channel.exchange_declare(exchange='direct_logs',
- type='direct')
- result = channel.queue_declare(exclusive=True)
- queue_name = result.method.queue
- severities = sys.argv[1:]
- if not severities:
- sys.stderr.write('Usage: %s [info] [warning] [error]\n' % sys.argv[0])
- sys.exit(1)
- for severity in severities:
- channel.queue_bind(exchange='direct_logs',
- queue=queue_name,
- routing_key=severity)
- print('[*] Waiting for logs.To exit press CTRL+C')
- def callback(ch,method,properties,body):
- print('[*] %r:%r' % (method.routing_key,body))
- channel.basic_consume(callback,
- queue=queue_name,
- no_ack=True)
- channel.start_consuming()
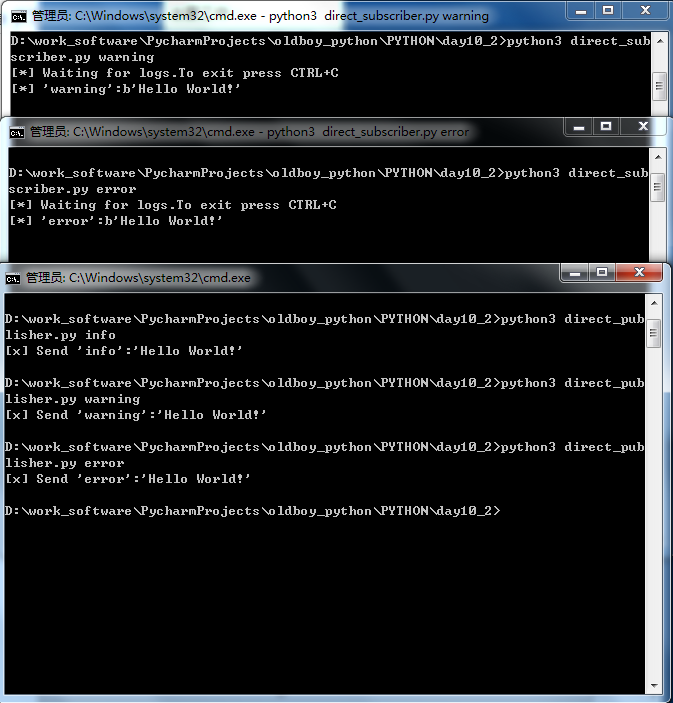
启动subscriber1
- python3 direct_subscriber.py warning
启动subscriber2
- python3 direct_subscriber.py error
启动publisher1
- python3 direct_publisher.py info
启动publisher2
- python3 direct_publisher.py warning
启动publisher3
- python3 direct_publisher.py error
结果
模糊匹配(exchange type=topic)
在topic类型下,可以让队列绑定几个模糊的关键字,发送者将数据发送到exchange,exchange将传入"路由值"和"关键字"进行匹配,匹配成功则将数据发送到指定队列。

*:匹配任意一个字符
#:匹配任意个字符
publisher
- __author__ = 'Golden'
- #!/usr/bin/env python3
- # -*- coding:utf-8 -*-
- import pika,sys
- connection = pika.BlockingConnection(pika.ConnectionParameters(host='localhost'))
- channel = connection.channel()
- channel.exchange_declare(exchange='topic_logs',
- type='topic')
- routing_key = sys.argv[1] if len(sys.argv) > 1 else 'anonymous.info'
- message = ''.join(sys.argv[2:]) or 'Hello World!'
- channel.basic_publish(exchange='topic_logs',
- routing_key=routing_key,
- body=message)
- print('[x] Sent %r:%r' % (routing_key,message))
- connection.close()
subscriber
- __author__ = 'Golden'
- #!/usr/bin/env python3
- # -*- coding:utf-8 -*-
- import pika,sys
- connection = pika.BlockingConnection(pika.ConnectionParameters(host='localhost'))
- channel = connection.channel()
- channel.exchange_declare(exchange='topic_logs',
- type='topic')
- result = channel.queue_declare(exclusive=True)
- queue_name = result.method.queue
- binding_keys = sys.argv[1:]
- if not binding_keys:
- sys.stderr.write('Usage: %s [binding_key]...\n' % sys.argv[0])
- sys.exit(1)
- for binding_key in binding_keys:
- channel.queue_bind(exchange='topic_logs',
- queue=queue_name,
- routing_key=binding_key)
- print('[*] Waiting for logs.To exit press CTRL+C')
- def callback(ch,method,properties,body):
- print('[x] %r:%r' % (method.routing_key,body))
- channel.basic_consume(callback,
- queue=queue_name,
- no_ack=True)
- channel.start_consuming()
测试

远程过程调用(RPC)
RPC(Remote Procedure Call Protocol)远程过程调用协议。在一个大型的公司,系统由大大小小的服务构成,不同的团队维护不同的代码,部署在不同的服务器。但是在做开发的时候往往要用到其他团队的方法,因为已经有了实现。但是这些服务部署在不同的服务器,想要调用就需要网络通信,这些代码繁琐且复杂,一不小心就会很低效。PRC协议定义了规划,其它的公司都给出了不同的实现。比如微软的wcf,以及WebApi。
在RabbitMQ中RPC的实现是很简单高效的,现在客户端、服务端都是消息发布者与消息接受者。
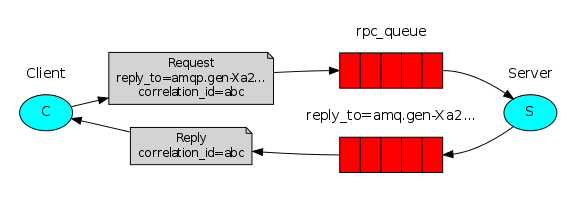
首先客户端通过RPC向服务端发生请求。correlation_id:请求标识,erply_to:结果返回队列。(我这里有一些数据需要你给我处理一下,correlation_id是我请求标识,你处理完成之后把结果返回到erply_to队列)
服务端拿到请求,开始处理并返回。correlation_id:客户端请求标识。(correlation_id这是你的请求标识,还给你。这时候客户端用自己的correlation_id与服务端返回的correlation_id进行对比,相同则接收。)
rpc_server
- __author__ = 'Golden'
- #!/usr/bin/env python3
- # -*- coding:utf-8 -*-
- import pika,time
- connection = pika.BlockingConnection(pika.ConnectionParameters(host='localhost'))
- channel = connection.channel()
- channel.queue_declare(queue='rpc_queue')
- def fib(n):
- if n == 0:
- return 0
- elif n == 1:
- return 1
- else:
- return fib(n-1) + fib(n-2)
- def on_request(ch,method,props,body):
- n = int(body)
- print('[.] fib(%s)' % n)
- response = fib(n)
- ch.basic_publish(exchange='',
- routing_key=props.reply_to,
- properties=pika.BasicProperties(correlation_id=props.correlation_id),
- body = str(response))
- ch.basic_ack(delivery_tag=method.delivery_tag)
- channel.basic_qos(prefetch_count=1)
- channel.basic_consume(on_request,queue='rpc_queue')
- print('[x] Awaiting RPC requests')
- channel.start_consuming()
rpc_client
- __author__ = 'Golden'
- #!/usr/bin/env python3
- # -*- coding:utf-8 -*-
- import pika,uuid
- class FibonacciRpcClient(object):
- def __init__(self):
- self.connection = pika.BlockingConnection(pika.ConnectionParameters(host='localhost'))
- self.channel = self.connection.channel()
- result = self.channel.queue_declare(exclusive=True)
- self.callback_queue = result.method.queue
- self.channel.basic_consume(self.on_response,no_ack=True,
- queue=self.callback_queue)
- def on_response(self,ch,method,props,body):
- if self.corr_id == props.correlation_id:
- self.response = body
- def call(self,n):
- self.response = None
- self.corr_id = str(uuid.uuid4())
- self.channel.basic_publish(exchange='',
- routing_key='rpc_queue',
- properties=pika.BasicProperties(
- reply_to=self.callback_queue,
- correlation_id=self.corr_id,),
- body=str(n))
- while self.response is None:
- self.connection.process_data_events()
- return int(self.response)
- fibonacci_rpc = FibonacciRpcClient()
- print('[x] Requesting fib(10)')
- response = fibonacci_rpc.call(10)
- print('[.] Got %r ' % response)
posted on 2017-08-17 22:16 yinshoucheng 阅读(497) 评论(0) 编辑 收藏 举报


