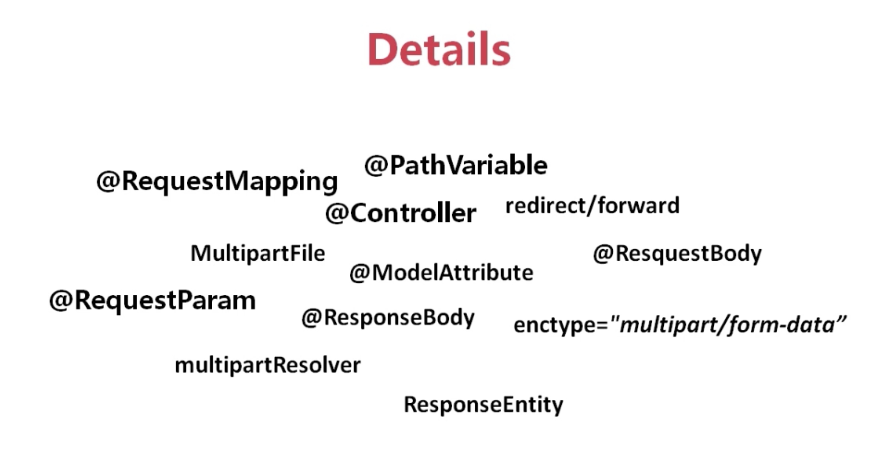
[Java] Spring MVC 知识点
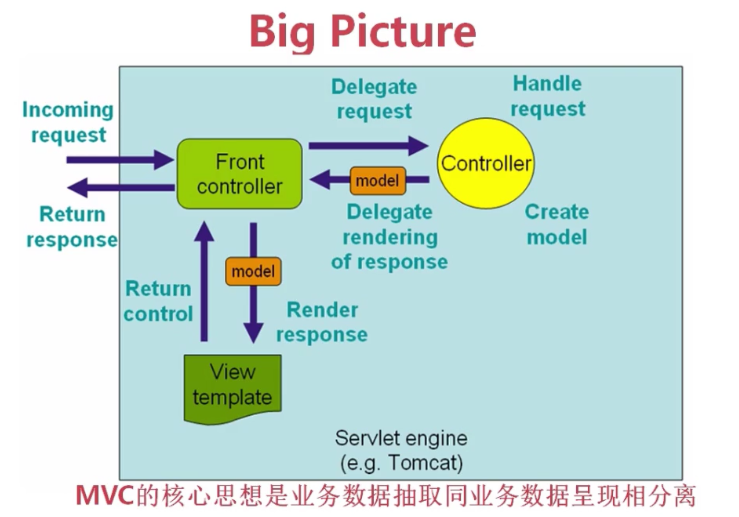
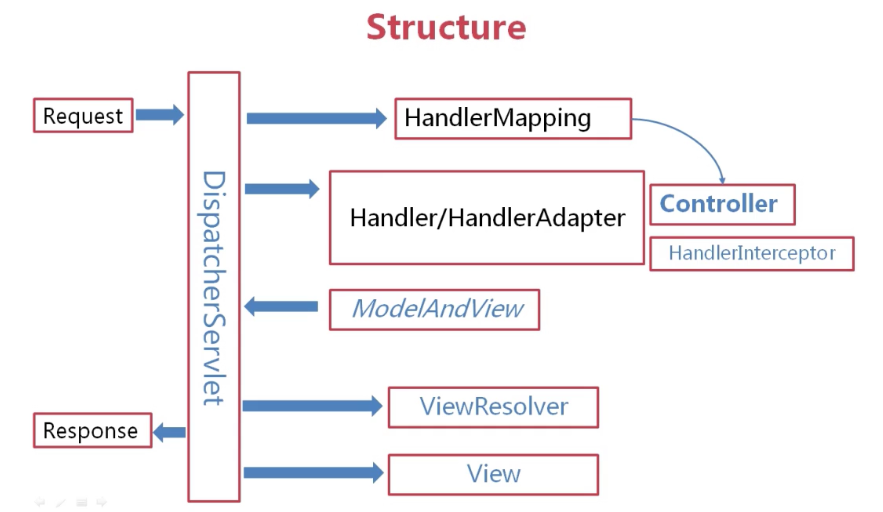
云图:
@Service
用于标注业务层组件。
在 Spring-servlet 配置xml中,component-scan 标签默认情况下自动扫描指定路径下的包(含所有子包),将带有@Component、@Repository、@Service、@Controller标签的类自动注册到spring容器。
对标记了 Spring's @Required、@Autowired、JSR250's @PostConstruct、@PreDestroy、@Resource、JAX-WS's @WebServiceRef、EJB3's @EJB、JPA's @PersistenceContext、@PersistenceUnit等注解的类进行对应的操作使注解生效(包含了annotation-config标签的作用)。
@Service
public class VentorServiceImpl implements iVentorService {
}
@Controller
spring mvc 中将 controller 认为是 MVC中的C --控制层, 规范命名 类名 xxxController , 作用是告诉服务器 这个类是MVC中的C这个类可以接收用户请求,处理用户请求。
在一个稍大的项目中,如果组件采用xml的bean定义来配置,显然会增加配置文件的体积,查找以及维护起来也不太方便。
Spring2.5为我们引入了组件自动扫描机制,他在类路径下寻找标注了上述注解的类,并把这些类纳入进spring容器中管理。
它的作用和在xml文件中使用bean节点配置组件时一样的。
如何接收用户请求
使用@RequestMapping
如何让spring 去扫描类 建立关联:
1:在配置文件中 (spring)的 假设是 mvc.xml 中
2:加入 <context:component-scan base-package="包名"/>
如何返回到视图层 V:
1: 解决:此时,需要在配置文件中,加入视图解析器 有很多种 ,太多了
2:这里用基于jsp/jstl 视图
3:在web.xml 中加入bean 配置
<bean class="org.s...f....web.servlet.view.InternalResourceViewResolver">
<property name="prefix" value="/WEB-INF/views"/> 前缀
<property name="suffix" value=".jsp"/> 后缀
</bean>
@Repository
用于标注数据访问组件,即DAO组件。
@Component
泛指组件,当组件不好归类的时候,我们可以使用这个注解进行标注。
@RequestMapping
RequestMapping是一个用来处理请求地址映射的注解,可用于类或方法上。用于类上,表示类中的所有响应请求的方法都是以该地址作为父路径。
RequestMapping注解有六个属性,下面我们把她分成三类进行说明。
1、 value, method;
value: 指定请求的实际地址,指定的地址可以是URI Template 模式(后面将会说明);
method: 指定请求的method类型, GET、POST、PUT、DELETE等;
2、 consumes,produces;
consumes: 指定处理请求的提交内容类型(Content-Type),例如application/json, text/html;
produces: 指定返回的内容类型,仅当request请求头中的(Accept)类型中包含该指定类型才返回;
3、 params,headers;
params: 指定request中必须包含某些参数值是,才让该方法处理。
headers: 指定request中必须包含某些指定的header值,才能让该方法处理请求。
示例:
1、value / method 示例
默认RequestMapping("....str...")即为value的值;
@Controller
@RequestMapping("/appointments")
public class AppointmentsController {

    private AppointmentBook appointmentBook;

    @Autowired
    public AppointmentsController(AppointmentBook appointmentBook) {
        this.appointmentBook = appointmentBook;
    }

    @RequestMapping(method = RequestMethod.GET)
    public Map<String, Appointment> get() {
        return appointmentBook.getAppointmentsForToday();
    }

    @RequestMapping(value="/{day}", method = RequestMethod.GET)
    public Map<String, Appointment> getForDay(@PathVariable @DateTimeFormat(iso=ISO.DATE) Date day, Model model) {
        return appointmentBook.getAppointmentsForDay(day);
    }

    @RequestMapping(value="/new", method = RequestMethod.GET)
    public AppointmentForm getNewForm() {
        return new AppointmentForm();
    }

    @RequestMapping(method = RequestMethod.POST)
    public String add(@Valid AppointmentForm appointment, BindingResult result) {
        if (result.hasErrors()) {
            return "appointments/new";
        }
        appointmentBook.addAppointment(appointment);
        return "redirect:/appointments";
    }
}
value的uri值为以下三类:
A) 可以指定为普通的具体值;
B) 可以指定为含有某变量的一类值(URI Template Patterns with Path Variables);
C) 可以指定为含正则表达式的一类值( URI Template Patterns with Regular Expressions);
@RequestMapping(value="/owners/{ownerId}", method=RequestMethod.GET)
public String findOwner(@PathVariable String ownerId, Model model) {
  Owner owner = ownerService.findOwner(ownerId);
  model.addAttribute("owner", owner);
  return "displayOwner";
}
@RequestMapping("/spring-web/{symbolicName:[a-z-]+}-{version:\d\.\d\.\d}.{extension:\.[a-z]}")
  public void handle(@PathVariable String version, @PathVariable String extension) {
    // ...
  }
}
cousumes的样例:
@Controller
@RequestMapping(value = "/pets", method = RequestMethod.POST, consumes="application/json")
public void addPet(@RequestBody Pet pet, Model model) {
    // implementation omitted
}
方法仅处理request Content-Type为“application/json”类型的请求。
produces的样例:
@Controller
@RequestMapping(value = "/pets/{petId}", method = RequestMethod.GET, produces="application/json")
@ResponseBody
public Pet getPet(@PathVariable String petId, Model model) {
    // implementation omitted
}
方法仅处理request请求中Accept头中包含了"application/json"的请求,同时暗示了返回的内容类型为application/json;
params的样例:
@Controller
@RequestMapping("/owners/{ownerId}")
public class RelativePathUriTemplateController {

  @RequestMapping(value = "/pets/{petId}", method = RequestMethod.GET, params="myParam=myValue")
  public void findPet(@PathVariable String ownerId, @PathVariable String petId, Model model) {
    // implementation omitted
  }
}
仅处理请求中包含了名为“myParam”,值为“myValue”的请求;
headers的样例:
@Controller
@RequestMapping("/owners/{ownerId}")
public class RelativePathUriTemplateController {

@RequestMapping(value = "/pets", method = RequestMethod.GET, headers="Referer=http://www.ifeng.com/")
  public void findPet(@PathVariable String ownerId, @PathVariable String petId, Model model) {
    // implementation omitted
  }
}
仅处理request的header中包含了指定“Refer”请求头和对应值为“http://www.ifeng.com/”的请求;
(示例代码转自: http://www.cnblogs.com/qq78292959/p/3760560.html )
@Autowired
Spring 2.5 引入了 @Autowired 注释,它可以对类成员变量、方法及构造函数进行标注,完成自动装配的工作。 通过 @Autowired的使用来消除 set ,get方法。
在接口前面标上@Autowired注释使得接口可以被容器注入:
    @Autowired
    @Qualifier("chinese")
    private Man man;
当接口存在两个实现类的时候必须使用@Qualifier指定注入哪个实现类,否则可以省略,只写@Autowired。
要实现我们要精简程序的目的。需要这样来处理:
<!-- 该 BeanPostProcessor 将自动对标注 @Autowired 的 Bean 进行注入 -->
  <bean class="org.springframework.beans.factory.annotation.AutowiredAnnotationBeanPostProcessor"/>
Spring 通过一个 BeanPostProcessor 对 @Autowired 进行解析,所以要让 @Autowired 起作用必须事先在 Spring 容器中声明 AutowiredAnnotationBeanPostProcessor Bean。
* 修改在原来注入spirng容器中的bean的方法。
在域变量上加上标签@Autowired,并且去掉 相应的get 和set方法
* 在applicatonContext.xml中 把原来 引用的<porpery >标签也去掉。
也可以通过 @Autowired 对方法或构造函数进行标注,如果构造函数有两个入参,分别是 bean1 和 bean2,@Autowired 将分别寻找和它们类型匹配的 Bean,将它们作为 CountryService (Bean1 bean1 ,Bean2 bean2) 的入参来创建 CountryService Bean。
    package com.baobaotao;

    public class Boss {
        private Car car;
        private Office office;

         @Autowired
        public void setCar(Car car) {
            this.car = car;
        }

        @Autowired
        public void setOffice(Office office) {
            this.office = office;
        }
        …
    }
这时,@Autowired 将查找被标注的方法的入参类型的 Bean,并调用方法自动注入这些 Bean。而下面的使用方法则对构造函数进行标注:
package com.baobaotao;

public class Boss {
    private Car car;
    private Office office;

    @Autowired
    public Boss(Car car ,Office office){
        this.car = car;
        this.office = office ;
    }

    …
}
由于 Boss() 构造函数有两个入参,分别是 car 和 office,@Autowired 将分别寻找和它们类型匹配的 Bean,将它们作为 Boss(Car car ,Office office) 的入参来创建 Boss Bean。
@Autowired 默认是按照byType进行注入的,但是当byType方式找到了多个符合的bean,又是怎么处理的?
经过一些代码的测试,我发现,Autowired默认先按byType,如果发现找到多个bean,则,又按照byName方式比对,如果还有多个,则报出异常。
例子:
@Autowired
private ExamUserMapper examUserMapper; - ExamUserMapper是一个接口
1. spring先找类型为ExamUserMapper的bean
2. 如果存在且唯一,则OK;
3. 如果不唯一,在结果集里,寻找name为examUserMapper的bean。因为bean的name有唯一性,所以,到这里应该能确定是否存在满足要求的bean了
@Autowired也可以手动指定按照byName方式注入,使用@Qualifier标签,例如:@Autowired ()
@Qualifier ( "baseDao" )@autowired和@resource的区别?
@Resource的作用相当于@Autowired,只不过@Autowired按byType自动注入,而@Resource默认按 byName自动注入罢了。@Resource有两个属性是比较重要的,分是name和type,Spring将@Resource注解的name属性解析为bean的名字,而type属性则解析为bean的类型。所以如果使用name属性,则使用byName的自动注入策略,而使用type属性时则使用byType自动注入策略。如果既不指定name也不指定type属性,这时将通过反射机制使用byName自动注入策略。
@Resource装配顺序
1. 如果同时指定了name和type,则从Spring上下文中找到唯一匹配的bean进行装配,找不到则抛出异常
2. 如果指定了name,则从上下文中查找名称(id)匹配的bean进行装配,找不到则抛出异常
3. 如果指定了type,则从上下文中找到类型匹配的唯一bean进行装配,找不到或者找到多个,都会抛出异常
4. 如果既没有指定name,又没有指定type,则自动按照byName方式进行装配;如果没有匹配,则回退为一个原始类型进行匹配,如果匹配则自动装配;
@PathVariable
@PathVariable是用来获得请求url中的动态参数的。当使用@RequestMapping URI template 样式映射时, 即 someUrl/{paramId}, 这时的paramId可通过 @Pathvariable注解绑定它传过来的值到方法的参数上。
@Controller
@RequestMapping("/owners/{ownerId}")
public class RelativePathUriTemplateController {

  @RequestMapping("/pets/{petId}")
  public void findPet(@PathVariable String ownerId, @PathVariable String petId, Model model) {
    // implementation omitted
  }
}
上面代码把URI template 中变量 ownerId的值和petId的值,绑定到方法的参数上。若方法参数名称和需要绑定的uri template中变量名称不一致,需要在@PathVariable("name")指定uri template中的名称。
@ModelAttribute
绑定请求参数到命令对象。
@ModelAttribute一个具有如下三个作用:
① 绑定请求参数到命令对象:放在功能处理方法的入参上时,用于将多个请求参数绑定到一个命令对象,从而简化绑定流程,而且自动暴露为模型数据用于视图页面展示时使用;
② 暴露表单引用对象为模型数据:放在处理器的一般方法(非功能处理方法)上时,是为表单准备要展示的表单引用对象,如注册时需要选择的所在城市等,而且在执行功能处理方法(@RequestMapping 注解的方法)之前,自动添加到模型对象中,用于视图页面展示时使用;
③ 暴露@RequestMapping 方法返回值为模型数据:放在功能处理方法的返回值上时,是暴露功能处理方法的返回值为模型数据,用于视图页面展示时使用。
绑定请求参数到指定对象
public String test1(@ModelAttribute("user") UserModel user)
只是此处多了一个注解@ModelAttribute("user"),它的作用是将该绑定的命令对象以“user”为名称添加到模型对象中供视图页面展示使用。我们此时可以在视图页面使用${user.username}来获取绑定的命令对象的属性。
如请求参数包含“?username=zhang&password=123&workInfo.city=bj”自动绑定到user 中的workInfo属性的city属性中。
    @RequestMapping(value="/model2/{username}")
    public String test2(@ModelAttribute("model") DataBinderTestModel model)
URI 模板变量也能自动绑定到命令对象中, 当你请求的URL 中包含“bool=yes&schooInfo.specialty=computer&hobbyList[0]=program&hobbyList[1]=music&map[key1]=value1&map[key2]=value2&state=blocked”会自动绑定到命令对象上。当URI模板变量和请求参数同名时,URI模板变量具有高优先权。
暴露表单引用对象为模型数据
    /**
     * 设置这个注解之后可以直接在前端页面使用hb这个对象(List)集合
     * @return
     */
    @ModelAttribute("hb")
    public List<String> hobbiesList(){
        List<String> hobbise = new LinkedList<String>();
        hobbise.add("basketball");
        hobbise.add("football");
        hobbise.add("tennis");
        return hobbise;
    }
JSP页面展示出来
    <br>
    初始化的数据 :    ${hb }
    <br>

        <c:forEach items="${hb}" var="hobby" varStatus="vs">
            <c:choose>
                <c:when test="${hobby == 'basketball'}">
                篮球<input type="checkbox" name="hobbies" value="basketball">
                </c:when>
                <c:when test="${hobby == 'football'}">
                    足球<input type="checkbox" name="hobbies" value="football">
                </c:when>
                <c:when test="${hobby == 'tennis'}">
                    网球<input type="checkbox" name="hobbies" value="tennis">
                </c:when>
            </c:choose>
        </c:forEach>
备注:
1、通过上面这种方式可以显示出一个集合的内容
2、上面的jsp代码使用的是JSTL,需要导入JSTL相关的jar包
<%@taglib prefix="c" uri="http://java.sun.com/jsp/jstl/core" %>
暴露@RequestMapping方法返回值为模型数据
public @ModelAttribute("user2") UserModel test3(@ModelAttribute("user2") UserModel user)
大家可以看到返回值类型是命令对象类型,而且通过@ModelAttribute("user2")注解,此时会暴露返回值到模型数据( 名字为user2 ) 中供视图展示使用
@ModelAttribute 注解的返回值会覆盖@RequestMapping 注解方法中的@ModelAttribute 注解的同名命令对象
@RequestParam
用于将请求参数区数据映射到功能处理方法的参数上。在SpringMVC后台控制层获取参数的方式主要有两种,一种是request.getParameter("name"),另外一种是用注解@RequestParam直接获取。
基本使用,获取提交的参数
后端代码:
    @RequestMapping("testRequestParam")
       public String filesUpload(@RequestParam String inputStr, HttpServletRequest request) {
        System.out.println(inputStr);

        int inputInt = Integer.valueOf(request.getParameter("inputInt"));
        System.out.println(inputInt);

        // ......省略
        return "index";
       }
前端代码:
    <form action="/gadget/testRequestParam" method="post">
         参数inputStr:<input type="text" name="inputStr">
         参数intputInt:<input type="text" name="inputInt">
    </form>
前端界面: 
执行结果:
test1
123
可以看到spring会自动根据参数名字封装进入,我们可以直接拿这个参数名来用.
各种异常情况处理
1、可以对传入参数指定参数名
    @RequestParam String inputStr
    // 下面的对传入参数指定为aa,如果前端不传aa参数名,会报错
    @RequestParam(value="aa") String inputStr
错误信息:
HTTP Status 400 - Required String parameter 'aa' is not present
2、可以通过required=false或者true来要求@RequestParam配置的前端参数是否一定要传
// required=false表示不传的话,会给参数赋值为null,required=true就是必须要有
@RequestMapping("testRequestParam")
    public String filesUpload(@RequestParam(value="aa", required=true) String inputStr, HttpServletRequest request)
3、如果用@RequestMapping注解的参数是int基本类型,但是required=false,这时如果不传参数值会报错,因为不传值,会赋值为null给int,这个不可以
    @RequestMapping("testRequestParam")
       public String filesUpload(@RequestParam(value="aa", required=true) String inputStr,
            @RequestParam(value="inputInt", required=false) int inputInt
            ,HttpServletRequest request) {

        // ......省略
        return "index";
       }
解决方法:
“Consider declaring it as object wrapper for the corresponding primitive type.”建议使用包装类型代替基本类型,如使用“Integer”代替“int”
@ResponseBody
该注解用于将Controller的方法返回的对象,通过适当的HttpMessageConverter的Adapter转换对象将内容转换为指定格式后,写入到Response对象的body数据区。
使用时机: 返回的数据不是html标签的页面,而是其他某种格式的数据时(如json、xml等)使用;
HttpMessageConverter接口,需要开启 <mvc:annotation-driven />。
AnnotationMethodHandlerAdapter 将会初始化7个转换器,可以通过调用AnnotationMethodHandlerAdapter的getMessageConverts()方法来获取转换器的一个集合 List<HttpMessageConverter>
- ByteArrayHttpMessageConverter
- StringHttpMessageConverter
- ResourceHttpMessageConverter
- SourceHttpMessageConverter
- XmlAwareFormHttpMessageConverter
- Jaxb2RootElementHttpMessageConverter
- MappingJacksonHttpMessageConverter
可以理解为,只要有对应协议的解析器,你就可以通过几行配置,几个注解完成协议——对象的转换工作!![]()
PS: Spring默认的json协议解析由Jackson完成。
servlet.xml配置
Spring的配置文件,简洁到了极致,对于当前这个需求只需要三行核心配置:
    <context:component-scan base-package="org.zlex.json.controller" />
    <context:annotation-config />
    <mvc:annotation-driven />
pom.xml配置
闲言少叙,先说依赖配置,这里以Json+Spring为参考:
    <dependency>
            <groupId>org.springframework</groupId>
            <artifactId>spring-webmvc</artifactId>
            <version>3.1.2.RELEASE</version>
            <type>jar</type>
            <scope>compile</scope>
        </dependency>
        <dependency>
            <groupId>org.codehaus.jackson</groupId>
            <artifactId>jackson-mapper-asl</artifactId>
            <version>1.9.8</version>
            <type>jar</type>
            <scope>compile</scope>
        </dependency>
        <dependency>
            <groupId>log4j</groupId>
            <artifactId>log4j</artifactId>
            <version>1.2.17</version>
            <scope>compile</scope>
        </dependency>
主要需要spring-webmvc、jackson-mapper-asl两个包,其余依赖包Maven会帮你完成。
    @Controller
    public class PersonController {

        /**
         * 查询个人信息
         *
         * @param id
         * @return
         */
        @RequestMapping(value = "/person/profile/{id}/{name}/{status}", method = RequestMethod.GET)
        public @ResponseBody
        Person porfile(@PathVariable int id, @PathVariable String name,
                @PathVariable boolean status) {
            return new Person(id, name, status);
        }

        /**
         * 登录
         *
         * @param person
         * @return
         */
        @RequestMapping(value = "/person/login", method = RequestMethod.POST)
        public @ResponseBody
        Person login(@RequestBody Person person) {
            return person;
        }
    }
备注:@RequestMapping(value = "/person/profile/{id}/{name}/{status}", method = RequestMethod.GET)中的{id}/{name}/{status}与@PathVariable int id, @PathVariable String name,@PathVariable boolean status一一对应,按名匹配。![]() 这是restful式风格。
这是restful式风格。
如果映射名称有所不一,可以参考如下方式:
    @RequestMapping(value = "/person/profile/{id}", method = RequestMethod.GET)
    public @ResponseBody
    Person porfile(@PathVariable("id") int uid) {
        return new Person(uid, name, status);
    }
- GET模式下,这里使用了@PathVariable绑定输入参数,非常适合Restful风格。因为隐藏了参数与路径的关系,可以提升网站的安全性,静态化页面,降低恶意攻击风险。

- POST模式下,使用@RequestBody绑定请求对象,Spring会帮你进行协议转换,将Json、Xml协议转换成你需要的对象。
- @ResponseBody可以标注任何对象,由Srping完成对象——协议的转换。
做个页面测试下:
    $(document).ready(function() {
        $("#profile").click(function() {
            profile();
        });
        $("#login").click(function() {
            login();
        });
    });
    function profile() {
        var url = 'http://localhost:8080/spring-json/json/person/profile/';
        var query = $('#id').val() + '/' + $('#name').val() + '/'
                + $('#status').val();
        url += query;
        alert(url);
        $.get(url, function(data) {
            alert("id: " + data.id + "\nname: " + data.name + "\nstatus: "
                    + data.status);
        });
    }
    function login() {
        var mydata = '{"name":"' + $('#name').val() + '","id":"'
                + $('#id').val() + '","status":"' + $('#status').val() + '"}';
        alert(mydata);
        $.ajax({
            type : 'POST',
            contentType : 'application/json',
            url : 'http://localhost:8080/spring-json/json/person/login',
            processData : false,
            dataType : 'json',
            data : mydata,
            success : function(data) {
                alert("id: " + data.id + "\nname: " + data.name + "\nstatus: "
                        + data.status);
            },
            error : function() {
                alert('Err...');
            }
        });
Table
    <table>
        <tr>
            <td>id</td>
            <td><input id="id" value="100" /></td>
        </tr>
        <tr>
            <td>name</td>
            <td><input id="name" value="snowolf" /></td>
        </tr>
        <tr>
            <td>status</td>
            <td><input id="status" value="true" /></td>
        </tr>
        <tr>
            <td><input type="button" id="profile" value="Profile——GET" /></td>
            <td><input type="button" id="login" value="Login——POST" /></td>
        </tr>
    </table>
常见错误
POST操作时,我用$.post()方式,屡次失败,一直报各种异常:
org.springframework.web.HttpMediaTypeNotSupportedException: Content type 'application/x-www-form-urlencoded;charset=UTF-8' not supported
org.springframework.web.HttpMediaTypeNotSupportedException: Content type 'application/x-www-form-urlencoded;charset=UTF-8' not supported
org.springframework.web.HttpMediaTypeNotSupportedException: Content type 'application/x-www-form-urlencoded;charset=UTF-8' not supported
直接用$.post()直接请求会有点小问题,尽管我标识为json协议,但实际上提交的ContentType还是application/x-www-form-urlencoded。需要使用$.ajaxSetup()标示下ContentType。
    function login() {
        var mydata = '{"name":"' + $('#name').val() + '","id":"'
                + $('#id').val() + '","status":"' + $('#status').val() + '"}';
        alert(mydata);
        $.ajaxSetup({
            contentType : 'application/json'
        });
        $.post('http://localhost:8080/spring-json/json/person/login', mydata,
                function(data) {
                    alert("id: " + data.id + "\nname: " + data.name
                            + "\nstatus: " + data.status);
                }, 'json');
    };
内容摘自: http://snowolf.iteye.com/blog/1628861/
@RequestBody
作用:
i) 该注解用于读取Request请求的body部分数据,使用系统默认配置的HttpMessageConverter进行解析,然后把相应的数据绑定到要返回的对象上;
ii) 再把HttpMessageConverter返回的对象数据绑定到 controller中方法的参数上。
使用时机:
A) GET、POST方式提时, 根据request header Content-Type的值来判断:
- application/x-www-form-urlencoded, 可选(即非必须,因为这种情况的数据@RequestParam, @ModelAttribute也可以处理,当然@RequestBody也能处理);
- multipart/form-data, 不能处理(即使用@RequestBody不能处理这种格式的数据);
- 其他格式, 必须(其他格式包括application/json, application/xml等。这些格式的数据,必须使用@RequestBody来处理);
B) PUT方式提交时, 根据request header Content-Type的值来判断:
- application/x-www-form-urlencoded, 必须;
- multipart/form-data, 不能处理;
- 其他格式, 必须;
说明:request的body部分的数据编码格式由header部分的Content-Type指定;
接受请求体中的数据,例如用ajax传数组的话就会放到请求体中,后台就要用@RequestBody来接受
@RequestMapping(value = "/getBooks")
public void getBooks(@RequestBody List<Book> list) {

}
  public void saveDispatches(@RequestBody DispatchesDTO dispatchesDTO,
      HttpServletResponse response) throws IOException {

    dispatchesService.saveDispatches(dispatchesDTO);
    success(response);
  }
无需手动进行json与实体的转换,只要能映射上去(也就是字段名和json的key相对应,value可以匹配上数据类型),那么就可以直接转换。
如何定义“能映射上去”呢?若是json中的key在实体中都能找到对应的field,那么就是“能映射上去”,也就是说:
前台传入的json中的key在实体中必须要存在,不然就会报错。
ResponseEntity
在传统的开发过程中,我们的控制CONTROLL层通常需要转向一个JSP视图;但随着WEB2.0相关技术的崛起,我们很多时候只需要返回数据即可,而不是一个JSP页面。
SPRING MVC3的@ResponseBody使Controller直接返回数据,而不是直接指向具体的视图;同时通过
MessageConverter和produces(如produces="text/plain;charset=UTF-8")可以返回各种格式的数据(XML,json,RSS,TEXT,字节流等),本章只介绍最简单的使用;
示例代码:
    @RequestMapping(value="/response", method=RequestMethod.GET)
    public class ResponseController {

    //http://127.0.0.1:8010/response/annotation
        @RequestMapping("/annotation")
        public @ResponseBody String responseBody() {
            return "The String ResponseBody";
        }


        @RequestMapping("/charset/accept")
        public @ResponseBody String responseAcceptHeaderCharset() {
            return "\u3053\u3093\u306b\u3061\u306f\u4e16\u754c\uff01 (\"Hello world!\" in Japanese)";
        }

    //http://127.0.0.1:8010/response/charset/produce
        @RequestMapping(value="/charset/produce", produces="text/plain;charset=UTF-8")
        public @ResponseBody String responseProducesConditionCharset() {
            return "\u3053\u3093\u306b\u3061\u306f\u4e16\u754c\uff01 (\"Hello world!\" in Japanese)";
        }

    //http://127.0.0.1:8010/response/entity/status
        @RequestMapping("/entity/status")
        public ResponseEntity<String> responseEntityStatusCode() {
            return new ResponseEntity<String>("The String ResponseBody with custom status code (403 Forbidden)",
                    HttpStatus.FORBIDDEN);
        }

    //http://127.0.0.1:8010/response/entity/headers
        @RequestMapping("/entity/headers")
        public ResponseEntity<String> responseEntityCustomHeaders() {
            HttpHeaders headers = new HttpHeaders();
            headers.setContentType(MediaType.TEXT_PLAIN);
            return new ResponseEntity<String>("The String ResponseBody with custom header Content-Type=text/plain",
                    headers, HttpStatus.OK);
        }

    }

