SpringBoot第二篇:配置文件详解一
作者:追梦1819
原文:https://www.cnblogs.com/yanfei1819/p/10837594.html
版权声明:本文为博主原创文章,转载请附上博文链接!
前言
SpringBoot 完全摒弃了xml配置的模式,几乎做到了“零配置”。说是“几乎”,是因为一般情况下默认的配置足够满足日常开发所需,但是在特殊的情况下,我们往往需要用到自定义属性配置、自定义文件配置、多环境配置、外部命令引导等一系列功能。
SpringBoot 使用的全局配置文件 application.properties 的作用是对一些默认配置的值进行修改。配置文件通常放在src/main/resources目录下或者类路径的/config下。application.properties 是springboot 项目的主配置文件。
本节内容包括:
- 主要配置文件
- 默认配置
- 自定义配置文件
- 多环境配置
- 外部配置
## 主配置文件
application.properties 文件是作为 SpringBoot 项目的默认配置文件。项目启动,它会被自动检测到。 然后我们可以正常注入任何加载的属性。因此,通过使用此默认文件,我们不必显式注册PropertySource,甚至不必提供属性文件的路径。
当然,如果必要的话,我们可以在项目运行时改变主配置文件,以下是命令:
java -jar config-demo.jar --spring.config.location=classpath:/customeize-application.properties
customeize-application.properties 是定义在 src/main/resources 路径下的配置文件。
而此时,application.properties 则不再起作用。如果项目中使用到了该文件中的属性,则在项目启动时可能会报错。需要特别注意。
## 默认配置
默认属性
SpringBoot 的默认属性有很多,如以上所说,一般情况下默认的配置足够满足日常开发所需。
针对 SpringBoot 的默认属性,我们可以参照官方文档:
https://docs.spring.io/spring-boot/docs/current/reference/html/common-application-properties.html
自定义属性
准备工作
在介绍自定义属性之前,为了提升开发者的体验(所以不是必须的依赖),先来做一下准备工作,那就是引入 maven 依赖:
<dependency>
    <groupId>org.springframework.boot</groupId>
    <artifactId>spring-boot-configuration-processor</artifactId>
    <optional>true</optional>
</dependency>
因为,在常用的IDE中,不会有属性提示。该依赖只会在编译时调用,所以不用担心会对生产造成影响。
自定义属性
通常情况下,一些常用的属性,可以直接在 SpringBoot 的主配置文件 application.properties 中自定义。
例如:
server.port=8083

# 自定义属性(单个)
yanfei1819.name=admin
yanfei1819.age=26
读取以上配置信息:
package com.yanfei1819.configdemo.config;
import org.springframework.beans.factory.annotation.Value;
import org.springframework.stereotype.Controller;
import org.springframework.web.bind.annotation.RequestMapping;
import org.springframework.web.bind.annotation.ResponseBody;
/**
* Created by 追梦1819 on 2019-05-06.
*/
@Controller
public class ReadApplicationConfigController {
@Value("${yanfei1819.name}")
private String name;
@Value("${yanfei1819.age}")
private int age;
@ResponseBody
@RequestMapping("/getProperties")
public String getProperties(){
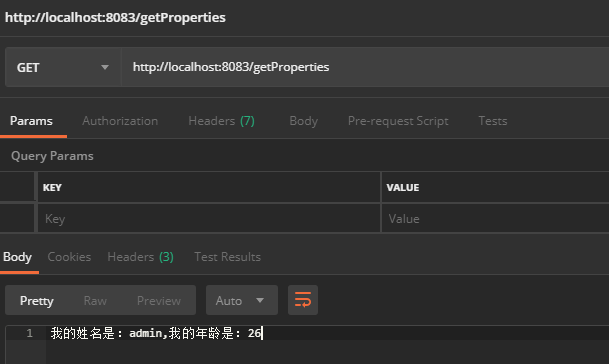
return "我的姓名是:"+name+",我的年龄是:"+age;
}
}
用postman进行测试:
以上是读取单个属性,如果属性比较多,这样就比较麻烦了,也不符合面向对象的思想。下面通过对象来读取配置信息。
首先,在 application.properties 中配置。
# 演示自定义对象
class.student.name=zhangsan
class.student.age=20
class.student.grade=98.5
其次,创建实体类接受对应的属性值。
package com.yanfei1819.configdemo.entity;
import org.springframework.boot.context.properties.ConfigurationProperties;
/**
 * Created by 追梦1819 on 2019-05-06.
 */
@ConfigurationProperties(prefix = "class.student")
public class Student {
    private String name;
    private int age;
    private Double grade;
	// set/get 省略
}
注意,在启动类上添加。
@EnableConfigurationProperties({Student.class})
最后,测试:
package com.yanfei1819.configdemo.config;
import com.yanfei1819.configdemo.entity.Student;
import org.springframework.beans.factory.annotation.Autowired;
import org.springframework.beans.factory.annotation.Value;
import org.springframework.stereotype.Controller;
import org.springframework.web.bind.annotation.RequestMapping;
import org.springframework.web.bind.annotation.ResponseBody;
/**
* Created by 追梦1819 on 2019-05-06.
*/
@Controller
public class ReadApplicationConfigController {
@Autowired
private Student student;
@ResponseBody
@RequestMapping("/getBeanProperties")
public String getBeanProperties(){
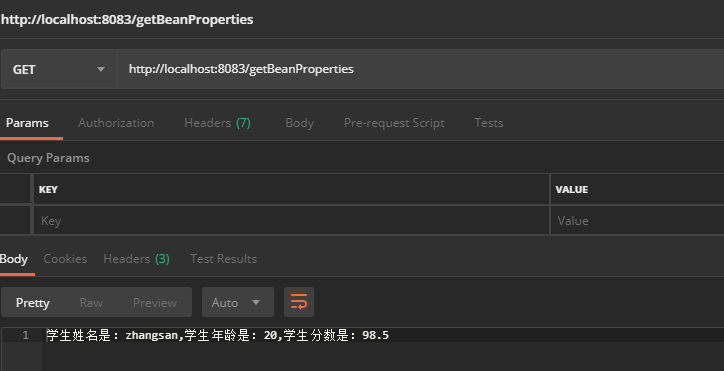
return "学生姓名是:"+student.getName()+",学生年龄是:"+student.getAge()+",学生分数是:"+student.getGrade();
}
}
测试结果是。
参数间的相互引用
class.student.description=姓名是${class.student.name},年龄是${class.student.age},分数是${class.student.grade}
然后同其他的属性方式引用。
自定义配置文件
一些特殊情况,需要的配置信息很多,如果全部定义在主配置文件中,会繁杂、难以维护。这个时候就需要自定义一些配置,将属性进行分类,便于维护。以下以JDBC配置文件为例,阐述自定义配置文件以及属性值的读取方式。
首先,创建自定义配置文件 jdbc.properties 。
jdbc.mysql.driverclassname=com.mysql.jdbc.Driver
jdbc.mysql.url=jdbc:mysql://127.0.0.1:3306/xxx
jdbc.mysql.username=root
jdbc.mysql.password=root
其次,创建对应的实体类。
package com.yanfei1819.configdemo.entity;

import org.springframework.boot.context.properties.ConfigurationProperties;
import org.springframework.context.annotation.Configuration;
import org.springframework.context.annotation.PropertySource;

/**
 * Created by 追梦1819 on 2019-05-06.
 */
@Configuration
@ConfigurationProperties(prefix = "jdbc.mysql")
@PropertySource("classpath:jdbc.properties")
public class JdbcBean {
    private String driverclassname;
    private String url;
    private String username;
    private String password;
	// set/get/toString 省略
}
最后,创建测试类。
package com.yanfei1819.configdemo.config;
import com.yanfei1819.configdemo.entity.JdbcBean;
import org.springframework.beans.factory.annotation.Autowired;
import org.springframework.web.bind.annotation.GetMapping;
import org.springframework.web.bind.annotation.RestController;
/**
* Created by 追梦1819 on 2019-05-06.
*/
@RestController
public class ReadCustomPropertiesController {
@Autowired
private JdbcBean jdbcBean;
@GetMapping("/getJdbcBean")
private String getJdbcBean(){
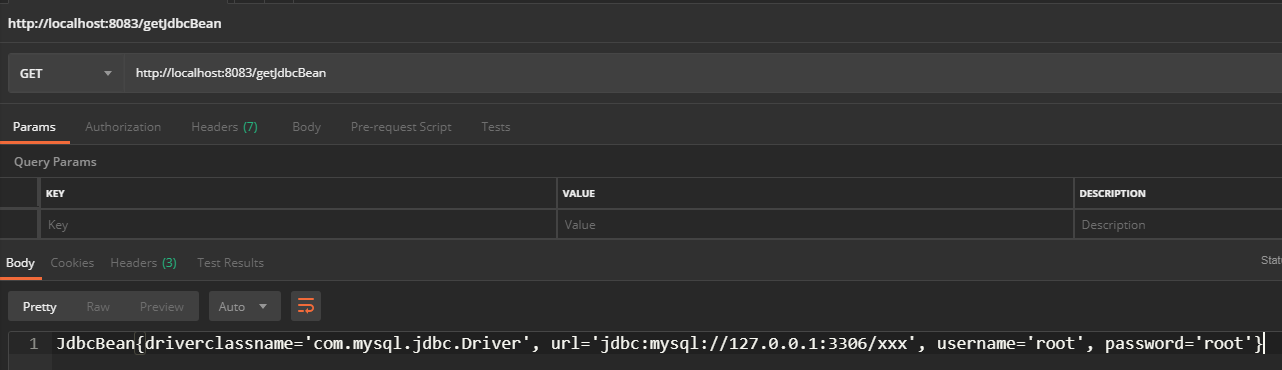
return jdbcBean.toString();
}
}
启动程序,可见测试结果。
注意,一个实体类的配置文件可以有多个。换句话说,可以用一个实体类接收多个配置文件的信息。
我们把上述demo的基础上,新增一个配置文件 jdbc2.properties ,并添加属性:
jdbc.mysql.ip=127.0.0.1
然后在实体类 JdbcBean 中加入属性:
private String ip;
// get/set/toString 省略
同时添加注解:
@ConfigurationProperties(prefix = "jdbc2.mysql")
当然,上面的两个注解:
@PropertySource("classpath:jdbc.properties")
@PropertySource("classpath:jdbc2.properties")
也可以用以下注解代替:
@PropertySources({
        @PropertySource("classpath:jdbc.properties"),
        @PropertySource("classpath:jdbc2.properties")
})
只是需要注意的是,在任何一种情况下,值得注意的是,在属性名称冲突的情况下,最后一次源读取优先。
## 多环境配置
上述内容只是演示了最基本的功能。而在真是的项目中,往往有多个环境,比如开发、测试、生产的环境。可能每个环境的配置参数都不一样。这个时候也需要我们自定义每个环境的配置文件了。
不过,这不需要以上那么复杂。因为SpringBoot 已经为我们做好了准备工作。只要遵循它提供的配置规则和格式即可。
1. 各个环境的配置文件格式是:application-{profile}.properties ;
2. 在主配置文件中添加属性 spring.profile.active 即可。
例如:
生产环境配置文件:application-prod.properties
开发环境配置文件:application-dev.properties
引用开发环境的配置文件,只要在 application.properties 中配置: spring.profiles.active=dev 。
外部配置
除了以上几种配置方式。SpringBoot 还支持外部命令行配置。
例如,在启动时修改程序端口号:java -jar xx.jar --server.port=9090 ;
选择对应环境配置:java -jar xx.jar --spring.profiles.active=test 等。其余还有很多。由于篇幅所限,此处不一一展开。感兴趣的可以自行深入了解。
源码:我的GitHub
本文来自博客园,作者:追梦1819,转载请注明原文链接:https://www.cnblogs.com/yanfei1819/p/10837594.html

