
最近在看别人技术博客(http://www.cnblogs.com/over140/p/3508335.html)的时候,发现一个属性:android:clipChildren属性。
翻文档找到下面介绍
| android:clipChildren | setClipChildren(boolean) | Defines whether a child is limited to draw inside of its bounds or not. |
| android:clipToPadding | setClipToPadding(boolean) | Defines whether the ViewGroup will clip its drawing surface so as to exclude the padding area. |
翻译就是,
1.clipChild用来定义他的子控件是否要在他应有的边界内进行绘制。 默认情况下,clipChild被设置为true。 也就是不允许进行扩展绘制。
2. clipToPadding用来定义ViewGroup是否允许在padding中绘制。默认情况下,cliptopadding被设置为ture, 也就是把padding中的值都进行裁切了。
还有该功能是android第一个版本就已经提供的方法。 所有可以跨任意android版本使用。
这两个属性联合起来能干什么呢? 哈, 用来做一些类似于心形放大等点击特效非常合适啊。 不用去更改布局, 只需加入这两个属相,并引入动画效果就完成了。
按照上面的思路,做个demo吧。
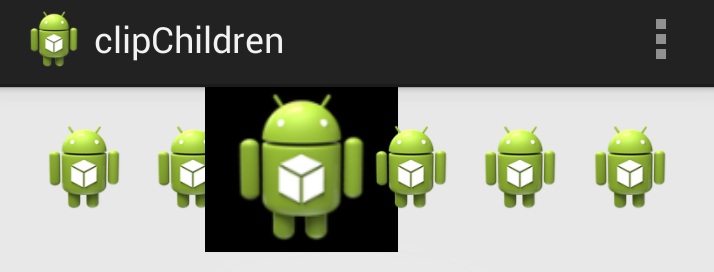
先看看最后的效果吧, 点击第三个机器人就会播放一个变大的效果(类似于心变大的效果)
废话不多说,上关键代码:
1. 布局代码(核心)
主要看设的两个关键属性android:clipChildren和android:clipToPadding均为false。 这就让点击第三个小人时,可以跨边界进行绘制,并且允许其在padding区域内绘制。
<LinearLayout xmlns:android="http://schemas.android.com/apk/res/android"
    xmlns:tools="http://schemas.android.com/tools"
    android:layout_width="match_parent"
    android:layout_height="match_parent"
    android:paddingBottom="@dimen/activity_vertical_margin"
    android:paddingLeft="@dimen/activity_horizontal_margin"
    android:paddingRight="@dimen/activity_horizontal_margin"
    android:paddingTop="@dimen/activity_vertical_margin"
    tools:context=".MainActivity"
    android:clipChildren="false"
    android:clipToPadding="false">

    <ImageView
        android:id="@+id/img1"
        android:layout_width="wrap_content"
        android:layout_height="wrap_content"
        android:layout_weight="1"
        android:src="@drawable/ic_launcher" />

    <ImageView
        android:id="@+id/img2"
        android:layout_width="wrap_content"
        android:layout_height="wrap_content"
        android:layout_weight="1"
        android:src="@drawable/ic_launcher" />

    <ImageView
        android:id="@+id/img3"
        android:onClick="AA"
        android:layout_width="wrap_content"
        android:layout_height="wrap_content"
        android:layout_weight="1"
        android:background="@android:color/black"
        android:src="@drawable/ic_launcher" />

    <ImageView
        android:id="@+id/img4"
        android:layout_width="wrap_content"
        android:layout_height="wrap_content"
        android:layout_weight="1"
        android:src="@drawable/ic_launcher" />

    <ImageView
        android:id="@+id/img5"
        android:layout_width="wrap_content"
        android:layout_height="wrap_content"
        android:layout_weight="1"
        android:src="@drawable/ic_launcher" />

    <ImageView
        android:id="@+id/img6"
        android:layout_width="wrap_content"
        android:layout_height="wrap_content"
        android:layout_weight="1"
        android:src="@drawable/ic_launcher" />

</LinearLayout>
2. 其他辅助代码,如动画和act等内容


<?xml version="1.0" encoding="utf-8"?>
<scale
    xmlns:android="http://schemas.android.com/apk/res/android"
    android:fromXScale="1.0"
    android:fromYScale="1.0"
    android:toXScale="3.0"
    android:toYScale="3.0"
    android:duration="2000"
       android:pivotX="50%"
       android:pivotY="50%"
    >
</scale>
package com.example.clipchildren;

import android.os.Bundle;
import android.app.Activity;
import android.view.Menu;
import android.view.View;
import android.view.animation.Animation;
import android.view.animation.AnimationUtils;
import android.widget.ImageView;
import android.widget.Toast;

public class MainActivity extends Activity {

    //只对第三个小人做放大动作
    ImageView image3 =null;
    @Override
    protected void onCreate(Bundle savedInstanceState) {
        super.onCreate(savedInstanceState);
        setContentView(R.layout.activity_main);
        image3 = (ImageView) findViewById(R.id.img3);
    }


    @Override
    public boolean onCreateOptionsMenu(Menu menu) {
        // Inflate the menu; this adds items to the action bar if it is present.
        getMenuInflater().inflate(R.menu.main, menu);
        return true;
    }

    public void AA(View view) {
        Toast.makeText(this, "aa", Toast.LENGTH_SHORT).show();
        Animation an = AnimationUtils.loadAnimation(getApplicationContext(), R.anim.anims);
        image3.startAnimation(an);
    }

}
3. 除了这种应用,网上还有其他人对这两个属性的妙用:
用viewPaper来实现一个Gallery效果:http://www.iteye.com/topic/1129898

