

本章内容:
1、功能概述
SparkEnv是Spark的执行环境对象,其中包括与众多Executor执行相关的对象。Spark 对任务的计算都依托于 Executor 的能力,所有的 Executor 都有自己的 Spark 的执行环境 SparkEnv。有了 SparkEnv,就可以将数据存储在存储体系中;就能利用计算引擎对计算任务进行处理,就可以在节点间进行通信等。在local模式下Driver会创建Executor,local-cluster部署模式或者Standalone部署模式下Worker另起的CoarseGrainedExecutorBackend进程中也会创建Executor,所以SparkEnv存在于Driver或者CoarseGrainedExecutorBackend进程中。
创建SparkEnv主要使用SparkEnv的createDriverEnv方法,有四个参数:conf、isLocal、listenerBus 以及在本地模式下driver运行executor需要的numberCores。
/**
 * :: DeveloperApi ::
 * Holds all the runtime environment objects for a running Spark instance (either master or worker),
 * including the serializer, RpcEnv, block manager, map output tracker, etc. Currently
 * Spark code finds the SparkEnv through a global variable, so all the threads can access the same
 * SparkEnv. It can be accessed by SparkEnv.get (e.g. after creating a SparkContext).
 *
 * NOTE: This is not intended for external use. This is exposed for Shark and may be made private
 *       in a future release.
 */
@DeveloperApi
class SparkEnv (
    val executorId: String,
    private[spark] val rpcEnv: RpcEnv,
    val serializer: Serializer,
    val closureSerializer: Serializer,
    val serializerManager: SerializerManager,
    val mapOutputTracker: MapOutputTracker,
    val shuffleManager: ShuffleManager,
    val broadcastManager: BroadcastManager,
    val blockManager: BlockManager,
    val securityManager: SecurityManager,
    val metricsSystem: MetricsSystem,
    val memoryManager: MemoryManager,
    val outputCommitCoordinator: OutputCommitCoordinator,
    val conf: SparkConf) extends Logging
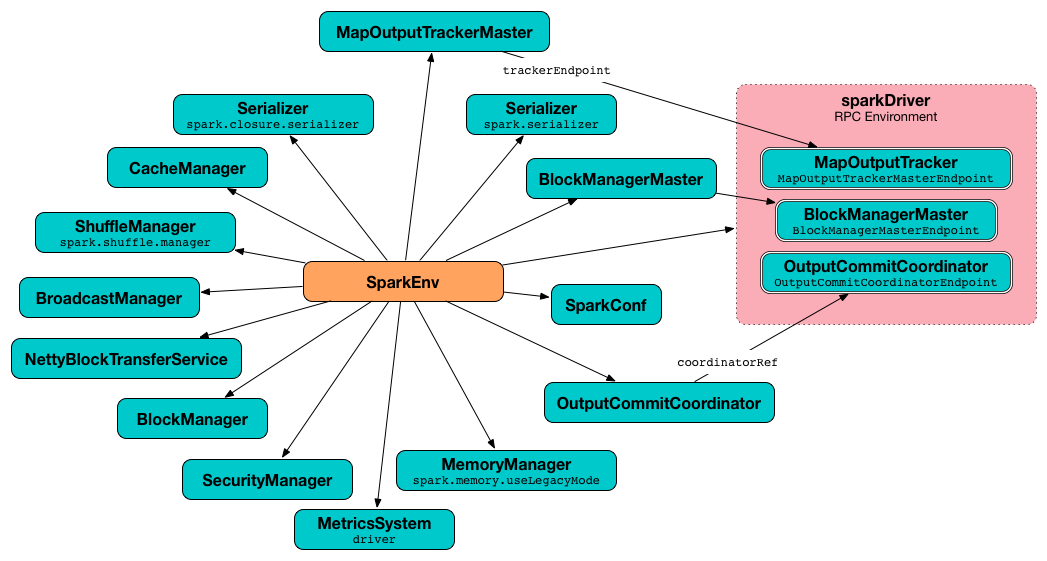
图1 在 Driver 上创建 SparkEnv

图2 在 Executor 上创建 SparkEnv
2、相关组件
| 名称 | 说明 |
| SecurityManager | 主要对账户、权限及身份认证进行设置与管理。 |
| RpcEnv | 各个组件之间通信的执行环境。 |
| SerializerManager | Spark 中很多对象在通用网络传输或者写入存储体系时,都需要序列化。 |
| BroadcastManager | 用于将配置信息和序列化后的RDD、Job以及ShuffleDependency等信息在本地存储。 |
| MapOutputTracker | 用于跟踪Map阶段任务的输出状态,此状态便于Reduce阶段任务获取地址及中间结果。 |
| ShuffleManager | 负责管理本地及远程的Block数据的shuffle操作。 |
| MemoryManager | 一个抽象的内存管理器,用于执行内存如何在执行和存储之间共享。 |
| NettyBlockTransferService | 使用Netty提供的异步事件驱动的网络应用框架,提供Web服务及客户端,获取远程节点上Block的集合。 |
| BlockManagerMaster | 负责对BlockManager的管理和协调。 |
| BlockManager | 负责对Block的管理,管理整个Spark运行时的数据读写的,当然也包含数据存储本身,在这个基础之上进行读写操作。 |
| MetricsSystem | 一般是为了衡量系统的各种指标的度量系统。 |
| OutputCommitCoordinator | 确定任务是否可以把输出提到到HFDS的管理者,使用先提交者胜的策略。 |
3、代码分析
| 代码 | 说明 |
// Create the Spark execution environment (cache, map output tracker, etc) |
创建 Spark 运行时环境(包括:cache、map output tracker 等)
|
// This function allows components created by SparkEnv to be mocked in unit tests: |
这个函数允许 SparkEnv 创建的组件在测试单元中被模仿。 类名:SparkContext 函数:createSparkEnv 参数:
用意:直接调用 SparkEnv.createDriverEnv()函数 |
/** |
为 Driver 创建一个 SparkEnv 对象 类名:SparkEnv 函数:createDriverEnv 参数:
用意:做了 HOST和 PORT 判断,然后调用 create()函数 |
/** |
为 Driver 和 Executor 创建一个 SparkEnv 的 Helper 方法 类名:SparkEnv 函数:create 用意:
|
3.1 创建安全管理器 SecurityManager
SecurityManager主要对帐号、权限以及身份认证进行设置和管理。如果 Spark 的部署模式为 YARN,则需要生成 secret key (密钥)并存储 Hadoop UGI。而在其他模式下,则需要设置环境变量 _SPARK_AUTH_SECRET(优先级更高)或者 spark.authenticate.secret 属性指定 secret key (密钥)。最后SecurityManager 中设置了默认的口令认证实例 Authenticator,此实例采用匿名内部类实现,用于每次使用 HTTP client 从 HTTP 服务器获取用户的用户和密码。这是由于 Spark 的节点间通信往往需要动态协商用户名、密码,这种方式灵活地支持了这种需求。
// 变量声明
// 包名:org.apache.spark
// 类名:SparkEnv
val securityManager = new SecurityManager(conf, ioEncryptionKey)
if (isDriver) {
  securityManager.initializeAuth()
}

// 变量处理
// 第一步:new SecurityManager()
// 包名:org.apache.spark
// 类名:SecurityManager
// 使用 HTTP 链接设置口令认证
// Set our own authenticator to properly negotiate(协商/达成) user/password for HTTP connections.
// This is needed by the HTTP client fetching from the HttpServer. Put here so its
// only set once.
if (authOn) {
  Authenticator.setDefault(
    // 创建口令认证实例,复写PasswordAuthentication方法,获得用户名和密码
    new Authenticator() {
      override def getPasswordAuthentication(): PasswordAuthentication = {
        var passAuth: PasswordAuthentication = null
        val userInfo = getRequestingURL().getUserInfo()
        if (userInfo != null) {
          val  parts = userInfo.split(":", 2)
          passAuth = new PasswordAuthentication(parts(0), parts(1).toCharArray())
        }
        return passAuth
      }
    }
  )
}

// 第二步:initializeAuth()
// 包名:org.apache.spark
// 类名:SecurityManager
/**
 * Initialize the authentication secret.
 *
 * If authentication is disabled, do nothing.
 *
 * In YARN mode, generate a new secret and store it in the current user's credentials.
 *
 * In other modes, assert that the auth secret is set in the configuration.
 */
def initializeAuth(): Unit = {
  if (!sparkConf.get(NETWORK_AUTH_ENABLED)) {
    return
  }

  if (sparkConf.get(SparkLauncher.SPARK_MASTER, null) != "yarn") {
    require(sparkConf.contains(SPARK_AUTH_SECRET_CONF),
      s"A secret key must be specified via the $SPARK_AUTH_SECRET_CONF config.")
    return
  }

  val rnd = new SecureRandom()
  val length = sparkConf.getInt("spark.authenticate.secretBitLength", 256) / JByte.SIZE
  val secretBytes = new Array[Byte](length)
  rnd.nextBytes(secretBytes)

  val creds = new Credentials()
  val secretStr = HashCodes.fromBytes(secretBytes).toString()
  creds.addSecretKey(SECRET_LOOKUP_KEY, secretStr.getBytes(UTF_8))
  UserGroupInformation.getCurrentUser().addCredentials(creds)
}
3.2 创建 RPC 通信层 RpcEnv
Spark1.6推出的RpcEnv、RpcEndPoint、RpcEndpointRef为核心的新型架构下的RPC通信方式,在底层封装了Akka和Netty,为未来扩充更多的通信系统提供了可能。RpcEnv是RPC的环境,所有的RpcEndpoint都需要注册到RpcEnv实例对象中,管理着这些注册的RpcEndpoint的生命周期:
- 根据name或者uri注册RpcEndpoint;
- 管理各种消息的处理;
- 停止RpcEndpoint
Spark RPC中最为重要的三个抽象(“三剑客”)为:RpcEnv、RpcEndpoint、RpcEndpointRef,这样做的好处有:
- 对上层的API来说,屏蔽了底层的具体实现,使用方便
- 可以通过不同的实现来完成指定的功能,方便扩展
- 促进了底层实现层的良性竞争,Spark 1.6.3中默认使用了Netty作为底层的实现,但Akka的依赖依然存在;而Spark 2.1.0中的底层实现只有Netty,这样用户可以方便的使用不同版本的Akka或者将来某种更好的底层实现
// 变量声明
// 包名:org.apache.spark
// 类名:SparkEnv
private[spark] val driverSystemName = "sparkDriver"
private[spark] val executorSystemName = "sparkExecutor"

val isDriver = executorId == SparkContext.DRIVER_IDENTIFIER

val systemName = if (isDriver) driverSystemName else executorSystemName
val rpcEnv = RpcEnv.create(systemName, bindAddress, advertiseAddress, port.getOrElse(-1), conf,
  securityManager, numUsableCores, !isDriver)

// 变量处理
// 第一步
// 包名:org.apache.spark.rpc
// 类名:RpcEnv
def create(
    name: String,
    bindAddress: String,
    advertiseAddress: String,
    port: Int,
    conf: SparkConf,
    securityManager: SecurityManager,
    numUsableCores: Int,
    clientMode: Boolean): RpcEnv = {
  val config = RpcEnvConfig(conf, name, bindAddress, advertiseAddress, port, securityManager,
    numUsableCores, clientMode)
  new NettyRpcEnvFactory().create(config)
}

// 第二步
// 包名:org.apache.spark.rpc.netty
// 类名:NettyRpcEnv
def create(config: RpcEnvConfig): RpcEnv = {
  val sparkConf = config.conf
  // Use JavaSerializerInstance in multiple threads is safe. However, if we plan to support
  // KryoSerializer in future, we have to use ThreadLocal to store SerializerInstance
  val javaSerializerInstance =
    new JavaSerializer(sparkConf).newInstance().asInstanceOf[JavaSerializerInstance]
  val nettyEnv =
    new NettyRpcEnv(sparkConf, javaSerializerInstance, config.advertiseAddress,
      config.securityManager, config.numUsableCores)
  if (!config.clientMode) {
    val startNettyRpcEnv: Int => (NettyRpcEnv, Int) = { actualPort =>
      nettyEnv.startServer(config.bindAddress, actualPort)
      (nettyEnv, nettyEnv.address.port)
    }
    try {
      Utils.startServiceOnPort(config.port, startNettyRpcEnv, sparkConf, config.name)._1
    } catch {
      case NonFatal(e) =>
        nettyEnv.shutdown()
        throw e
    }
  }
  nettyEnv
}
3.3 创建序列化管理器 SerializerManager
Spark 中很多对象在通用网络传输或者写入存储体系时,都需要序列化。SparkEnv 中有两个序列化组件,分别是SerializerManager和ClosureSerializer。
创建 SparkEnv 的代码:
// 变量声明
// 包名:org.apache.spark
// 类名:SparkEnv
// Create an instance of the class named by the given SparkConf property, or defaultClassName
// if the property is not set, possibly initializing it with our conf
def instantiateClassFromConf[T](propertyName: String, defaultClassName: String): T = {
  instantiateClass[T](conf.get(propertyName, defaultClassName))
}

val serializer = instantiateClassFromConf[Serializer](
  "spark.serializer", "org.apache.spark.serializer.JavaSerializer")
logDebug(s"Using serializer: ${serializer.getClass}")

val serializerManager = new SerializerManager(serializer, conf, ioEncryptionKey)

val closureSerializer = new JavaSerializer(conf)
可以看到这里创建的serializer默认为org.apache.spark.serializer.JavaSerializer,用户可以通过spark.serializer属性配置其他的序列化实现,如org.apache.spark.serializer.KryoSerializer。而 closureSerializer 的实际类型固定为org.apache.spark.serializer.JavaSerializer,用户不能够自己指定。JavaSerializer采用 Java 语言自带的序列化 API 实现。
3.4 创建广播管理器 BroadcastManager
BroadcastManager用于将配置信息和序列化后的RDD、Job以及ShuffleDependency等信息在本地存储。如果为了容灾,也会复制到其他节点上。
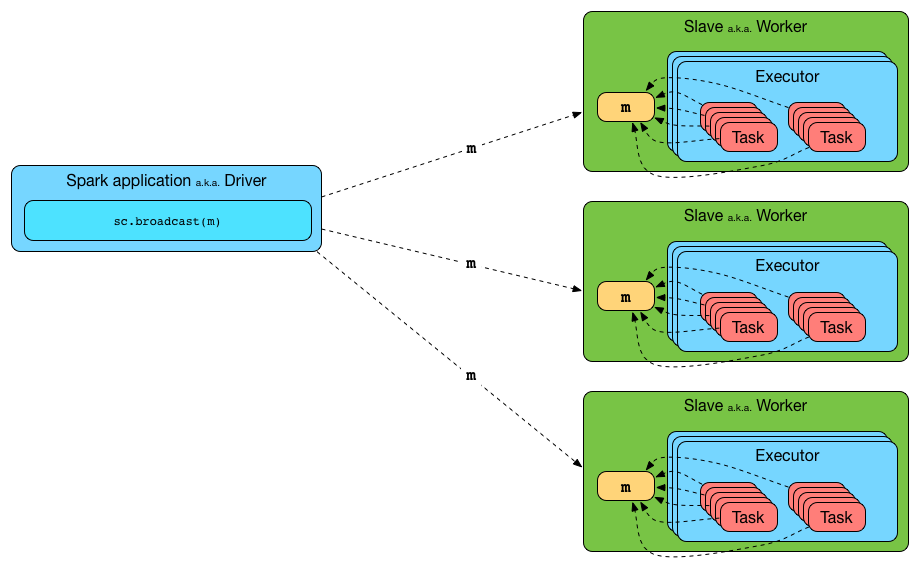
图3 向 Executor 广播一个变量
创建 BroadcastManager 的代码:
// 变量声明
// 包名:org.apache.spark
// 类名:SparkEnv
val broadcastManager = new BroadcastManager(isDriver, conf, securityManager)

// 变量处理
// 包名:org.apache.spark.broadcast
// 类名:BroadcastManager
initialize()

// Called by SparkContext or Executor before using Broadcast
private def initialize() {
  synchronized {
    if (!initialized) {
      broadcastFactory = new TorrentBroadcastFactory
      broadcastFactory.initialize(isDriver, conf, securityManager)
      initialized = true
    }
  }
}
BroadcastManager 在其初始化的过程中就会调用自身的 initialize 方法,当 initialize 执行完毕,BroadcastManager 就会正式生效。
3.5 创建 Map 任务输出跟踪器 MapOutputTracker
MapOutputTracker 用于跟踪Map阶段任务的输出状态,此状态便于Reduce阶段任务获取地址及中间结果。每个Map任务或者Reduce任务都会有其唯一的标识,分别为mapId 和 reduceId。每个Reduce任务的输入可能是多个Map任务的输出,Reduce会到各个Map任务的所在节点上拉取Block,这一过程叫做Shuffle。每个Shuffle过程都有唯一的表示shuffleId。
MapOutputTracker 有两个子类:MapOutputTrackerMaster(for driver) 和 MapOutputTrackerWorker(for executors);因为它们使用了不同的HashMap来存储元数据。
创建 MapOutputTracker 的代码:
// 变量声明
// 包名:org.apache.spark
// 类名:SparkEnv
val mapOutputTracker = if (isDriver) {
  new MapOutputTrackerMaster(conf, broadcastManager, isLocal)
} else {
  new MapOutputTrackerWorker(conf)
}

// 变量处理
// 第一步
// 包名:org.apache.spark
// 类名:SparkEnv
// MapOutputTracker.ENDPOINT_NAME 变量声明为 val ENDPOINT_NAME = "MapOutputTracker"
// Have to assign trackerEndpoint after initialization as MapOutputTrackerEndpoint
// requires the MapOutputTracker itself
mapOutputTracker.trackerEndpoint = registerOrLookupEndpoint(MapOutputTracker.ENDPOINT_NAME,
  new MapOutputTrackerMasterEndpoint(
    rpcEnv, mapOutputTracker.asInstanceOf[MapOutputTrackerMaster], conf))

// 第二步
// 包名:org.apache.spark
// 类名:SparkEnv
def registerOrLookupEndpoint(
    name: String, endpointCreator: => RpcEndpoint):
  RpcEndpointRef = {
  if (isDriver) {
    logInfo("Registering " + name)
    rpcEnv.setupEndpoint(name, endpointCreator)
  } else {
    RpcUtils.makeDriverRef(name, conf, rpcEnv)
  }
}

// 第三步
// 包名:org.apache.spark.rpc.netty
// 类名:NettyRpcEnv
override def setupEndpoint(name: String, endpoint: RpcEndpoint): RpcEndpointRef = {
  dispatcher.registerRpcEndpoint(name, endpoint)
}

// 包名:org.apache.spark.util
// 类名:RpcUtils
/**
 * Retrieve a `RpcEndpointRef` which is located in the driver via its name.
 */
def makeDriverRef(name: String, conf: SparkConf, rpcEnv: RpcEnv): RpcEndpointRef = {
  val driverHost: String = conf.get("spark.driver.host", "localhost")
  val driverPort: Int = conf.getInt("spark.driver.port", 7077)
  Utils.checkHost(driverHost)
  rpcEnv.setupEndpointRef(RpcAddress(driverHost, driverPort), name)
}
在 MapOutputTracker 初始化中,可以看到针对当前实例是 Driver 还是 Executor,创建其方式有所不同。
- 如果当前应用程序是 Driver,则创建 MapOutputTrackerMaster,然后创建 MapOutputTrackerMasterEndpoint,并且注册到 Dispatcher 中,注册名为 MapOutputTracker;
- 如果当前应用程序是 Executor,则创建 MapOutputTrackerWorker,并从远端 Driver 实例的 NettyRpcEnv 的 Dispatcher 中查找 MapOutputTrackerMasterEndpoint 的引用。
无论是 Driver 还是 Executor,最后都由 MapOutputTracker 的属性 trackerEndpoint 持有 MapOutputTrackerEndpoint 的引用。
3.6 创建 ShuffleManager
ShuffleManager负责管理本地及远程的Block数据的shuffle操作。ShuffleManager根据默认的 spark.shuffle.manager 属性,通过反射方式生成的SortShuffleManager的实例。默认使用的是sort模式的SortShuffleManager,Spark 2.x.x 版本提供 sort 和 tungsten-sort 两种 ShuffleManager 的实现。无论是 sort 还是 tungsten-sort,我们看到实现类都是 SortShuffleManager。
// 变量声明
// 包名:org.apache.spark
// 类名:SparkEnv
// Let the user specify short names for shuffle managers
val shortShuffleMgrNames = Map(
  "sort" -> classOf[org.apache.spark.shuffle.sort.SortShuffleManager].getName,
  "tungsten-sort" -> classOf[org.apache.spark.shuffle.sort.SortShuffleManager].getName)
val shuffleMgrName = conf.get("spark.shuffle.manager", "sort")
val shuffleMgrClass =
  shortShuffleMgrNames.getOrElse(shuffleMgrName.toLowerCase(Locale.ROOT), shuffleMgrName)
val shuffleManager = instantiateClass[ShuffleManager](shuffleMgrClass)


// 变量处理
// 第一步
// 包名:org.apache.spark
// 类名:SparkEnv
// Create an instance of the class with the given name, possibly initializing it with our conf
def instantiateClass[T](className: String): T = {
  val cls = Utils.classForName(className)
  // Look for a constructor taking a SparkConf and a boolean isDriver, then one taking just
  // SparkConf, then one taking no arguments
  try {
    cls.getConstructor(classOf[SparkConf], java.lang.Boolean.TYPE)
      .newInstance(conf, new java.lang.Boolean(isDriver))
      .asInstanceOf[T]
  } catch {
    case _: NoSuchMethodException =>
      try {
        cls.getConstructor(classOf[SparkConf]).newInstance(conf).asInstanceOf[T]
      } catch {
        case _: NoSuchMethodException =>
          cls.getConstructor().newInstance().asInstanceOf[T]
      }
  }
}

// 第二步
// 包名:org.apache.spark.util
// 类名:Utils
// scalastyle:off classforname
/** Preferred alternative to Class.forName(className) */
def classForName(className: String): Class[_] = {
  Class.forName(className, true, getContextOrSparkClassLoader)
  // scalastyle:on classforname
}

/**
 * Get the Context ClassLoader on this thread or, if not present, the ClassLoader that
 * loaded Spark.
 *
 * This should be used whenever passing a ClassLoader to Class.ForName or finding the currently
 * active loader when setting up ClassLoader delegation chains.
 */
def getContextOrSparkClassLoader: ClassLoader =
  Option(Thread.currentThread().getContextClassLoader).getOrElse(getSparkClassLoader)

/**
 * Get the ClassLoader which loaded Spark.
 */
def getSparkClassLoader: ClassLoader = getClass.getClassLoader
3.7 创建内存管理器 MemoryManager
MemoryManager 的主要实现有 StaticMemoryManager 和 UnifiedMemoryManager。其中 StaticMemoryManager 是 Spark 早期版本遗留下来的内存管理器实现,可以配置 spark.memory.useLegacyMode 属性来指定,该属性默认为 false,因此默认的内存管理器是 UnifiedMemoryManager;而UnifiedMemoryManager 是在Spark1.6中增加了一个新的内存管理模型,该模型可以使得execution部分和storage部分的内存不像之前的(StaticMemoryManager)由比例参数限定住,而是两者可以互相借用空闲的内存。
创建 MemoryManager 的代码:
// 变量声明
// 包名:org.apache.spark
// 类名:SparkEnv
val useLegacyMemoryManager = conf.getBoolean("spark.memory.useLegacyMode", false)
val memoryManager: MemoryManager =
  if (useLegacyMemoryManager) {
    new StaticMemoryManager(conf, numUsableCores)
  } else {
    UnifiedMemoryManager(conf, numUsableCores)
  }
3.8 创建块传输服务 NettyBlockTransferService
在Spark1.6中只保留了NettyBlockTransferService,已经没有了NioBlockTransferService。NettyBlockTransferService使用Netty提供的异步事件驱动的网络应用框架,提供Web服务及客户端,获取远程节点上Block的集合。 在这里使用的是 BlockTransferService 的子类 NettyBlockTransferService创建块传输服务 BlockTransferService,NettyBlockTransferService 将提供对外的块传输服务。也正是因为 MapOutputTracker 与 NettyBlockTransferService 的配合,才实现了 Spark 的 Shuffle。
创建 BlockTransferManager 的代码:
// 变量声明
// 包名:org.apache.spark
// 类名:SparkEnv
val blockManagerPort = if (isDriver) {
  conf.get(DRIVER_BLOCK_MANAGER_PORT)
} else {
  conf.get(BLOCK_MANAGER_PORT)
}

val blockTransferService =
  new NettyBlockTransferService(conf, securityManager, bindAddress, advertiseAddress,
    blockManagerPort, numUsableCores)
3.9 创建 BlockManagerMaster
BlockManagerMaster 负责对BlockManager的管理和协调,具体操作依赖于BlockManagerMasterEndpoint。
创建 BlockManagerMaster 的代码:
// 变量声明
// 包名:org.apache.spark
// 类名:SparkEnv
val blockManagerMaster = new BlockManagerMaster(registerOrLookupEndpoint(
  BlockManagerMaster.DRIVER_ENDPOINT_NAME,
  new BlockManagerMasterEndpoint(rpcEnv, isLocal, conf, listenerBus)),
  conf, isDriver)


// 第二步
// 包名:org.apache.spark
// 类名:SparkEnv
def registerOrLookupEndpoint(
    name: String, endpointCreator: => RpcEndpoint):
  RpcEndpointRef = {
  if (isDriver) {
    logInfo("Registering " + name)
    rpcEnv.setupEndpoint(name, endpointCreator)
  } else {
    RpcUtils.makeDriverRef(name, conf, rpcEnv)
  }
}

// 第三步
// 包名:org.apache.spark.rpc.netty
// 类名:NettyRpcEnv
override def setupEndpoint(name: String, endpoint: RpcEndpoint): RpcEndpointRef = {
  dispatcher.registerRpcEndpoint(name, endpoint)
}

// 包名:org.apache.spark.util
// 类名:RpcUtils
/**
 * Retrieve a `RpcEndpointRef` which is located in the driver via its name.
 */
def makeDriverRef(name: String, conf: SparkConf, rpcEnv: RpcEnv): RpcEndpointRef = {
  val driverHost: String = conf.get("spark.driver.host", "localhost")
  val driverPort: Int = conf.getInt("spark.driver.port", 7077)
  Utils.checkHost(driverHost)
  rpcEnv.setupEndpointRef(RpcAddress(driverHost, driverPort), name)
}

图4 为 Driver 创建块管理的流程

图5 为 Executor 创建块管理的流程
这里通过 registerOrLookupEndpoint 方法查找或者注册 BlockManagerMasterEndpoint,而对Driver和Executor处理BlockManagerMaster的方式不同:
- 当前应用程序是 Driver,则创建 BlockManagerMasterEndpoint,并且注册到 Dispatcher 中,注册名为 BlockManagerMaster;
- 当前应用程序是 Executor,则从远端 Driver 实例的 NettyRpcEnv 的 Dispatcher 中查找 BlockManagerMasterEndpoint 的引用。
无论是 Driver 还是 Executor,最后都由 BlockManagerMaster 的属性 driverEndpoint 持有 BlockManagerMasterEndpoint 的引用。
提示:这里的BlockManagerMaster 的创建逻辑与 MapOutputTracker 基本一致,可以互相对照着分析,能更好理解 Spark RPC 服务。
3.10 创建块管理器 BlockManager
BlockManager负责对Block的管理,只有在BlockManager的初始化方法initialize()被调用后才是有效的。
创建 BlockManager 的代码:
// 变量声明
// 包名:org.apache.spark
// 类名:SparkEnv
// NB: blockManager is not valid until initialize() is called later.
val blockManager = new BlockManager(executorId, rpcEnv, blockManagerMaster,
  serializerManager, conf, memoryManager, mapOutputTracker, shuffleManager,
  blockTransferService, securityManager, numUsableCores)

// 变量处理
// 包名:org.apache.spark
// 类名:SparkContext
_env.blockManager.initialize(_applicationId)
BlockManager 对象在 SparkContext 初始化创建 SparkEnv 执行环境被创建,而在 SparkContext 后续的初始化过程中调用其initialize()完成其初始化。
3.11 创建测量系统 MetricsSystem
MetricsSystem 是Spark的测量系统,在 SparkEnv 中,度量系统也是必不可少的一个子组件。
创建 MetricsSystem 的代码:
// 变量声明
// 包名:org.apache.spark
// 类名:SparkEnv
val metricsSystem = if (isDriver) {
  // Don't start metrics system right now for Driver.
  // We need to wait for the task scheduler to give us an app ID.
  // Then we can start the metrics system.
  MetricsSystem.createMetricsSystem("driver", conf, securityManager)
} else {
  // We need to set the executor ID before the MetricsSystem is created because sources and
  // sinks specified in the metrics configuration file will want to incorporate this executor's
  // ID into the metrics they report.
  conf.set("spark.executor.id", executorId)
  val ms = MetricsSystem.createMetricsSystem("executor", conf, securityManager)
  ms.start()
  ms
}

// 变量处理
// 第一步
// 包名:org.apache.spark.metrics
// 类名:MetricsSystem
def createMetricsSystem(
    instance: String, conf: SparkConf, securityMgr: SecurityManager): MetricsSystem = {
  new MetricsSystem(instance, conf, securityMgr)
}

// 第二步(当是 Driver 时)
// 包名:org.apache.spark
// 类名:SparkContext
// The metrics system for Driver need to be set spark.app.id to app ID.
// So it should start after we get app ID from the task scheduler and set spark.app.id.
_env.metricsSystem.start()
// Attach the driver metrics servlet handler to the web ui after the metrics system is started.
_env.metricsSystem.getServletHandlers.foreach(handler => ui.foreach(_.attachHandler(handler)))
根据代码描述,可以看出创建度量系统根据当前实例是 Driver 还是 Executor 有所区别:
- 当前实例为 Driver:创建度量系统,并且指定度量系统的实例名为 driver。此时虽然创建了,但是并未启动,目的是等待 SparkContext 中的任务调度器 TaskScheculer 告诉度量系统应用程序ID后再启动。
- 当前实例为 Executor:设置spark.executor.id属性为当前 Executor 的ID,然后再创建并启动度量系统。
创建度量系统使用了伴生对象 MetricsSystem 的 createMetricsSystem 方法(类似 Java 的静态方法)
3.12 创建 OutputCommitCoordinator
当 Spark 应用程序使用了 Spark SQL (包括 Hive)或者需要将任务的输出保存到 HDFS 时,就会用到输出提交协调器 OutputCommitCoordinator,OutputCommitCoordinator 将决定任务是否可以提交输出到 HDFS。无论是 Driver 还是 Executor,在 SparkEnv 中都包含了子组件 OutputCommitCoordinator。在 Driver 上注册了 OutputCommitCoordinatorEndpoint,在所有 Executor 上的 OutputCommitCoordinator 都是通过 OutputCommitCoordinatorEndpoint 的 RpcEndpointRef 来询问 Driver 上的 OutputCommitCoordinator,是否能够将输出提交到 HDFS。
创建 OutputCommitCoordinator 的代码:
// 变量声明
// 包名:org.apache.spark
// 类名:SparkEnv
val outputCommitCoordinator = mockOutputCommitCoordinator.getOrElse {
  new OutputCommitCoordinator(conf, isDriver)
}
val outputCommitCoordinatorRef = registerOrLookupEndpoint("OutputCommitCoordinator",
  new OutputCommitCoordinatorEndpoint(rpcEnv, outputCommitCoordinator))
outputCommitCoordinator.coordinatorRef = Some(outputCommitCoordinatorRef)

// 第二步
// 包名:org.apache.spark
// 类名:SparkEnv
def registerOrLookupEndpoint(
    name: String, endpointCreator: => RpcEndpoint):
  RpcEndpointRef = {
  if (isDriver) {
    logInfo("Registering " + name)
    rpcEnv.setupEndpoint(name, endpointCreator)
  } else {
    RpcUtils.makeDriverRef(name, conf, rpcEnv)
  }
}

// 第三步
// 包名:org.apache.spark.rpc.netty
// 类名:NettyRpcEnv
override def setupEndpoint(name: String, endpoint: RpcEndpoint): RpcEndpointRef = {
  dispatcher.registerRpcEndpoint(name, endpoint)
}

// 包名:org.apache.spark.util
// 类名:RpcUtils
/**
 * Retrieve a `RpcEndpointRef` which is located in the driver via its name.
 */
def makeDriverRef(name: String, conf: SparkConf, rpcEnv: RpcEnv): RpcEndpointRef = {
  val driverHost: String = conf.get("spark.driver.host", "localhost")
  val driverPort: Int = conf.getInt("spark.driver.port", 7077)
  Utils.checkHost(driverHost)
  rpcEnv.setupEndpointRef(RpcAddress(driverHost, driverPort), name)
}
根据代码可以看出 OutputCommitCoordinator 的创建步骤如下:
- 当前实例为 Driver 时,则创建 OutputCommitCoordinatorEndpoint,并且注册到 Dispatcher 中,注册名为 OutputCommitCoordinator;
- 当前实例为 Executor 时,则从远端 Driver 实例的 NettyRpcEnv 的 Dispatcher 中查找 OutputCommitCoordinatorEndpoint 的引用。
无论是 Driver 还是 Executor,最后都由 OutputCommitCoordinator 的属性 coordinatorRef 持有 OutputCommitCoordinatorEndpoint 的引用。
提示:这里的BlockManagerMaster 的创建逻辑与 MapOutputTracker 基本一致,可以互相对照着分析,能更好理解 Spark RPC 服务。
3.13 创建 SparkEnv
当 SparkEnv 内的所有组件都实例化完毕,将正式构建 SparkEnv。
// 变量声明
// 包名:org.apache.spark
// 类名:SparkEnv
val envInstance = new SparkEnv(
  executorId,
  rpcEnv,
  serializer,
  closureSerializer,
  serializerManager,
  mapOutputTracker,
  shuffleManager,
  broadcastManager,
  blockManager,
  securityManager,
  metricsSystem,
  memoryManager,
  outputCommitCoordinator,
  conf)
如果当前实例为 Driver 时,还要为其创建临时目录,相关代码如下:
// Add a reference to tmp dir created by driver, we will delete this tmp dir when stop() is
// called, and we only need to do it for driver. Because driver may run as a service, and if we
// don't delete this tmp dir when sc is stopped, then will create too many tmp dirs.
if (isDriver) {
  val sparkFilesDir = Utils.createTempDir(Utils.getLocalDir(conf), "userFiles").getAbsolutePath
  envInstance.driverTmpDir = Some(sparkFilesDir)
}
从上面的注释可以看出,当 Driver 调用 stop() 函数停止时,这些创建的临时目录将会被删除。但是当一个 SparkContext 实例停止时,则不会被删除,因为 Driver 是作为一个服务运行的,因此将会创建很多的临时目录。
参考文献:
- SparkEnv
- 深入理解 Spark - 核心思想与源码分析 @耿嘉安
- Spark 内核设计的艺术 - 架构设计与实现 @耿嘉安
- Spark 大数据处理 - 技术、应用与性能优化 @高彦杰
- 图解 Spark 核心技术与案例实战 @郭景瞻
- Spark 技术内幕 - 深入解析 Spark 内核、架构设计与实现原理 @张安站
- SparkEnv — Spark Runtime Environment
如果,您认为阅读这篇博客让您有些收获,不妨点击一下右下角的【推荐】。
如果,您希望更容易地发现我的新博客,不妨点击一下左下角的【关注我】。
如果,您对我的博客所讲述的内容有兴趣,请继续关注我的后续博客,我是【虾皮★csAxp】。
如果,您还想与更多的爱好者进一步交流,不防加入QQ群【虾皮工作室-ABC大数据(232658451)】。
本文版权归作者和博客园共有,欢迎转载,但未经作者同意必须保留此段声明,且在文章页面明显位置给出原文连接,否则保留追究法律责任的权利。

