

很多情况下,我们已经不需要通过编写代码来实现一个应用程序的图形界面,而是通过强大的IDE工具通过拖拽辅以简单的事件处理代码即可很轻松的完成。但是我们不得不面对这样操作存在的一些问题,有时候我们希望能够自由改变一个程序界面的大小,通过托拽生成的界面往往是不提供这个功能的,因为定制的界面一旦改变形状,组件间的布局会变得杂乱无章。
Java中的布局管理器应用了策略者模式(Strategy),为不同类型的组件布局提供了很好的模型。而其中的网格组布局管理器(GridBagLayout)被认为是所有布局管理器中最强大的。下面将通过一个例子讲述它的使用方法。
1.实现一个WindowsXP下画图板的框架,下面是设计模型图

我们可以将GridBagLayout看作没有任何约束或限制的网格布局(GridLayout),一个组件可以占据若干行和列,而且大小设定也是自由的。从上图我们可以清晰的看到整个画图板界面被划分为4行2列的一个表格,我们先不用管某个单元格的大小,只管划分。
这样五个具体的面板(我们使用JPanel对象进行填充)就构成了整个界面,上侧占据1行2列的工具选择面板(toolSelectPanel),左侧1行1列的某个工具的选项面板(toolConcretePanel),右侧的drawPanel,下侧的colorPanel和statePanel
2.我们通过以下步骤为界面进行GridBagLayout布局
1).设置主界面的布局管理器为GridBagLayout(不用指定行和列)
2).为界面中的每一个组件(这里是JPanel对象)指定一个GridBagConstraints对象,通过设置该对象的属性值指出组件在
管理器中的布局方案
3).通过下面的调用添加组件极其约束条件(GridBagConstraints对象)
add(Component,constraints);
我们有必要了解一下GridBagConstraints中各个属性的具体含义以便我们更好的进行个性化的布局
@gridx,gridy:
组件左上角所在的位置,如上图中左侧的面板在1行0列,则gridy=0,gridx=1。读者请注意这里的行对应的是gridy,列对应的是gridx
@gridwidth,gridheight
组件占据的行数和列数,如最上面的那个面板占了1行2列,则gridwidth=2,gridheight=1
@weightx,weighty
可以简单理解为组件大小变化的增量值,如设置weightx=100,组件会随着单元格而变化,设置weightx=0时,组件大小不会发生变化。当然weightx,weighty也可以设置成其他的值,不过意义不大,就不再详细介绍。
@fill
组件在所处格子(分配区域)内的填充方式
如fill= HORIZONTAL,组件就只在水平方向上填充满单元格,取fill= BOTH则会填满整个格子。
@anchor
组件在所处格子内的对其方式,取anchor=EAST就是指右对齐
@ipadx,ipady
内部填充,是指在组件首选大小的基础上x方向上加上ipadx,y方向上加上ipady,这样做就可以保证组件不会收缩到ipadx,ipady所确定的大小以下,因此我们可以用ipadx,ipady的值来指定组件的大小,而不必指定组件的大小否则会有意想不到的效果
@insets
外部填充,填充的区域是组件与所处格子边框之间的部分,有left,top,right,bottom四个参数,不过当组件的fill=NONE时,指定insects值是无意义的
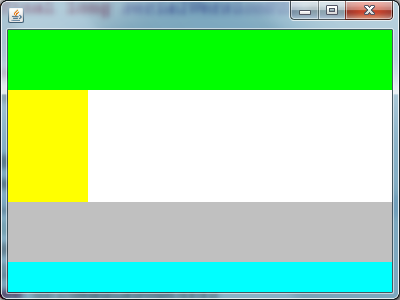
3.下面就是代码实现了,先看下效果图吧
这是运行生成的界面
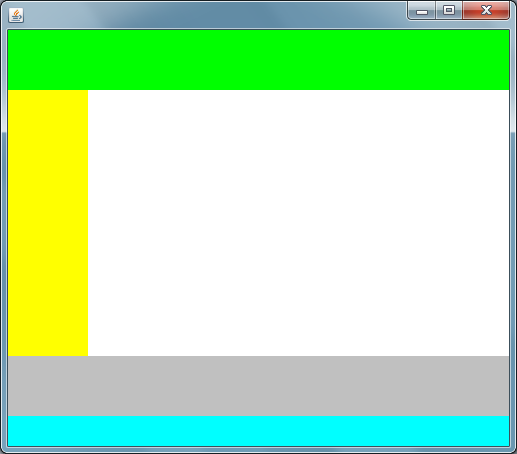
这是拉伸之后的界面
关键代码如下

- private void addGridBagPanes() {
- //上侧的工具选择面板
- JPanel toolSelectPanel = new JPanel();
- toolSelectPanel.setBackground(Color.green);
- this.add(toolSelectPanel, new GBC(0,0,2,1).
- setFill(GBC.BOTH).setIpad(200, 50).setWeight(100, 0));
- //左侧的具体工具面板
- JPanel toolConcretePanel = new JPanel();
- toolConcretePanel.setBackground(Color.YELLOW);
- this.add(toolConcretePanel,new GBC(0,1).
- setFill(GBC.BOTH).setIpad(70, 90).setWeight(0, 100));
- //右侧的绘图面板
- JPanel drawPanel = new JPanel();
- drawPanel.setBackground(Color.WHITE);
- this.add(drawPanel,new GBC(1,1).setFill(GBC.BOTH));
- //下侧的颜色选择面板
- JPanel colorPanel = new JPanel();
- colorPanel.setBackground(Color.LIGHT_GRAY);
- this.add(colorPanel,new GBC(0,2,2,1).
- setFill(GBC.BOTH).setIpad(200,50).setWeight(100, 0));
- //下侧的状态面板
- JPanel statePanel = new JPanel();
- statePanel.setBackground(Color.CYAN);
- this.add(statePanel,new GBC(0,3,2,1).
- setFill(GBC.BOTH).setIpad(200, 20).setWeight(100, 0));
- }
其中的GBC类继承于GridBagConstraints这样做的目的是简化每次对GridBagConstraints对象的直接操作带来的繁琐,而GBC的各个set方法返回的都是一个GBC对象因此可以接连调用set方法。GBC类的代码如下:
- public class GBC extends GridBagConstraints
- {
- //初始化左上角位置
- public GBC(int gridx, int gridy)
- {
- this.gridx = gridx;
- this.gridy = gridy;
- }
- //初始化左上角位置和所占行数和列数
- public GBC(int gridx, int gridy, int gridwidth, int gridheight)
- {
- this.gridx = gridx;
- this.gridy = gridy;
- this.gridwidth = gridwidth;
- this.gridheight = gridheight;
- }
- //对齐方式
- public GBC setAnchor(int anchor)
- {
- this.anchor = anchor;
- return this;
- }
- //是否拉伸及拉伸方向
- public GBC setFill(int fill)
- {
- this.fill = fill;
- return this;
- }
- //x和y方向上的增量
- public GBC setWeight(double weightx, double weighty)
- {
- this.weightx = weightx;
- this.weighty = weighty;
- return this;
- }
- //外部填充
- public GBC setInsets(int distance)
- {
- this.insets = new Insets(distance, distance, distance, distance);
- return this;
- }
- //外填充
- public GBC setInsets(int top, int left, int bottom, int right)
- {
- this.insets = new Insets(top, left, bottom, right);
- return this;
- }
- //内填充
- public GBC setIpad(int ipadx, int ipady)
- {
- this.ipadx = ipadx;
- this.ipady = ipady;
- return this;
- }
- }

