
How To Scan QRCode For UWP (1)
本文将介绍实现一个类似于微信扫一扫功能的UI界面,后续会再实现具体的识别二维码的功能。
实例使用的Win10 SDK Version是Windows 10 Anniversary Edition(10.0;Build 14393)。
简单的介绍UI布局
UI 布局采用 3*3 的Grid,扫描Foucs部分占据最中间,其他格子的背景色都是灰色并且设置了Opacity="0.2"。
扫描的动画采用的是线性动画DoubleAnimation,需要提到的是Storyboard.TargetName - 附加属性,要进行动画处理的对象的名称,Storyboard.TargetProperty - 附加属性,要进行动画处理的对象的属性。
此外还使用了CaptureElement来预览摄像头捕获的图像,具体如何实现会在下篇文章来介绍。
UI具体实现
 1  <Grid Background="#FF1D1D1D">
 2         <Grid>
 3             <CaptureElement x:Name="PreviewControl" Visibility="Collapsed"  VerticalAlignment="Stretch" HorizontalAlignment="Stretch" Stretch="Fill" />
 4             <Grid IsHitTestVisible="False">
 5                 <Grid.RowDefinitions>
 6                     <RowDefinition Height="*"/>
 7                     <RowDefinition Height="Auto"/>
 8                     <RowDefinition Height="*"/>
 9                 </Grid.RowDefinitions>
10                 <Grid.ColumnDefinitions>
11                     <ColumnDefinition Width="*"/>
12                     <ColumnDefinition Width="Auto"/>
13                     <ColumnDefinition Width="*"/>
14                 </Grid.ColumnDefinitions>
15                 <Grid Opacity="0.2" Background="LightGray" Grid.ColumnSpan="3"></Grid>
16                 <Grid Opacity="0.2" Background="LightGray" Grid.Row="1"></Grid>
17                 <Grid Opacity="0.2" Background="LightGray" Grid.Row="1" Grid.Column="2"></Grid>
18                 <Grid Opacity="0.2" Background="LightGray" Grid.Row="2"  Grid.ColumnSpan="3"></Grid>
19                 <Grid x:Name="scanGrid" Grid.Row="1" Grid.Column="1" Opacity="1">
20                     <Grid.Resources>
21                         <Storyboard x:Name="scanStoryboard">
22                             <DoubleAnimation x:Name="scanAnimation"
23                                 Storyboard.TargetName="scanLine"
24                                 Storyboard.TargetProperty="(Canvas.Top)"
25                                 Duration="0:0:2"
26                                 To="300"
27                                 RepeatBehavior="Forever"/>
28                         </Storyboard>
29                     </Grid.Resources>
30                     <Border x:Name="leftTopBorder" HorizontalAlignment="Left" VerticalAlignment="Top"  BorderBrush="White" />
31                     <Border x:Name="rightTopBorder" HorizontalAlignment="Right" VerticalAlignment="Top"  BorderBrush="White" />
32                     <Border x:Name="leftBottomBorder" HorizontalAlignment="Left" VerticalAlignment="Bottom"  BorderBrush="White" />
33                     <Border x:Name="rightBottomBorder" HorizontalAlignment="Right" VerticalAlignment="Bottom"  BorderBrush="White" />
34                     <Canvas x:Name="scanCavas" Margin="10">
35                         <Line Name="scanLine" X1="0" Y1="0" Y2="0" Stroke="Red" StrokeThickness="3" />
36                     </Canvas>
37                 </Grid>
38             </Grid>
39         </Grid>
40     </Grid>
UI自适应
由于在Win10里,App就像destop application可以随便改变窗口的大小,所以当窗口大小改变的时候我们需要重新计算Border的Width,Height,Line的宽度等等。
可以在Page的SizeChanged来实现我们的代码。
 1 const int borderThickness = 5;
 2
 3 private void InitFocusRec()
 4         {
 5             leftTopBorder.BorderThickness = new Thickness(borderThickness, borderThickness, 0, 0);
 6             rightTopBorder.BorderThickness = new Thickness(0, borderThickness, borderThickness, 0);
 7             leftBottomBorder.BorderThickness = new Thickness(borderThickness, 0, 0, borderThickness);
 8             rightBottomBorder.BorderThickness = new Thickness(0, 0, borderThickness, borderThickness);
 9
10             var borderLength = 20;
11             leftTopBorder.Width = leftTopBorder.Height = borderLength;
12             rightTopBorder.Width = rightTopBorder.Height = borderLength;
13             leftBottomBorder.Width = leftBottomBorder.Height = borderLength;
14             rightBottomBorder.Width = rightBottomBorder.Height = borderLength;
15
16             var focusRecLength = Math.Min(ActualWidth / 2, ActualHeight / 2);
17             scanGrid.Width = scanGrid.Height = focusRecLength;
18             scanCavas.Width = scanCavas.Height = focusRecLength;
19
20             scanStoryboard.Stop();
21             scanLine.X2 = scanCavas.Width - 20;
22             scanAnimation.To = scanCavas.Height;
23
24             scanStoryboard.Begin();
25         }
26
27         private void Page_SizeChanged(object sender, SizeChangedEventArgs e)
28         {
29             InitFocusRec();
30         }
预览效果图如下: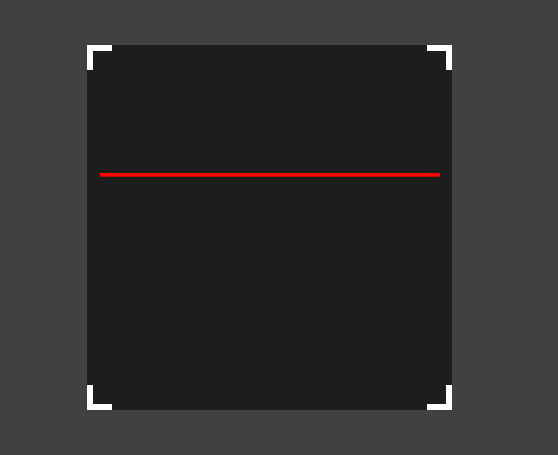
后续将介绍实现摄像头的预览功能。

