

【腾讯云的1001种玩法】几种在腾讯云建立WordPress的方法(Linux)(一)
版权声明:本文由张宁 原创文章,转载请注明出处:
文章原文链接:https://www.qcloud.com/community/article/928869001488201231
来源:腾云阁 https://www.qcloud.com/community
引言:腾讯云作为国内一流的云服务提供商,云服务器CVM的使用可谓是“一键成站”,十分方便。今天我们就来介绍一下几种在腾讯云建立WordPress的方法。
这里,我们仅介绍Linux下安装WordPress等内容托管开源程序的示例,对于在Windows下的环境配置与开源程序安装大同小异,只不过Windows下图形界面多一些使得让人看上去没那么难而已。
【常规安装——LAMP或LNMP安装】
前奏:环境检查
- 操作系统:Linux(本例使用的大部分在CentOS 7.x x64与Ubuntu 14.04.1 LTS 64位上可行)
-
服务架构:LAMP或LNMP
注:此处LAMP为Linux+Apache+MariaDB+PHP,LNMP为Linux+Nginx+MySQL+PHP
-
软体版本:Apache 2.4、MariaDB5.5、PHP5
LAMP在CentOS上的配置
这一节是按照已有域名来写的,如果暂时没有域名或者只是想配置单网站,可以先看下一节“LNMP在CentOS上的配置”
Apache HTTP Server(简称Apache)是Apache软件基金会的一个开放源码的网页服务器,是最流行的Web服务器端软件之一。Apache 2.4版本是Apache一重大升级版本,新版改进了缓存、代理模块,会话控制,改进异步读写、增加proxy_fcgi各方面支持等,有大幅度提升并发性能。
下面,我们就介绍一下在Apache配置多域名或已有域名模式的WordPress,以供参考。
更新系统
# yum update
安装并配置 Apache 网络服务器
CentOS 7 中默认的是 Apache 2.4 版本,Apache 官网有份很好的 vhost.conf 配置实例。
安装
# yum install -y httpd
备份配置文件(建议对于所有的配置文件,做任何更改前都先备份一份,以便应对未知错误)
# mkdir ~/zningfbak
# cp -R /etc/httpd ~/zningbak
其中 ~ 表示当前登录用户的用户文件夹;-R 参数表示递归到所有子目录
配置虚拟主机(/etc/httpd/conf.d/vhost.conf )
# vim /etc/httpd/conf.d/vhost.conf
文件内需要填写的内容:
#
# 主机 1
# zning.net
#
<VirtualHost *:80>
    ServerAdmin admin@zning.net
    ServerName zning.net
    ServerAlias www
    # 注意下面这行末尾不要带 /
    DocumentRoot /srv/www/zning.net/html

<Directory "/srv/www/zning.net/html/">
    Options FollowSymLinks
    # 下一行这样设置就可以在网站文件的目录中使用 .htaccess
    AllowOverride All
    # 下一行是替代 Allow from all 的新机制
    Require all granted
</Directory>

    ErrorLog /srv/www/zning.net/logs/error.log
    CustomLog /srv/www/zning.net/logs/access.log combined
    ServerSignature Off
</VirtualHost>

#
# 主机 2
# qcloud.zning.net
# 这是另一个位于同一服务器的网站,如果不需要则删除此段配置
#
<VirtualHost *:80>
    ServerAdmin admin@zning.net
    ServerName test.zning.net
    ServerAlias test
    DocumentRoot /srv/www/qcloud.zning.net/html

<Directory "/srv/www/qcloud.zning.net/html/">
    Options FollowSymLinks
    AllowOverride All
    Require all granted
</Directory>

    ErrorLog /srv/www/qcloud.zning.net/logs/error.log
    CustomLog /srv/www/qcloud.zning.net/logs/access.log combined
    ServerSignature Off
</VirtualHost>

#
# 主机 3
# 为了以后给访问 phpMyAdmin 的时候用,也可以是别的端口,如 4444
Listen 3366
#
# phpMyAdmin,访问地址:http://12.34.56.78:3366/phpMyAdmin
#
<VirtualHost 12.34.56.78:3366>
    ServerAdmin admin@zning.net
    DocumentRoot /srv/www/phpmyadmin/html
<Directory "/srv/www/phpmyadmin/html/">
    Options FollowSymLinks
    AllowOverride None
    Require all granted
</Directory>
    ErrorLog /srv/www/phpmyadmin/logs/error.log
    CustomLog /srv/www/phpmyadmin/logs/access.log combined
    ServerSignature Off
</VirtualHost>
虽然配置文件写好了,但是还不能启动 httpd 进程,因为上面设置的各个文件夹(网站目录)还没有创建。
创建各个虚拟主机的文件夹(根据需要增加或删除),
# 主机 1 的
# mkdir /srv/www/zning.net/html -p
# mkdir /srv/www/zning.net/logs

# 主机 2 的
# mkdir /srv/www/qcloud.zning.net/html -p
# mkdir /srv/www/qcloud.zning.net/logs

# 主机 3 的
# mkdir /srv/www/phpmyadmin/html -p
# mkdir /srv/www/phpmyadmin/logs
为了能够在系统启动时自动运行 Apache 服务器,需要运行下面的指令:
# systemctl enable httpd
输出类似于,
# Created symlink from /etc/systemd/system/multi-user.target.wants/httpd.service to /usr/lib/systemd/system/httpd.service.
然后启动 Apache 服务,
# systemctl start httpd
如果上述指令提示说本来已经启动了 httpd,则重新加载它,
# systemctl reload httpd
现在需要将 http 服务加入防火墙以允许外部访问。先启用防火墙服务,如果防火墙默认没有启动,则下述指令会提示错误,“FirewallD is not running”。
# systemctl enable firewalld && systemctl start firewalld
其中 && 表示两条指令依次执行。
启动后再重新执行下面的指令:
将 HTTP 默认使用的端口 80 加入到防火墙允许列表里
# firewall-cmd --add-service=http --permanent
其中,–permanent 参数表示这是一条永久防火墙规则,如果不加这个参数则重启系统后就没有这条规则了。
而对于自定义的用于 phpMyAdmin 的 3366 端口,也需要添加相应的防火墙规则。因为是非标准端口,直接用数字表示即可,
# firewall-cmd --zone=public --add-port=3366/tcp --permanent
重启 Firewalld 使该规则生效,
# systemctl restart firewalld
如果要查看加入后的防火墙规则,使用指令,
# firewall-cmd --list-all
显示结果类似于,
public (default)
  interfaces:
  sources:
  services: dhcpv6-client http ssh
  ports: 3366/tcp
  masquerade: no
  forward-ports:
  icmp-blocks:
  rich rules:
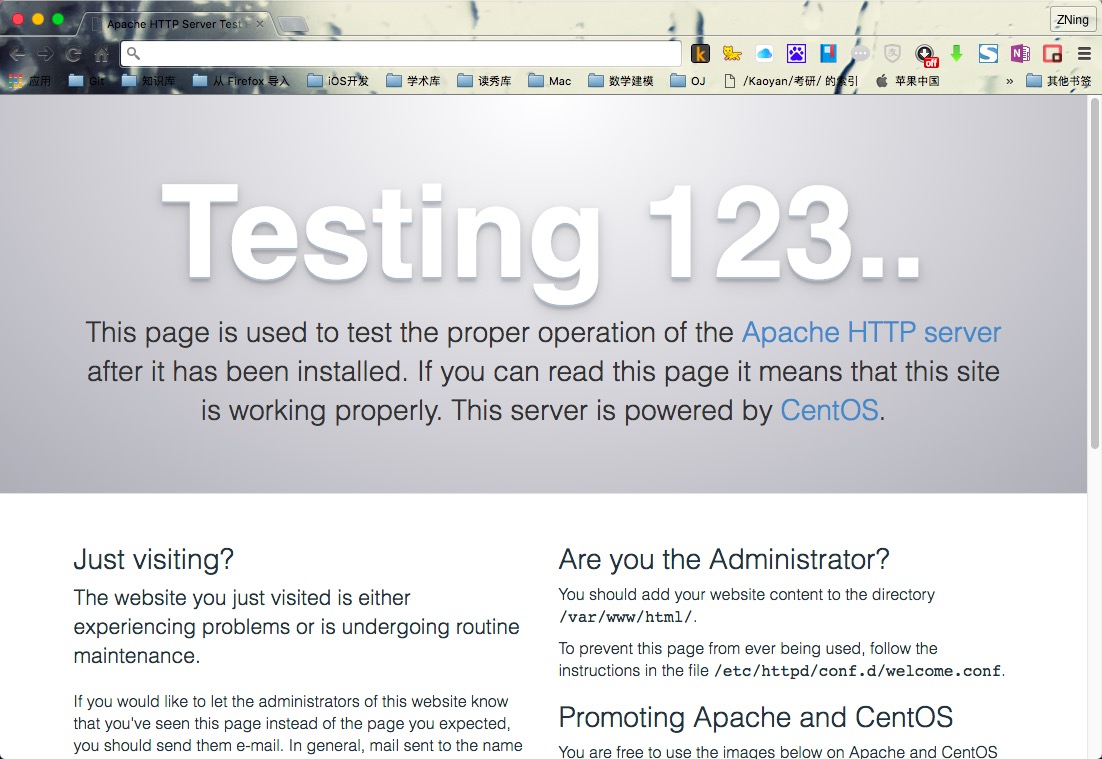
如果已经做好了 DNS 域名解析,现在用浏览器打开域名应该能够看到 Apache 的测试页面了。
安装和配置 MariaDB 数据库服务
MariaDB 是在 MySQL 基础上重建的一个数据库软件,各 Linux 发行版都陆陆续续从 MySQL 切换到了 MariaDB。CentOS 从 7 开始默认使用 MariaDB。
安装
# yum install -y mariadb-server mariadb
加入随系统启动
# systemctl enable mariadb
输出结果类似于,
Created symlink from /etc/systemd/system/multi-user.target.wants/mariadb.service to /usr/lib/systemd/system/mariadb.service.
启动 MariaDB 守护进程(mysqld)
# systemctl start mariadb
其默认用户名还是 mysql,
# top -u mysql
可以查看内存占用情况。
安全配置 MariaDB
使用 MariaDB 内建的安全配置脚本进行配置
# mysql_secure_installation
这里需要配置 mysql 根用户和密码、清除其他用户、清除不需要的数据库等。输出类似于下面的执行过程,其中需要我们从键盘输入的内容用**注释出来了:
NOTE: RUNNING ALL PARTS OF THIS SCRIPT IS RECOMMENDED FOR ALL MariaDB
      SERVERS IN PRODUCTION USE!  PLEASE READ EACH STEP CAREFULLY!

In order to log into MariaDB to secure it, we'll need the current
password for the root user.  If you've just installed MariaDB, and
you haven't set the root password yet, the password will be blank,
so you should just press enter here.

Enter current password for root (enter for none):
OK, successfully used password, moving on...

Setting the root password ensures that nobody can log into the MariaDB
root user without the proper authorisation.

Set root password? [Y/n] y **此处输入y**
New password:***这里输入你的密码(并不会显示)***
Re-enter new password:***再次输入***
Password updated successfully!
Reloading privilege tables..
 ... Success!


By default, a MariaDB installation has an anonymous user, allowing anyone
to log into MariaDB without having to have a user account created for
them.  This is intended only for testing, and to make the installation
go a bit smoother.  You should remove them before moving into a
production environment.

Remove anonymous users? [Y/n] y **此处输入y**
 ... Success!

Normally, root should only be allowed to connect from 'localhost'.  This
ensures that someone cannot guess at the root password from the network.

Disallow root login remotely? [Y/n] y **此处输入y**
 ... Success!

By default, MariaDB comes with a database named 'test' that anyone can
access.  This is also intended only for testing, and should be removed
before moving into a production environment.

Remove test database and access to it? [Y/n] y **此处输入y**
 - Dropping test database...
 ... Success!
 - Removing privileges on test database...
 ... Success!

Reloading the privilege tables will ensure that all changes made so far
will take effect immediately.

Reload privilege tables now? [Y/n] y **此处输入y**
 ... Success!

Cleaning up...

All done!  If you've completed all of the above steps, your MariaDB
installation should now be secure.

Thanks for using MariaDB!
然后使用 MySQL 的 root 帐户(不同于 Linux 的 root 帐户,刚才设置密码了)登录进去
# mysql -u root -p
输入密码后回车,下面是输出示例,可以看到命令提示符变为 MariaDB [(none)]>
Welcome to the MariaDB monitor.  Commands end with ; or \g.
Your MariaDB connection id is 20
Server version: 5.5.44-MariaDB MariaDB Server

Copyright (c) 2000, 2015, Oracle, MariaDB Corporation Ab and others.

Type 'help;' or '\h' for help. Type '\c' to clear the current input statement.

MariaDB [(none)]>
建一个新数据库给 WordPress 用(这里取名为 wpzning,也可以用别的名字)
MariaDB [(none)]> create database wpzning;
创建一个新用户,并将该数据库的权限赋给他(这里只是举例,用户名为 zningwp_us,密码为 zningwp2016)
MariaDB [(none)]> grant all on wpzning.* to 'zningwp_us' identified by 'zningwp2016';
更新权限
MariaDB [(none)]> flush privileges;
退出数据库
MariaDB [(none)]> quit
执行大体输出如下:
MariaDB [(none)]> create database wpzning;
Query OK, 1 row affected (0.00 sec)

MariaDB [(none)]> grant all on wpzning.* to 'zningwp_us' identified by 'zningwp2016';
Query OK, 0 rows affected (0.00 sec)

MariaDB [(none)]> flush privileges;
Query OK, 0 rows affected (0.00 sec)

MariaDB [(none)]> quit
Bye
备份配置文件,
# cp /etc/my.cnf ~/zningbak/my.cnf.bak
其它的先不做了,回头用图形界面的 phpMyAdmin 来做。
安装和配置 PHP
安装 PHP5
# yum install -y php
备份配置文件 /etc/php.ini,还有 php.conf 以及 10-php.conf,
# cp /etc/php.ini ~/zningbak/php.ini.bak
# cp /etc/httpd/conf.d/php.conf ~/zningbak/httpd/conf.d/php.conf.bak
# cp /etc/httpd/conf.modules.d/10-php.conf ~/zningbak/httpd/conf.modules.d/10-php.conf.bak
并确保 /etc/php.ini 中有下面的语句(不同的就修改,没有的就添加,某些数值可以后再调整,这是针对一个简单的运行 WordPress 的服务器的配置):
error_reporting = E_COMPILE_ERROR|E_RECOVERABLE_ERROR|E_ERROR|E_CORE_ERROR
display_errors = Off
log_errors = On
max_execution_time = 300
memory_limit = 32M
安装 PHP-MYSQL
为了在 PHP 中使用 MySQL,还需要安装这个 php-mysql 包:
# yum install -y php-mysql
安装和配置 phpMyAdmin (选作)
Remi 安装源上有最新的 PHP、MySQL 以及 phpMyAdmin 的 Yum 安装包,可以方便安装、更新。但是正在使用的 Linux 发行版 CentOS 7 上的软件包可能版本上要求不一样,所以使用 Yum 安装源优先级插件来进行控制。
安装使用 EPEL REPOSITORY
选择合适的源地址来安装,参考方法:安装使用 EPEL 安装源。
到 EPEL 主页:
http://fedoraproject.org/wiki/EPEL#How_can_I_use_these_extra_packages.3F
找到 The newest version of ‘epel-release’ for EL7,点击打开新页面,复制 epel-release-latest-7.noarch.rpm 的链接(数字可能有变化,当前版本是 7)。采用下面的方法直接安装:
# yum install -y https://dl.fedoraproject.org/pub/epel/epel-release-latest-7.noarch.rpm
安装PHPMYADMIN
# yum install -y phpmyadmin
配置
phpMyAdmin 的默认安装目录是 /usr/share/phpMyAdmin,同时会在 Apache 的配置文件目录中自动创建虚拟主机配置文件 /etc/httpd/conf.d/phpMyAdmin.conf (区分大小写)。
同样的,先备份配置文件以防修改出现错误,
# cp /etc/httpd/conf.d/phpMyAdmin.conf ~/zningbak/httpd/conf.d/phpMyAdmin.conf.bak
然后修改配置文件(vim /etc/httpd/conf.d/phpMyAdmin.conf)中有设置:
Alias /phpMyAdmin /usr/share/phpMyAdmin
Alias /phpmyadmin /usr/share/phpMyAdmin
也就是说,我们可以通过绑定到 Apache 服务器上的任何域名访问 phpMyDdmin。比如这里可以通过 zning.net/phpmyadmin 或者 zning.net/phpMyAdmin 访问。但是这样一来,phpMyAdmin 的内容就与网站内容混到一起了,感觉 phpMyAdmin 成了网站的一个目录。但实际上我们并不希望别人也去访问这个页面。所以我们使用习惯的地址加端口 3366(而不是默认的 80 端口,换成自己喜欢的端口就行,再比如 3344)的方式,即 IP:port/phpMyAdmin 的链接形式访问 phpMyAdmin,加 # 注释掉上面的 Apache Alias 规则:
#Alias /phpMyAdmin /usr/share/phpMyAdmin
#Alias /phpmyadmin /usr/share/phpMyAdmin
并将
<Directory /usr/share/phpMyAdmin/>
.........
</Directory>
里面的
Require ip 127.0.0.1
Require ip ::1
改成
Require all granted
保存退出,使之可以从任何地方都可以访问。如果本地电脑是固定 IP 的,为了安全,也可以将上面的Require all granted 改成 Require ip <your-local-ip>。咱的 ADSL 就享受不到这样的待遇了。
因为在前面创建虚拟主机配置文件 /etc/httpd/conf.d/vhost.conf 的时候已经为 phpMyAdmin 配置了一个端口为 2082 的虚拟主机,只能通过该虚拟主机(端口)访问 phpMyAdmin。因为/srv/www/phpmyadmin/public_html 配置为 phpMyAdmin 的虚拟主机目录,为该目录创建符号连接到 phpMyAdmin 安装目录(/usr/share/phpMyAdmin):
# ln -sf /usr/share/phpMyAdmin /srv/www/phpmyadmin/html
备份然后修改 phpMyAdmin 的配置文件,
# cp /etc/phpMyAdmin/config.inc.php ~/zningbak/config.inc.php.bak
编辑文件:
# vim /etc/phpMyAdmin/config.inc.php
找到其中的如下代码段:
$cfg['blowfish_secret'] = '这里随便填上一串乱七八糟的字符即可,字母、数字等,长度最好大于 16 个';
按照上面的提示填写 blowfish_secret 字符串。其他的不用修改,保存并退出。
重起 APACHE 使配置生效
# systemctl restart httpd
现在就可以通过 ip:port/phpMyAdmin (将 IP 换为你腾讯云服务器的 IP,端口为前面设置的 phpmyadmin 的虚拟主机端口,注意大小写)访问 phpMyAdmin 了。
使用前面创建的用户名和密码(2.3.4 中 grant 语句中包含的用户名和密码)登录 phpMyAdmin。
###安装WordPress
域名配置
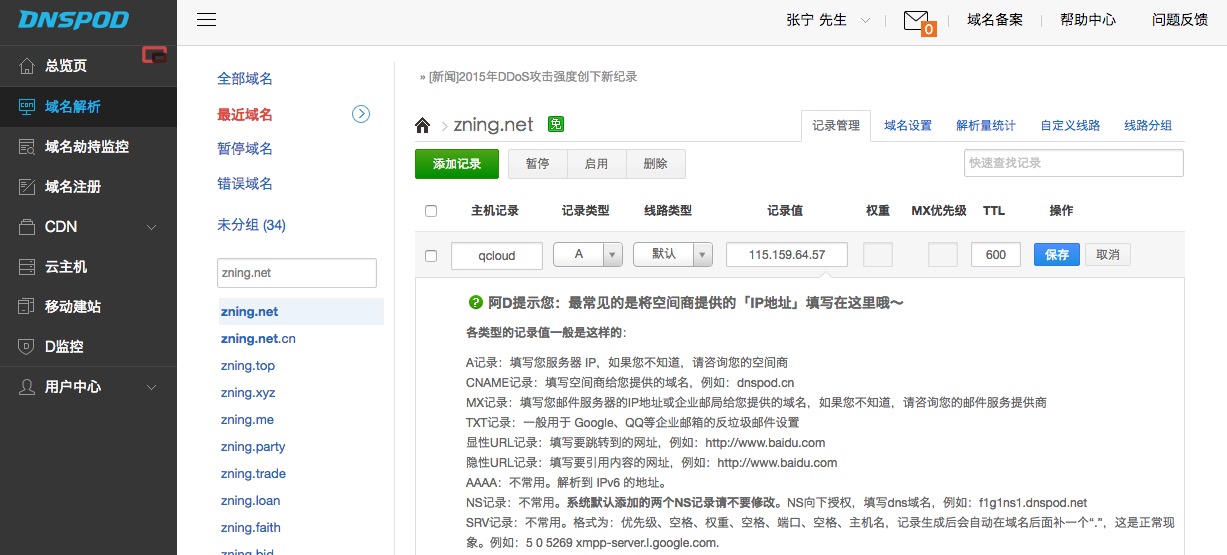
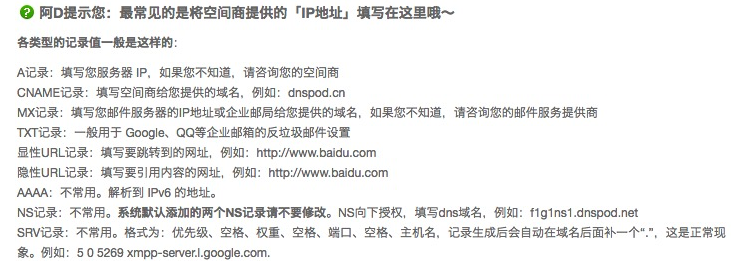
首先配置域名DNS,这里以DNSPod为示例演示,截图中也有对相关记录的解释,接下来的其他方法也可通过此教程来配置域名解析。
DNSPod增加解析如图:
DNSPod解析详解如图:
安装
转移目录到相关目录
# cd /srv/www/qcloud.zning.net/html
下载WordPress
# wget https://cn.wordpress.org/wordpress-4.5.2-zh_CN.tar.gz
解压文件
# tar zxvf wordpress-4.5.2-zh_CN.tar.gz
移动文件
# mv /srv/www/qcloud.zning.net/html/wordpress/* /srv/www/qcloud.zning.net/html
访问网址qcloud.zning.net,进行最后一步的安装。
出现如下图所示页面,单击继续:
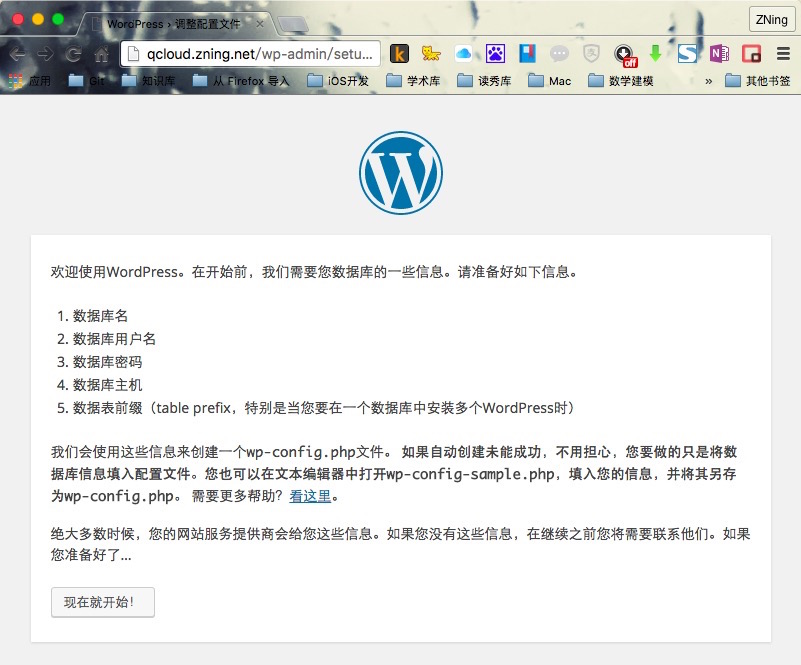
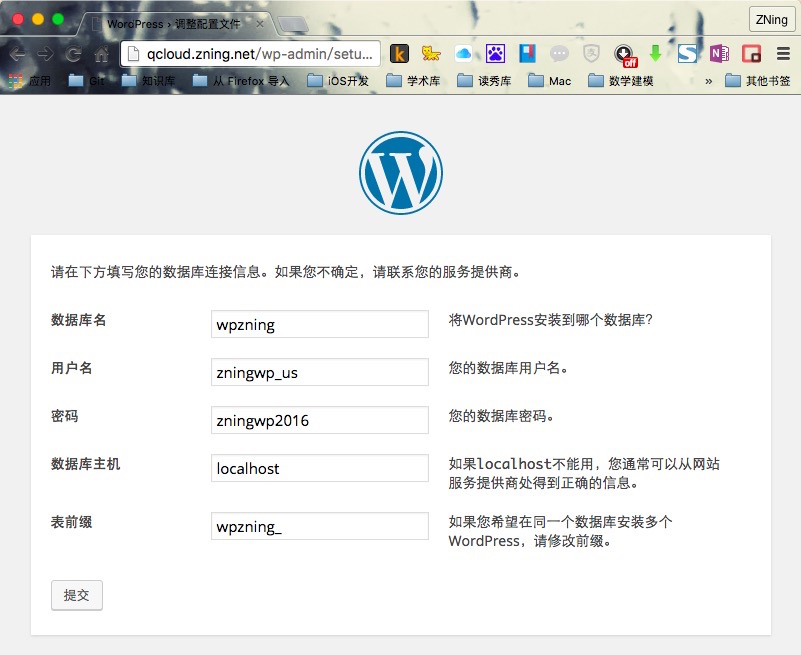
输入已经创建的数据库信息:
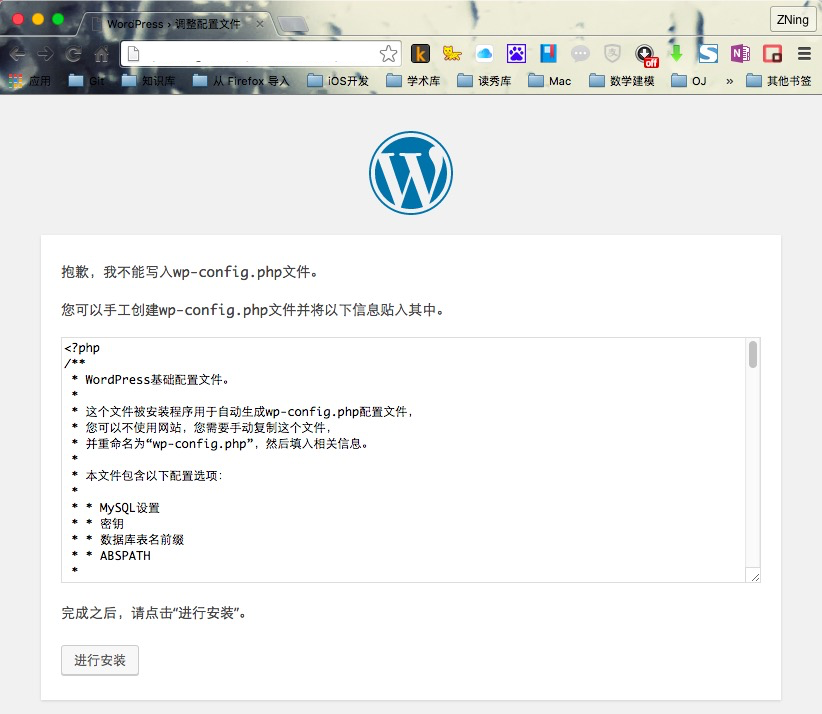
这一步出错的原因是,网站本身对html文件夹没有读写权限,具体解决方案可以查看本节参考资料链接中关于网站用户权限的讲解。此处我们可以按照提示,通过ssh,输入vim /srv/www/qcloud.zning.net/html/wp-config.php来创建,并复制WordPress已经提供的内容,保存继续即可
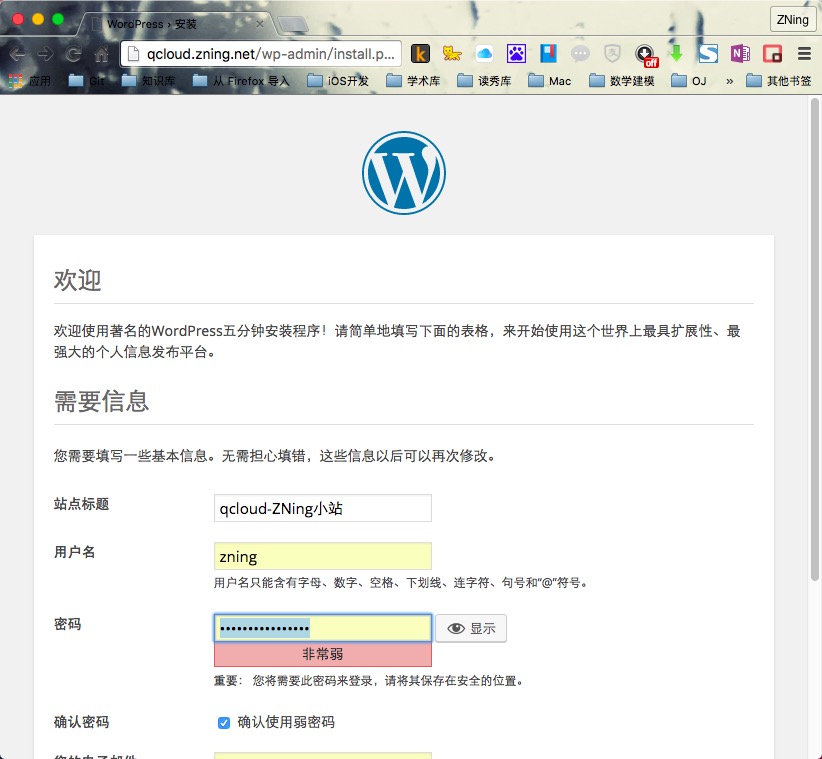
到这里说明已经连接了数据库,提供网站管理信息就可以继续安装咯。
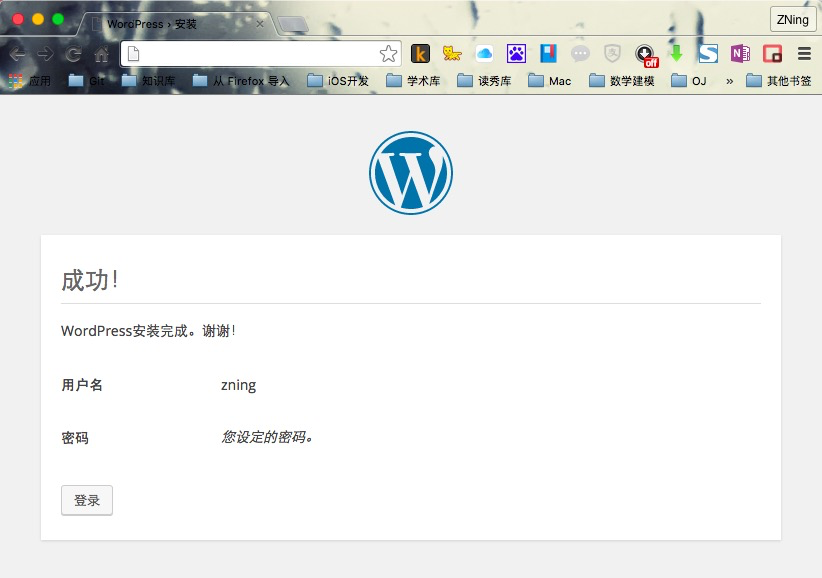
哇咔咔,这个页面不用解释了吧~
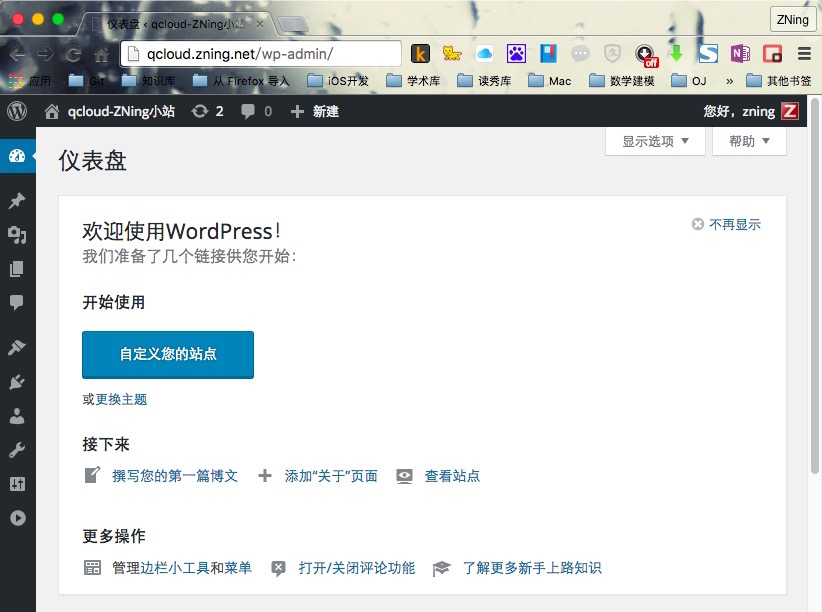
仪表盘控制后台界面:
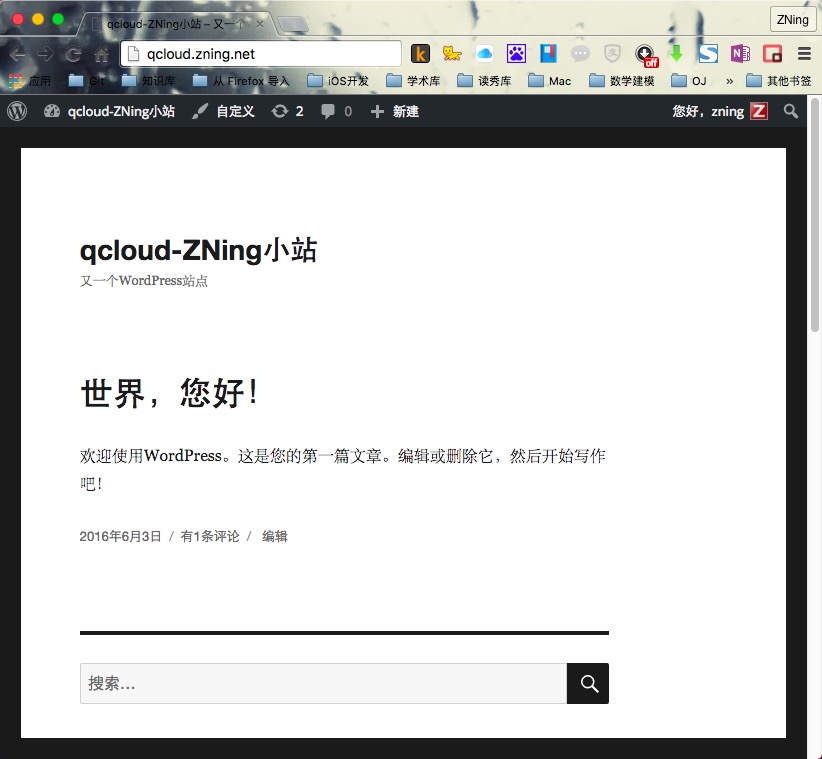
首页截图:
LNMP在CentOS上的配置
Nginx是一款轻量级的Web 服务器,并在一个BSD-like 协议下发行。由俄罗斯的程序设计师Igor Sysoev所开发,供俄国大型的入口网站及搜索引擎Rambler使用。其特点是占有内存少,并发能力强。
下面,我们就介绍一下在Nginx配置单网站模式的WordPress,以供参考。
安装Nginx服务程序
安装Nginx:
# yum install -y nginx
使Nginx能够开机自启:
# systemctl enable nginx
输出结果类似于,
Created symlink from /etc/systemd/system/multi-user.target.wants/nginx.service to /usr/lib/systemd/system/nginx.service.
重新启动Nginx:
# systemctl restart nginx.service
安装完成后,访问IP地址,出现如下图页面的欢迎界面,即说明已经完成安装了。
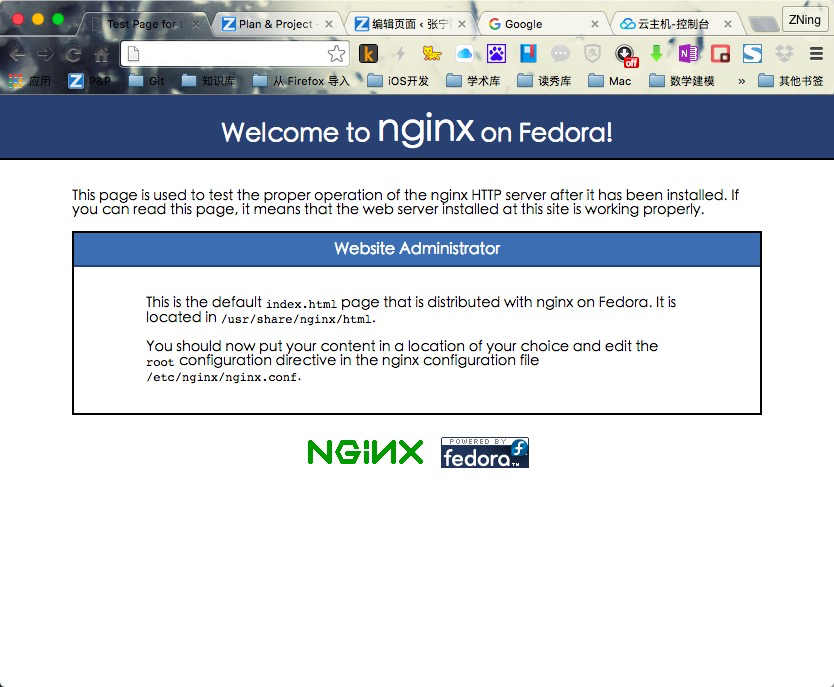
在这个页面我们看到
This is the default index.html page that is distributed with nginx on Fedora. It is located in /usr/share/nginx/html.You should now put your content in a location of your choice and edit the root configuration directive in the nginx configuration file /etc/nginx/nginx.conf.
这两句话,这里告诉我们Nginx默认的配置文件在哪里,以及访问路径在哪里,也就是我们需要放置WordPress的路径在哪里。先记下来,等会有用
这里的Nginx是最简单的安装方法,其实最合适的安装方法还是在本地环境交叉编译完成后进行的安装,也不算特别麻烦,教程详见:nginx服务器安装及配置文件详解
安装 PHP 服务程序和 MariaDB 数据库服务程序
此步与上节相同,请参照上节相关子节的步骤进行即可。
不过按照上节步骤安装完PHP之后,需要安装一个php-fpm插件才行
# yum install -y php-fpm
创建守护进程,并设置自启并启动:
# systemctl enable php-fpm
# systemctl start php-fpm
输出如下的类似内容:
Created symlink from /etc/systemd/system/multi-user.target.wants/php-fpm.service to /usr/lib/systemd/system/php-fpm.service.
配置完成并启动后,我们通过如下命令可以看到进程的监听状态:
# netstat -antl|grep 9000
# ps -ef|grep php-cgi
输出如下的类似内容:
[root@QCLOUD share]# ps -ef|grep php-cgi
root     12838  8024  0 10:23 pts/0    00:00:00 grep --color=auto php-cgi
[root@QCLOUD share]# netstat -antl|grep 9000
tcp        0      0 127.0.0.1:9000          0.0.0.0:*               LISTEN
安装WordPress
首先配置nginx.conf,通过如下命令进入编辑器:
# vim /etc/nginx/nginx.conf
在
        location / {
           index index.html index.php;
        }
中添加
index index.html index.php;
并在}后另起一行,添加如下内容:
         location ~ \.php$ {
            root           html;
            fastcgi_pass   127.0.0.1:9000;
            fastcgi_index  index.php;
            fastcgi_param  SCRIPT_FILENAME  $document_root$fastcgi_script_name;
            include        fastcgi_params;
        }
添加完成后,server代码区段的代码情况如下:
        location / {
           index index.html index.php;
        }

         location ~ \.php$ {
            root           html;
            fastcgi_pass   127.0.0.1:9000;
            fastcgi_index  index.php;
            fastcgi_param  SCRIPT_FILENAME  $document_root$fastcgi_script_name;
            include        fastcgi_params;
        }
然后,进入刚才所列的路径:
# cd /usr/share/nginx/html
下载WordPress
# wget https://cn.wordpress.org/wordpress-4.5.2-zh_CN.tar.gz
这里可能受服务器影响,北京机房下载速度不错,上海可能慢点。
解压文件
# tar zxvf wordpress-4.5.2-zh_CN.tar.gz
更改与备份html文件夹现有文件:
# mv index.html index.html.bak
移动文件
# mv /usr/share/nginx/html/wordpress/* /usr/share/nginx/html
访问你服务器的IP地址,进行最后一步的安装。
安装情况同上节相关子节,请参见上一节的相关子节
小结
这是最传统的安装方法,学习这样的安装方法主要还是为了熟悉Linux环境的命令操作与文本编辑。可以有效学习各种组件的调用执行原理。建议人人都会。
请继续阅读《【腾讯云的1001种玩法】几种在腾讯云建立WordPress的方法(Linux)(二)》

