
Android 着色器 Tint 研究
Tint 这个东西 主要用来减少apk体积的,比如说我现在有一个textview,他的背景图 有两种,一种是当获得焦点时显示的a图,另一种是 失去焦点时显示的b图。
相信大家开发的时候 这种需求做过很多次了,我们一般都会发现 这种a图和b图 除了颜色不一样,其他都是一样的,但是我们做的时候呢,通常是找ui要了两张图。
如果要适配分辨率的话 很有可能图片会更多,而且在切换的时候 因为是重新加载一次bitmap 效率也会下降很多。所以谷歌就给了一套解决方案 这个就是tint了。
他的目的就是当你发现有这种需求的时候,只需要 放一张图 在apk里即可,当你需要改变背景图的颜色的时候 就用Tint即可!
下面就来简单说一下,tint的使用 以及需要注意的地方。
首先 我们定义一个简单的布局文件:
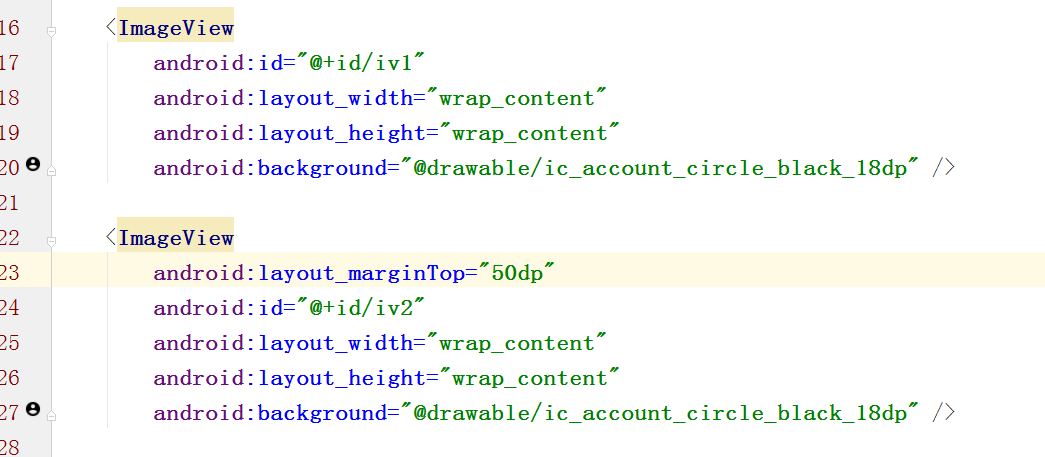
我们发现这2个imageview 都是引用的同样一个drawable资源,并且 在studio这个xml编辑界面里面 我们很明显的 能看出来 这个图片的颜色是黑色的 对吧!
那 现在 我们想改一下,想把iv1 这个imageview的 背景色 改成绿色的! 我们想当然的 当然会这么写:
1         iv1 = (ImageView) this.findViewById(R.id.iv1);
2         iv2 = (ImageView) this.findViewById(R.id.iv2);
3
4         final Drawable originBitmapDrawable = getResources().getDrawable(R.drawable.ic_account_circle_black_18dp);
5         iv1.setImageDrawable(tintDrawable(originBitmapDrawable, ColorStateList.valueOf(Color.GREEN)));
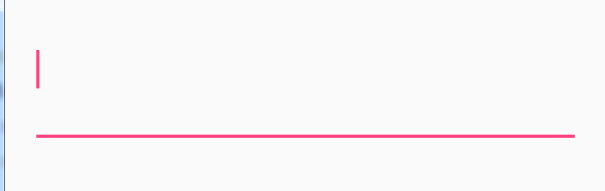
应该很好理解对吧,代码就不解释了。但是我们运行以后发现:
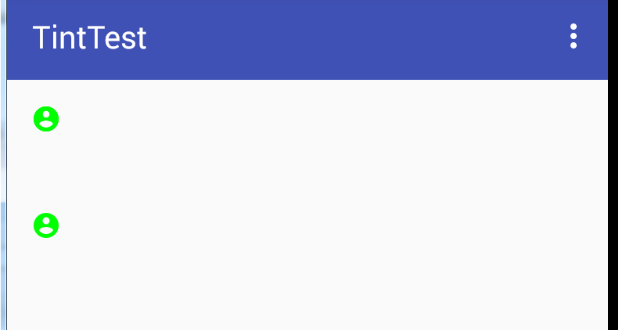
卧槽 怎么2个都变绿色了!
回顾一下 我们的代码 我们应该能明白 2个imageview 都是引用的同样的一个drawable,要知道 既然是一个drawable,那系统肯定为了优化资源 把这2个drawable 在内存里的拷贝弄成了一份!
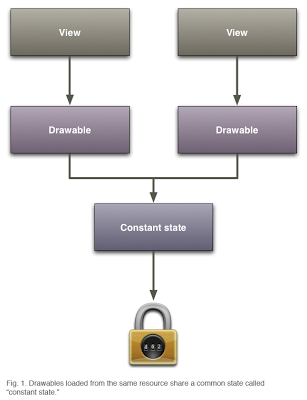
还记得 我们以前讲的bitmap优化那篇么?http://www.cnblogs.com/punkisnotdead/p/4881771.html 和这个里面的inBitmap 属性有异曲同工之妙,如果还不理解 你看下面的图就理解了:
所以才会造成上面的情况。你修改了共同变量,所以2个图就都被影响了。
解决方法 其实也很简单:
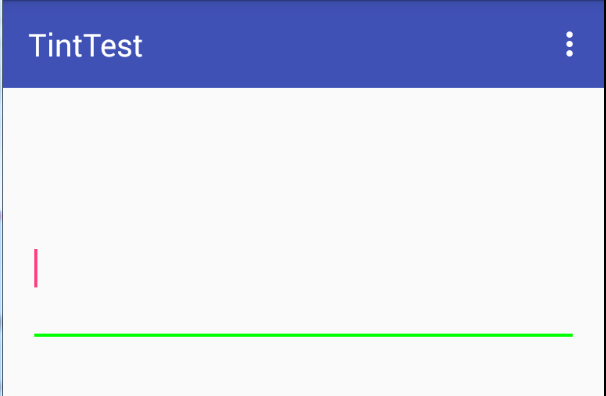
1 final Drawable originBitmapDrawable = getResources().getDrawable(R.drawable.ic_account_circle_black_18dp).mutate();
修改以后 我们再看:
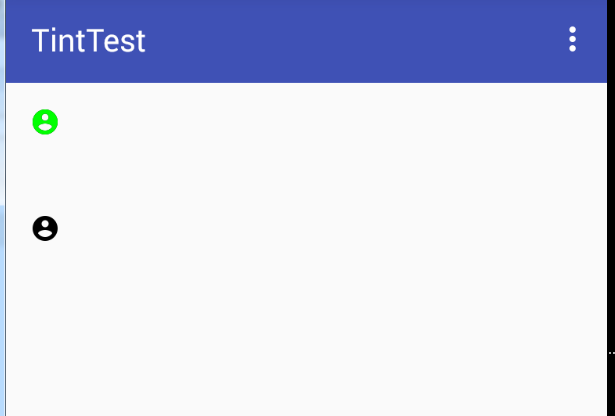
你看这么做就一切正常了。
那有人就要问了,卧槽 你这么做 不是把谷歌给我们做好的图片内存优化方案给损坏了么,其实这种担心是多余的,这个http://android-developers.blogspot.hk/2009/05/drawable-mutations.html
这个地址会告诉你 其实我们做 只是把单独的受到影响的那部分 内存给单独拿出来了,其他没受到影响的还是共享的数据!换句话说 我们内存里 会另外存放的就是一些纯的标志位 之类的 类似于状态值这种东西。
大部分的内存还是公用的!
然后接着来,我们看下一个例子 关于editext的。
你看这个edittext 的颜色是这样的。那现在我们来修改一下 这个edittext的背景色
1         et1 = (EditText) this.findViewById(R.id.et);
2         final Drawable originBitmapDrawable = et1.getBackground();
3         et1.setBackgroundDrawable(tintDrawable(originBitmapDrawable, ColorStateList.valueOf(Color.GREEN)));
背景色是修改成功了 但是这个光标的颜色 还没变 非常不协调, 有人又要说了 我们可以用:

这个xml 属性来修改呀,当然了这个方法确实是可以的 但是你想 你这么做的话 又要增加资源文件了,不是与我们的tint 背道而驰了么?
所以 这个地方 我们就要想办法 突破一下。其实很多人都能想到方法了,对于android 没有 提供给我们的api 比如那些private 函数,
我们通常都是通过反射的方法 去调用的。 这里也是一样,稍微想一下 我们就能明白, 这个地方 我们就先通过反射来获取到这个cursorDrawable
然后给他着色,然后在反射调用方法 给他set进去不就行了么?
首先我们都知道 editext 实际上就是textview,所以我们看一下textview 的源码 找找看 这个属性到底叫啥名字。经过一番努力发现 在这:
1  // Although these fields are specific to editable text, they are not added to Editor because
2     // they are defined by the TextView's style and are theme-dependent.
3     int mCursorDrawableRes;
并且我们要看下editor的源码 这是和edittext息息相关的:
/**
     * EditText specific data, created on demand when one of the Editor fields is used.
     * See {@link #createEditorIfNeeded()}.
     */
    private Editor mEditor;
1 //注意这段代码属于editor
2  final Drawable[] mCursorDrawable = new Drawable[2];
有了这段代码 我们就知道 剩下反射的代码怎么写了。
 1 //参数就是要反射修改光标的edittext对象
 2     private void invokeEditTextCallCursorDrawable(EditText et) {
 3         try {
 4             Field fCursorDrawableRes = TextView.class.getDeclaredField("mCursorDrawableRes");
 5             // 看源码知道 这个变量不是public的 所以要设置下这个可访问属性
 6             fCursorDrawableRes.setAccessible(true);
 7             //取得 editext对象里的mCursorDrawableRes 属性的值 看源码知道这是一个int值
 8             int mCursorDrawableRes = fCursorDrawableRes.getInt(et);
 9             //下面的代码 是通过获取mEditor对象 然后再通过拿到的mEditor对象来获取最终我们的mCursorDrawable这个光标的drawable
10             Field fEditor = TextView.class.getDeclaredField("mEditor");
11             fEditor.setAccessible(true);
12             Object editor = fEditor.get(et);
13             Class<?> clazz = editor.getClass();
14             Field fCursorDrawable = clazz.getDeclaredField("mCursorDrawable");
15             fCursorDrawable.setAccessible(true);
16             if (mCursorDrawableRes <= 0) {
17                 return;
18             }
19             //到这里 我们终于拿到了默认主题下 edittext的光标的那个小图标的drawable
20             Drawable cursorDrawable = et.getContext().getResources().getDrawable(mCursorDrawableRes);
21             if (cursorDrawable == null) {
22                 return;
23             }
24             //既然都拿到了这个drawble 那就修改他。
25             Drawable tintDrawable = tintDrawable(cursorDrawable, ColorStateList.valueOf(Color.GREEN));
26             //前面贴出的mCursorDrawable源码 可以知道 这是一个二维数组。所以我们要构造出一个全新的二维数组
27             Drawable[] drawables = new Drawable[]{tintDrawable, tintDrawable};
28             //然后再通过反射 把这个二维数组的值 放到editor里面 即可!
29             fCursorDrawable.set(editor, drawables);
30         } catch (NoSuchFieldException e) {
31             e.printStackTrace();
32         } catch (IllegalAccessException e) {
33             e.printStackTrace();
34         }
35
36     }
最后调用这个方法以后看一下效果:
很完美 对吧~~
最后tintDrawable这个方法是用来向下兼容用的。你如果不考虑向下兼容的问题 用系统自带的方法 就可以了,这里就不做过多介绍了。
1  public static Drawable tintDrawable(Drawable drawable, ColorStateList colors) {
2         final Drawable wrappedDrawable = DrawableCompat.wrap(drawable);
3         DrawableCompat.setTintList(wrappedDrawable, colors);
4         return wrappedDrawable;
5     }
当然你也可以用http://andraskindler.com/blog/2015/tinting_drawables/ 这个文章里的方法来做向下兼容:
 1 public final class TintedBitmapDrawable extends BitmapDrawable {
 2   private int tint;
 3   private int alpha;
 4
 5   public TintedBitmapDrawable(final Resources res, final Bitmap bitmap, final int tint) {
 6     super(res, bitmap);
 7     this.tint = tint;
 8     this.alpha = Color.alpha(tint);
 9   }
10
11   public TintedBitmapDrawable(final Resources res, final int resId, final int tint) {
12     super(res, BitmapFactory.decodeResource(res, resId));
13     this.tint = tint;
14     this.alpha = Color.alpha(tint);
15   }
16
17   public void setTint(final int tint) {
18     this.tint = tint;
19     this.alpha = Color.alpha(tint);
20   }
21
22   @Override public void draw(final Canvas canvas) {
23     final Paint paint = getPaint();
24     if (paint.getColorFilter() == null) {
25       paint.setColorFilter(new LightingColorFilter(tint, 0));
26       paint.setAlpha(alpha);
27     }
28     super.draw(canvas);
29   }
30 }

