
asp.net core 外部认证多站点模式实现
PS:之前因为需要扩展了微信和QQ的认证,使得网站是可以使用QQ和微信直接登录。github 传送门 。然后有小伙伴问,能否让这个配置信息(appid, appsecret)按需改变,而不是在 ConfigureServices 里面写好。
先上 官方文档 : https://docs.microsoft.com/zh-cn/aspnet/core/security/authentication/social/?view=aspnetcore-2.1
官方已经实现了 microsft,facebook,twitter,google 等这几个网站认证。代码可以认证授权库看到找到 https://github.com/aspnet/Security 。
国内的QQ和微信其实也是基于OAuth来实现的,所以自己集成还是比较容易。
正常情况下,配置这个外部认证都是在 ConfigureServices 里面配置好,并且使用配置或者是使用机密文件的形式来保存 appid 等信息。
回到正文,多站点模式,就是一个网站下分为多个子站点,并且不同的子站点可以配置不同的appId 。Asp.net core 默认的配置模式,在这种场景下已经适应不了了。
先上代码: https://github.com/jxnkwlp/AspNetCore.AuthenticationQQ-WebChat/tree/muti-site
官方代码分析:
1,RemoteAuthenticationHandler 远程认证处理程序。位于 microsoft.aspnetcore.authentication 下 。 源码 (https://github.com/aspnet/Security/blob/master/src/Microsoft.AspNetCore.Authentication/RemoteAuthenticationHandler.cs)
这个是泛型类,并且需要一个 TOptions ,这个 TOptions 必须是继承 RemoteAuthenticationOptions 的类。
2,OAuthHandler 实现 OAuth 认证处理程序,这个类继承 RemoteAuthenticationHandler 。同时必须实现一个 OAuthOptions 。
正常情况下实现 QQ、微信、github ,google ,facebook 等登录都是基于这个来实现的。 OAuthHandler 已经实现了标准的 OAuth 认证。
源码:https://github.com/aspnet/Security/blob/master/src/Microsoft.AspNetCore.Authentication.OAuth/OAuthHandler.cs
在 ConfigureServices 中,使用 AddFacebook 等方法,就是将 对于的 Handler 添加到 处理管道中,这些管到都是实现了 OAuth,然后传递 对应的 Options 来配置Handler 。
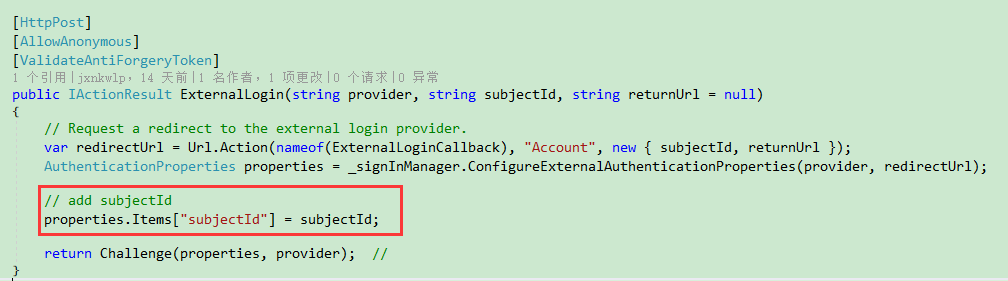
3,回到Account/ExternalLogin ,在提交外部登录的请求中, AuthenticationProperties properties = _signInManager.ConfigureExternalAuthenticationProperties(provider, redirectUrl); //这行代码的作用是 配置当前外部登录返回URL和认证的相关属性。return Challenge(properties, provider); // 将结果转到相关相关处理程序。这里返回的结果用于上面 OAuthHandler 作为一个处理参数。从这开始,就进入了 OAuthHandler 的处理范围了。
4,查看 OAuthHandler 代码 。 Task HandleChallengeAsync(AuthenticationProperties properties); 这个函数作为接收上一步中传递的 认证参数。 默认实现代码:
protected override async Task HandleChallengeAsync(AuthenticationProperties properties)
{

    if (string.IsNullOrEmpty(properties.RedirectUri))
    {
        properties.RedirectUri = CurrentUri;
    }

    // OAuth2 10.12 CSRF

    GenerateCorrelationId(properties);

    var authorizationEndpoint = BuildChallengeUrl(properties, BuildRedirectUri(Options.CallbackPath));

    var redirectContext = new RedirectContext<OAuthOptions>(

        Context, Scheme, Options,

        properties, authorizationEndpoint);

    await Events.RedirectToAuthorizationEndpoint(redirectContext);
}
protected virtual string BuildChallengeUrl(AuthenticationProperties properties, string redirectUri)
{
    var scopeParameter = properties.GetParameter<ICollection<string>>(OAuthChallengeProperties.ScopeKey);
    var scope = scopeParameter != null ? FormatScope(scopeParameter) : FormatScope();

    var state = Options.StateDataFormat.Protect(properties);
    var parameters = new Dictionary<string, string>
    {
        { "client_id", Options.ClientId },
        { "scope", scope },
        { "response_type", "code" },
        { "redirect_uri", redirectUri },
        { "state", state },
    };

    return QueryHelpers.AddQueryString(Options.AuthorizationEndpoint, parameters);
}
在这里面,构建了一个请求URL, 要求的这个URL 是目标站点授权的URL, 比如微信的那个黑色背景中间有二维码的页面。 这个构建请求URL的方法可以重写。
5,在上一步中,在需要授权的网站,授权完成后,会跳转到自己的网站并且带上授权相关数据。入口是 Task<HandleRequestResult> HandleRemoteAuthenticateAsync();
改造方法:
在上面的分析中,官方的实现是 在 ConfigureServices 中配置好参数 TOptions ,然后在 Handler 中 获取该参数。我们的目的是在请求中可以按需改变参数,如 client_id。
1,定义一个接口 IClientStore 和 一个实体 ClientStoreModel 。
public interface IClientStore
{
    /// <summary>
    ///  由 <paramref name="provider"/> 和 <paramref name="subjectId"/> 查找 <seealso cref="ClientStoreModel"/>
    /// </summary>
    ClientStoreModel FindBySubjectId(string provider, string subjectId);
}
/// <summary>
///  表示一个 Client 信息
/// </summary>
public class ClientStoreModel
{
    public string Provider { get; set; }

    public string SubjectId { get; set; }

    /// <summary>
    /// Gets or sets the provider-assigned client id.
    /// </summary>
    public string ClientId { get; set; }

    /// <summary>
    /// Gets or sets the provider-assigned client secret.
    /// </summary>
    public string ClientSecret { get; set; }

}
IClientStore 用于查找 client 的配置信息
2,在 Account/ExternalLogin 中,新增一个 参数 subjectId ,表示在当前某个认证(Provider)中是哪个请求(SubjectId) 。
同时在返回的授权配置参数中将subjectId 保存起来。
3,定义一个 MultiOAuthHandler ,集成 RemoteAuthenticationHandler ,不继承 OAuthHandler 是因为 这里需要一个新的 Options. (完整代码 请看代码仓库) 定义: class MultiOAuthHandler<TMultiOAuthOptions>:RemoteAuthenticationHandler<TMultiOAuthOptions>whereTMultiOAuthOptions:MultiOAuthOptions,new()
在构造函数中添加参数 IClientStore 。
4,在默认的实现中,从外部授权网站跳转回自己的网站的时候,默认的路径是 /signin-{provider} , 比如 /signin-microsoft 。为了区分请求的 subjectId , 这个默认路径将改为 /signin-{provider}/subject/{subjectId} 。
5,修改 HandleRemoteAuthenticateAsync ,在开头添加2行代码,用于获取 subjectId 。
var callbackPath = Options.CallbackPath.Add("/subject").Value;

var subjectId = Request.Path.Value.Remove(0, callbackPath.Length + 1);
6,修改 ExchangeCodeAsync 方法
protected virtual async Task<OAuthTokenResponse> ExchangeCodeAsync(string subjectId, string code, string redirectUri)
{
    var clientStore = GetClientStore(subjectId);

    var tokenRequestParameters = new Dictionary<string, string>()
    {
        { "client_id", clientStore.ClientId },
        { "client_secret", clientStore.ClientSecret },

        { "redirect_uri", redirectUri },
        { "code", code },
        { "grant_type", "authorization_code" },
    };

    var requestContent = new FormUrlEncodedContent(tokenRequestParameters);

    var requestMessage = new HttpRequestMessage(HttpMethod.Post, Options.TokenEndpoint);
    requestMessage.Headers.Accept.Add(new MediaTypeWithQualityHeaderValue("application/json"));
    requestMessage.Content = requestContent;
    var response = await Backchannel.SendAsync(requestMessage, Context.RequestAborted);
    if (response.IsSuccessStatusCode)
    {
        var payload = JObject.Parse(await response.Content.ReadAsStringAsync());
        return OAuthTokenResponse.Success(payload);
    }
    else
    {
        var error = "OAuth token endpoint failure: " + await Display(response);
        return OAuthTokenResponse.Failed(new Exception(error));
    }
}
7,还有一些小修改,就不一一列出来了。 到这里 MultiOAuthHandler 相关就调整好了。
我把这个单独出来了 Microsoft.AspNetCore.Authentication.MultiOAuth
8,使用 。 实现 IClientStore 接口,然后在 ConfigureServices 中添加如下代码:
services.AddAuthentication()
    .AddMultiOAuthStore<MylientStore>()
    .AddMultiWeixinAuthentication(); // 微信
9, 目前github 上的demo 只对 微信 做了实现。
PS:如有错误,欢迎指正。
源地址: https://blog.wuliping.cn/post/aspnet-core-security-authentication-social-multi-config

