openstack之rpo方式安装
一、环境准备
1、准备yum源服务器一台

网络规则:
[root@yum yum.repos.d]# ifconfig
eno16777736: flags=4163<UP,BROADCAST,RUNNING,MULTICAST>  mtu 1500
        inet 192.168.1.10  netmask 255.255.255.0  broadcast 192.168.1.255
        inet6 fe80::20c:29ff:fe2d:91e6  prefixlen 64  scopeid 0x20<link>
        ether 00:0c:29:2d:91:e6  txqueuelen 1000  (Ethernet)
        RX packets 52056639  bytes 73751435961 (68.6 GiB)
        RX errors 0  dropped 0  overruns 0  frame 0
        TX packets 4793169  bytes 857761714 (818.0 MiB)
        TX errors 0  dropped 0 overruns 0  carrier 0  collisions 0

lo: flags=73<UP,LOOPBACK,RUNNING>  mtu 65536
        inet 127.0.0.1  netmask 255.0.0.0
        inet6 ::1  prefixlen 128  scopeid 0x10<host>
        loop  txqueuelen 0  (Local Loopback)
        RX packets 4283  bytes 120737647 (115.1 MiB)
        RX errors 0  dropped 0  overruns 0  frame 0
        TX packets 4283  bytes 120737647 (115.1 MiB)
        TX errors 0  dropped 0 overruns 0  carrier 0  collisions 0
2、准备openstack服务器一台
网络规则:
    [root@openstack ~]# ifconfig
br-ex: flags=4163<UP,BROADCAST,RUNNING,MULTICAST>  mtu 1500
        inet6 fe80::6005:a9ff:fef4:f845  prefixlen 64  scopeid 0x20<link>
        ether 62:05:a9:f4:f8:45  txqueuelen 0  (Ethernet)
        RX packets 0  bytes 0 (0.0 B)
        RX errors 0  dropped 0  overruns 0  frame 0
        TX packets 8  bytes 648 (648.0 B)
        TX errors 0  dropped 0 overruns 0  carrier 0  collisions 0

eno16777736: flags=4163<UP,BROADCAST,RUNNING,MULTICAST>  mtu 1500
        inet 192.168.1.7  netmask 255.255.255.0  broadcast 192.168.1.255
        inet6 fe80::20c:29ff:fe35:2637  prefixlen 64  scopeid 0x20<link>
        ether 00:0c:29:35:26:37  txqueuelen 1000  (Ethernet)
        RX packets 405415  bytes 565821877 (539.6 MiB)
        RX errors 0  dropped 0  overruns 0  frame 0
        TX packets 41933  bytes 10586783 (10.0 MiB)
        TX errors 0  dropped 0 overruns 0  carrier 0  collisions 0

eno33554984: flags=4163<UP,BROADCAST,RUNNING,MULTICAST>  mtu 1500
        inet 192.168.1.8  netmask 255.255.255.0  broadcast 192.168.1.255
        inet6 fe80::20c:29ff:fe35:2641  prefixlen 64  scopeid 0x20<link>
        ether 00:0c:29:35:26:41  txqueuelen 1000  (Ethernet)
        RX packets 15320  bytes 968611 (945.9 KiB)
        RX errors 0  dropped 0  overruns 0  frame 0
        TX packets 29  bytes 4166 (4.0 KiB)
        TX errors 0  dropped 0 overruns 0  carrier 0  collisions 0

lo: flags=73<UP,LOOPBACK,RUNNING>  mtu 65536
        inet 127.0.0.1  netmask 255.0.0.0
        inet6 ::1  prefixlen 128  scopeid 0x10<host>
        loop  txqueuelen 0  (Local Loopback)
        RX packets 522703  bytes 85061700 (81.1 MiB)
        RX errors 0  dropped 0  overruns 0  frame 0
        TX packets 522703  bytes 85061700 (81.1 MiB)
        TX errors 0  dropped 0 overruns 0  carrier 0  collisions 0
二、先配置本地yum源服务器
参考:http://www.cnblogs.com/nulige/p/7309283.html(这里不做详细说明)
[root@yum yum.repos.d]# ll
total 12
-rw-r--r--. 1 root root  332 Sep  8 07:01 centos.repo
-rw-r--r--. 1 root root 1084 May 15  2015 epel.repo
-rw-r--r--. 1 root root   84 Sep  8 06:06 newton.repo
本地yum源:
[root@yum ~]# cd /var/ftp/pub/
[root@yum pub]# ll
total 68
drwxr-xr-x. 14 root root  4096 Sep  7 23:04 centos
drwxr-xr-x.  4 root root 45056 Feb 10  2017 newton
#在yum源服务器上面配置/etc/hosts解析
[root@yum pub]# tail -1 /etc/hosts
192.168.1.10 yum.hotdoor.com
四、在openstack服务器上面配置
1、添加yum源
[root@yum yum.repos.d]# ll
total 12
-rw-r--r--. 1 root root  332 Sep  8 07:01 centos.repo
-rw-r--r--. 1 root root 1084 May 15  2015 epel.repo
-rw-r--r--. 1 root root   84 Sep  8 06:06 newton.repo
然后:
yum clean all
yum makecache
2、配置/etc/hosts
[root@openstack ~]# tail -10 /etc/hosts
127.0.0.1   localhost localhost.localdomain localhost4 localhost4.localdomain4
::1         localhost localhost.localdomain localhost6 localhost6.localdomain6
192.168.1.7 openstack.hotdoor.com openstack
192.168.1.10 yum.hotdoor.com
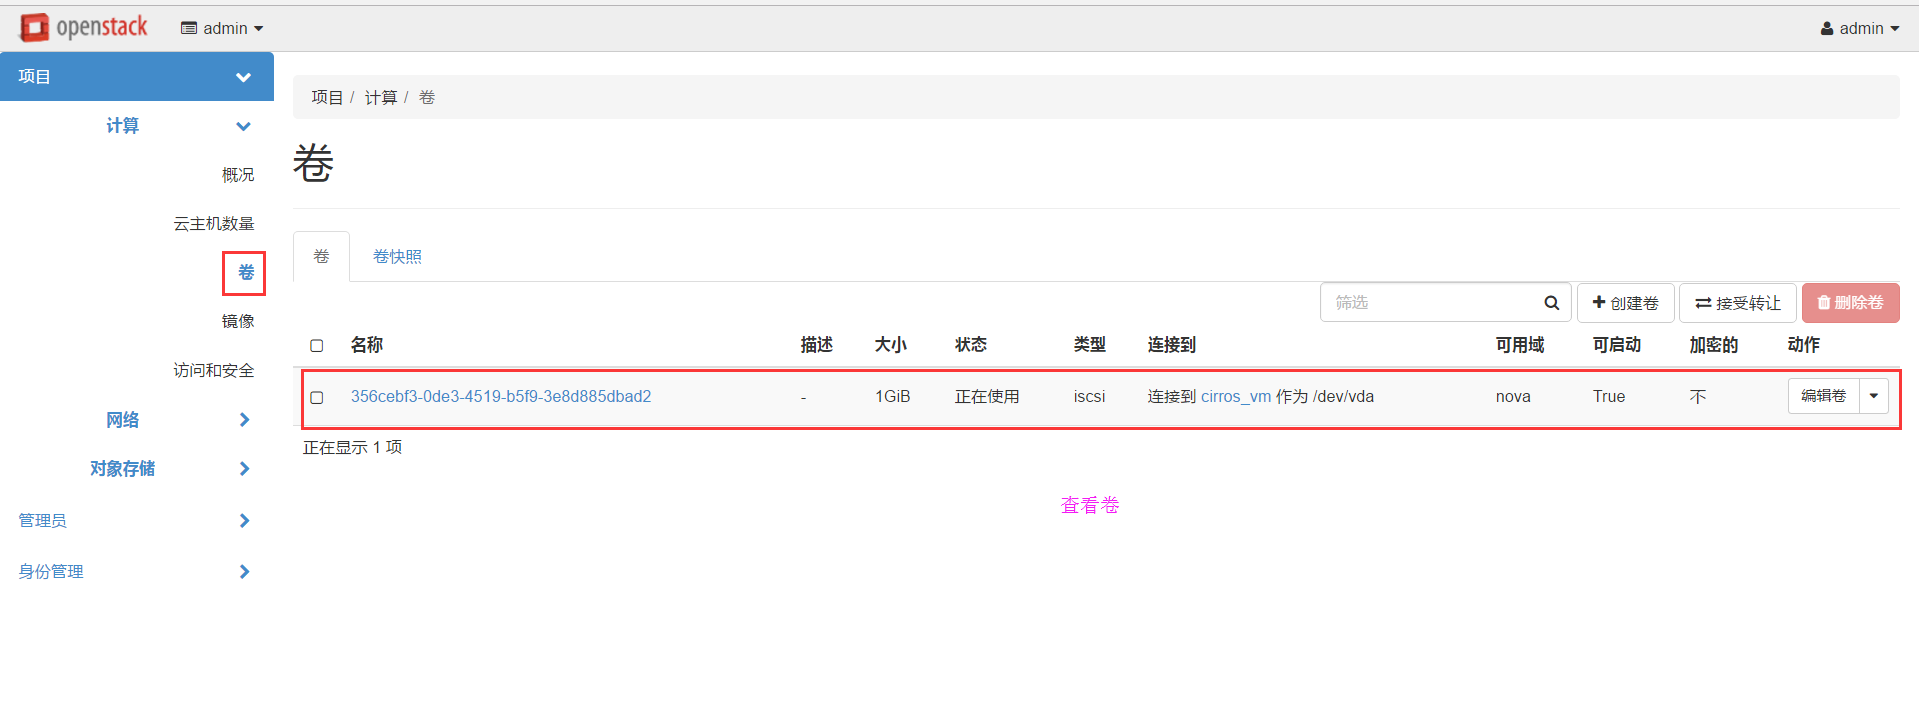
3、创建一个LVM卷
fdisk /dev/sda
partprobe
pvcreate /dev/sda3
vgcreate cinder-volumes /dev/sda3
注:如果无法使用pvcreate命令,则需配置yum仓库,执行yum install lvm2
4、安装packstack包
yum install openstack-packstack -y
5、创建answers文件
packstack --allinon --provision-demo=n --nagios-install=n
详细过程:
[root@openstack ~]# packstack --allinon --provision-demo=n --nagios-install=n
Welcome to the Packstack setup utility

The installation log file is available at: /var/tmp/packstack/20170908-095037-oKUCtL/openstack-setup.log
Packstack changed given value  to required value /root/.ssh/id_rsa.pub

Installing:
Clean Up                                             [ DONE ]
Discovering ip protocol version                      [ DONE ]
Setting up ssh keys                                  [ DONE ]
Preparing servers                                    [ DONE ]
Pre installing Puppet and discovering hosts' details [ DONE ]
Preparing pre-install entries                        [ DONE ]
Setting up CACERT                                    [ DONE ]
Preparing AMQP entries                               [ DONE ]
Preparing MariaDB entries                            [ DONE ]
Fixing Keystone LDAP config parameters to be undef if empty[ DONE ]
Preparing Keystone entries                           [ DONE ]
Preparing Glance entries                             [ DONE ]
Checking if the Cinder server has a cinder-volumes vg[ DONE ]
Preparing Cinder entries                             [ DONE ]
Preparing Nova API entries                           [ DONE ]
Creating ssh keys for Nova migration                 [ DONE ]
Gathering ssh host keys for Nova migration           [ DONE ]
Preparing Nova Compute entries                       [ DONE ]
Preparing Nova Scheduler entries                     [ DONE ]
Preparing Nova VNC Proxy entries                     [ DONE ]
Preparing OpenStack Network-related Nova entries     [ DONE ]
Preparing Nova Common entries                        [ DONE ]
Preparing Neutron LBaaS Agent entries                [ DONE ]
Preparing Neutron API entries                        [ DONE ]
Preparing Neutron L3 entries                         [ DONE ]
Preparing Neutron L2 Agent entries                   [ DONE ]
Preparing Neutron DHCP Agent entries                 [ DONE ]
Preparing Neutron Metering Agent entries             [ DONE ]
Checking if NetworkManager is enabled and running    [ DONE ]
Preparing OpenStack Client entries                   [ DONE ]
Preparing Horizon entries                            [ DONE ]
Preparing Swift builder entries                      [ DONE ]
Preparing Swift proxy entries                        [ DONE ]
Preparing Swift storage entries                      [ DONE ]
Preparing Gnocchi entries                            [ DONE ]
Preparing MongoDB entries                            [ DONE ]
Preparing Redis entries                              [ DONE ]
Preparing Ceilometer entries                         [ DONE ]
Preparing Aodh entries                               [ DONE ]
Preparing Puppet manifests                           [ DONE ]
Copying Puppet modules and manifests                 [ DONE ]
Applying 192.168.1.7_controller.pp
192.168.1.7_controller.pp:                           [ DONE ]
Applying 192.168.1.7_network.pp
192.168.1.7_network.pp:                              [ DONE ]
Applying 192.168.1.7_compute.pp
192.168.1.7_compute.pp:                              [ DONE ]
Applying Puppet manifests                            [ DONE ]
Finalizing                                           [ DONE ]

 **** Installation completed successfully ******

Additional information:
 * A new answerfile was created in: /root/packstack-answers-20170908-095038.txt
 * Time synchronization installation was skipped. Please note that unsynchronized time on server instances might be problem for some OpenStack components.
 * Warning: NetworkManager is active on 192.168.1.7. OpenStack networking currently does not work on systems that have the Network Manager service enabled.
 * File /root/keystonerc_admin has been created on OpenStack client host 192.168.1.7. To use the command line tools you need to source the file.
 * To access the OpenStack Dashboard browse to http://192.168.1.7/dashboard .
Please, find your login credentials stored in the keystonerc_admin in your home directory.
 * The installation log file is available at: /var/tmp/packstack/20170908-095037-oKUCtL/openstack-setup.log
 * The generated manifests are available at: /var/tmp/packstack/20170908-095037-oKUCtL/manifests
6、注:若安装过程出错,则
packstack --answer-file=packstack-answers-XXXXX.txt
7、登录信息
[root@openstack ~]# ll
total 60
-rw-------. 1 root root  1606 Sep  7 17:02 anaconda-ks.cfg
drwxr-xr-x. 2 root root     6 Sep  7 13:02 Desktop
drwxr-xr-x. 2 root root     6 Sep  7 13:02 Documents
drwxr-xr-x. 2 root root     6 Sep  7 13:02 Downloads
-rw-------  1 root root   260 Sep  8 09:53 keystonerc_admin
drwxr-xr-x. 2 root root     6 Sep  7 13:02 Music
-rw-------  1 root root 49832 Sep  8 09:50 packstack-answers-20170908-095038.txt
drwxr-xr-x. 2 root root     6 Sep  7 13:02 Pictures
drwxr-xr-x. 2 root root     6 Sep  7 13:02 Public
drwxr-xr-x. 2 root root     6 Sep  7 13:02 Templates
drwxr-xr-x. 2 root root     6 Sep  7 13:02 Videos
[root@openstack ~]# cat keystonerc_admin
unset OS_SERVICE_TOKEN
    export OS_USERNAME=admin  #用户名
    export OS_PASSWORD=c3c835824ad84981  #密码
    export OS_AUTH_URL=http://192.168.1.7:5000/v2.0
    export PS1='[\u@\h \W(keystone_admin)]\$ '

export OS_TENANT_NAME=admin
export OS_REGION_NAME=RegionOne
登录地址:
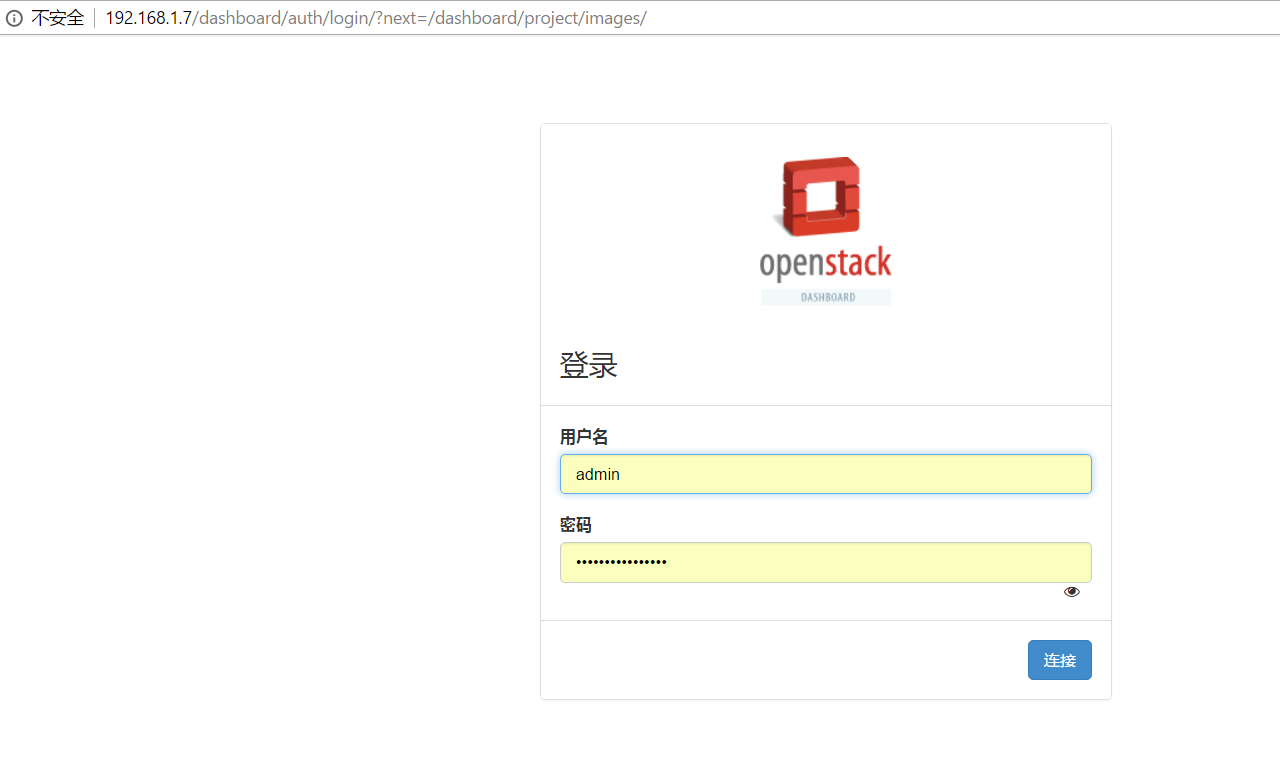
#查看端口
[root@openstack ~]# netstat -lntup
Active Internet connections (only servers)
Proto Recv-Q Send-Q Local Address           Foreign Address         State       PID/Program name
tcp        0      0 0.0.0.0:8776            0.0.0.0:*               LISTEN      20620/python2
tcp        0      0 0.0.0.0:25672           0.0.0.0:*               LISTEN      16456/beam.smp
tcp        0      0 127.0.0.1:6633          0.0.0.0:*               LISTEN      28331/python2
tcp        0      0 192.168.1.7:27017       0.0.0.0:*               LISTEN      16410/mongod
tcp        0      0 192.168.1.7:873         0.0.0.0:*               LISTEN      15402/xinetd
tcp        0      0 0.0.0.0:3306            0.0.0.0:*               LISTEN      16024/mysqld
tcp        0      0 192.168.1.7:6379        0.0.0.0:*               LISTEN      15499/redis-server
tcp        0      0 0.0.0.0:11211           0.0.0.0:*               LISTEN      9808/memcached
tcp        0      0 0.0.0.0:5900            0.0.0.0:*               LISTEN      41299/qemu-kvm
tcp        0      0 0.0.0.0:9292            0.0.0.0:*               LISTEN      26162/python2
tcp        0      0 127.0.0.1:6640          0.0.0.0:*               LISTEN      28078/ovsdb-server
tcp        0      0 192.168.1.7:8080        0.0.0.0:*               LISTEN      24526/python2
tcp        0      0 192.168.1.7:6000        0.0.0.0:*               LISTEN      24205/python2
tcp        0      0 192.168.1.7:6001        0.0.0.0:*               LISTEN      24096/python2
tcp        0      0 0.0.0.0:4369            0.0.0.0:*               LISTEN      1/systemd
tcp        0      0 192.168.1.7:6002        0.0.0.0:*               LISTEN      24144/python2
tcp        0      0 0.0.0.0:22              0.0.0.0:*               LISTEN      5954/sshd
tcp        0      0 127.0.0.1:631           0.0.0.0:*               LISTEN      1281/cupsd
tcp        0      0 127.0.0.1:25            0.0.0.0:*               LISTEN      1442/master
tcp        0      0 192.168.1.7:3260        0.0.0.0:*               LISTEN      -
tcp        0      0 0.0.0.0:16509           0.0.0.0:*               LISTEN      30652/libvirtd
tcp        0      0 0.0.0.0:9696            0.0.0.0:*               LISTEN      26725/python2
tcp        0      0 0.0.0.0:6080            0.0.0.0:*               LISTEN      19870/python2
tcp        0      0 0.0.0.0:8774            0.0.0.0:*               LISTEN      20022/python2
tcp        0      0 0.0.0.0:9191            0.0.0.0:*               LISTEN      26079/python2
tcp        0      0 0.0.0.0:8775            0.0.0.0:*               LISTEN      20022/python2
tcp6       0      0 :::5000                 :::*                    LISTEN      21576/httpd
tcp6       0      0 :::5672                 :::*                    LISTEN      16456/beam.smp
tcp6       0      0 :::8777                 :::*                    LISTEN      21576/httpd
tcp6       0      0 :::8041                 :::*                    LISTEN      21576/httpd
tcp6       0      0 :::8042                 :::*                    LISTEN      21576/httpd
tcp6       0      0 :::80                   :::*                    LISTEN      21576/httpd
tcp6       0      0 :::22                   :::*                    LISTEN      5954/sshd
tcp6       0      0 ::1:631                 :::*                    LISTEN      1281/cupsd
tcp6       0      0 ::1:25                  :::*                    LISTEN      1442/master
tcp6       0      0 :::16509                :::*                    LISTEN      30652/libvirtd
tcp6       0      0 :::35357                :::*                    LISTEN      21576/httpd
udp        0      0 0.0.0.0:11211           0.0.0.0:*                           9808/memcached
udp        0      0 0.0.0.0:48849           0.0.0.0:*                           958/avahi-daemon: r
udp        0      0 0.0.0.0:8125            0.0.0.0:*                           18531/statsd.log
udp        0      0 0.0.0.0:4952            0.0.0.0:*                           21187/ceilometer-co
udp        0      0 0.0.0.0:5353            0.0.0.0:*                           958/avahi-daemon: r
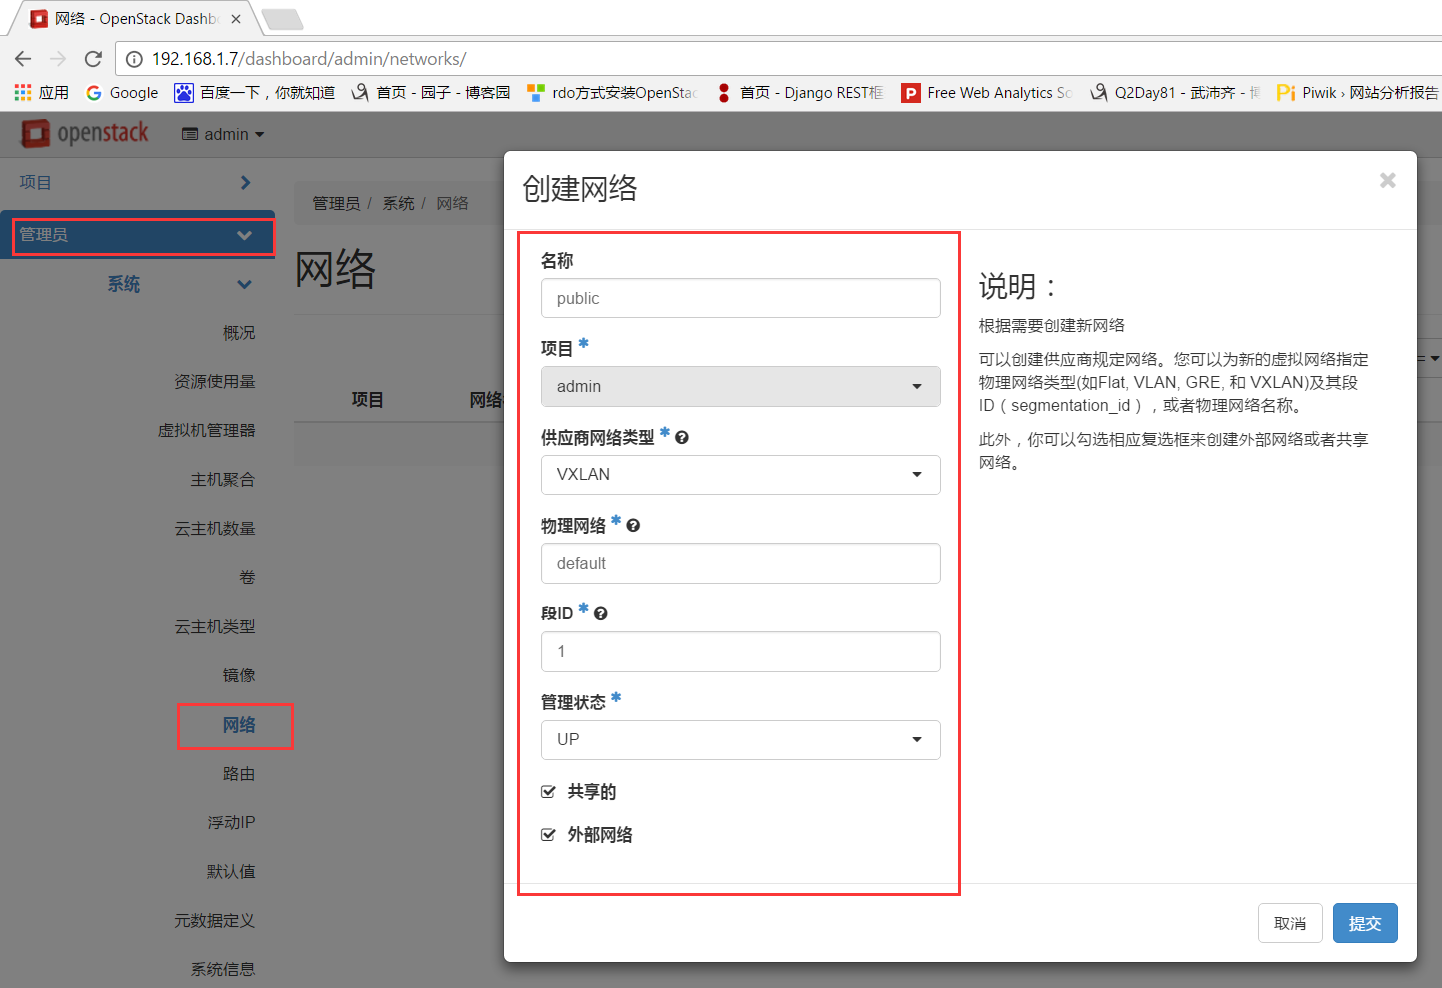
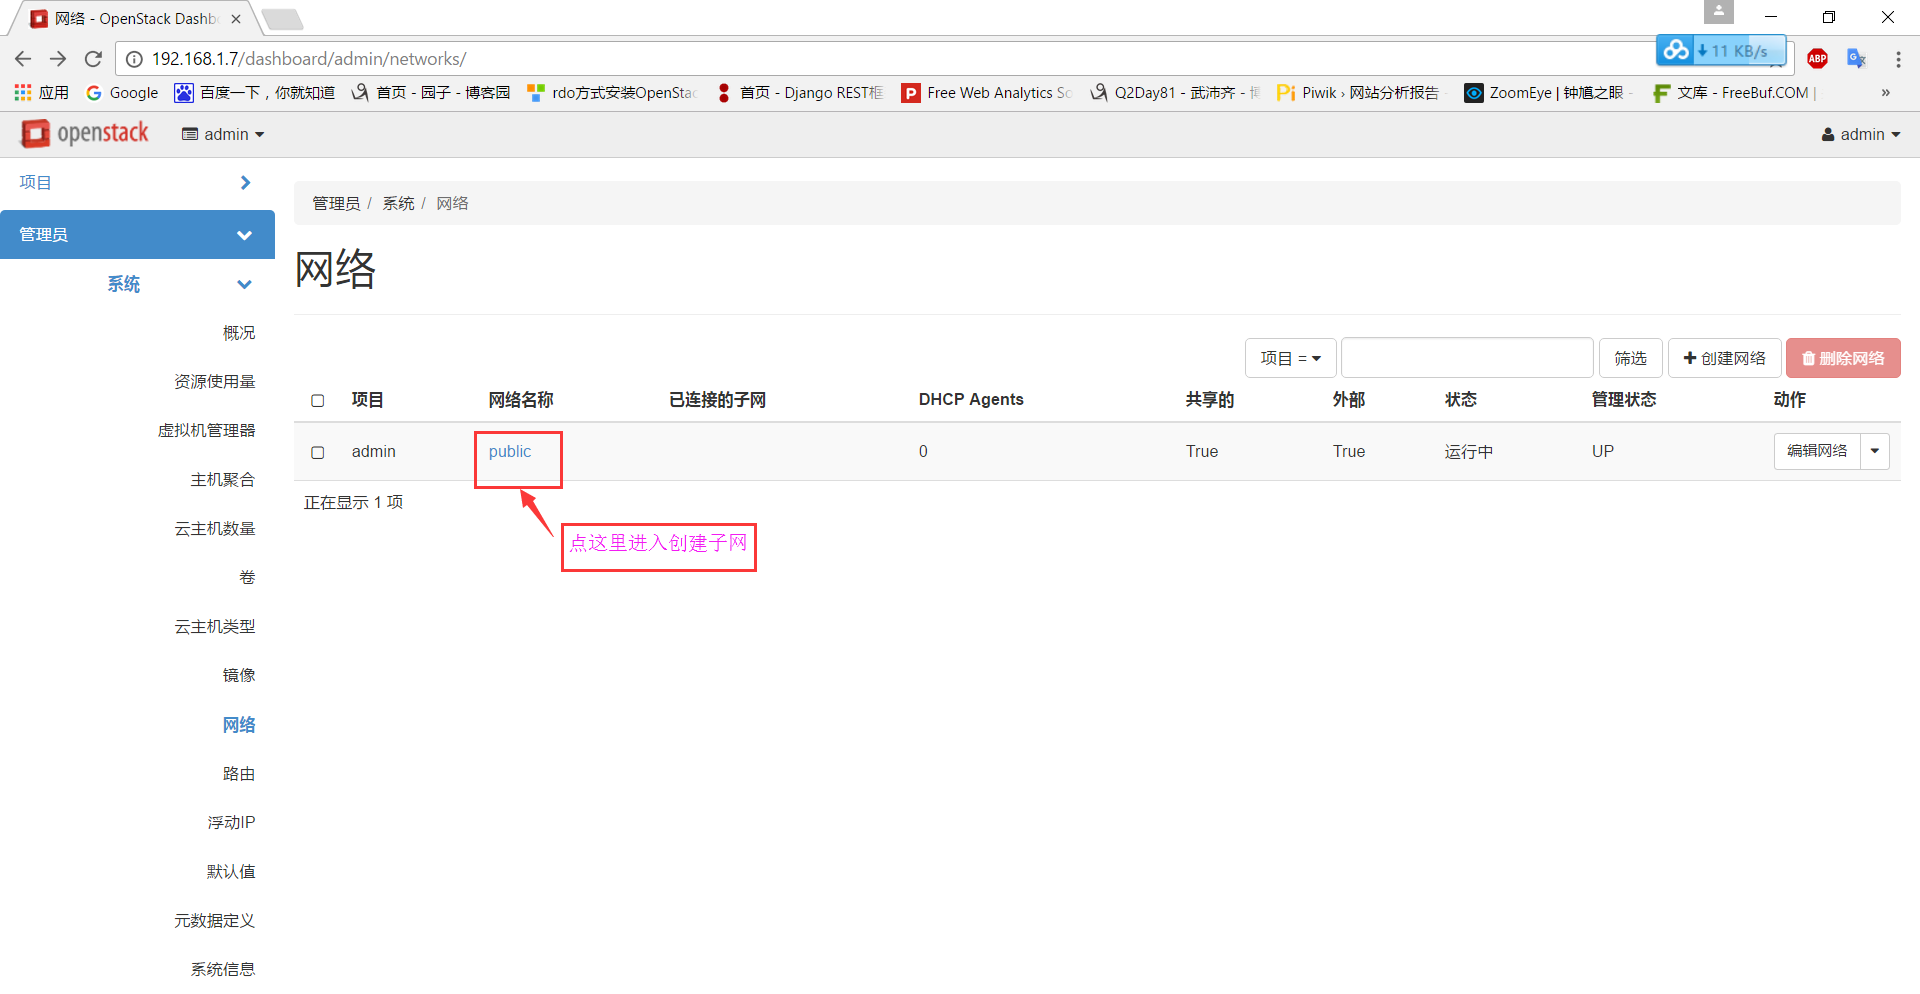
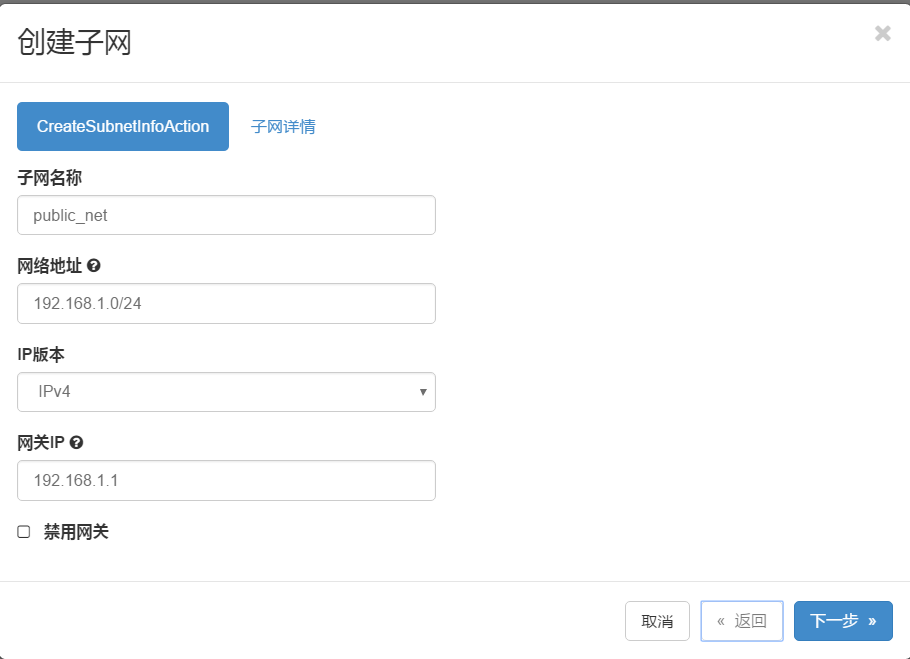
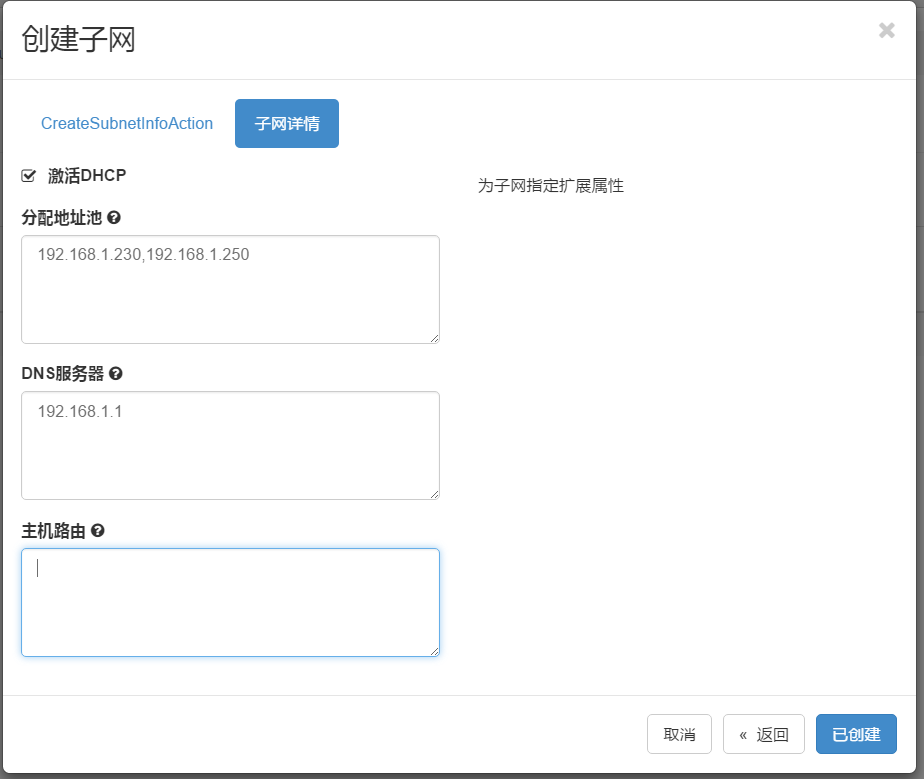
配置方法:
第一阶段_管理员_创建网络
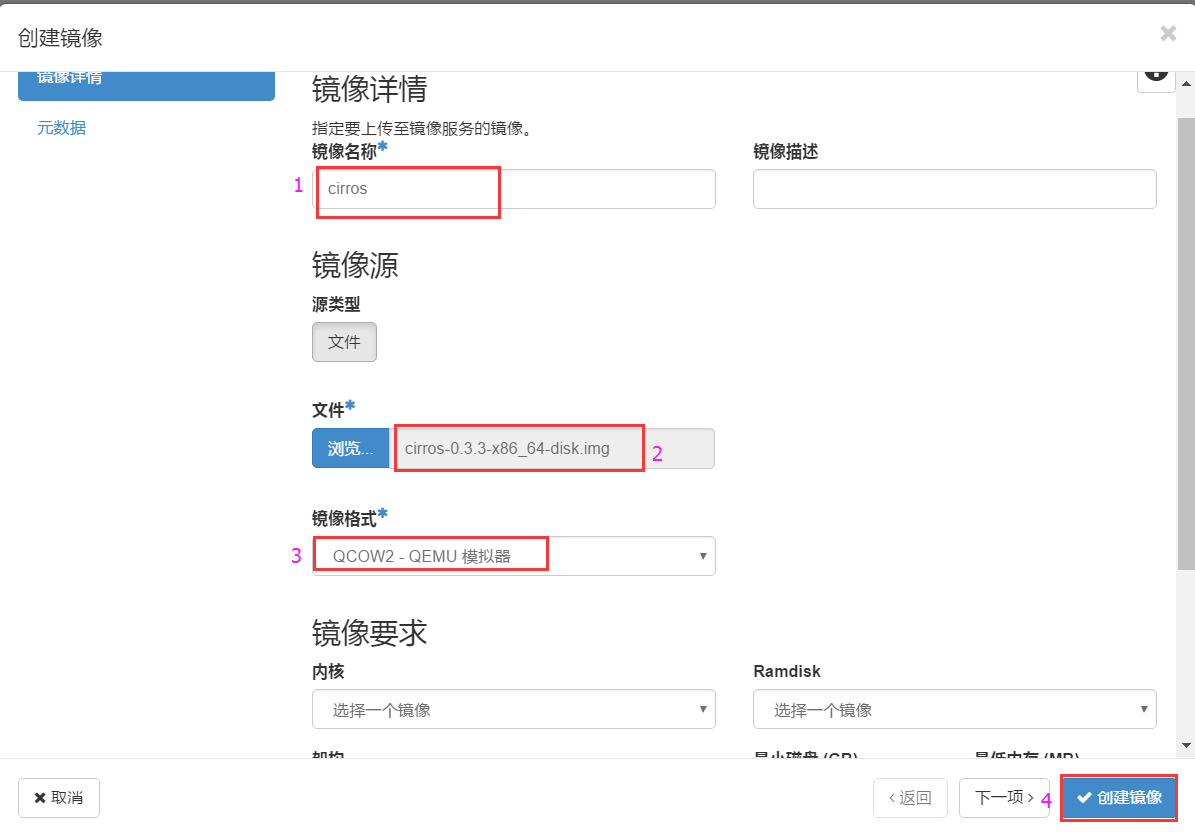
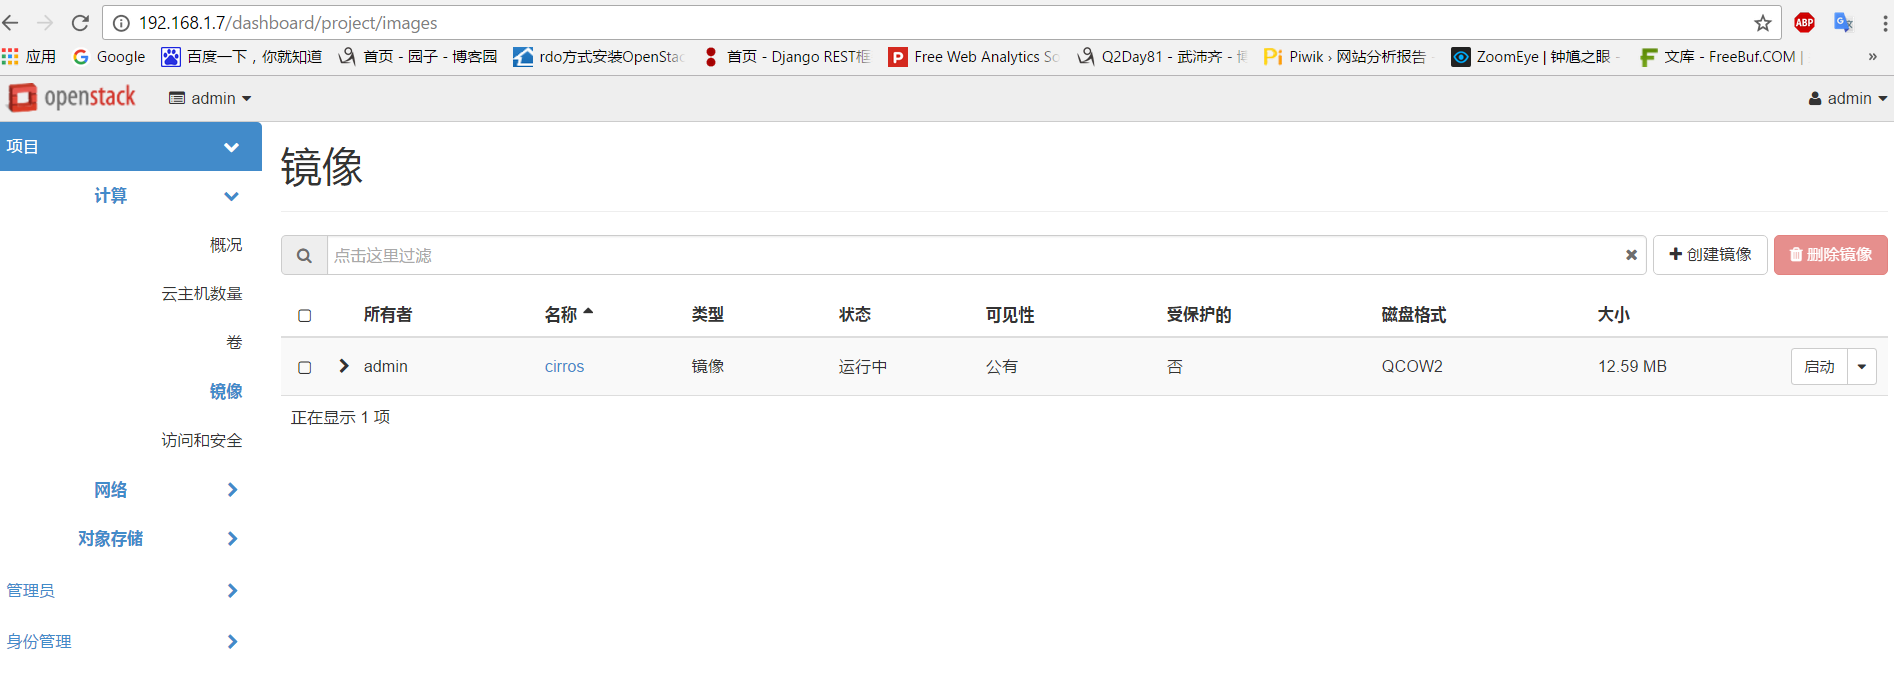
第二阶段_项目_创建镜像

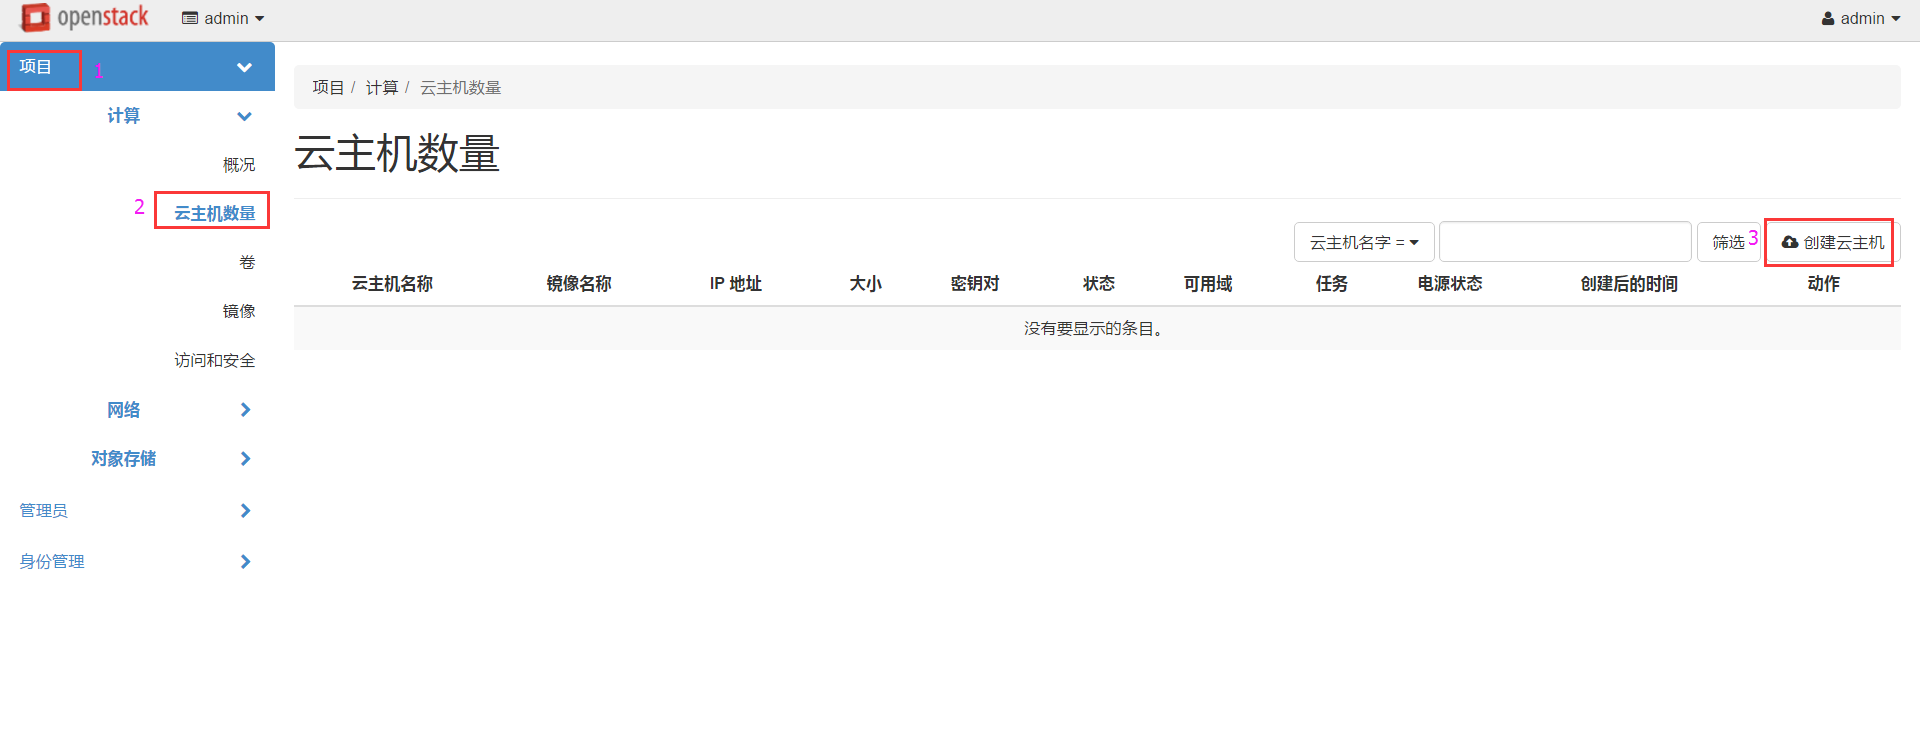
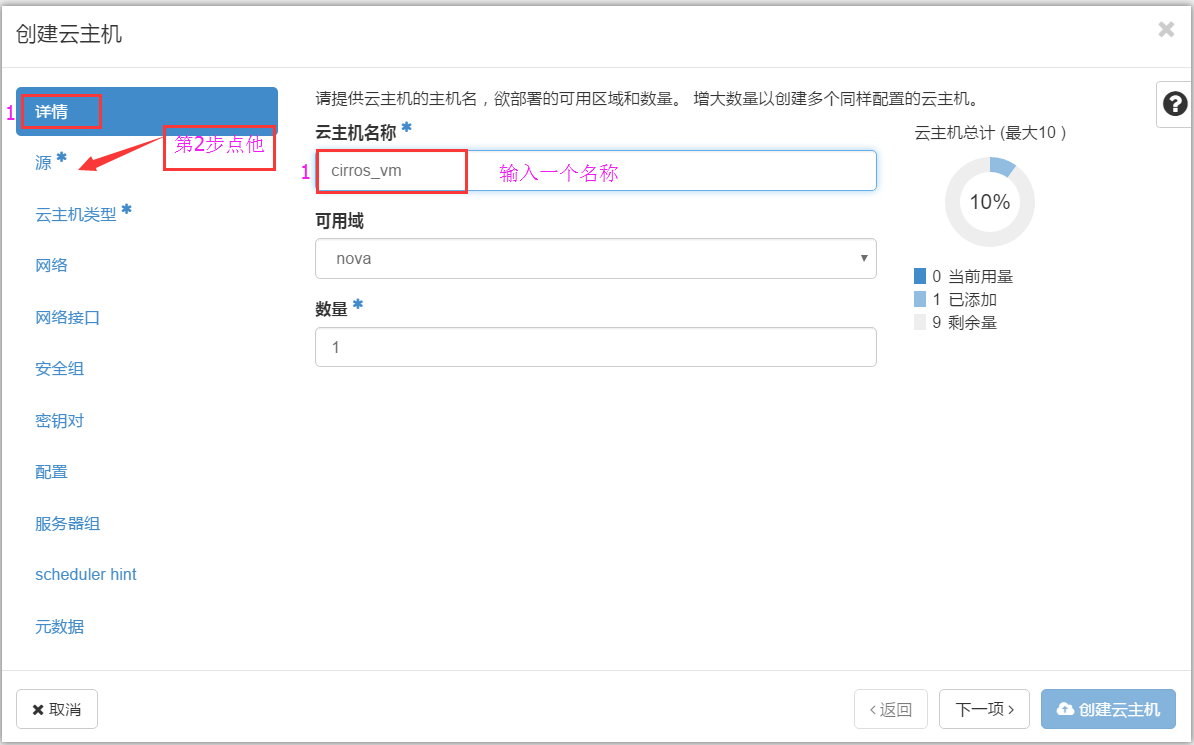
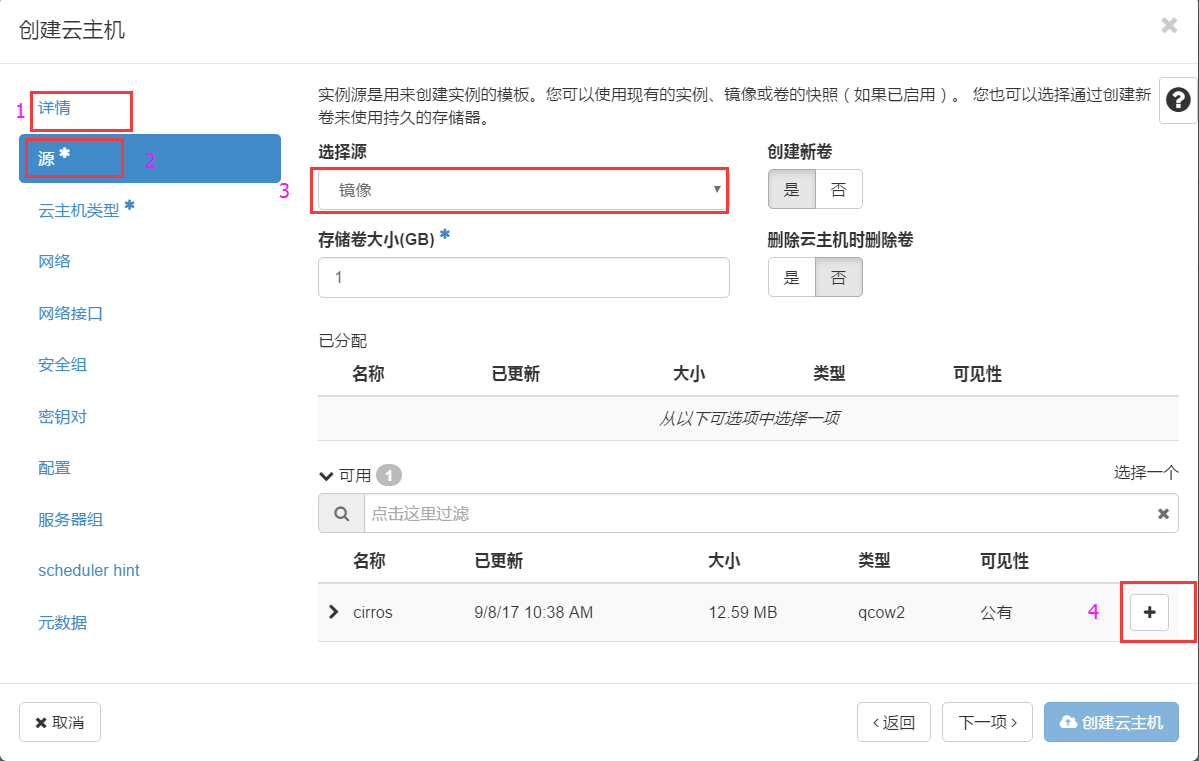
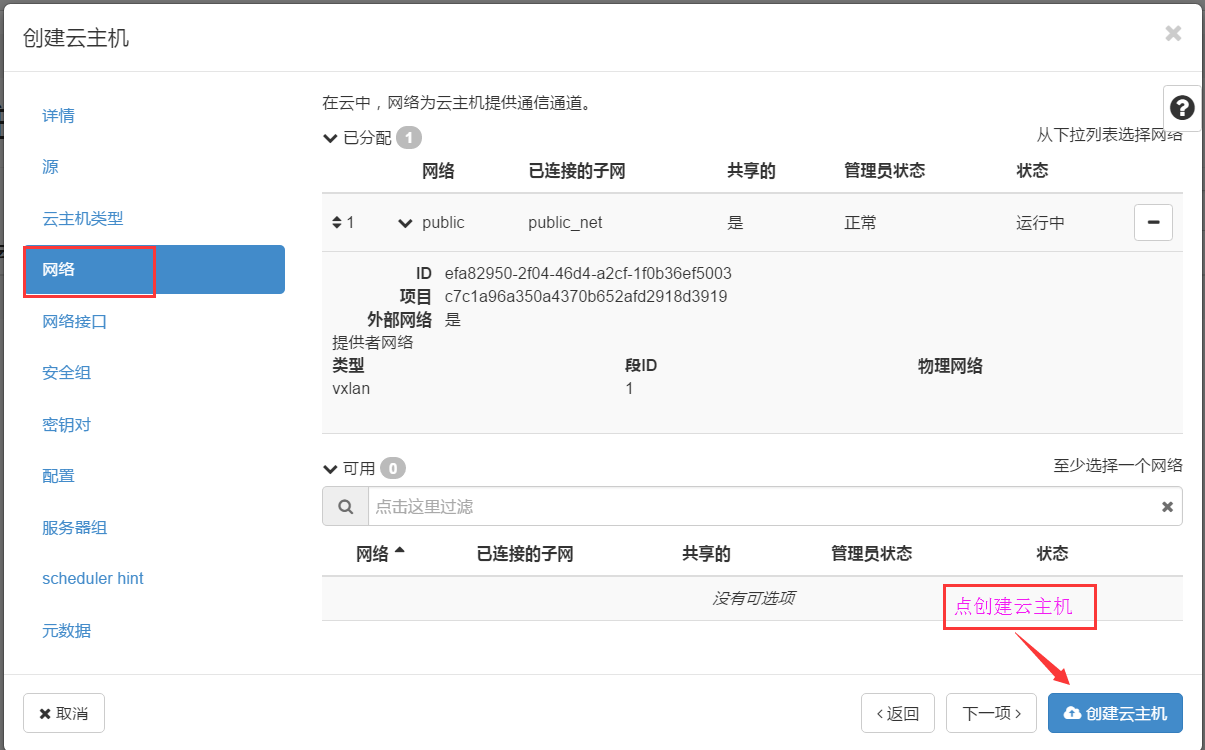
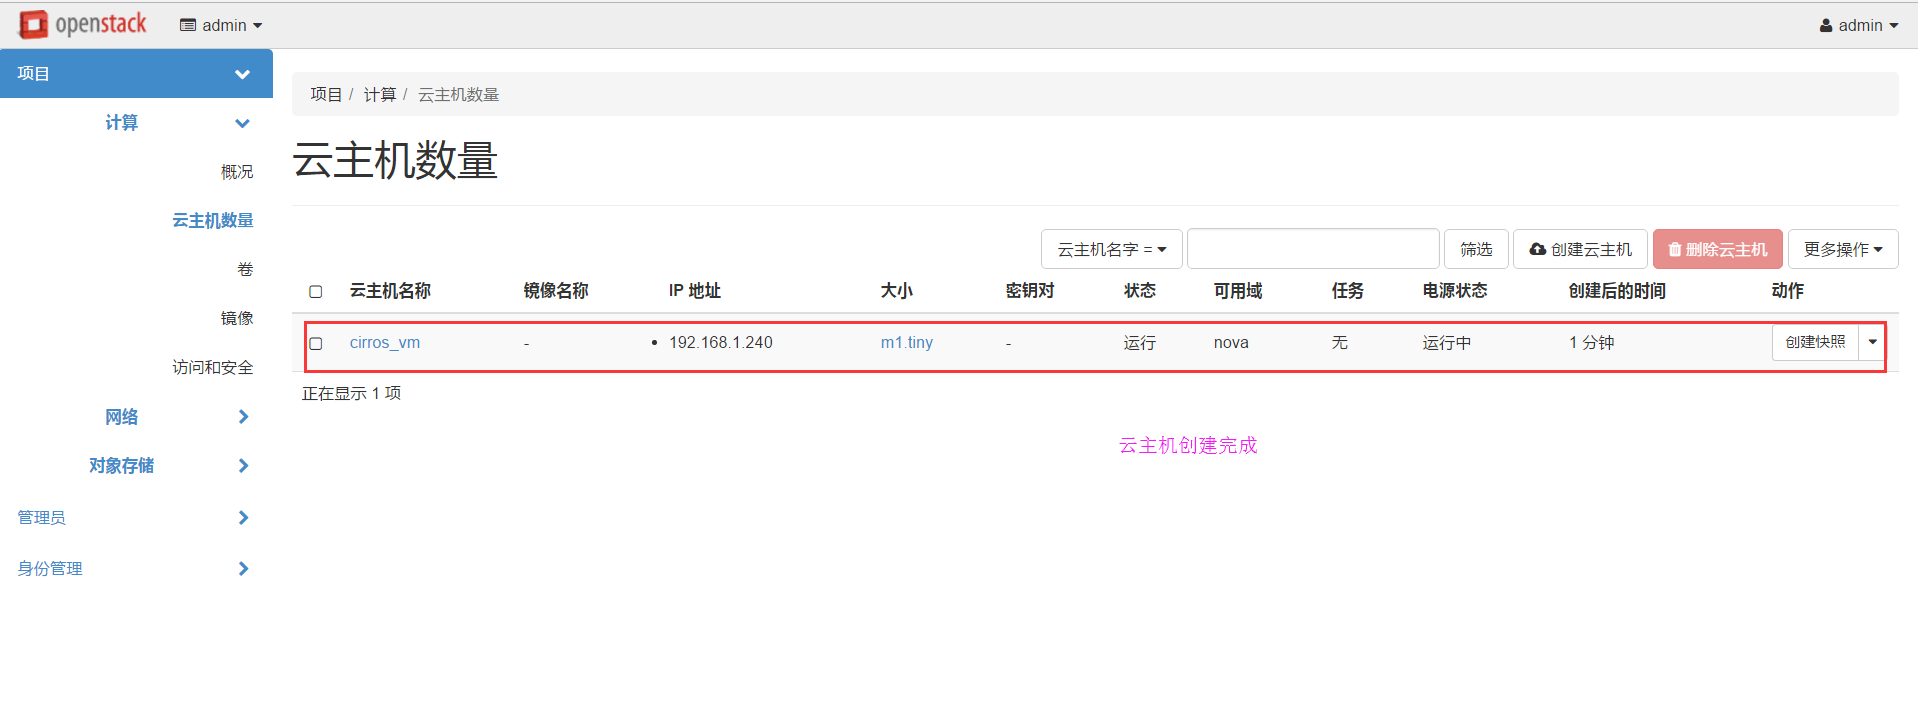
第三阶段_项目_创建云主机