FastDFS 环境搭建
原文地址:FastDFS 环境搭建
博客地址:http://www.extlight.com
一、前言
最近闲下来,整理了一下笔记,今天就分享一下 FastDFS 环境搭建吧。
二、介绍
2.1 FastDFS 定义
FastDFS 是用 C 语言编写的一款开源的分布式文件系统。FastDFS 为互联网量身定制,充分考虑了冗余备份、负载均衡、线性扩容等机制,并注重高可用、高性能等指标,使用 FastDFS 很容易搭建一套高性能的文件服务器集群提供文件上传、下载等服务。
2.2 FastDFS 架构

FastDFS 架构包括 Tracker Server 和 Storage Server。客户端请求 Tracker Server 进行文件上传、下载,通过 Tracker Server 调度最终由 Storage Server 完成文件上传和下载。
Tracker Server 作用是负载均衡和调度,通过 Tracker Server 在文件上传时可以根据一些策略找到 Storage server 提供文件上传服务。可以将 tracker 称为追踪服务器或调度服务器。
Storage Server 作用是文件存储,客户端上传的文件最终存储在 Storage 服务器上,Storage Server 没有实现自己的文件系统而是利用操作系统 的文件系统来管理文件。可以将 storage 称为存储服务器。
三、安装
本次测试使用 ip 为 192.168.10.110 的 CentOS 7 系统的虚拟机
3.1 安装 libfastcommon
libfastcommon 是 FastDFS 官方提供的,其包含了 FastDFS 运行所需要的一些基础库。
git clone https://github.com/happyfish100/libfastcommon.git

cd libfastcommon

./make.sh

./make.sh install
3.2 安装 FastDFS
git clone https://github.com/happyfish100/fastdfs.git

cd fastdfs

./make.sh

./make.sh install
安装 FastDFS 成功后,会在如下目录中生成相应的文件。
- /etc/fdfs 生成配置文件:
[root@fastdfs fdfs]# pwd
/etc/fdfs
[root@fastdfs fdfs]# ll
total 24
-rw-r--r--. 1 root root 1461 Oct 16 22:26 client.conf.sample
-rw-r--r--. 1 root root 7978 Oct 16 22:26 storage.conf.sample
-rw-r--r--. 1 root root  105 Oct 16 22:26 storage_ids.conf.sample
-rw-r--r--. 1 root root 7441 Oct 16 22:26 tracker.conf.sample
我们需要将“.simple”缀后删除,这些配置文件才能生效。
或者进入到 fdfs/conf 目录中,如下:
[root@fastdfs conf]# pwd
/root/fastdfs/conf
[root@fastdfs conf]# ll
total 84
-rw-r--r--. 1 root root 23981 Oct 16 22:19 anti-steal.jpg
-rw-r--r--. 1 root root  1461 Oct 16 22:19 client.conf
-rw-r--r--. 1 root root   955 Oct 16 22:19 http.conf
-rw-r--r--. 1 root root 31172 Oct 16 22:19 mime.types
-rw-r--r--. 1 root root  7978 Oct 16 22:19 storage.conf
-rw-r--r--. 1 root root   105 Oct 16 22:19 storage_ids.conf
-rw-r--r--. 1 root root  7441 Oct 16 22:19 tracker.conf
[root@fastdfs conf]#
该目录也生成好 FastDFS 运行时所需要的配置文件,我们也可以将这些文件一并拷贝到 /etc/fdfs 中。
- /usr/bin 中生成对应的执行命令:
[root@fastdfs bin]# pwd
/usr/bin
[root@fastdfs bin]# ll fdfs*
-rwxr-xr-x. 1 root root  317632 Oct 16 22:26 fdfs_appender_test
-rwxr-xr-x. 1 root root  317408 Oct 16 22:26 fdfs_appender_test1
-rwxr-xr-x. 1 root root  304264 Oct 16 22:26 fdfs_append_file
-rwxr-xr-x. 1 root root  304008 Oct 16 22:26 fdfs_crc32
-rwxr-xr-x. 1 root root  304320 Oct 16 22:26 fdfs_delete_file
-rwxr-xr-x. 1 root root  305048 Oct 16 22:26 fdfs_download_file
-rwxr-xr-x. 1 root root  304648 Oct 16 22:26 fdfs_file_info
-rwxr-xr-x. 1 root root  322560 Oct 16 22:26 fdfs_monitor
-rwxr-xr-x. 1 root root 1112112 Oct 16 22:26 fdfs_storaged
-rwxr-xr-x. 1 root root  327576 Oct 16 22:26 fdfs_test
-rwxr-xr-x. 1 root root  326784 Oct 16 22:26 fdfs_test1
-rwxr-xr-x. 1 root root  454944 Oct 16 22:26 fdfs_trackerd
-rwxr-xr-x. 1 root root  305248 Oct 16 22:26 fdfs_upload_appender
-rwxr-xr-x. 1 root root  306272 Oct 16 22:26 fdfs_upload_file
四、配置
首先创建 4 个目录:
mkdir -p /data/fastdfs/tracker
mkdir -p /data/fastdfs/storage
mkdir -p /data/fastdfs/client
mkdir -p /data/fastdfs/tmp
这些目录用于存放 fastDFS 服务产生的数据文件和日志。
为了简化步骤,进入到 fdfs/conf 目录,将里边的所有文件复制到 /etc/fdfs 中:
cp /root/fastdfs/conf/* /etc/fdfs
4.1 配置 Tracker Server
修改 tracker.conf 文件:vim /etc/fdfs/tracker.conf
port=22122

base_path=/data/fastdfs/tracker
启动 Tracker Server 服务:
/usr/bin/fdfs_trackerd /etc/fdfs/tracker.conf start
检测启动情况:
[root@fastdfs fdfs]# ps -ef | grep tracker
root       2136      1  0 23:55 ?        00:00:00 /usr/bin/fdfs_trackerd /etc/fdfs/tracker.conf start
root       2147   1294  0 23:55 pts/0    00:00:00 grep --color=auto tracker
4.2 配置 Storage Server
修改 storage.conf 文件:vim /etc/fdfs/storage.conf
port=23000

base_path=/data/fastdfs/storage

store_path0=/data/fastdfs/storage

tracker_server=192.168.10.110:22122

group_name=light

http.server_port=80
注意:tracker_server 中,ip 为本机 ip,端口为 tracker.conf 中设置的值
启动 Storage Server 服务:
/usr/bin/fdfs_storaged /etc/fdfs/storage.conf start
检测启动情况:
[root@fastdfs fdfs]# ps -ef | grep storage
root       2155      1 10 00:00 ?        00:00:01 /usr/bin/fdfs_storaged /etc/fdfs/storage.conf start
root       2167   1294  0 00:00 pts/0    00:00:00 grep --color=auto storage
4.3 配置 client
此步骤的配置是为了测试
修改 client.conf 文件:vim /etc/fdfs/client.conf
base_path=/data/fastdfs/client

tracker_server=192.168.10.110:22122
五、测试
准备图片,名为 test.jpg
[root@fastdfs ~]# pwd
/root
[root@fastdfs ~]# ll
total 52
drwxr-xr-x. 11 root root   270 Oct 16 22:19 fastdfs
drwxr-xr-x.  6 root root   147 Oct 16 22:22 libfastcommon
-rw-r--r--.  1 root root 49608 Oct 17 01:51 test.jpg
通过 fdfs 命令上传该图片:
/usr/bin/fdfs_test /etc/fdfs/client.conf upload /root/test.jpg
最终,图片会被上传到 /data/fastdfs/storage/data/ 目录中。
运行结果如下图:
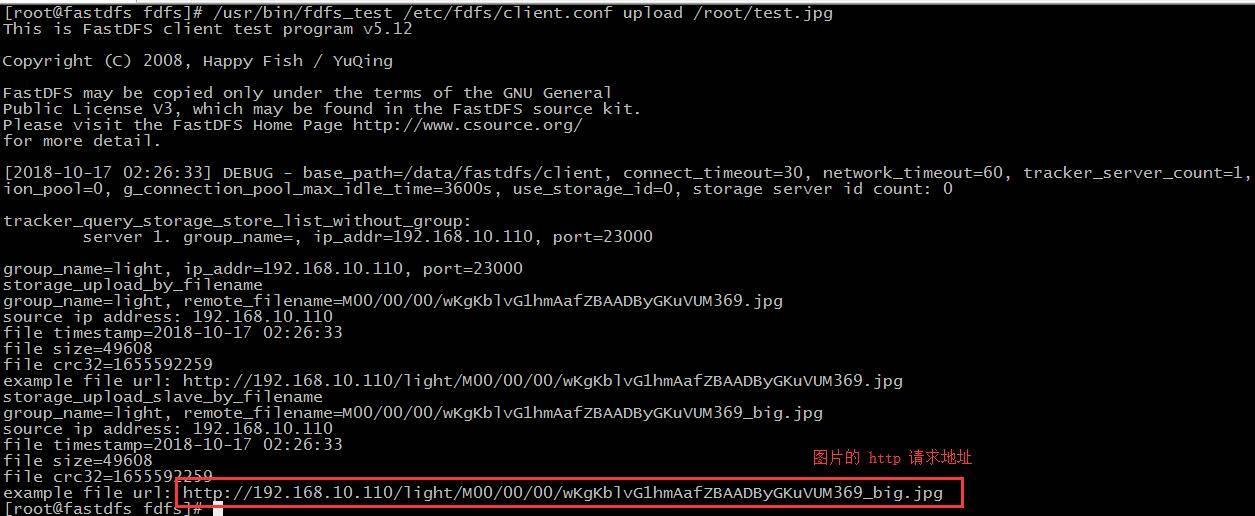
不过目前该图片无法通过浏览器访问,因为我们还没有设置 web 服务器将外部请求与本地文件系统中的目录的映射关联。最简单的实现方式就是整合 nginx 服务器来实现 http 访问请求,该功能将在下篇文章介绍。

