
利用WCF创建简单的RESTFul Service
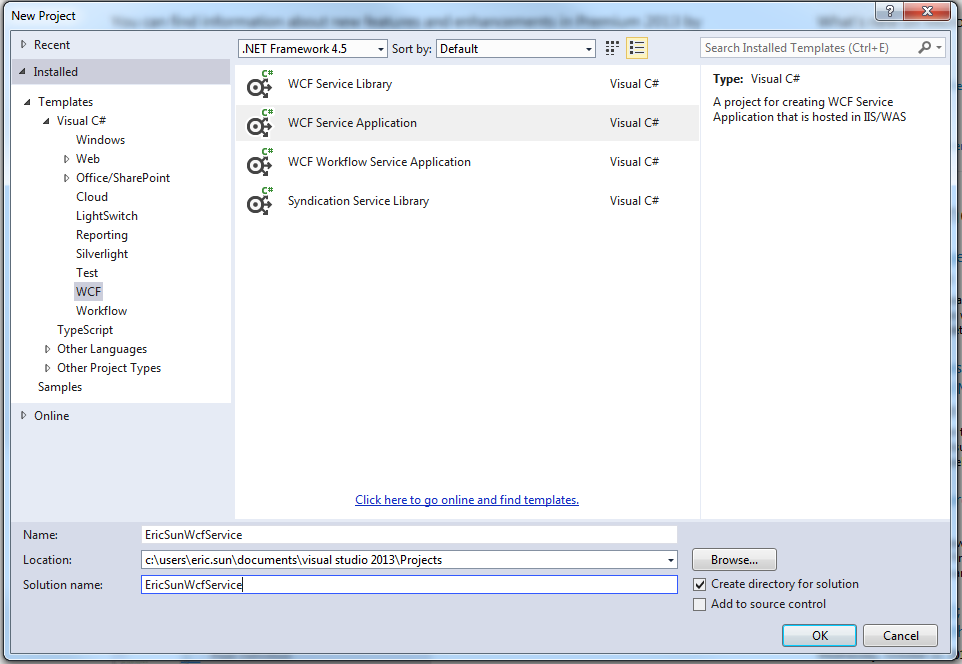
1):用VS2013创建一个WCF的工程,如下图所示:
2):我们来看一下默认状态下的config文件内容,这里的内容我们会再后续的步骤中进行修改
<?xml version="1.0"?>
<configuration>

  <appSettings>
    <add key="aspnet:UseTaskFriendlySynchronizationContext" value="true" />
  </appSettings>
  <system.web>
    <compilation debug="true" targetFramework="4.5" />
    <httpRuntime targetFramework="4.5"/>
  </system.web>
  <system.serviceModel>
    <behaviors>
      <serviceBehaviors>
        <behavior>
          <!-- To avoid disclosing metadata information, set the values below to false before deployment -->
          <serviceMetadata httpGetEnabled="true" httpsGetEnabled="true"/>
          <!-- To receive exception details in faults for debugging purposes, set the value below to true.  Set to false before deployment to avoid disclosing exception information -->
          <serviceDebug includeExceptionDetailInFaults="false"/>
        </behavior>
      </serviceBehaviors>
    </behaviors>
    <protocolMapping>
        <add binding="basicHttpsBinding" scheme="https" />
    </protocolMapping>
    <serviceHostingEnvironment aspNetCompatibilityEnabled="true" multipleSiteBindingsEnabled="true" />
  </system.serviceModel>
  <system.webServer>
    <modules runAllManagedModulesForAllRequests="true"/>
    <!--
        To browse web app root directory during debugging, set the value below to true.
        Set to false before deployment to avoid disclosing web app folder information.
      -->
    <directoryBrowse enabled="true"/>
  </system.webServer>

</configuration>
3):我们对工程文件及其内容做一下修改,具体代码如下所示:
3.1):UserData class
using System;
using System.Collections.Generic;
using System.Linq;
using System.Runtime.Serialization;
using System.Web;

namespace EricSunWcfService
{
    [DataContract]
    public class UserData
    {
        [DataMember]
        public string Name { get; set; }
        [DataMember]
        public string Password { get; set; }
        [DataMember]
        public string Email { get; set; }
    }
}
3.2):IDataService,这个接口是从默认的IService1修改而来,并且这里提供了两种方法,一个是GET,另外是POST,都是简单的返回UserData对象的Json字符串
using System;
using System.Collections.Generic;
using System.Linq;
using System.Runtime.Serialization;
using System.ServiceModel;
using System.ServiceModel.Web;
using System.Text;

namespace EricSunWcfService
{
    // NOTE: You can use the "Rename" command on the "Refactor" menu to change the interface name "IService1" in both code and config file together.
    [ServiceContract]
    public interface IUserService
    {
        [OperationContract]
        [WebInvoke(Method = "GET", UriTemplate = "getuser/{name}", RequestFormat = WebMessageFormat.Json, ResponseFormat = WebMessageFormat.Json)]
        UserData GetUserData(string name);

        [OperationContract]
        [WebInvoke(Method = "POST", UriTemplate = "checkuser", RequestFormat = WebMessageFormat.Json, ResponseFormat = WebMessageFormat.Json)]
        UserData CheckUserData(UserData user);
    }
}
3.3):UserService,这个文件名是从默认的Service1修改过来的
using System;
using System.Collections.Generic;
using System.Linq;
using System.Runtime.Serialization;
using System.ServiceModel;
using System.ServiceModel.Web;
using System.Text;

namespace EricSunWcfService
{
    // NOTE: You can use the "Rename" command on the "Refactor" menu to change the class name "Service1" in code, svc and config file together.
    // NOTE: In order to launch WCF Test Client for testing this service, please select Service1.svc or Service1.svc.cs at the Solution Explorer and start debugging.
    public class UserService : IUserService
    {
        public UserData GetUserData(string name)
        {
            UserData user = new UserData();
            user.Name = name;
            user.Email = "test@123.com";
            return user;
        }

        public UserData CheckUserData(UserData user)
        {
            user.Name += "-test";
            return user;
        }
    }
}
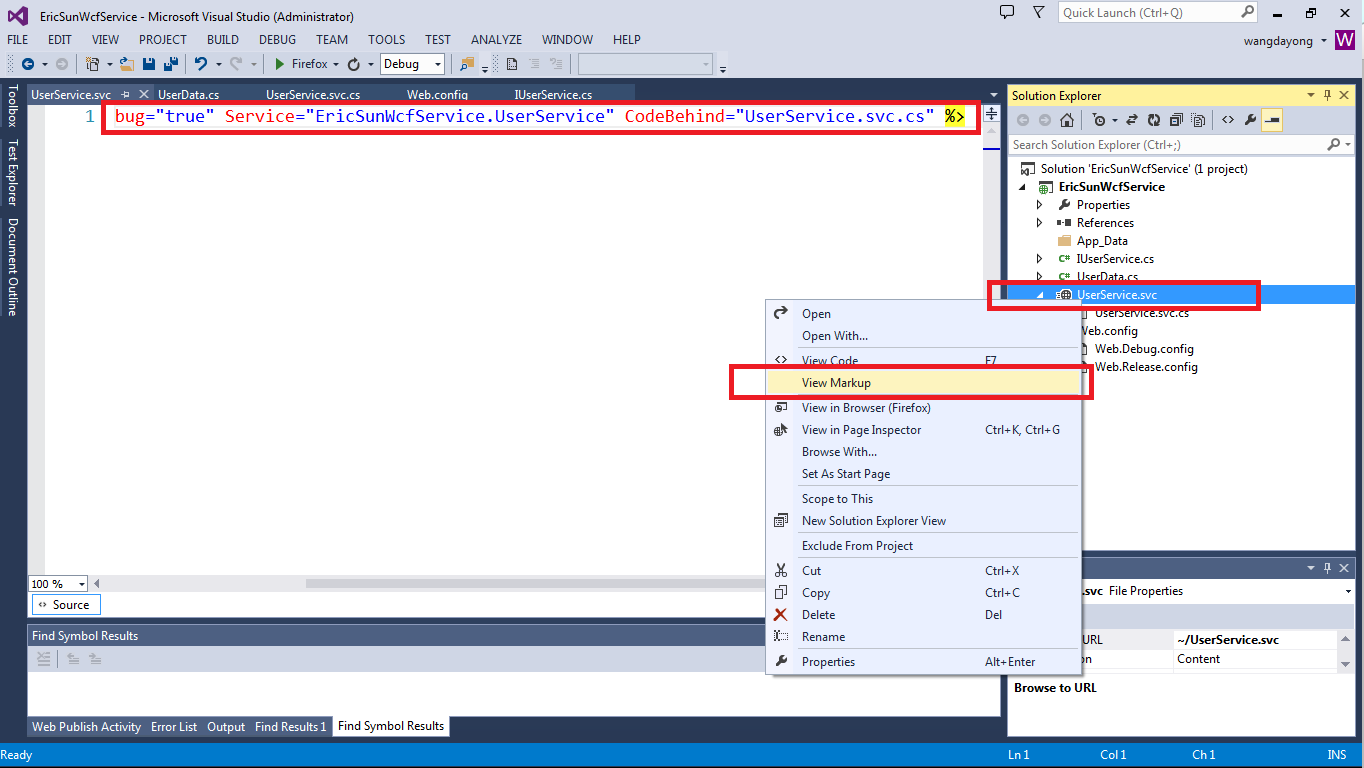
3.4):我们可以点击对应的Service的‘View Markup’来修改ServiceHost的信息,如下图所示
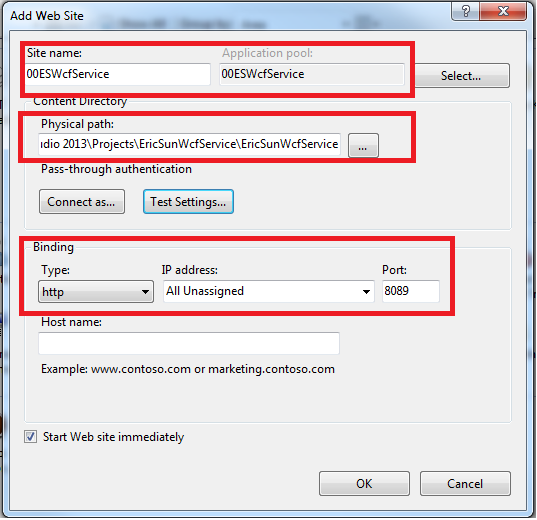
4):我们在IIS中创建一个Site来Host我们所提供的WCF Service,用http协议并且将端口绑定为8089,与此同时制定好Physical path,如下图所示
【注:请将创建的Application Pool的.Net Framework Version修改成为4.0】
5):在目前这种状态下还不能成功的访问对应的WCF Service的,我们需要对web.config进行修改
<?xml version="1.0"?>
<configuration>

  <appSettings>
    <add key="aspnet:UseTaskFriendlySynchronizationContext" value="true" />
  </appSettings>
  <system.web>
    <compilation debug="true" targetFramework="4.5" />
    <httpRuntime targetFramework="4.5"/>
  </system.web>
  <system.serviceModel>
    <services>
        <service name="EricSunWcfService.UserService" behaviorConfiguration="RESTBehaviour">
          <endpoint address=""
                    binding="webHttpBinding"
                    contract="EricSunWcfService.IUserService"
                    behaviorConfiguration="ESEndPointBehavior"/>
        </service>
      </services>
    <behaviors>
      <serviceBehaviors>
        <behavior name="RESTBehaviour">
          <serviceMetadata httpGetEnabled="true"/>
          <serviceDebug includeExceptionDetailInFaults="true"/>
        </behavior>

        <behavior>
          <!-- To avoid disclosing metadata information, set the values below to false before deployment -->
          <serviceMetadata httpGetEnabled="true" httpsGetEnabled="true"/>
          <!-- To receive exception details in faults for debugging purposes, set the value below to true.  Set to false before deployment to avoid disclosing exception information -->
          <serviceDebug includeExceptionDetailInFaults="false"/>
        </behavior>
      </serviceBehaviors>
      <endpointBehaviors>
        <behavior name="ESEndPointBehavior">
          <webHttp/>
        </behavior>
      </endpointBehaviors>
    </behaviors>
    <protocolMapping>
        <add binding="basicHttpsBinding" scheme="https" />
    </protocolMapping>
    <serviceHostingEnvironment aspNetCompatibilityEnabled="true" multipleSiteBindingsEnabled="true" />
  </system.serviceModel>
  <system.webServer>
    <!--
      To browse web app root directory during debugging, set the value below to true.
      Set to false before deployment to avoid disclosing web app folder information.
    -->
    <directoryBrowse enabled="true"/>
    <modules runAllManagedModulesForAllRequests="true"/>
  </system.webServer>

</configuration>
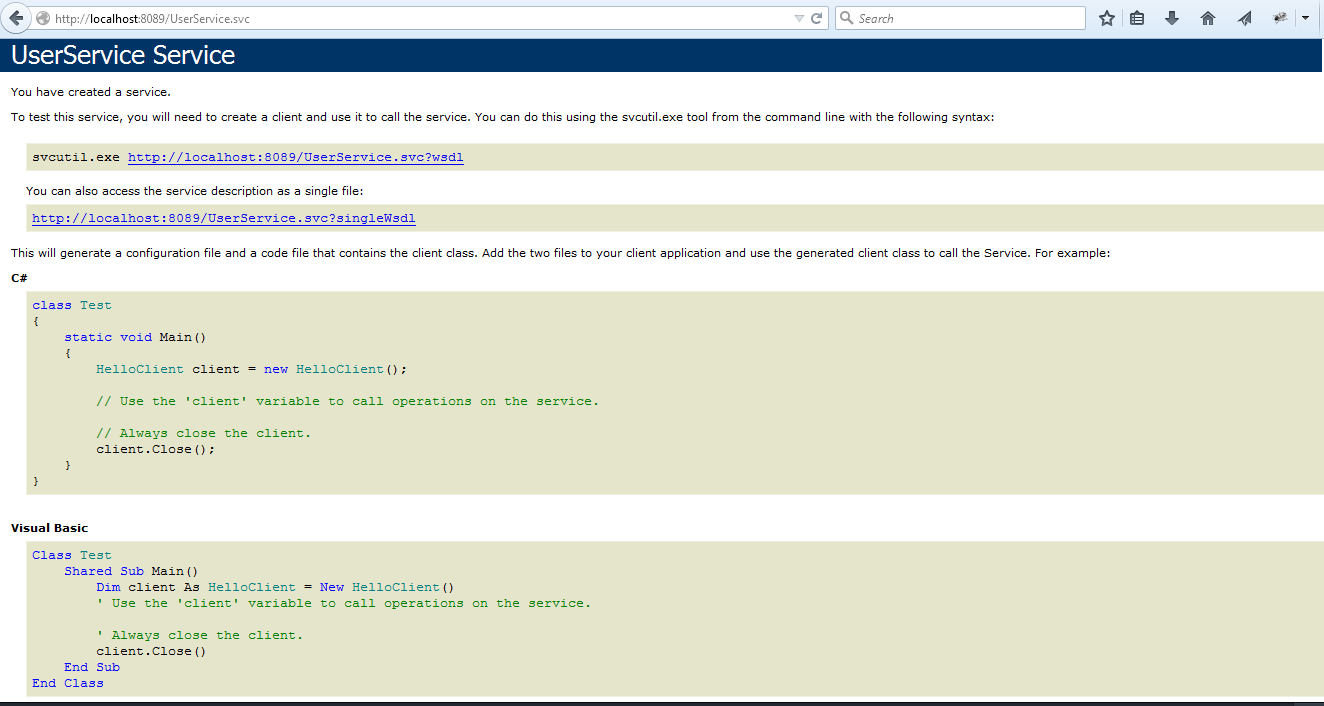
6):config文件配置完毕后,我们就可访问此URL:http://localhost:8089/UserService.svc 来判断我们Service提供的正确与否,若是看到下面的截图则表明Service无误
7):若在访问 http://localhost:8089/UserService.svc 的时候出现500.19【HTTP Error 500.19 - Internal Server Error】错误请参考如下链接解决
http://www.cnblogs.com/mingmingruyuedlut/archive/2011/11/04/2235630.html
8):访问GET方法我们可以直接在浏览器地址栏中输入对应的service地址即可访问
例如输入 http://localhost:8089/UserService.svc/getuser/eric
会给我们返回: {"Email":"test@123.com","Name":"eric","Password":null}
9):若是访问POST方法,单纯的在浏览器中输入地址则无法完成正确的调用,这里我们使用浏览器的插件poster (https://addons.mozilla.org/en-US/firefox/addon/poster/)
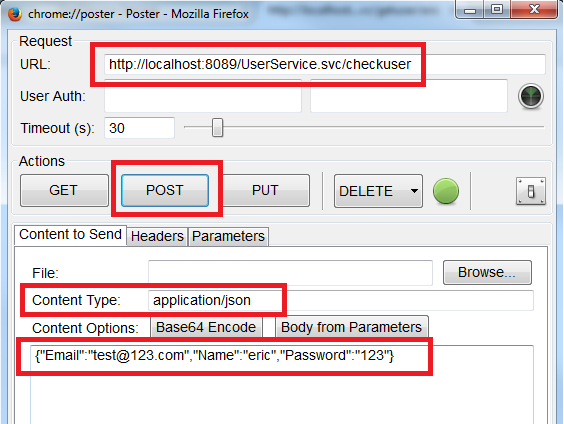
如上图所示,在poster中填入正确的配置信息,并且传入Json的参数值{"Email":"test@123.com","Name":"eric","Password":"123"}
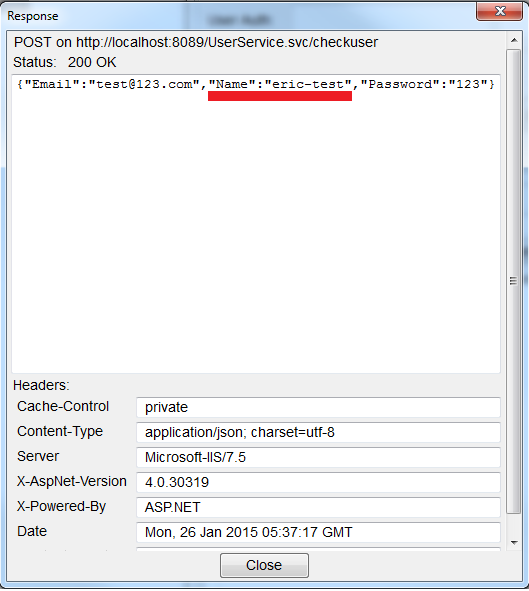
点击POST按钮之后变回得到如下返回结果:
10):若是我们发现在调用PUT或者DELETE方法时出现Status:405 Method Not Allowed的问题,请在web.config文件中的system.webServer节点中添加如下配置
    <modules runAllManagedModulesForAllRequests="true">
      <remove name="WebDAVModule" />
    </modules>
    <handlers>
      <remove name="WebDAV" />
    </handlers>
至此我们就可以通过WCF向外提供REST的Service了~~
如何配置来完成HTTPS的访问请看如下链接:
http://www.cnblogs.com/mingmingruyuedlut/p/4236035.html

