

Android 自定义View 三板斧之二——组合现有控件
通常情况下,Android实现自定义控件无非三种方式。
Ⅰ、继承现有控件,对其控件的功能进行拓展。
Ⅱ、将现有控件进行组合,实现功能更加强大控件。
Ⅲ、重写View实现全新的控件
上文说过了如何继承现有控件来自定义控件,这节我们来讨论第二个议题。怎么将控件组合来实现一个功能强大的自定义控件。
先看看创建组合控件的好处吧,创建组合控件能够很好的创建具有组合功能的控件集合。那我们一般又是怎么做的了,一般我们来继承一个合适的ViewGroup,再为他创建一个新功能,从而就形成了一个新功能的控件。我们还会为这种控件指定一些新的属性,从而使他具有很好扩展性了。好了,废话说了这么多,下面,我们就以几乎每个app都有的控件——标题栏为例,来介绍组合控件的做法。
首先,我来回答为什么要重用标题栏:
Ⅰ、使应用程序拥有统一的风格。
Ⅱ、重用标题栏,也是我们将来修改标题栏非常方便,真正实现"一次编写,到处运行"的效果,而不用大费周章的,每个页面都修改。
Ⅲ、向调用者向外暴露调用接口,从而更加灵活的控制标题栏,使其功能更加的强大。
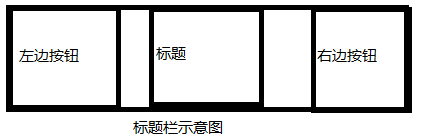
那么,标题栏长成那个样子,请见下图:
我们,先做一下简单的分析一下,这是一个自定义控件,应该像Android的原生控件一样,能够方便调用者设置控件的属性。因此,十分有必要为这个控件设置一些属性,为一个View提供一些自定义属性十分的简单,只需要在res资源目录下的values目录下创建一个attrs.xml属性文件,并在该文件定义你所需要的属性即可。这个自定义控件自定义属性如下:
 <declare-styleable name="titleBar">
        <attr name="title" format="string" />
        <attr name="titleTextSize" format="dimension" />
        <attr name="titleTextColor" format="color" />
        <attr name="titleLeftText" format="string" />
        <attr name="titleLeftBackground" format="color|reference" />
        <attr name="titleLeftTextColor" format="color" />
        <attr name="titleRightText" format="string" />
        <attr name="titleRightBackground" format="color|reference" />
        <attr name="titleRightTextColor" format="color" />
    </declare-styleable>
我们用<declare-styleable>标签声明要使用的自定义属性,用name属性来确定引用的名称。用format来确定引用数据的格式。在这个自定义控件自定义属性对应列表如下:
Ⅰ、title——对应标题的文字
Ⅱ、titleTextSize——对应标题的文字大小
Ⅲ、titleTextColor——对应标题的文本颜色
Ⅳ、titleLeftText——对应左边按钮的文本
Ⅴ、titleLeftBackground——对应左边按钮的背景
Ⅵ、titleLeftTextColor——对应左边按钮的文字颜色
Ⅶ、titleRightText——对应右边按钮的文本
Ⅴ、titleRightBackground——对应右边按钮的背景
Ⅵ、titleRightTextColor——对应右边按钮的文字颜色
这里,需要指出的是左右按钮的背景,即可以是颜色类型,也可以对应为相应的图片,所以,我们可以用“|”来分隔不同的属性。
好了,既然,有了自定义属性的定义了,我们就需要自定义一个TitleBar的控件,来获取这些定义好的属性值,上文,我们提到一般组合控件一般继承与ViewGroup控件,这里,我们方便起见,就继承与RelativeLayout。怎么获取属性值了,系统提供了TypedArray这样数据结构就能十分方便获取属性集了,获取属性的代码如下:
private void initAttrs(AttributeSet attrs) {
        TypedArray ta = this.getContext().obtainStyledAttributes(attrs,
                R.styleable.titleBar);
        if (ta != null) {
            title = ta.getString(R.styleable.titleBar_title);
            titleTextSize = ta.getDimension(R.styleable.titleBar_titleTextSize,
                    16);
            titleTextColor = ta
                    .getColor(R.styleable.titleBar_titleTextColor, 0);
            titleLeftText = ta.getString(R.styleable.titleBar_titleLeftText);
            titleLeftBackground = ta
                    .getDrawable(R.styleable.titleBar_titleLeftBackground);
            titleLeftTextColor = ta.getColor(
                    R.styleable.titleBar_titleLeftTextColor, 0);
            titleRightText = ta.getString(R.styleable.titleBar_titleRightText);
            titleRightBackground = ta
                    .getDrawable(R.styleable.titleBar_titleRightBackground);
            titleRightTextColor = ta.getColor(
                    R.styleable.titleBar_titleRightTextColor, 0);
            ta.recycle();
        }
    }
这里,需要值得一提的是需要调用TypedArray的recycle方法将资源回收。
既然,我们让这个组合控件有了属性以后,下面,我们要做的是将这个组合控件的按钮,文本框有机组合起来,组合的代码如下所示:
    private void initView() {
        leftButton = new Button(getContext());
        titleTextView = new TextView(getContext());
        rightButton = new Button(getContext());

        leftButton.setTextColor(titleLeftTextColor);
        leftButton.setBackgroundDrawable(titleLeftBackground);
        leftButton.setText(titleLeftText);

        rightButton.setTextColor(titleRightTextColor);
        rightButton.setBackgroundDrawable(titleRightBackground);
        rightButton.setText(titleRightText);

        titleTextView.setText(title);
        titleTextView.setTextSize(titleTextSize);
        titleTextView.setTextColor(titleTextColor);

        mLeftLayoutParams = new LayoutParams(LayoutParams.WRAP_CONTENT,
                LayoutParams.MATCH_PARENT);
        mLeftLayoutParams.addRule(RelativeLayout.ALIGN_PARENT_LEFT);
        addView(leftButton, mLeftLayoutParams);

        mCenterLayoutParams = new LayoutParams(LayoutParams.WRAP_CONTENT,
                LayoutParams.MATCH_PARENT);
        mCenterLayoutParams.addRule(RelativeLayout.CENTER_IN_PARENT);
        addView(titleTextView, mCenterLayoutParams);

        mRightLayoutParams = new LayoutParams(LayoutParams.WRAP_CONTENT,
                LayoutParams.MATCH_PARENT);
        mRightLayoutParams.addRule(RelativeLayout.ALIGN_PARENT_RIGHT);
        addView(rightButton, mRightLayoutParams);
    }
我们看到上文定义一些属性,无非复制给了这些组合控件,使这个组合控件变得"有血有肉"了。
这既然是一个自定义控件,是一个UI模版,应该每个调用者点击左右按钮,所实现的可能都不一样,我们应当所做就是向外暴露接口,让调用者灵活的控制这两个按钮。那么接口的定义如下:
    public interface ClickListener {
        void Click(int tag);
    }

    private ClickListener listener;
在模版方法中,为左、右按钮增加点击事件,调用接口的点击方法,代码如下所示:
private void setListener() {
        leftButton.setOnClickListener(this);
        rightButton.setOnClickListener(this);
    }

    @Override
    public void onClick(View v) {
        if (listener != null) {
            if (v == leftButton) {
                listener.Click(LEFT_BUTTON);
            } else if (v == rightButton) {
                listener.Click(RIGHT_BUTTON);
            }
        }

    }
在代码,我们有效判断是左边按钮点击了,还是右边按钮点击了。
有了这个模版方法中接口的定义之后,我们在外部调用这个回调代码如下:
titleBar.setListener(new ClickListener() {

            @Override
            public void Click(int tag) {
              switch (tag) {
            case TitleBar.LEFT_BUTTON:
                Toast.makeText(MainActivity.this, "左边按钮被点击了", 0).show();
                break;
            case TitleBar.RIGHT_BUTTON:
                Toast.makeText(MainActivity.this, "右边按钮被点击了", 0).show();
                break;
            default:
                break;
            }
            }
        });
这样在外部,能够有效的控制左右按钮的点击事件了。
做了这么多,就是希望能够有效调用这个组合控件,调用组合控件的代码如下:
<RelativeLayout xmlns:android="http://schemas.android.com/apk/res/android"
     xmlns:custom="http://schemas.android.com/apk/res/com.example.test"
    xmlns:tools="http://schemas.android.com/tools"
    android:layout_width="match_parent"
    android:layout_height="match_parent"
    android:padding="5dp"
    tools:context=".MainActivity">

    <!-- <include layout="@layout/topbar" /> -->

    <com.example.test.TitleBar
        android:id="@+id/titleBar"
        android:layout_width="match_parent"
        android:layout_height="40dp"
        custom:titleLeftBackground="@drawable/blue_button"
        custom:titleLeftText="Back"
        custom:titleLeftTextColor="#FFFFFF"
        custom:titleRightBackground="@drawable/blue_button"
        custom:titleRightText="More"
        custom:titleRightTextColor="#FFFFFF"
        custom:title="自定义标题"
        custom:titleTextColor="#123412"
        custom:titleTextSize="10sp"/>

</RelativeLayout>
这里,需要和大家交代的是,自定义控件与原生控件调用区别在于:
Ⅰ、引用自定义控件必须引用它的完全类名。
Ⅱ、引用自定义控件自定义属性时,必须要引用自定义的命名空间,引用方法如下:
xmlns:custom="http://schemas.android.com/apk/res/com.example.test"
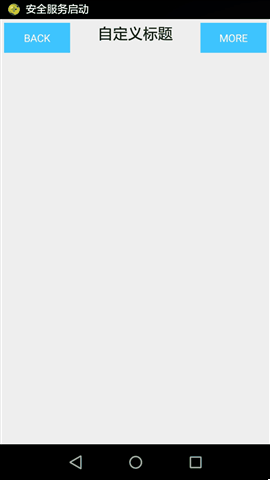
这个控件,最终运行效果为:
这就是我封装标题栏,欢迎大家吐槽。


