Java web 引入wangEditor编辑器
最近项目需要我做些前端的事,这让我这个半吊子前端很是痛苦。项目中需要一个编辑器,之前找了个ueditor,插件比较多,需要改源码等等不说,最后弄好了,发现需要flash插件。没办法,只有推到重来,在网上寻找对比后,最后决定使用用wangEditor,首先它简单,轻量,基本能满足我的需求,不好的地方就是网上的demo不是很多,不是大公司的开源产品,不知道能不能坚持更新下去,不过ueditor都不更新了,也没必要强求。
首先贴上官方地址:https://www.kancloud.cn/wangfupeng/wangeditor3/335771。
没什么说的,就是简洁,轻量、官网上的例子已经写很详细了,主要记录下我的做法。
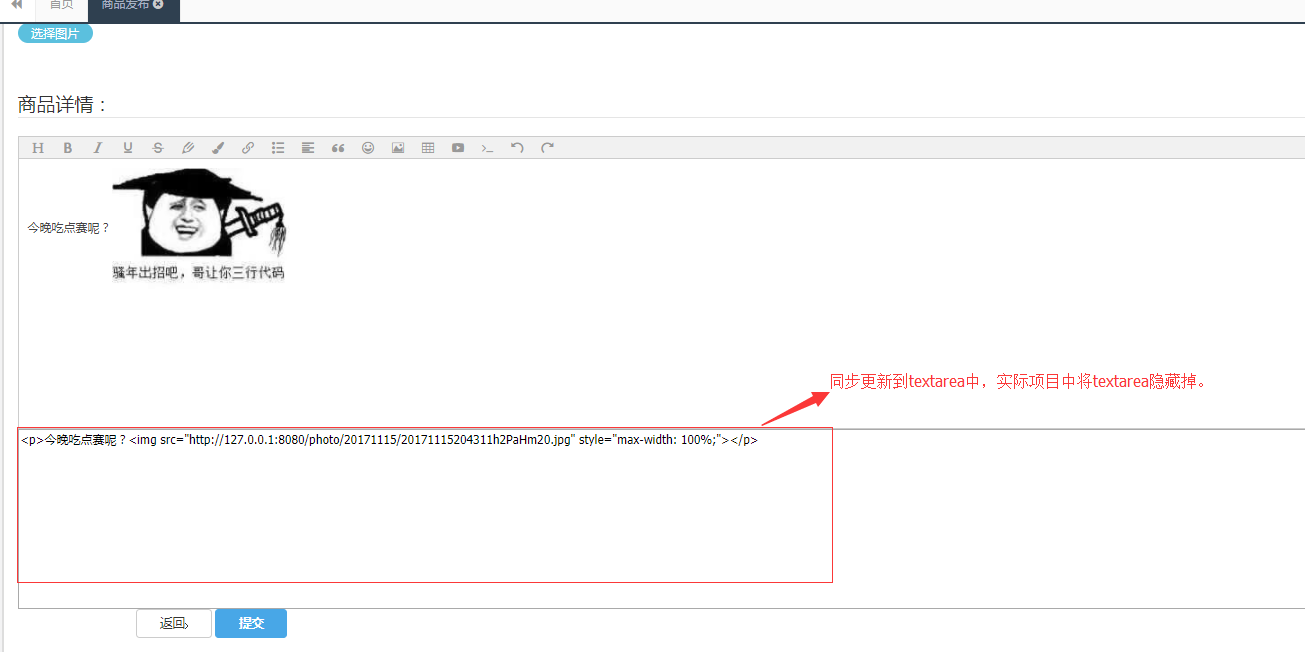
 <div id="div1">

     </div>
    <textarea name="ueditorContent" id="ueditorContent" style="width:100%; height:200px;display:none" ></textarea>
    <script type="text/javascript">
        var E = window.wangEditor;
        var editor = new E('#div1');
        var $ueditorContent = $('#ueditorContent');
        editor.customConfig.onchange = function (html) {
            // 监控变化,同步更新到 textarea
            $ueditorContent.val(html);
        };
        editor.customConfig.uploadImgServer = '/bhym/systemController/fileUp.do' ; // 上传图片到服务器,
        // 隐藏“网络图片”tab
       // editor.customConfig.showLinkImg = false;
        editor.customConfig.uploadImgHooks = {
                // (但是,服务器端返回的必须是一个 JSON 格式字符串!!!否则会报错)
                customInsert: function (insertImg, result, editor) {
                    // insertImg 是插入图片的函数,editor 是编辑器对象,result 是服务器端返回的结果:
                    var url = result.obj;
                    insertImg(url);
                },
              },
        editor.create();
        // 初始化 textarea 的值,向后台提交textarea中的值
        $ueditorContent.val(editor.txt.html())

    </script>
因为前端参数比较多,不想单独去写个ajax请求去发送请求。所以为了偷下懒,就在编辑器的下方,定义了一个textarea ,将它隐藏掉,将编辑器的内容同步更新到textarea中。再通过将textarea中的内容用提交form
表单的方式提交。前端就这样了,再来看看后台的图片处理,思路是:按照常规的文件上传方式将图片上传到服务器,返回一个url(虚拟路径)再通过配置虚拟路径的方式访问图片,前面有篇文章说的怎么配置虚拟路径:http://www.cnblogs.com/magic101/p/7756402.html。
/**
     *
     * @Title: fileUp
     * @Description:wangEditor上传图片
     * @param
     * @return
     */
    @RequestMapping("/fileUp")
    @ResponseBody
    public AjaxJson fileUp(HttpServletRequest request) {
        AjaxJson j = new AjaxJson();
        MultipartHttpServletRequest multipartRequest = (MultipartHttpServletRequest) request;
        try {
            multipartRequest.setCharacterEncoding("UTF-8");
            Map<String, MultipartFile> fileMap = multipartRequest.getFileMap();
            // 文件数据库保存的路径
            String path = null;
            // 文件保存在硬盘的相对路径
            String realPath = null;

            realPath = ResourceUtil.getConfigByName("webUploadpath") + "/";
            path = ResourceUtil.getConfigByName("http_url") + "/";
            File file = new File(realPath);
            if (!file.exists()) {
                file.mkdirs();// 创建根目录
            }
            realPath += DateUtils.getDataString(DateUtils.yyyyMMdd) + "/";
            path += DateUtils.getDataString(DateUtils.yyyyMMdd) + "/";
            file = new File(realPath);
            if (!file.exists()) {
                file.mkdir();// 创建文件时间子目录
            }
            String fileName = "";
            // String swfName = "";
            for (Map.Entry<String, MultipartFile> entity : fileMap.entrySet()) {

                MultipartFile mf = entity.getValue();// 获取上传文件对象
                fileName = mf.getOriginalFilename();// 获取文件名
                // swfName =
                // PinyinUtil.getPinYinHeadChar(oConvertUtils.replaceBlank(FileUtils.getFilePrefix(fileName)));//
                // 取文件名首字母作为SWF文件名
                String extend = FileUtils.getExtend(fileName);// 获取文件扩展名
                String myfilename = "";
                String noextfilename = "";// 不带扩展名

                noextfilename = DateUtils.getDataString(DateUtils.yyyymmddhhmmss) + StringUtil.random(8);// 自定义文件名称
                myfilename = noextfilename + "." + extend;// 自定义文件名称

                String savePath = realPath + myfilename;// 文件保存全路径

                File savefile = new File(savePath);
                if (entity.getKey() != null) {
                    // 设置文件数据库的物理路径
                    String filePath = path + myfilename;
                    j.setObj(filePath);
                }
                // 文件拷贝到指定硬盘目录
                if ("txt".equals(extend)) {
                    // 利用utf-8字符集的固定首行隐藏编码原理
                    // Unicode:FF FE UTF-8:EF BB
                    byte[] allbytes = mf.getBytes();
                    try {
                        String head1 = toHexString(allbytes[0]);
                        // System.out.println(head1);
                        String head2 = toHexString(allbytes[1]);
                        // System.out.println(head2);
                        if ("ef".equals(head1) && "bb".equals(head2)) {
                            // UTF-8
                            String contents = new String(mf.getBytes(), "UTF-8");
                            if (StringUtils.isNotBlank(contents)) {
                                OutputStream out = new FileOutputStream(savePath);
                                out.write(contents.getBytes());
                                out.close();
                            }
                        } else {

                            // GBK
                            String contents = new String(mf.getBytes(), "GBK");
                            OutputStream out = new FileOutputStream(savePath);
                            out.write(contents.getBytes());
                            out.close();
                        }
                    } catch (Exception e) {
                        String contents = new String(mf.getBytes(), "UTF-8");
                        if (StringUtils.isNotBlank(contents)) {
                            OutputStream out = new FileOutputStream(savePath);
                            out.write(contents.getBytes());
                            out.close();
                        }
                    }
                } else {
                    FileCopyUtils.copy(mf.getBytes(), savefile);
                }
            }
        } catch (Exception e) {
            j.setSuccess(false);
            e.printStackTrace();
        }
        return j;
    }

    private String toHexString(int index) {
        String hexString = Integer.toHexString(index);
        // 1个byte变成16进制的,只需要2位就可以表示了,取后面两位,去掉前面的符号填充
        hexString = hexString.substring(hexString.length() - 2);
        return hexString;
    }
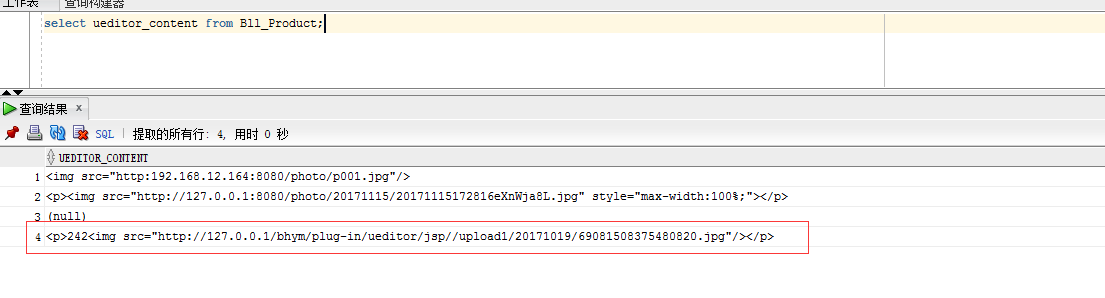
最后再来测试一下:
然后再访问一下数据库。发现确实也存入了的。