

在做MVVM各种框架对比之前,我觉得有必要先自己做一个简单的MVVM实现案例比较好,这样就可以看到自己实现的时候有那些不方便的地方。而各种框架又是怎么解决我们这些麻烦的。
案例介绍:用户登录画面,没有输入用户ID数据时按钮不可用,输入用户ID数据后按钮可以使用。点击按钮获取用户名信息。
案例下载:https://github.com/NewBLife/UWP/tree/master/MvvmDemo
1、创建UWP空项目

将False改成True,这应该都懂的

2、构建项目结构
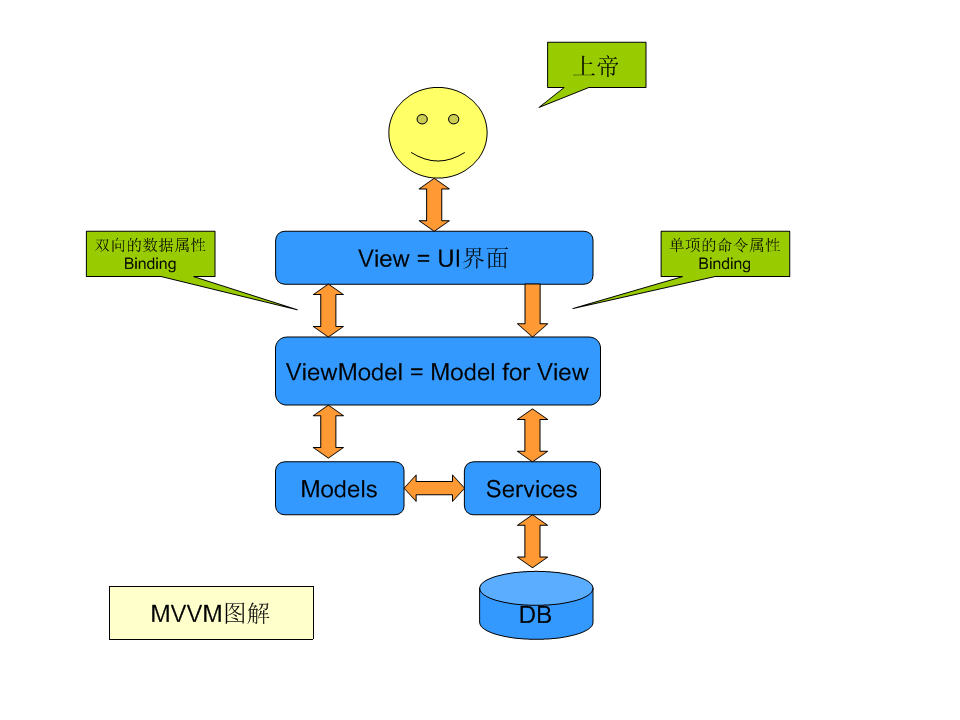
按照MVVM模式思想,一般都会包含Views,ViewModels,Models,如果项目比较复杂在ViewModel和Model之间还会有Service层。
复杂系统情况:

3、创建Binding基类
MVVM核心技能之一:绑定。如果是单向显示数据的话直接使用类属性就可以,如果想交互双向绑定的实现INotifyPropertyChanged接口。其中的PropertyChanged事件会通知UI改变绑定值状态。

代码如下:
using System;
using System.ComponentModel;
using System.Runtime.CompilerServices;

namespace MvvmDemo.Common
{
    /// <summary>
    /// Viewmodel基类,属性双向绑定基础
    /// </summary>
    public class ViewModelBase : INotifyPropertyChanged
    {
        public event PropertyChangedEventHandler PropertyChanged;

        /// <summary>
        /// 属性变更通知
        /// </summary>
        /// <param name="propertyName">属性名</param>
        public void NotifyPropertyChanged([CallerMemberName] String propertyName = "")
        {
            if (PropertyChanged != null)
            {
                PropertyChanged(this, new PropertyChangedEventArgs(propertyName));
            }
        }
    }
}
4、创建Command基类
MVVM核心技能二:ICommand。这个的存在使我们的UI逻辑可以搬迁到其他地方处理,给自动化单体测试与分工设计带来了可能。按钮的Click事件,Combox选择,列表选择等等都可以使用Command形式绑定到ViewModel的Command属性做处理。
代码如下:
using System;
using System.Collections.Generic;
using System.Linq;
using System.Text;
using System.Threading.Tasks;
using System.Windows.Input;

namespace MvvmDemo.Common
{
    public class DelegateCommand<T>: ICommand
    {
        /// <summary>
        /// 命令
        /// </summary>
        private Action<T> _Command;
        /// <summary>
        /// 命令可否执行判断
        /// </summary>
        private Func<T, bool> _CanExecute;
        /// <summary>
        /// 可执行判断结束后通知命令执行
        /// </summary>
        public event EventHandler CanExecuteChanged;

        /// <summary>
        /// 构造函数
        /// </summary>
        /// <param name="command">命令</param>
        public DelegateCommand(Action<T> command):this(command,null)
        {
        }

        /// <summary>
        /// 构造函数
        /// </summary>
        /// <param name="command">命令</param>
        /// <param name="canexecute">命令可执行判断</param>
        public DelegateCommand(Action<T> command,Func<T,bool> canexecute)
        {
            if(command==null)
            {
                throw new ArgumentException("command");
            }
            _Command = command;
            _CanExecute = canexecute;
        }

        /// <summary>
        /// 命令执行判断
        /// </summary>
        /// <param name="parameter">判断数据</param>
        /// <returns>判定结果(True:可执行,False:不可执行)</returns>
        public bool CanExecute(object parameter)
        {
            return _CanExecute == null ? true : _CanExecute((T)parameter);
        }

        /// <summary>
        /// 执行命令
        /// </summary>
        /// <param name="parameter">参数</param>
        public void Execute(object parameter)
        {
            _Command((T)parameter);
        }
    }
}
5、创建ViewModel
脱离UI的数据处理中心。让我们可以单独编写它的测试程序来完成UI测试。主要目的就是将DB数据整合为用户想看的数据。
代码如下:
using MvvmDemo.Common;
using MvvmDemo.Models;
using System;
using System.Collections.Generic;
using System.Linq;
using System.Text;
using System.Threading.Tasks;

namespace MvvmDemo.ViewModels
{
    public class MainViewModel : ViewModelBase
    {
        private string _userId;
        private string _userName;
        private DelegateCommand<string> _loginCommand;

        /// <summary>
        /// 用户名
        /// </summary>
        public string UserId
        {
            get
            {
                return _userId;
            }

            set
            {
                _userId = value;
                NotifyPropertyChanged();
            }
        }
        /// <summary>
        /// 用户名
        /// </summary>
        public string UserName
        {
            get
            {
                return _userName;
            }

            set
            {
                _userName = value;
                NotifyPropertyChanged();
            }
        }
        /// <summary>
        /// 登陆命令
        /// </summary>
        public DelegateCommand<string> LoginCommand
        {
            get
            {
                return _loginCommand
                    ??(_loginCommand=new DelegateCommand<string>(
                        s=>
                        {
                            UserName = new UserModel().GetUserName(s);
                        },
                        s=>!string.IsNullOrEmpty(s)
                        ));
            }
        }
    }
}
6、创建View设置绑定
绑定6.0后有X:Bind,之前有Binding。x:Bind是编译时确定绑定对象,Binding是实行时确定绑定对象。总得来说X:Bind的速度比Binding快,在程序运行前就能发现绑定错误的问题。
这里直接就拿MainView做例子,更改下布局
<Page
    x:Class="MvvmDemo.MainPage"
    xmlns="http://schemas.microsoft.com/winfx/2006/xaml/presentation"
    xmlns:x="http://schemas.microsoft.com/winfx/2006/xaml"
    xmlns:local="using:MvvmDemo"
    xmlns:d="http://schemas.microsoft.com/expression/blend/2008"
    xmlns:mc="http://schemas.openxmlformats.org/markup-compatibility/2006"
    mc:Ignorable="d">

    <Grid Background="{ThemeResource ApplicationPageBackgroundThemeBrush}"
          VerticalAlignment="Center"
          HorizontalAlignment="Center">
        <Grid.RowDefinitions>
            <RowDefinition Height="50"/>
            <RowDefinition Height="50"/>
            <RowDefinition Height="50"/>
        </Grid.RowDefinitions>
        <Grid.ColumnDefinitions>
            <ColumnDefinition Width="Auto" />
            <ColumnDefinition Width="Auto" />
        </Grid.ColumnDefinitions>

        <TextBlock Text="用户ID:" Grid.Row="0" Grid.Column="0" Width="100" />
        <TextBlock Text="用户名:" Grid.Row="1" Grid.Column="0" Width="100" />
        <TextBox x:Name="txtUserID" Grid.Row="0" Grid.Column="1" Width="150" Text="{x:Bind VM.UserId,Mode=OneWay}" />
        <TextBlock x:Name="txbUserName" Grid.Row="1" Grid.Column="1" Width="150" Text="{x:Bind VM.UserName,Mode=OneWay}"  />
        <Button x:Name="btnLogin" Content="Login" Grid.Row="2" Grid.ColumnSpan="2" Width="150" HorizontalAlignment="Center"
                Command="{x:Bind VM.LoginCommand,Mode=OneWay}"
                CommandParameter="{Binding Text,ElementName=txtUserID,Mode=OneWay}"/>
    </Grid>
</Page>
后台添加代码
/// <summary>
    /// 可用于自身或导航至 Frame 内部的空白页。
    /// </summary>
    public sealed partial class MainPage : Page
    {
        public MainViewModel VM =>new MainViewModel();

        public MainPage()
        {
            this.InitializeComponent();
            this.DataContext = VM;
        }
    }
7、创建Model
由于这里没有复杂逻辑,就不添加Service了。
using System;
using System.Collections.Generic;
using System.Linq;
using System.Text;
using System.Threading.Tasks;

namespace MvvmDemo.Models
{
    public class UserModel
    {
        public string GetUserName(string userid)
        {
            return string.Format("取得成功:{0}",userid);
        }
    }
}
8、实行结果
输入内容前按钮自动不可用:

输入内容后按钮自动可用:

点击Login按钮:

9、总结
这种就是简单的登陆实现,涉及到了MVVM的View,Viewmodel,Model,以及XBind的用法。6.0后有X:Bind,之前有Binding。x:Bind是编译时确定绑定对象,Binding是实行时确定绑定对象。总得来说X:Bind的速度比Binding快,在程序运行前就能发现绑定错误的问题。登陆页面的按钮是随着输入自动判断是否可用,这个就是Icommand一个方法Canexcute的作用。可见自己实现Mvvm模式也不是很难的事情,不过随着项目的复杂加深就会有很多问题,比如Viewmode之间通信等,这个时候才是MVVM框架的优势所在。

