
MaskRCNN配置(目标检测算法+语义分割算法)
创建虚拟环境
conda create -n MaskRCNN python=3.6 pip
激活命令:conda activate MaskRCNN
退出命令:conda deactivate
安装环境(也可根据requiremens.txt文件一键安装)
# 有显卡使用gpu版,没显卡就不要-gpu
# 这个版本配套的是CUDA10.1和cudnn7.6.5
pip install tensorflow-gpu==1.14.0

# 避免多余错误使用keras2.2.5
pip install keras-gpu==2.2.5
装好tensorflow和keras后numpy、scipy之类的包已经顺带装好了,接下来就是查漏补缺,根据requiremens补充
pip install pillow

pip install cython

pip install matplotlib

#这个推荐pip安装 conda装的容易出问题阉割版opencv
pip install opencv-python
pip install h5py
pip install scikit-image
pip install jupyter
pip install install ipython
有一个重点是imgaug这个包,requirements里面没有说安装shapely,不装这个是无法安装imgaug的
pip install shapely

pip install imgaug
clone MaskRCNN库(有两种下载途径选择其一)
git clone https://github.com/matterport/Mask_RCNN.git
git clone https://gitee.com/kongmo/Mask_RCNN.git
安装 pycocotools
(注:需要Visual C++2015 build tools)
最后,安装pycocotools工具,windows和linux下安装方法不同,windows下安装必须要有visual c++2015这个东西,没有的话可以参考https://github.com/philferriere/cocoapi来安装vc++2015,必须是在线安装,有这个之后就能安装pycocotool了
-
clone pycocotools 库
git clone https://github.com/philferriere/cocoapi.git
git clone https://gitee.com/ACANX/cocoapi.git
-
使用 pip安装pycocotools库
pip install git+https://github.com/philferriere/cocoapi.git#subdirectory=PythonAPI
pip install git+https://gitee.com/ACANX/cocoapi.git#subdirectory=PythonAPI
下载预训练权重
官方给出的下载地址:https://github.com/matterport/Mask_RCNN/releases
样例有一个做气球和coco数据集的,看名称就可以简单分辨,下载对应的就行
下载好的mask_rcnn_coco.h5文件放在项目下文件夹内
测试
-
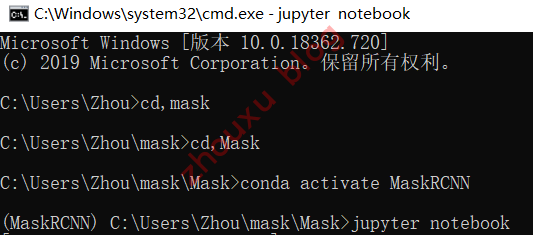
进入MaskRCNN虚拟环境打开jupyter notebook

-
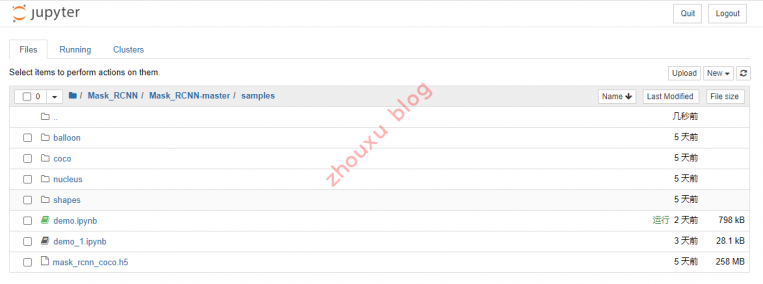
打开演示文稿
-
执行文件

-
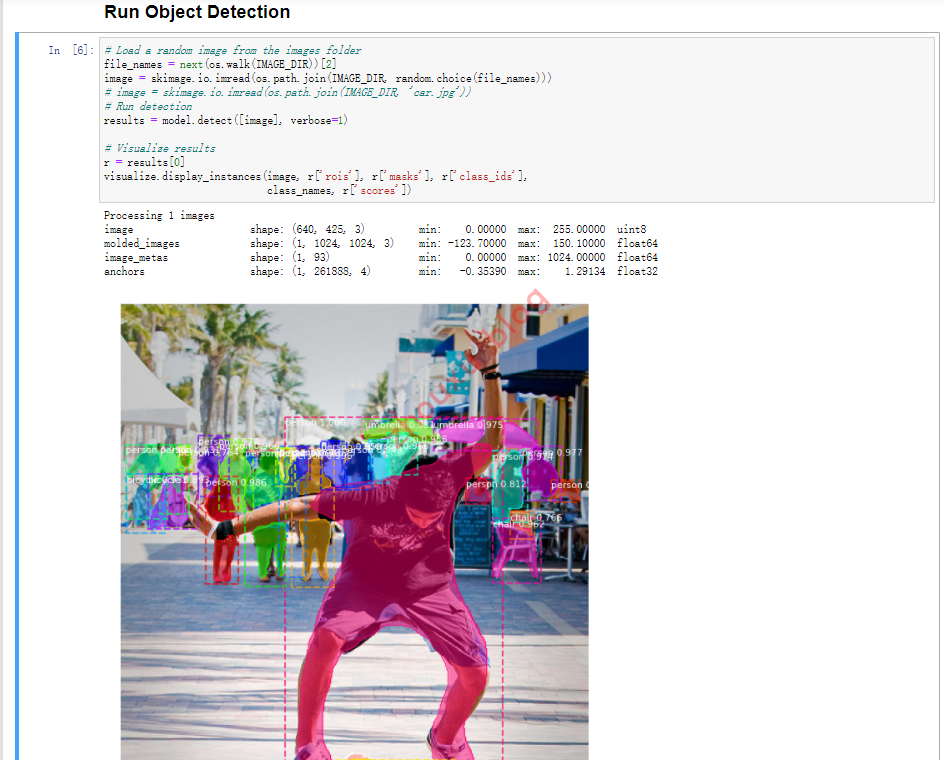
运行目标检测结果
参考资料
Mask RCNN with Keras and Tensorflow (pt.1) Setup and Installation
【Tensorflow】Windows安装tensorflow错误原因查询、卸载tensorflow与重新安装
神经网络学习小记录42——windows下的tensorflow-gpu=1.13.2环境配置
干货:TensorFlow1.2~2.1各个GPU版本CUDA和cuDNN对应版本整理
【实践】MaskRCNN——01.环境配置(基于Anaconda)
本文由博客群发一文多发等运营工具平台 OpenWrite 发布

