
使用Hexo & Github,搭建属于自己的博客
经过在网上各种找资料,踩过各种坑,终于搭建好了hexo,直接与gitbub一起使用,搭建起自己的免费的博客。
关于Hexo
Hexo是一款基于Node.js的静态博客框架。

Hexo特性
- 风一般的速度
Hexo基于Node.js,支持多进程,几百篇文章也可以秒生成。 - 流畅的撰写
支持GitHub Flavored Markdown和所有Octopress的插件。 - 扩展性
Hexo支持EJS、Swig和Stylus。通过插件支持Haml、Jade和Less.
博客搭建思路
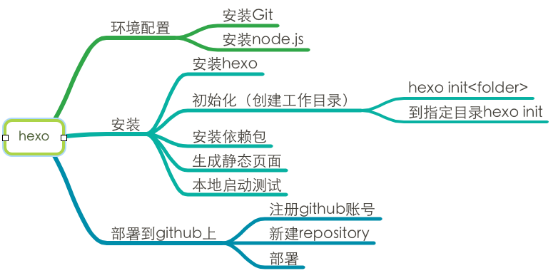
搭建过程
① 安装Node.js
② 安装Git
③ Github仓库准备
1.  创建仓库,http://your-user-name.github.io
2.  创建两个分支:master 与 hexo
	touch README.md
	git init
	git add README.md
	git commit -m "first commit"
	git remote add origin https://github.com/your-user-name/your-user-name.github.io.git
	git push -u origin master

	在本地新建一个分支:
		git branch hexo
	切换到你的新分支:
		git checkout hexo
	将新分支发布在github上:
		git push origin hexo
	至此分支创建完毕
3.  在github网站设置hexo为默认分支
④ Hexo创建
在本地your-user-name.github.io文件夹下通过Git bash依次执行
1.  npm install hexo
2.  hexo init <folder>
如果指定 <folder>,便会在目前的资料夹建立一个名为 <folder> 的新资料夹;否则会在目前资料夹初始化。
3.  npm install
4.  npm install hexo-deployer-git
5.  hexo generate  生成网站
6.  hexo server  启动本地服务器
网站会执行在http://localhost:port (port 预设为 4000,可在 _config.yml 设定)
⑤ Hexo和Github关联
1.  修改_config.yml中的deploy参数,分支应为master;
2.  hexo generate -deploy(可以简化为hexo g -d) 生成推送到github的master分支
此时访问your-user-name.github.io即可查看生成的站点内容
⑥ Hexo源码备份
1.  进入本地的your-user-name.github.io文件夹下
2.  git clone https://github.com/your-user-name/your-user-name.github.io.git
此时显示分支为hexo
3.  git add --all
4.  git commit -m "blog source commit"
5.  git push origin hexo
至此博客源代码就备份到了hexo分支上面。
⑦ 后期维护以及博客更新
在本地对博客进行修改(添加新博文、修改样式等等)后,通过下面的流程进行管理。
- 依次执行git add .、git commit -m "..."、git push origin hexo指令将改动推送到GitHub(此时当前分支应为hexo);
- 然后再执行hexo g -d发布网站到master分支上。

